
Fine line tattoos are gorgeous when fresh, but trends and longevity do not always match. The pieces that still read clean at year five are often the ones that were given room to breathe, proper placement, and a realistic touch-up plan. Below are 21 abstract designs for couples that balance romance with longevity, plus notes on how to ask for them so they still look like you in a decade.
1. Mirrored Fine Line Forearm Pairing

I recommend this when both partners want a piece that reads private most days but clicks into view when hands touch. Tell your artist you want slightly heavier lineweight than a micro line to avoid early blurring. Pain is mild on the inner forearm and a session runs about 45 to 75 minutes per arm. Common mistake is compressing too much detail into the arc. Expect the lines to look crisp at six months, soften by two years, and need a small touch-up by year three if you want the separation to stay. For showing it off, roll sleeve cuffs and pair with a minimalist chain bracelet that sits under the wrist without covering the design.
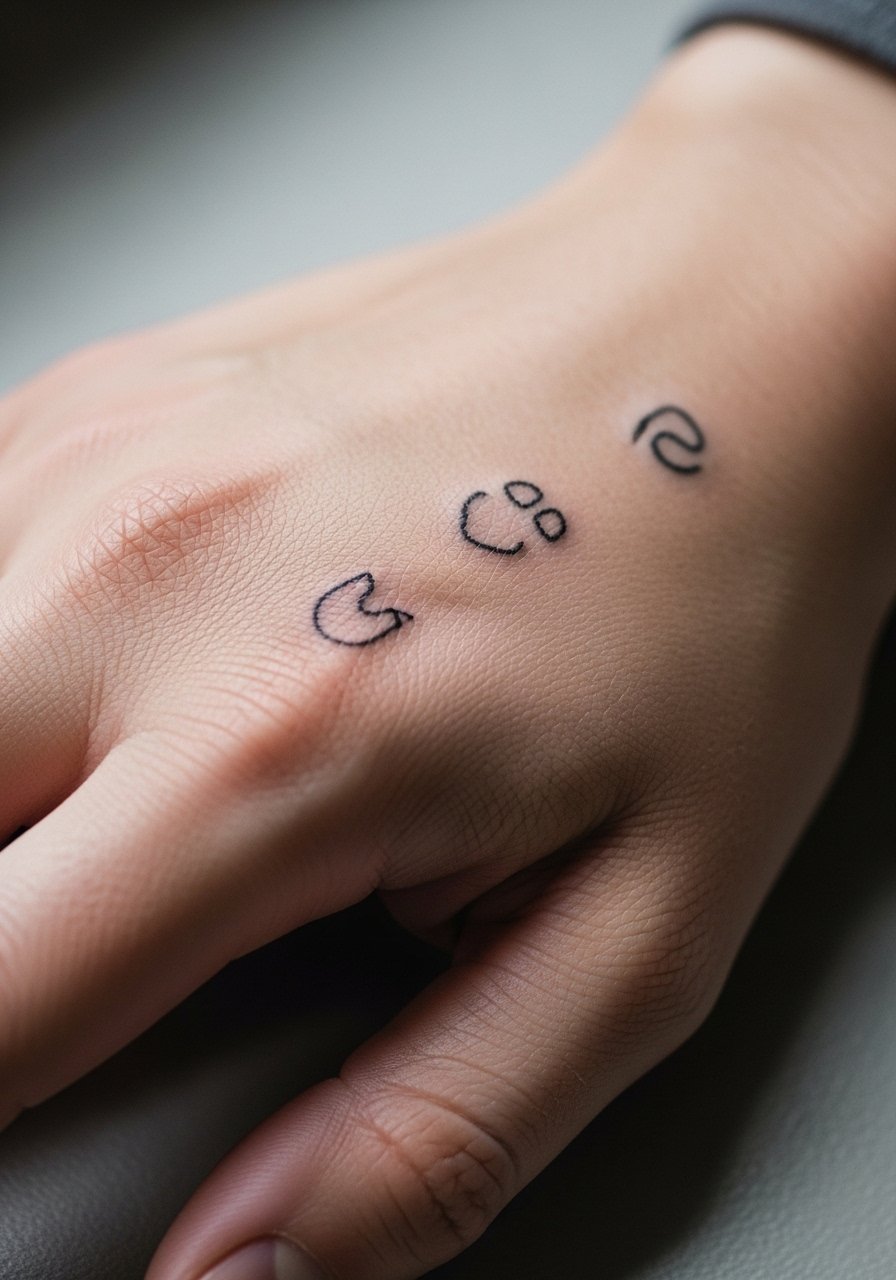
2. Constellation Dots Across Matching Wrists
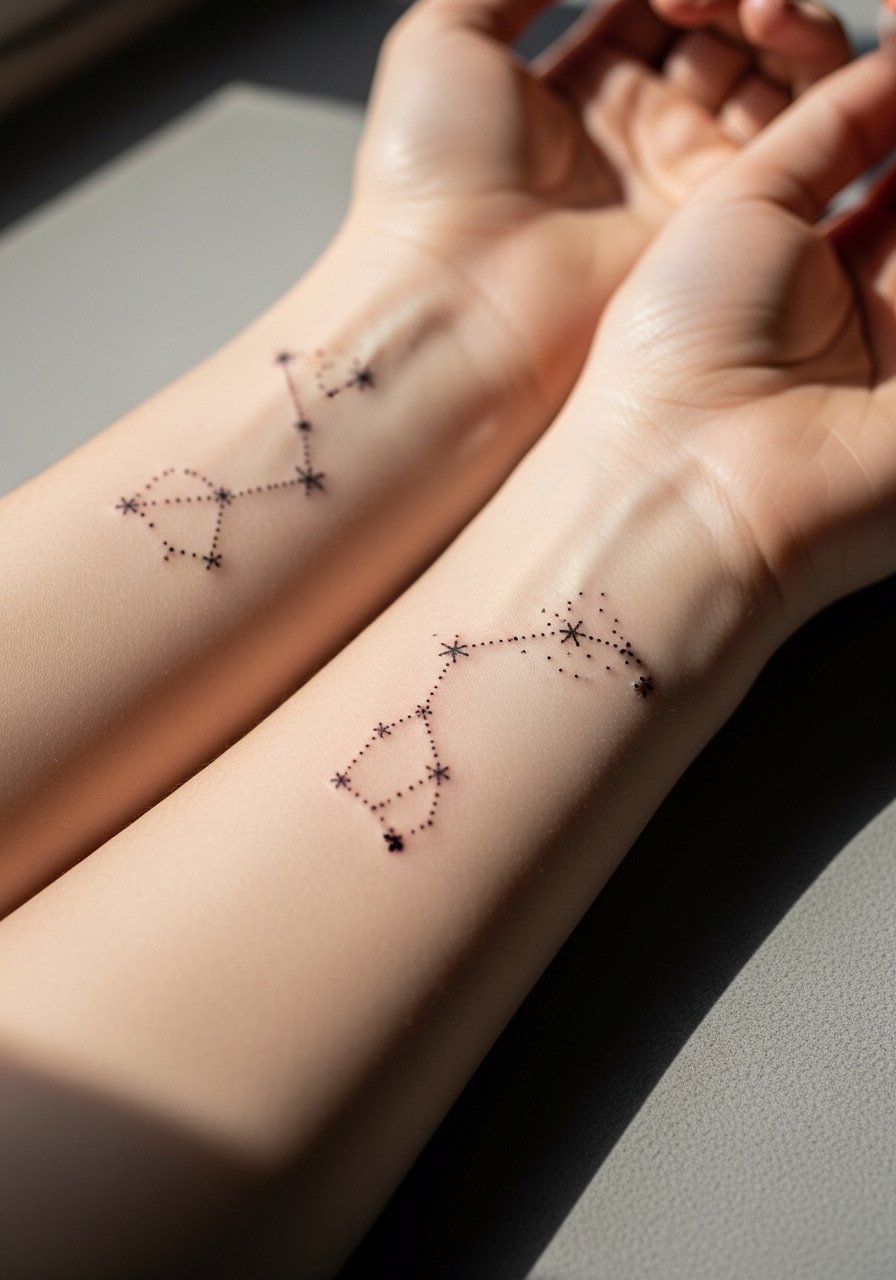
This is a low-profile couple piece that reads like a private map. Expect a quick thirty to sixty minute session per wrist with light pain. Tell your artist you want scope for a single heavier dot rather than tiny, fragile dots everywhere. Tiny dots merge faster with sun and friction. At six months the pattern is still distinct. By year three the smallest dots may need retouching. For the session, wear a loose button-down shirt you can pull aside so the artist has clear access and you stay comfortable.
3. Matching Collarbone Abstract Bars

A collarbone placement sits at a visible crossroads between romance and everyday wear. Expect moderate pain and a 45 to 90 minute session depending on saturation. Ask for a slightly arched composition so the pieces follow the natural collarbone curve. The common error is placing perfectly straight bars that read off when the body moves. These hold well if you avoid overly thin strokes. For evenings out, pair with an open-back blouse or wide-neck dress that frames the area without exposing more than you intend.
4. Ribcage Negative Space Florals

Fair warning, ribs are high on the pain scale and the skin there moves a lot. Artists split into two camps about fine line on ribs. One camp argues the stretch blurs lines within two years. The other camp says with proper depth and spacing it settles fine. Ask your artist where they stand before booking. Favor negative space and stipple shading to give the design room. Sessions last longer and you may split this into two visits. Expect softer edges at two years and plan a touch-up if you want the crispness preserved.
5. Ankle Chain-Link Abstracts

Ankle work reads like jewelry and it behaves like jewelry, meaning friction and socks will nag the linework. Sessions are short, thirty to forty-five minutes, but healing needs care. Ask for slightly bolder outlines around the smallest links to keep them distinct after scabbing. The common mistake is getting chain elements too tiny. For showing it off, wear strappy sandals or rolled jeans that leave the ankle visible without rubbing the fresh ink.
6. Shoulder Pairing with Negative Space

Outer shoulder is an easy aging placement because it gets sun and clothing abrasion but heals predictably. The session is often one to two hours depending on saturation. Tell your artist you want bold blocks with negative space instead of dense micro detail. A frequent mistake is cramming tiny elements that age into a muddle. For the session, wear a loose tank top so the artist can access the area and you do not feel restricted. Expect touch-ups at year three for sustaining saturation.
Pre-Session Essentials
The shoulder and ankle pieces above need different prep than wrist work, and a few items smooth out the appointment and the first week.
-
Stencil transfer paper kit. Lets you preview the placement on skin before committing, which is handy for matching asymmetrical collarbone bars.
-
Plant-based healing balm. A gentler balm option for sensitive skin, useful for small wrist and ankle dots that scab easily.
-
Thin protective film roll. Keeps low-coverage wrist pieces and finger work clean during the first few days of frequent hand washing.
-
Fragrance-free gentle body wash. Cleanses without irritating fresh linework, particularly important for collarbone and shoulder showers.
-
Aquaphor healing ointment. Thin layer for the initial healing window supports fine line pieces without clogging the skin.
7. Sternum Minimalist Mirror Forms
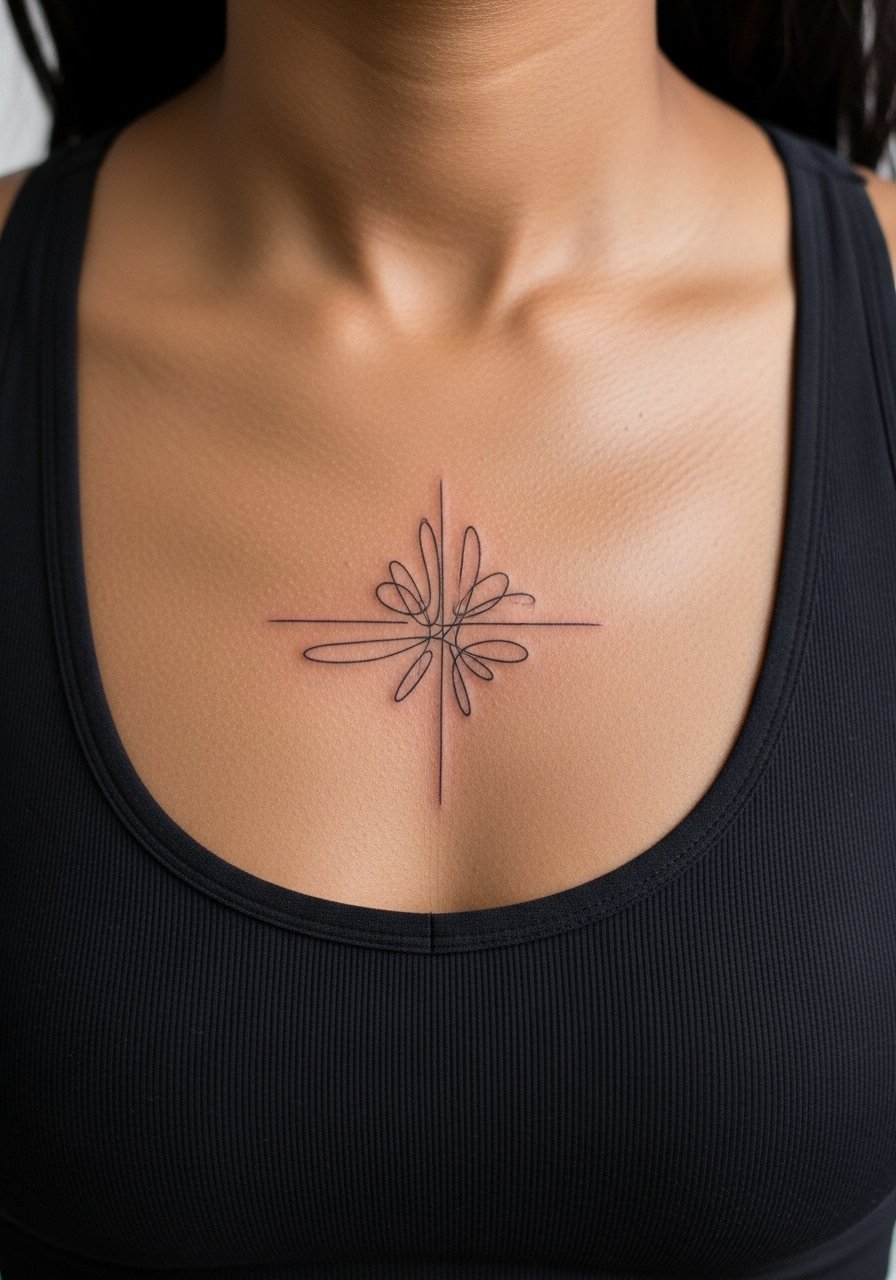
Sternum pieces read as intimate and they ask for a careful consult. Pain is high and sessions can run long because the area is bony and sensitive. Artists differ on how much fine detail to use near the sternum. Ask for a composition that follows the chest contour so the design sits with movement. Common mistakes include placing symmetrical elements without accounting for breathing and posture. Healed at six months the lines look crisp. Expect some softening by year two and plan for a touch-up if you want long-term sharpness.
8. Thigh Paired Abstract Landscapes
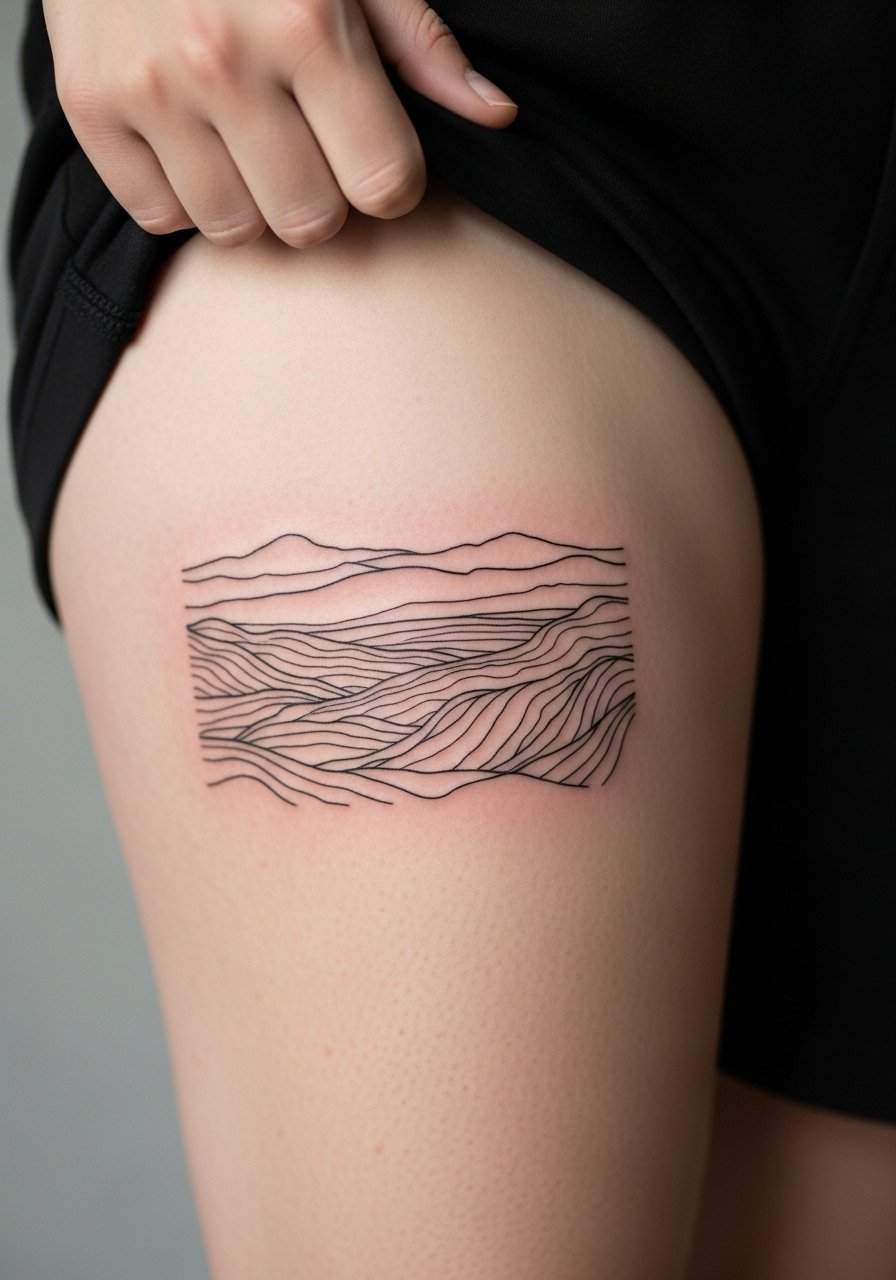
The outer thigh is forgiving and great for larger couple pieces that can be more detailed. Sessions can be longer, often two to four hours, and pain is usually moderate. Tell your artist you want room between parallel lines to reduce blowout risk. A common mistake is making parallel lines too dense. For the session, wear loose drawstring shorts so the artist can roll the leg up without pressure on healing skin. Thigh pieces hold well and often need touch-up later than wrist pieces.
9. Back of Neck Mirrored Symbols
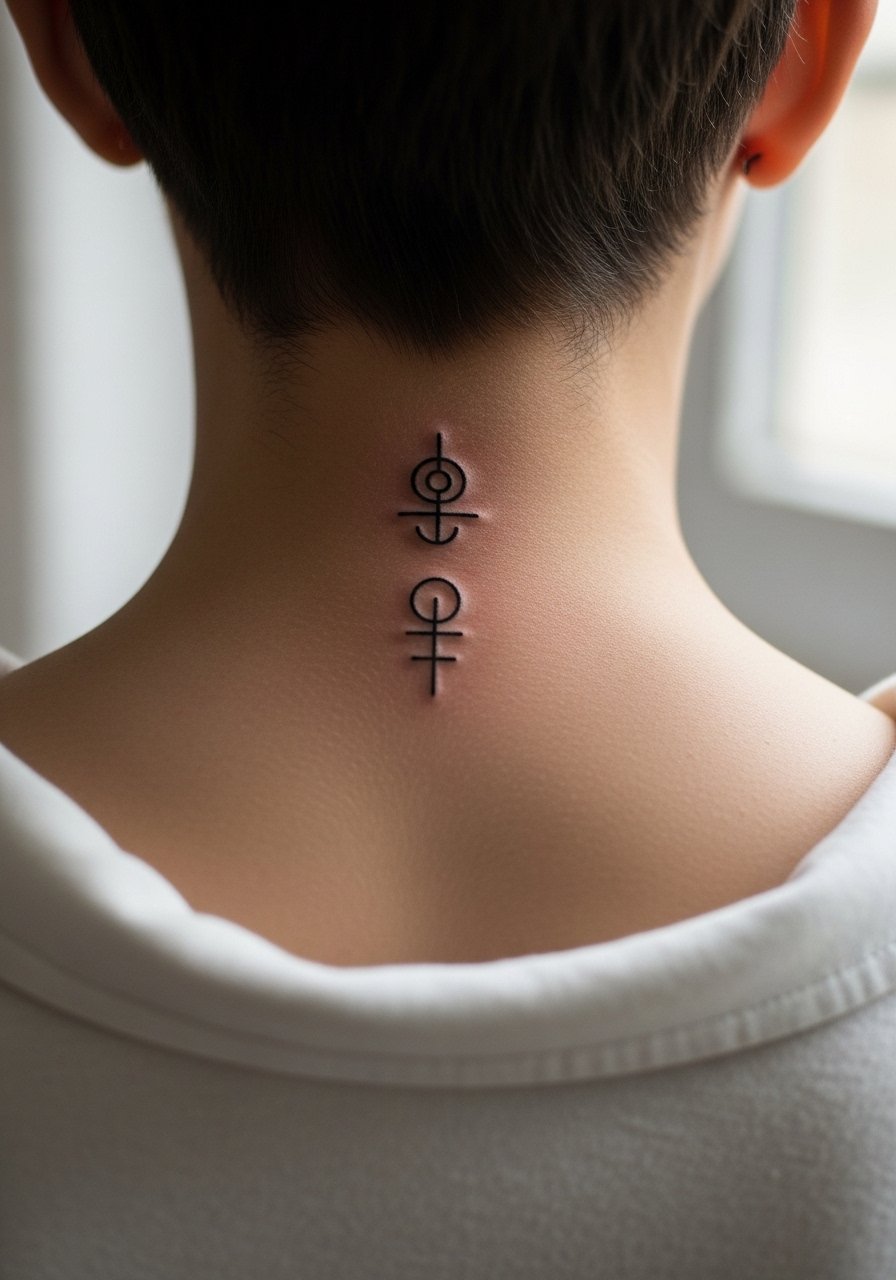
Neck tattoos are visible and can affect first impressions in some settings, so plan placement with that in mind. Pain is moderate and sessions are short. Ask for compact symbols that read clearly from a distance rather than ornate scripts. The common mistake is asking for tiny text. Expect clean lines at six months and some softening by three years if you spend a lot of time outdoors. Pair this with a thin chain pendant necklace that sits above the design without crowding it.
10. Matching Micro-Realism Hands
Hand tattoos still affect hiring in some industries, so think about career paths before committing. Top-of-hand placements are high friction and fade faster. Sessions are short but healing involves extra care. Ask for slightly bolder edgework to keep the motif legible as the skin moves. The biggest mistake is treating hand work like wrist work. Plan for more frequent touch-ups and accept that fine detail will blur faster than on forearms. For showing it off, stack a minimalist ring set on the adjacent finger so the hand reads styled without covering the tattoo.
11. Spine Pairing for Couples

Spine placements can be dramatic for couples who want a reveal in specific clothing choices. The area can be painful near vertebrae and sessions are often split. Ask the artist to keep negative space between dense elements to prevent merging over time. A common error is crowding the vertical axis with too much micro detail. For show-off moments, pair with an open-back dress that reveals the spine without overexposure. Spinal linework holds up reasonably well but expect touch-ups at year three for thin strokes.
12. Calf Abstract Wraps
Calf is a solid choice for couples who want larger, visible work that ages reliably. Sessions are moderate in length and pain is tolerable for most. Request clear separations between wrapped elements to reduce the chance of blowout. The common mistake is creating a continuous thin line around the leg without breaks. For casual show-off, a pair of low-top sneakers and cropped pants frames the calf without hiding the wrap. Calf work typically holds color and line separation longer than hands or ribs.
13. Hip Crescent Motifs
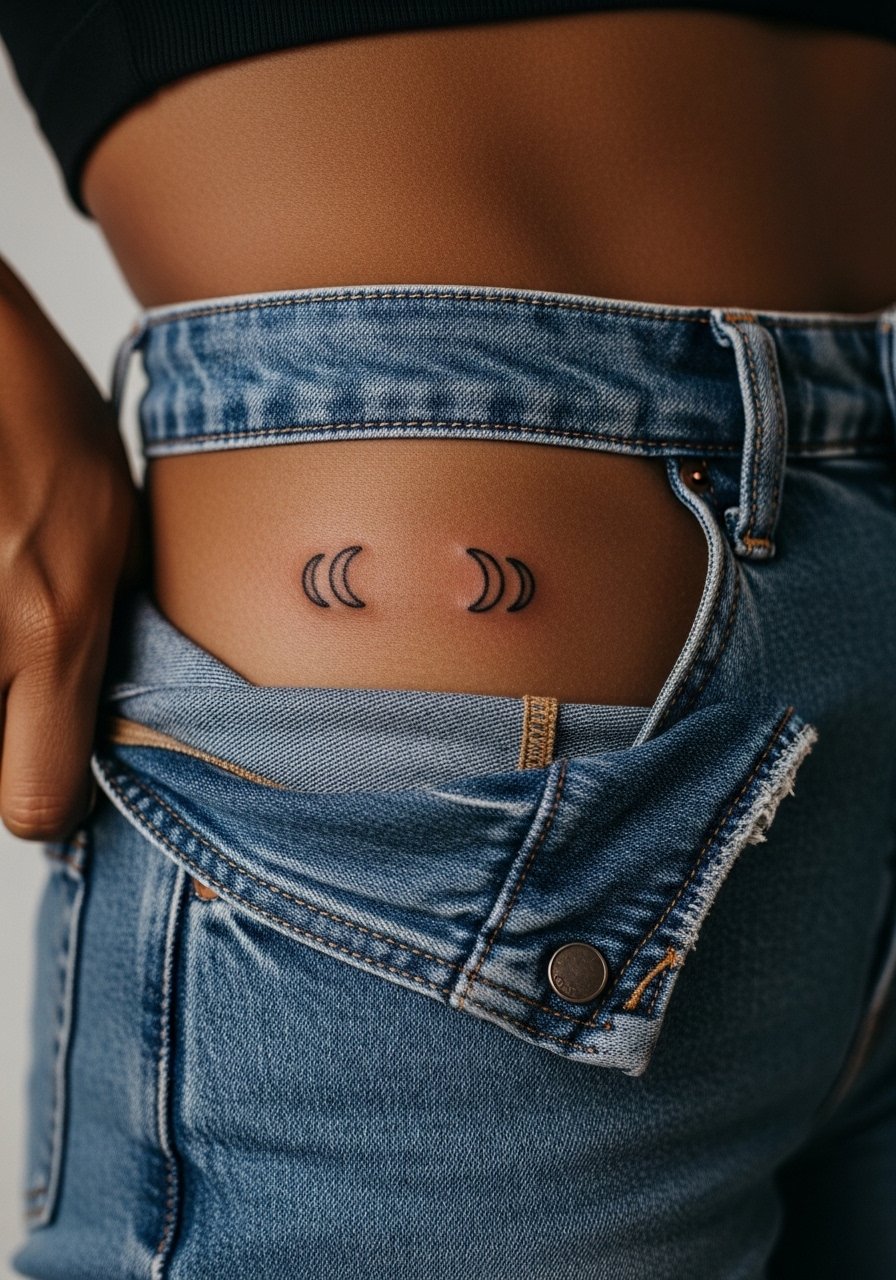
Hip tattoos are private and sensual, and they ask for specific session clothing. Pain varies with body fat and placement. For the appointment, plan to wear high-cut bottoms you can shift so only the tattoo zone is exposed. The frequent error is asking for ultra-fine filigree that loses detail during healing. These pieces can stay legible for years if you choose open forms with clear negative space. The artist may suggest a two-part session for larger crescents to ensure consistent saturation.
14. Inner Bicep Abstract Marks

Inner bicep skin is soft and heals differently from the outer arm. Pain can be moderate to high for some people. Tell your artist you want slightly slower passes to keep saturation even. The most common mistake is making tiny connected dots that blur when the arm rests against clothing. Expect the piece to mellow at six months. For session day wear, a loose tank top gives access and comfort. Inner bicep work often needs fewer touch-ups than hand work but more than shoulder pieces.
15. Matching Minimalist Footmarks

Top-of-foot tattoos age fast because shoes and socks rub them daily. Sessions are quick and painful in spots. Ask for slightly bolder edges to account for abrasion. The common mistake is using ultra-thin linework that flakes off during early healing. For showing the art, sandals that leave the top of the foot visible work best, try a pair of strappy sandals that frame the tattoo without rubbing it. Expect touch-ups within two years if you wear enclosed shoes often.
16. Paired Abstract Sleeves with Negative Space

Half-sleeves are a commitment but they allow for composition that reads from a distance. Sessions usually span multiple long visits. Ask your artist to plan for negative space corridors so the piece does not seal into a single dark mass. The most common error is continuous saturation with no breaks, which ages into a blob. Expect gradual softening after two to three years and budget one larger touch-up after the first year. For show-off looks, roll sleeves or wear a fitted short-sleeve so the negative space remains visible.
17. Matching Geometric Ear-Adjacent Marks
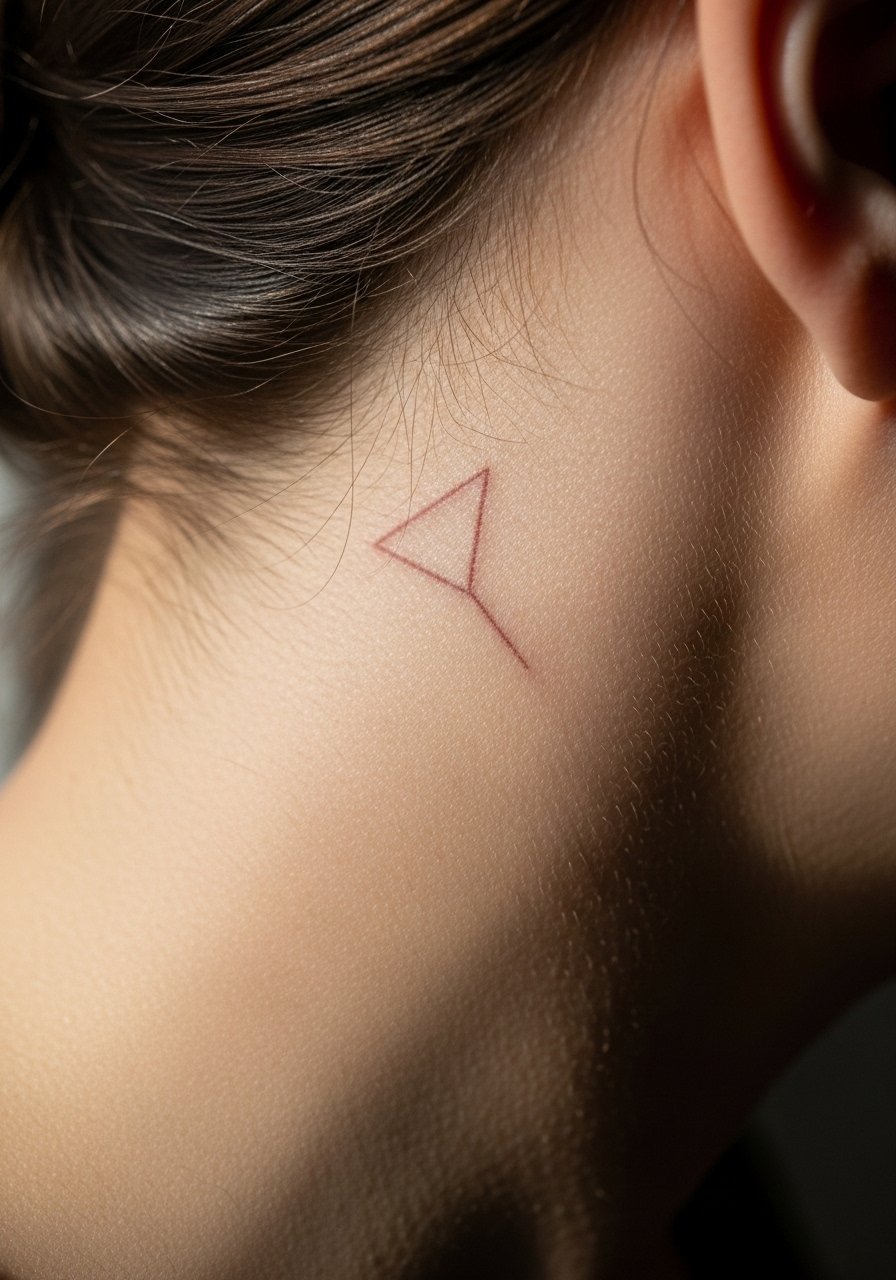
Behind-the-ear designs need hair management for the session and thoughtful framing. Pain is low but the area is easy to irritate when hair rubs it. Ask the artist to place the piece just below the hairline so you can hide or show it. The error is letting hairline fuzz sit inside the layout, which can hide the piece. For the appointment, bring a wide-headband or hair ties to keep hair away from the area. Expect good longevity if you avoid constant hair friction.
18. Paired Abstract Chest Curves

Upper chest work sits where clothing and sunlight meet, so plan accordingly. Sessions can be lengthy and reasonably painful near the bone. Tell your artist you want the curves to follow your clavicle and to leave perimeter negative space. A common mistake is centering designs too high so they disappear under most shirts. For evenings, an open-neck blouse frames the curves without forcing a reveal. These pieces hold well if you use slightly stronger line weights than micro line.
19. Inner Thigh Paired Abstract Shards

Inner thigh is intimate and needs a specialist touch from artists who do work in that zone. Pain is variable and sessions often happen in several shorter sittings. For the consult, ask for simple shards with generous spacing to avoid bleeding into a patch. The most common mistake is packing too much filigree. Wear wrap shorts or a swimsuit bottom to the appointment so only the area shows and you stay comfortable. Expect this area to keep shape well but plan touch-ups if you change weight significantly.
20. Paired Abstract Ear-to-Temple Lines

Temple and side-head pieces are subtle and need a clear plan for hair coverage. Pain is minimal for most but the area is sensitive. Ask your artist for a short run of confident strokes, not a long filigree. The mistake is asking for hairline-level detail that disappears under regular styling. For the session, tuck hair with a slim hair clip to keep the area clear. These lines hold up if you avoid daily friction and heavy styling products on the site.
21. Paired Minimalist Lower Back Motifs
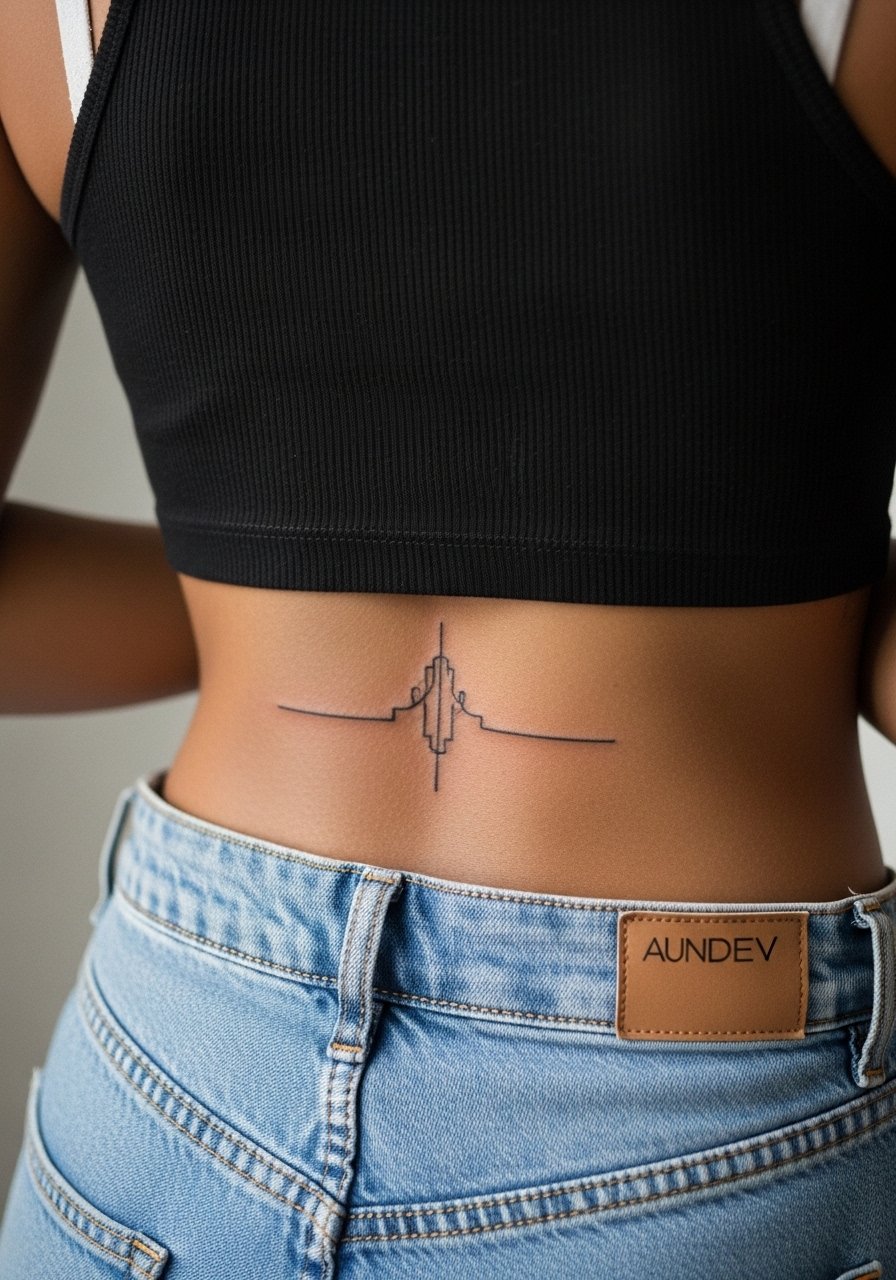
Lower back work is discreet and pairs well with wardrobe reveals. Be mindful that this area sees a lot of movement and denim friction. Sessions are moderate in length and pain is usually low. Ask for composition that reads when the fabric moves, and avoid ultra-thin parallel lines too close together. The common mistake is cramped motifs that blur under belt lines. For the appointment, a tank top and high-waisted jeans setup makes access simple. Expect touch-ups later if you wear low-rise clothing frequently.
Frequently Asked Questions
Q: Will a fine line couple piece fade faster than a bolder blackwork pair?
A: Fine line tends to soften faster because each stroke has less pigment to resist natural skin stretching and UV. If longevity matters more than delicacy, ask for slightly bolder linework and plan a touch-up around year two or three. Placement matters more than style for fading, so pick areas with less friction for fine line pieces.
Q: How should couples approach matching designs if one partner wants bold and the other wants delicate?
A: Consider matching composition and differing execution. For example, the same abstract motif can be rendered in bold blackwork on one partner and fine line negative space on the other. Discuss this split in the consultation and bring photos that show line weight. It helps to pick complementary clothing touches, like a minimalist bracelet on the finer side so the visual language reads coherent.
Q: Are there placements couples should avoid for abstract matching tattoos?
A: Avoid areas with extreme friction or unpredictable stretch if you want long-term symmetry, such as the top of the foot or inner thigh for long-term matching precision. Hands and fingers also change quickly, so accept a retouch timeline if you go there.
Q: How long should I expect a touch-up appointment to take for most of these styles?
A: Touch-ups vary. Small wrist or ankle dots often take thirty to forty-five minutes. Larger collarbone or shoulder adjustments can take an hour or longer. The touch-up timing depends on how much the piece softened and where it sits.
Q: If my partner and I have different skin tones, will identical abstract designs look the same?
A: Identical stencils read differently across skin tones because contrast and saturation show differently. Discuss contrast and lineweight with your artist. A smart artist will adjust line thickness and negative space so the design reads similarly for both of you.
Q: Can couples book a joint consultation to ensure their pieces read as a pair?
A: Yes, joint consultations help align composition and placement so the pieces interact. Bring images of clothing you plan to wear during reveals, and agree on a touch-up timeline before you commit.
