
Fine line tattoos are everywhere on saved boards, but trend popularity and long-term wear do not always match. Bold blackwork and properly spaced linework often look better after a few years than the ultra-detailed pieces that get the most immediate likes. If you want Attack on Titan ink that still reads in five years, these 21 ideas pair style, placement, and real heal-time advice so your reference photos do more than just impress a feed.
1. Levi Ackerman Forearm Portrait

I recommend micro-realism for Levi on the inner forearm because the area holds detail without odd stretching. Tell your artist you want slightly heavier linework around the jaw and reduced hair stippling so it settles cleanly at year two. The ribbed cloak and single-session vibe mean expect 2 to 3 hours and a 3 to 4 pain rating. Common mistakes are asking for ultra-fine hairlines that blur into saturation. Plan a touch-up at 12 to 18 months. For showing it off, roll up a navy chambray button-down to keep attention on the portrait while avoiding sleeve pressure in the first week.
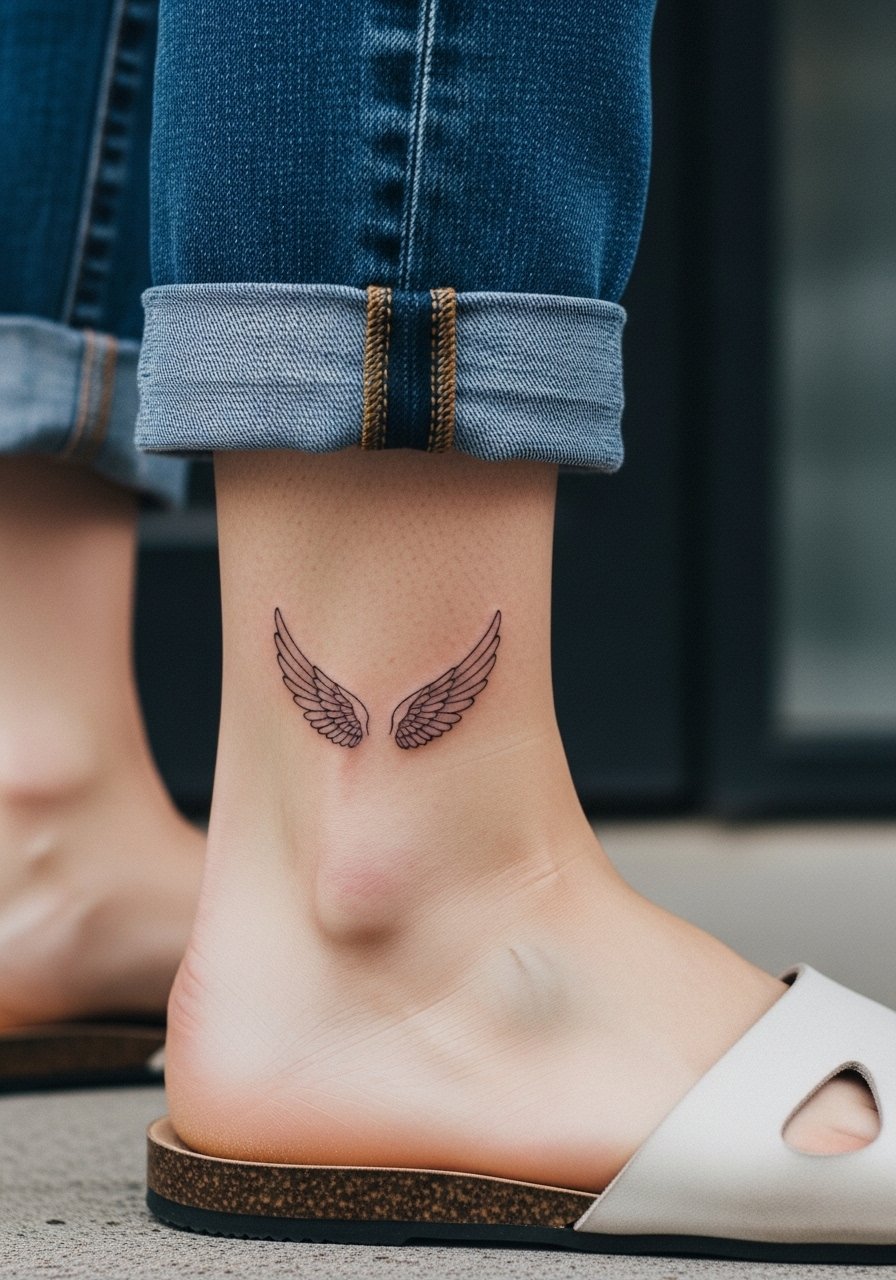
2. Minimalist Wings of Freedom Wrist
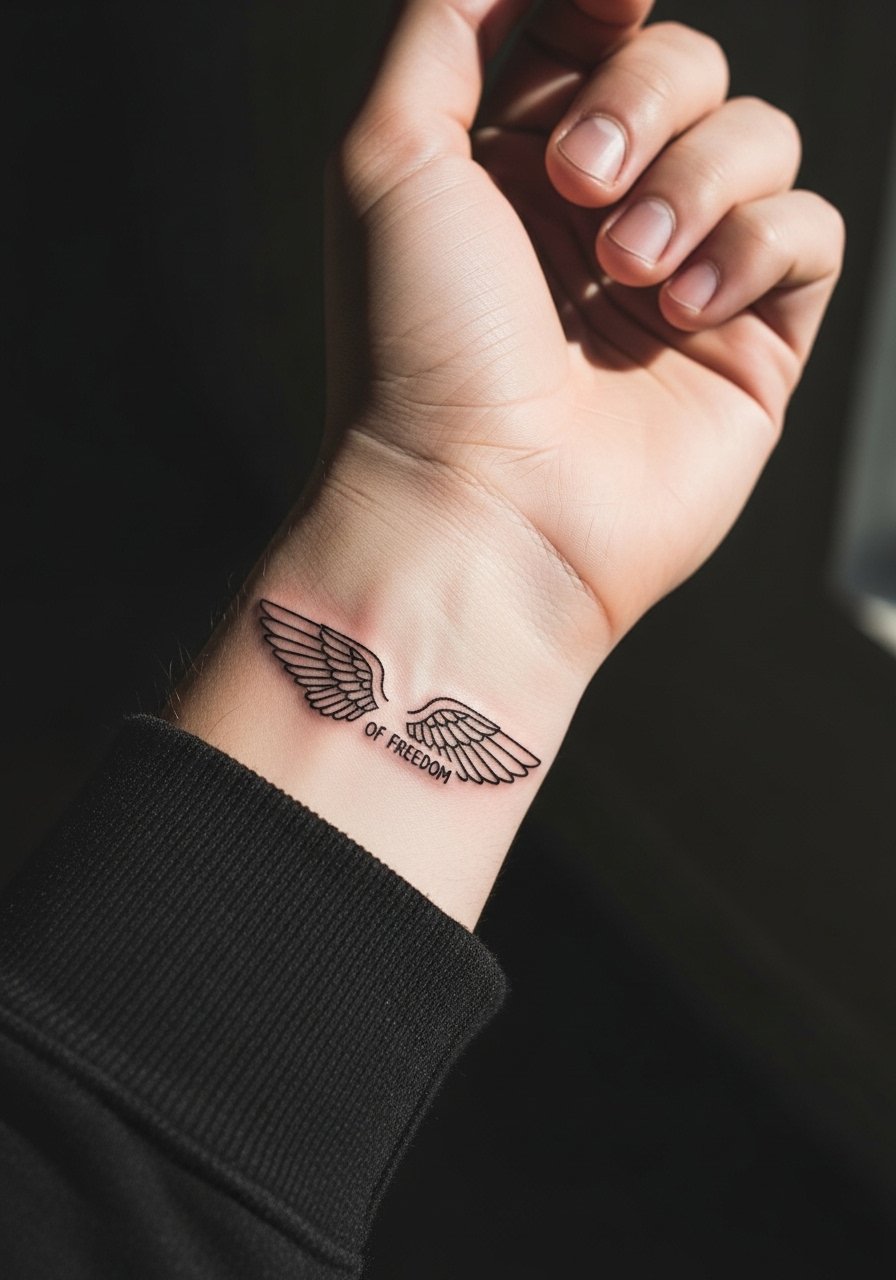
The wrist is a high-motion spot so thicker single-line weight beats hairline single-needle work there. Ask for 1.5 to 2 mm line weight and clean negative space between feathers to prevent early merging. Pain is low and sessions are quick, often under an hour. Expect fine-line versions to need touch-ups at year one to two. A common regret is sizing the wings too small. For day-of comfort, wear a sleeveless tee so the artist can access the area without jewelry complications. Pair the healed piece with a thin leather cuff bracelet on the opposite wrist to frame the emblem.
3. Eren Transformation Upper Arm

Go neo-traditional if you want the drama of Eren shifting without muddied color later. Ask for saturated reds or greens to be balanced by strong black outlines and mid-tone grays, that keeps the Titan details readable after a couple of years. Upper arm sessions often span 2 to 3 sessions depending on size. Pain is moderate. A common mistake is overloading tiny facial details that turn into blotches as color fades. Expect a touch-up schedule around year two. For session wear, a loose tank helps the artist access the bicep and keeps fabric off the fresh ink.
4. Mikasa Collarbone Silhouette with Scarf
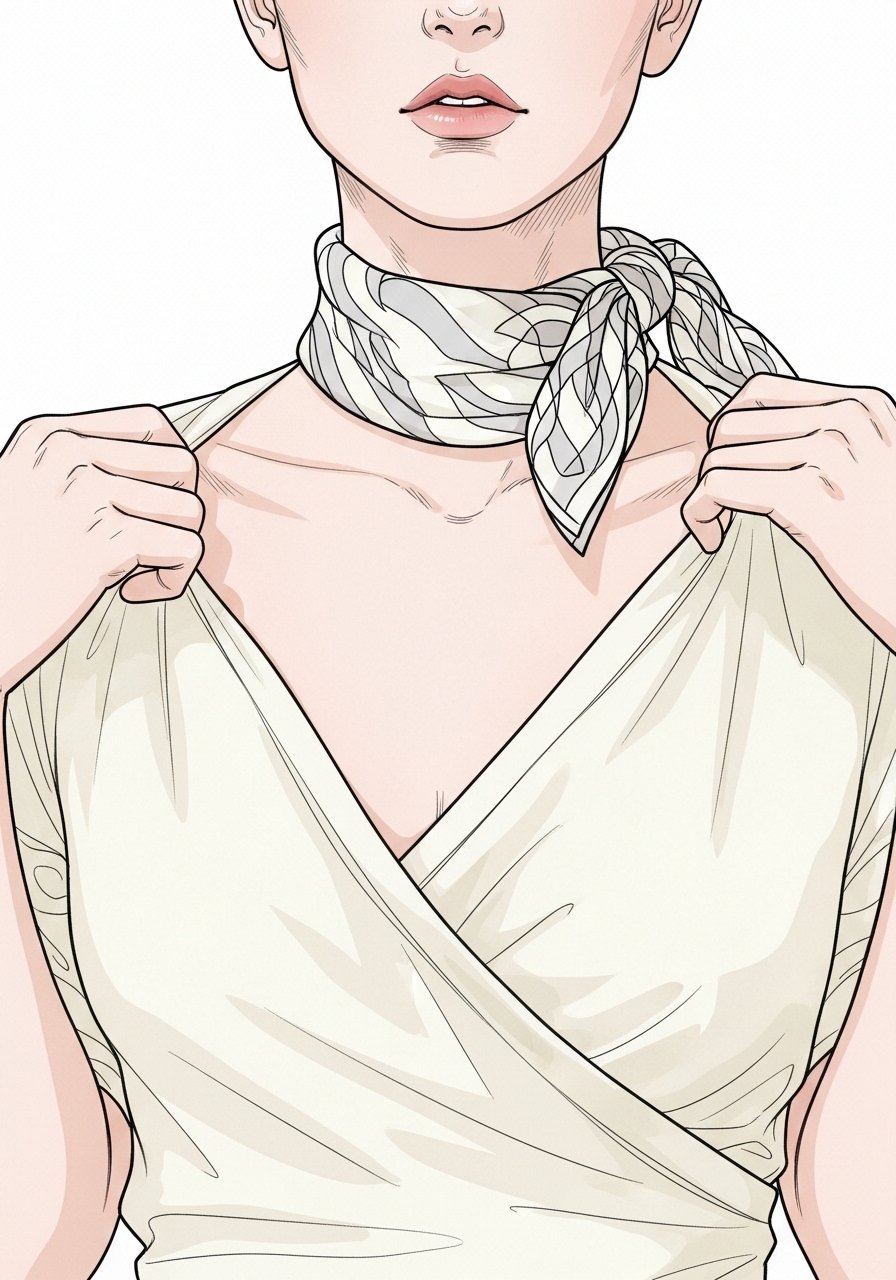
Collarbone linework reads elegant when lines are spaced and the scarf is left as a negative-space element. Be explicit in consultation that you want contrast in the scarf edges, not dense stippling. Collarbone placement runs 3 to 4 for pain and usually fits a single session under two hours for a 3 inch piece. Fine line on this area fades faster if lines are too close together. Plan a touch-up at 12 months if you pick single-needle work. For outings, a v-neck tank in cream keeps the silhouette visible without competing patterns.
5. Colossal Titan Calf Blackwork
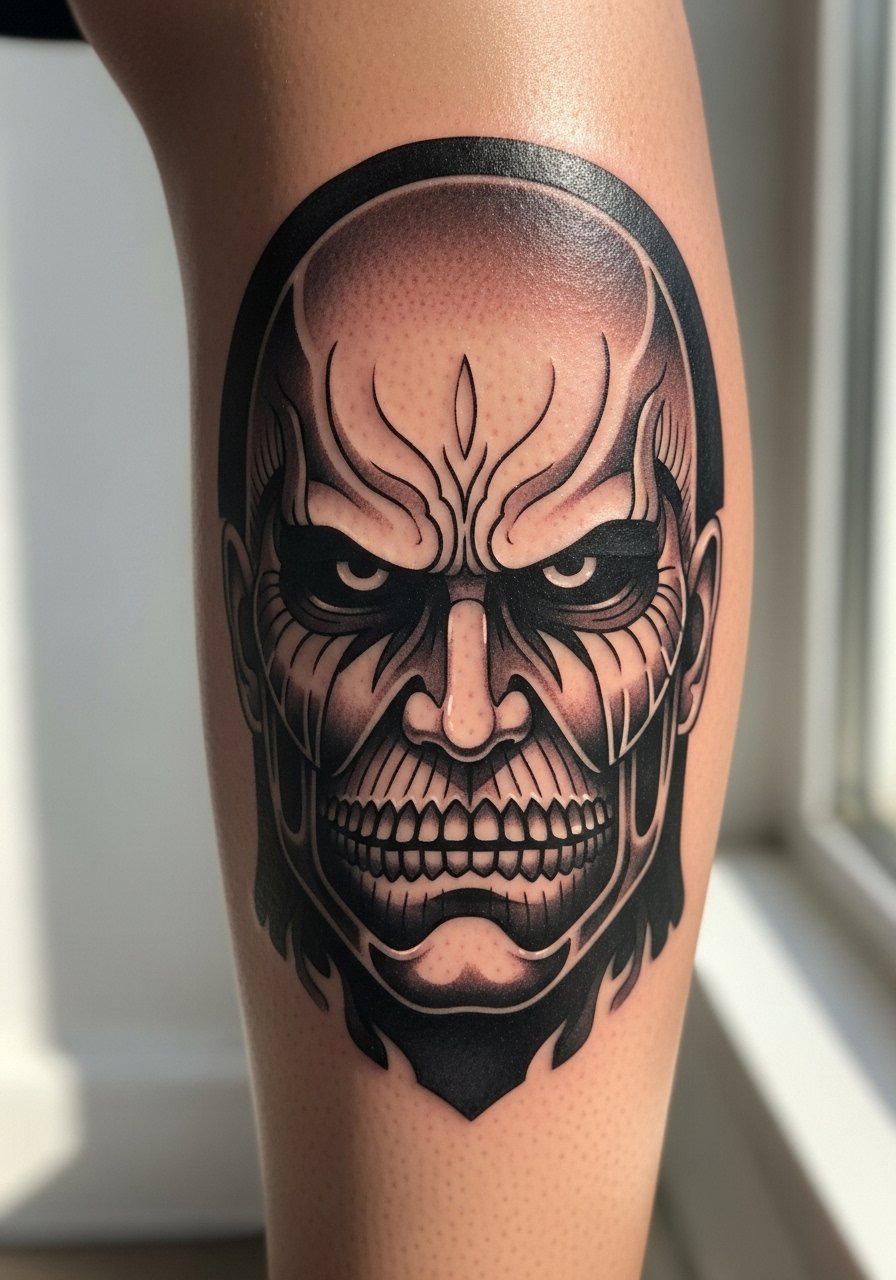
Bold blackwork is ideal for the Colossal Titan on the calf because the leg tolerates saturation and the large shapes hold well. Sessions usually run two sittings for a 4 to 6 inch piece. Pain is moderate and tolerable compared with ribs. A common error is trying to fit too many tiny facial textures into one solid block. Overly busy detail in blackwork becomes a gray blur after a few years. For casual show-off looks, roll slim joggers to mid-calf or wear boat shoes so the silhouette reads in summer.
6. Geometric Survey Corps Mandala Shoulder
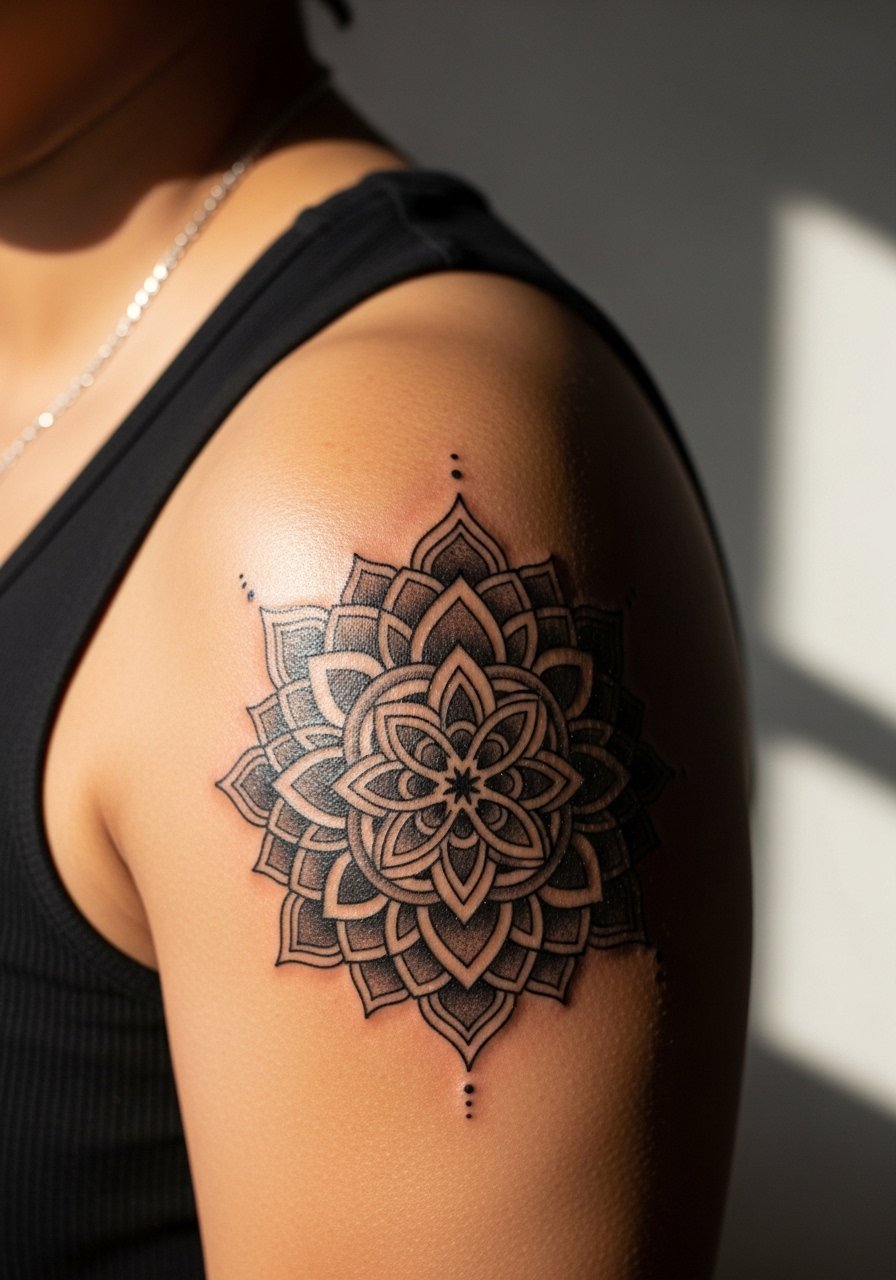
Geometric mandalas need spacing to age right. Ask for intentional negative space between repeating elements and slightly thicker primary lines. Shoulders are forgiving for detail and often heal into a crisp look if the stencil is scaled up from the reference. Sessions are single and fit under two hours for a 4 inch piece. The main mistake is compressing a full mandala into too small a footprint. For show-off pairing, an off shoulder tee keeps the geometry visible while protecting the area from tight straps during healing.
Studio Day Picks
The inner forearm, wrist, calf, shoulder, and collarbone pieces above each demand slightly different prep and first-week care, so these picks smooth the session and early healing.
-
Tattoo Goo balm. A thinner indie balm many people report works better than heavy ointments, useful for summer calf and shoulder pieces that need breathable moisture.
-
Ink Fix tattoo spray. Fast-absorbing spray that helps on intricate inner forearm and mechanical ODM details without leaving a greasy film.
-
Utsukushii ointment. Lighter formula praised for keeping blackwork crisp on darker tones during the first week.
-
Fragrance free gentle body wash. Cleans the area after showering without irritating fresh linework on collarbone and shoulder zones.
-
Second Skin protective film. Stays on for days and helps protect wrist and inner-forearm pieces from early friction while color settles.
7. Armin Watercolor Thigh Portrait

Watercolor works beautifully with Armin's softer features but expect color to diffuse faster on thighs due to movement. Thigh sessions often span two sittings for a 5 inch piece and pain is low to moderate. Ask for anchoring lines in black and muted washes rather than pure gradients so the portrait keeps structure as the color fades. A frequent regret is expecting watercolor to keep vibrancy without periodic touch-ups. For summer reveal, pair with high-waisted denim shorts so the artwork sits naturally with casual outfits.
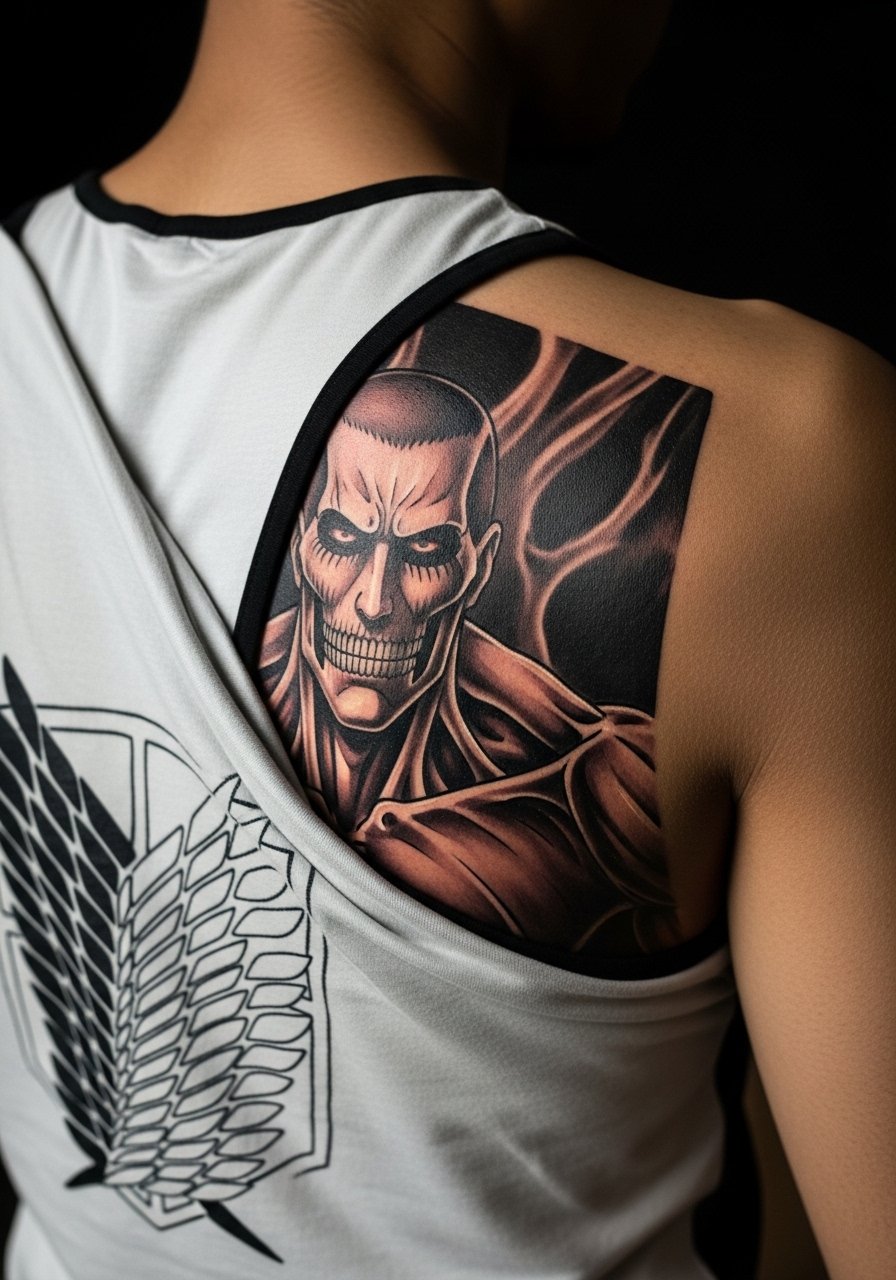
8. Attack Titan Roaring Outer Forearm

Traditional motifs age well because solid outlines and saturated fills keep contrast over time. For the Attack Titan, request bold outline work and saturated red accents tied back to heavy black saturation. Expect a single session for a 3 to 5 inch piece and moderate pain. The most common mistake is soft line weight thinking color alone will hold the image. Over time, saturated outlines preserve boldness. Roll a loose button-down shirt with sleeves you can pull up easily for the session.
9. Female Titan Spine Walker Outline

Spine placement is high pain and needs multiple sessions for long pieces. Tell your artist you want clear vertical negative space so the elongated silhouette reads across movement. Fine line on the spine splits artists into camps. One camp says skin movement and curvature blur lines quickly. The other camp says with proper depth and spacing it can settle fine. Ask where your artist stands and expect touch-ups at year two. The big mistake is compressing too many tiny ribs of detail into one long strip.
10. ODM Gear Inner Bicep Mechanical Realism

Inner bicep detail reads well if the gear lines have shallow gradation and strong contrast. Inner bicep sessions can be painful due to sensitivity, plan for 2 to 4 hours across sittings. Tell your artist you want clear contrast between metal plates and leather straps to avoid muddying after healing. A typical mistake is expecting hyper crisp micro-detail in one sitting. For session comfort, wear a racerback tank to give the artist access without fabric dragging.
11. Eren and Mikasa Ribcage Duo Portrait

Ribcage realism is intimate and demands realistic sizing. Fair warning, ribs are often 7 out of 10 on pain maps. Ask for staged reference photos that show the scale on a torso and request breaks during long sessions. The mistake is shrinking portraits to fit on ribs without proportion checks, which warps faces as skin stretches. Expect 3 to 5 sessions for a 6 inch duo and plan for touch-ups at year two. For session wear, a supportive sports bra and loose pants are ideal.
12. Titan Shifter Ornamental Ankle Band

Ankle wraps look striking when spacing repeats around the limb. Because ankles see a lot of friction, ask for slightly bolder primary lines so the pattern keeps definition over time. Ankle work is quick, often one session, and pain is moderate. A common misstep is choosing extremely thin bands that blur after walking seasons. Wear rolled jeans or slim rolled cuff joggers while showing it off and during the initial heal to avoid tight shoe abrasion.
13. Titan Eye Knuckles Reveal
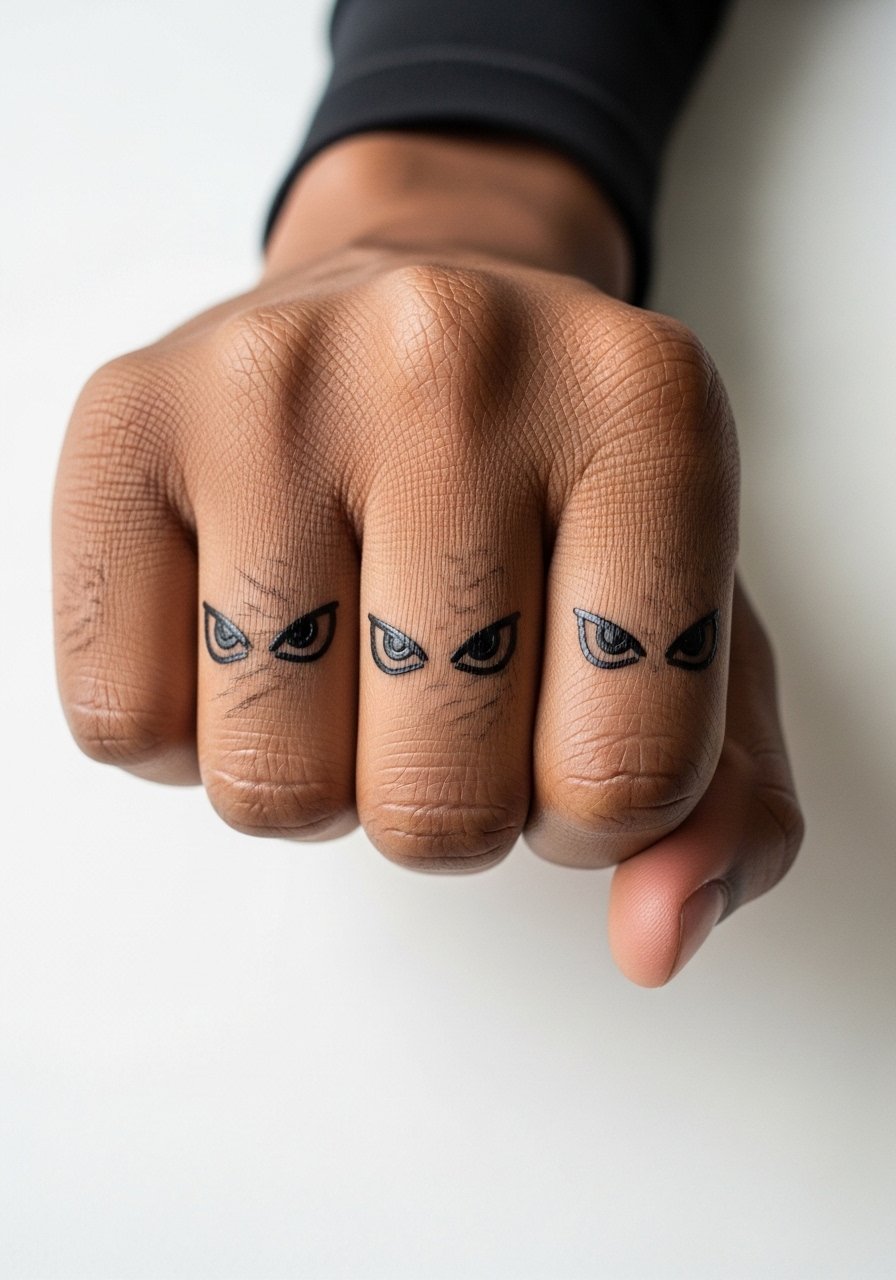
Knuckle tattoos flex with every gesture so pick very simple glyphs or single eyes and plan for frequent touch-ups. Knuckles are high wear and can fade in months. Tell your artist you want compact, bold strokes and not intricate shading. The common regret is expecting knuckle detail to last like forearm work. Pain is sharp and quick and sessions are short. Consider a subtle hidden version on outer finger for less exposure to washing.
14. Scarf-As-Coverup Collarbone Blend

Using Mikasa's scarf to mask an old faded piece works when you plan overlapping flow. In consultation, show both the faded tattoo and scarf references so the artist can design a cover layer that blends texture and avoids patchy saturation. Collarbone cover-ups need careful stencil planning and often one extra hour to map. A mistake is forcing solid color over low-contrast old ink without reworking edges. For session comfort, bring a strapless tank so the artist has clear access and you stay covered.
15. Runic Forearm Script for Lore Fans
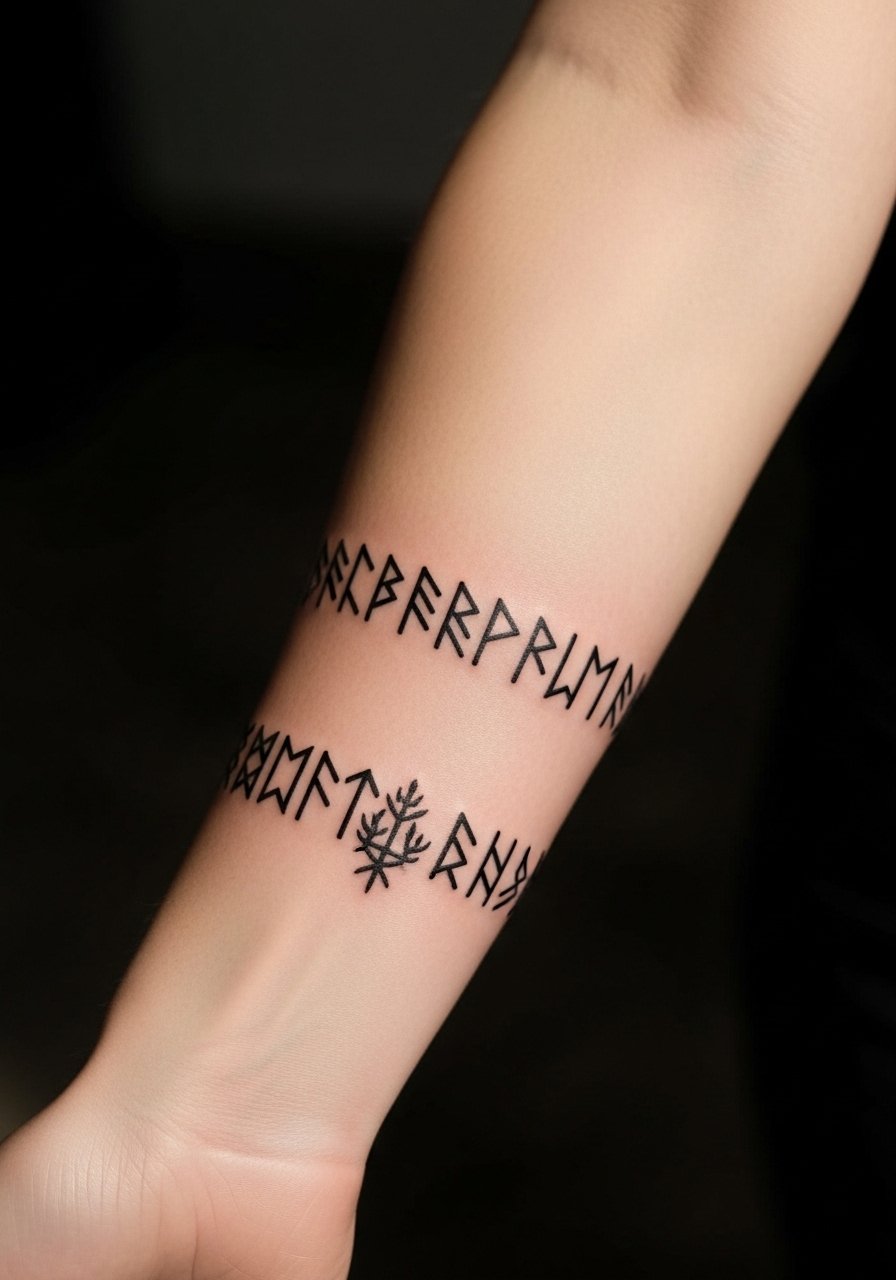
Custom runes are a low-profile nod to the lore that reads well on skin when spaced and sized for visibility. Ask for exact spacing and a stencil test so the script sits naturally across muscle curves. Forearm scripts heal cleanly and the pain is low. A frequent error is small, dense lettering that becomes indistinct after a year. Keep line weight consistent and plan touch-ups at year two. Roll a navy chambray button-down when you want the script to peek from a sleeve without competing with patterns.
16. Geometric Titan Abstract Sleeve Starter

Geometric abstractions make strong sleeve starters because elements can scale into larger work. Tell your artist you want modular pieces that can be added without losing form. Avoid packing everything into one small area. Sessions vary but initial block-in is often two hours. The mistake is starting a sleeve with tiny motifs that get lost when connected. For the session wear, choose a loose button-down shirt you can undo to expose the shoulder and upper arm.
17. Subtle Survey Corps Chest Pin

Upper chest placements need careful placement because movement and shirt lines can distort detail. Request the emblem sit slightly off center so clothing seams do not press directly on it. Sternum and chest pieces vary in pain from moderate to high depending on proximity to bone. A mistake is positioning the emblem under bra straps. For show-off outfits, a cropped tank top keeps the piece peekable without constant friction.
18. Blended Black and Gray Sleeve Patchwork

Patchwork sleeves let collectors build AOT scenes over time while working within shop minimums. When planning patchwork, tell your artist which symbols must remain bold and which can be filler so future additions match tone. Forearm sleeves age predictably if outlines are strong and shading is consistent. A common mistake is mismatched line weights across different sessions. For casual showing, roll sleeves or wear a navy chambray shirt with sleeves pushed for a coordinated look.
19. Small ODM Gear Wrist Band

A thin ODM gear band on the wrist is subtle but needs bolder elements than pencil hairlines to survive washing and typing. Request 1.5 to 2 mm line weight and clear gaps between teeth and gears. Wrist bands are low pain and often one short session. The typical mistake is cramming micro detail into a 1 inch space. During the appointment, wear a sleeveless tee for clean access and no jewelry.
20. Colossal Back Piece Panel
Large back panels allow terrifying scale with controlled negative space. For a Colossal partial, ask for broad planes of black and staged texture zones so the composition reads at distance. Back pieces are slow and need multiple sessions, expect moderate pain on bone-proximate areas. A common regret is starting with too many tiny facial features that clash with large-scale shadowing. For the long chair days, pick a loose tank and breathable shorts to stay comfortable between sittings.
21. Minimalist Wings Ankle Variant
Ankle placements will rub against shoes and socks so pick slightly bolder primary strokes for longevity. Small AOT ankle symbols look best at 1 to 2 inch size with deliberate spacing. The biggest mistake is making them too tiny. Sessions are quick and pain is low to moderate. For showing it off, wear sandals or roll jeans and consider slim footwear to avoid friction during the first two weeks.
Frequently Asked Questions
Q: Will fine line AOT designs on the wrist or hand blur faster than blackwork?
A: In my experience, yes, fine line on high-motion spots like wrists and knuckles tends to blur faster. One camp of artists says single-needle ages gracefully if depth and spacing are perfect. The other camp warns the motion and washing make lines merge within two years. If you love fine line, plan touch-ups around year one and consider slightly bolder primary lines for wrist pieces.
Q: How should I pick colors for darker skin tones if I want an Eren or Armin portrait?
A: Match the palette to the skin tone and ask for black and gray previews first so the artist can show contrast. Lighter washes and high-contrast outlines often read cleaner than saturated midtones. Some people test the design with temporary ink on similar skin tones before committing to color.
Q: What pain and healing differences should I expect between a ribcage duo portrait and a forearm Levi portrait?
A: Ribs usually run high on pain and need more breaks, while forearms are low to moderate and faster to finish. Ribs can take 3 to 5 sessions for detailed realism and need careful clothing choices during healing. I advise a sports bra and loose bottoms for ribs and a loose tank or rolled sleeve for forearms.
Q: Are patchwork AOT sleeves a good budget approach given shop minimums?
A: Yes, patchwork lets you spread cost across sessions while building a cohesive sleeve. Start with anchor pieces that have strong outlines so later filler tats can match saturation and style. Tell your artist you want modular additions so they can plan negative space.
Q: How often should I plan touch-ups for tiny knuckle or wrist symbols?
A: Expect maintenance every 9 to 18 months for knuckles and wrists, depending on your activity level. High-friction zones and frequent washing speed fading. Choosing slightly bolder primary strokes at the start reduces the frequency but does not eliminate touch-ups.
Q: If I want an AOT geometric mandala on my shoulder, what should I ask during consults?
A: Ask for scaled stencils and spacing tests so dense areas do not merge over time. Request that primary lines be thicker than decorative inner lines and show examples of healed mandalas on similar skin tones if possible. Bring clothing plans so the artist can place the design for outfits you actually wear.
Q: Can wardrobe choices speed up or slow down early fading for visible placements?
A: Yes, clothing and accessories affect early healing. Tight straps and abrasive fabrics cause scabbing and pigment loss. For session day wear, pick loose items that give access like button-downs or tanks. For showing off the healed work, pick styles that frame the tattoo without constant rubbing.
