
Fine-line leopard print keeps showing up on feeds, but what actually wears well over time is not always what looks best fresh. High-contrast black and grey holds up when spacing, needle depth, and placement are chosen with aging in mind. These 21 designs mix bold patches and delicate spots so you can pick a look that reads like patterned texture now and still reads like texture years from now. Start with the small wrist piece and work through options that scale up or tuck into clothing.
1. Tiny Leopard Ring on Inner Wrist

Start with a small ring of leopard spots on the inner wrist if you want a discreet pattern that still peeks out with rolled sleeves. Fair warning, the wrist rubs against watches and cuffs, so tell your artist to leave slightly more spacing between spots than the reference image. That spacing keeps the pattern readable at six months and helps avoid lines softening into blotches by year three. Session time is short and pain is low to moderate. A common mistake is shrinking the spots too small. During consultation, ask for bold outer contours with lighter internal shading so the motif keeps contrast as it heals and with everyday friction.
2. Mini Spots Behind the Ear, Neck-Framed
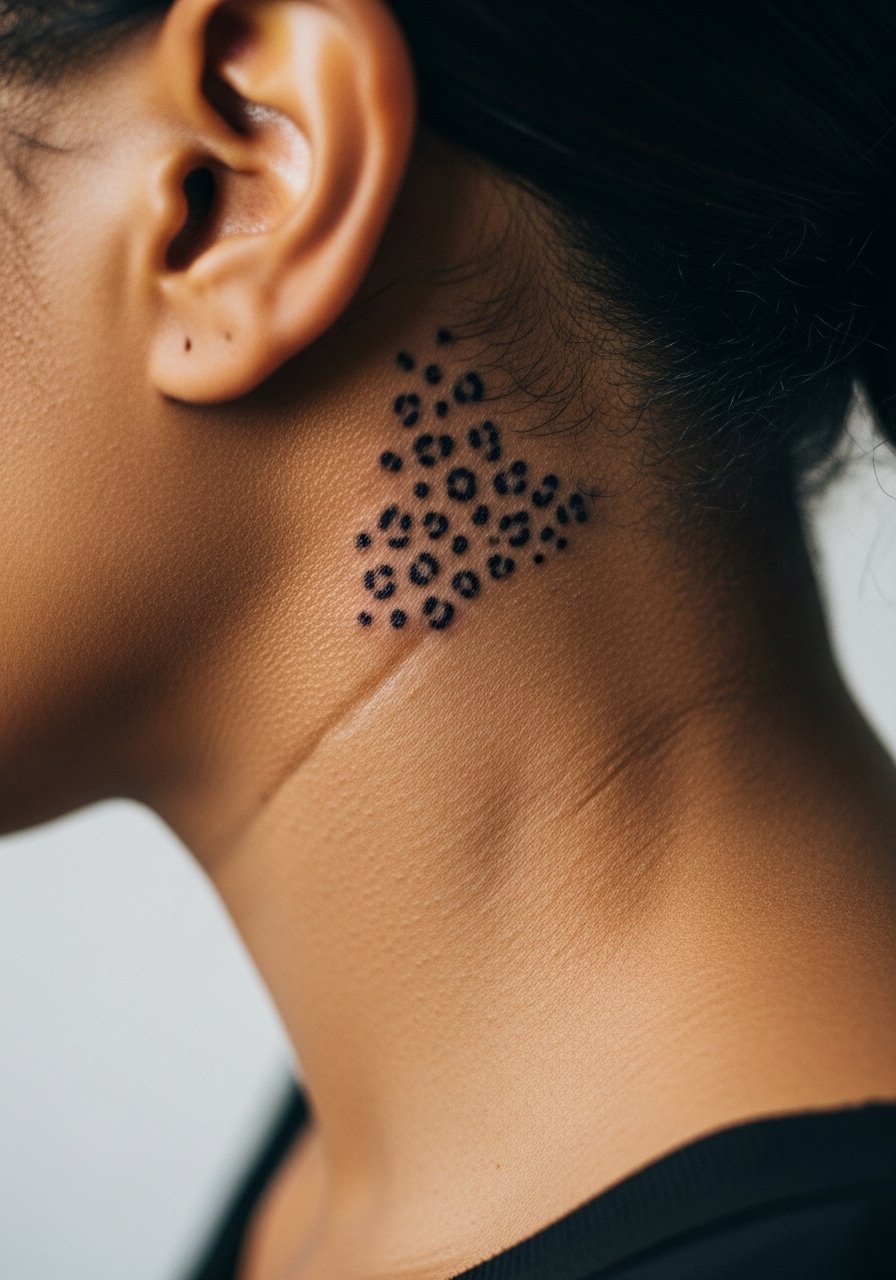
This tiny placement reads like a whisper of pattern. The skin behind the ear is thin, so tell your artist you want shallow, deliberate needle depth and light stipple shading. The session feels quick but sensitive. Artists debate whether micro work holds there. One camp says shallow lines blur fast because of movement and hair growth. The other camp says careful depth and spacing keep details intact. Ask where your artist stands. For showing it off, a cropped hairstyle or half-up look frames the spot without exposing more than you want. Note that not all shops take micro placements behind the ear, so check walk-in policies ahead of time.
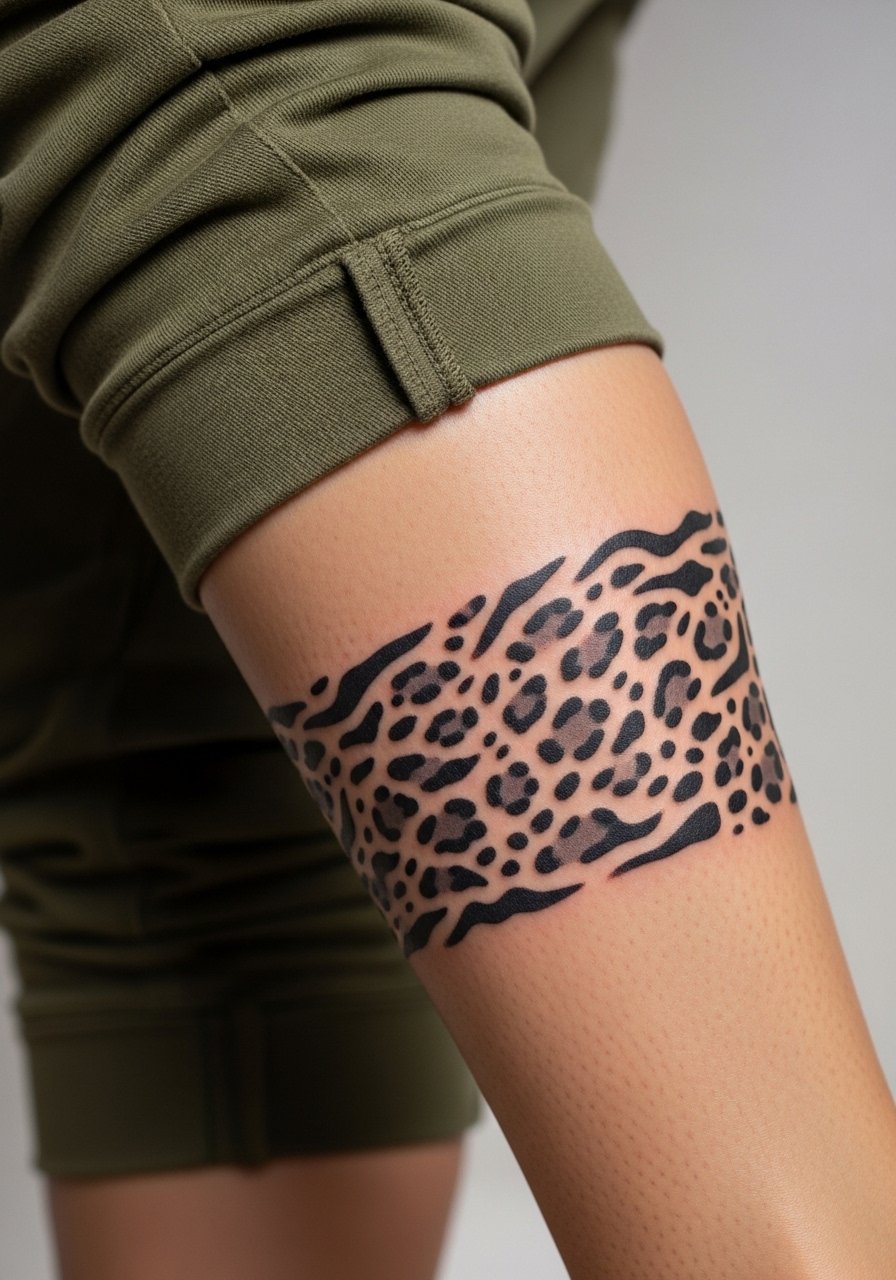
3. Forearm Sweep with Stipple Shading
I recommend a forearm band that sweeps like a sash for people who want readable pattern at arm length. Ask your artist for stipple shading inside the larger spots rather than solid fill. Stipple keeps the texture airy and slows the visual merging that happens when dense shading settles. The session is moderate in length and tolerable on the outer forearm. Common mistakes include cramming too many tiny spots into a narrow band. For show-off outfits, roll up a linen shirt so the print sits against breathable fabric that complements the grey tones.
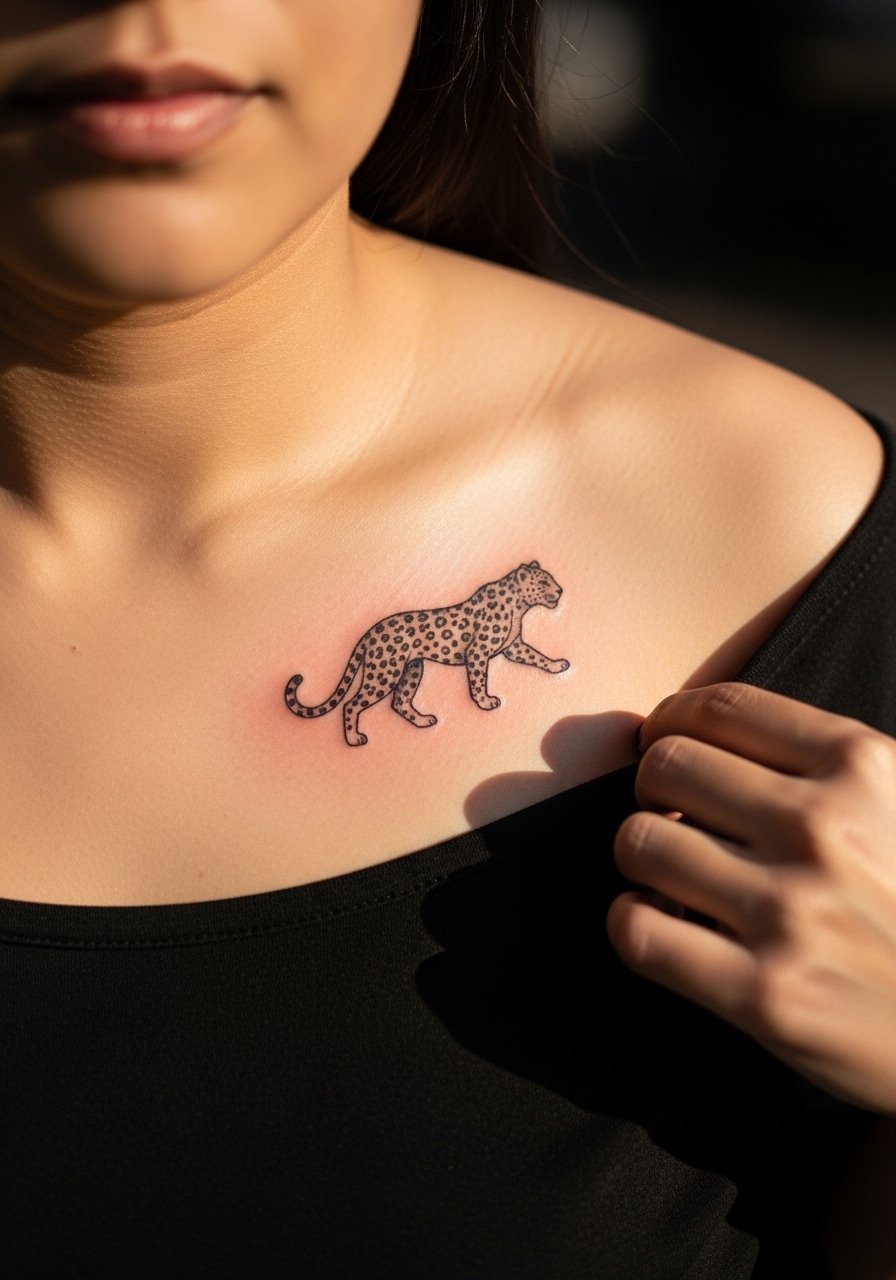
4. Collarbone Cluster Near the Strap
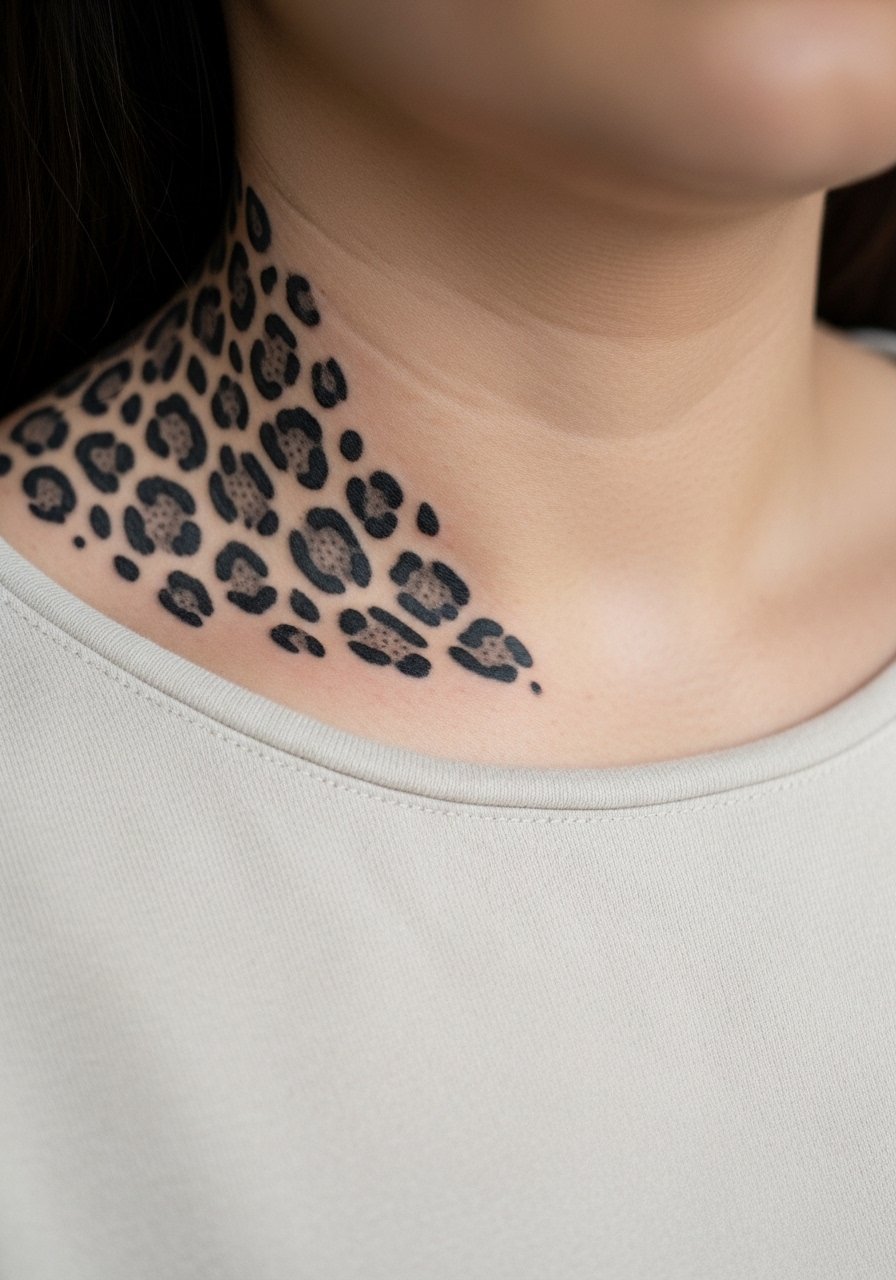
A collarbone cluster reads like jewelry when placed just above the strap line. Pain is low to moderate. Tell your artist to keep shapes larger near the bone and taper them slightly toward the shoulder so the pattern breathes with body curvature. This placement ages well if spots are scaled up slightly from reference. The typical mistake is treating the collarbone like a flat canvas and packing uniform spots. For sessions, wear a wide-neck top you can pull aside. If you often wear necklaces, plan placement so chains do not sit directly over the densest part of the pattern.
5. Ankle Band That Peeks from Shoes
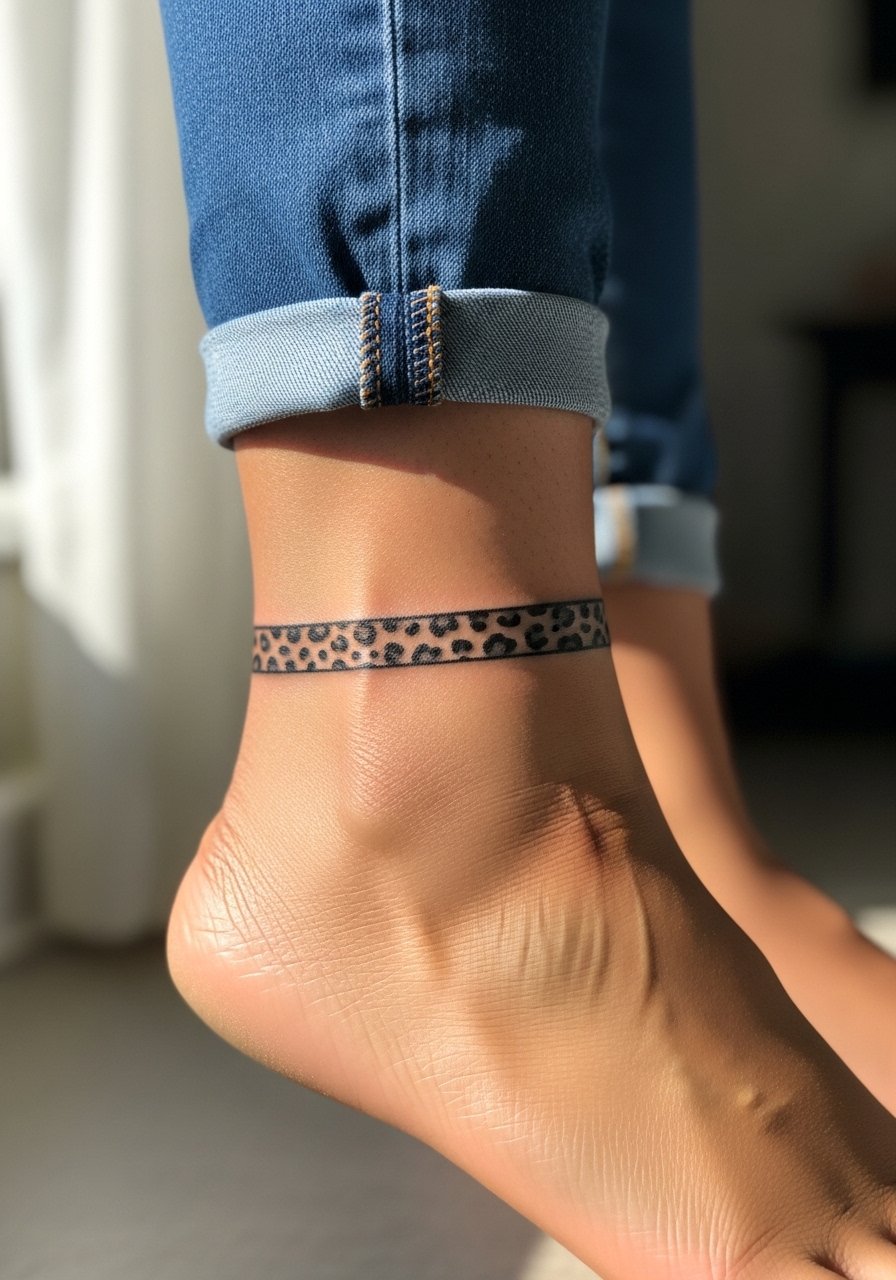
An ankle band is a low-visibility option that still reads as intentional pattern when you wear sandals. The ankle faces constant friction from socks and shoes. Ask for slightly bolder outer linework and filled greys inside the spots so the contrast resists abrasion during the first months. Sessions are quick and the pain is moderate to slightly sharp depending on bone proximity. People often make the mistake of getting the band too thin. For showing it off, roll jeans or choose low-cut sandals that frame the band without covering it.
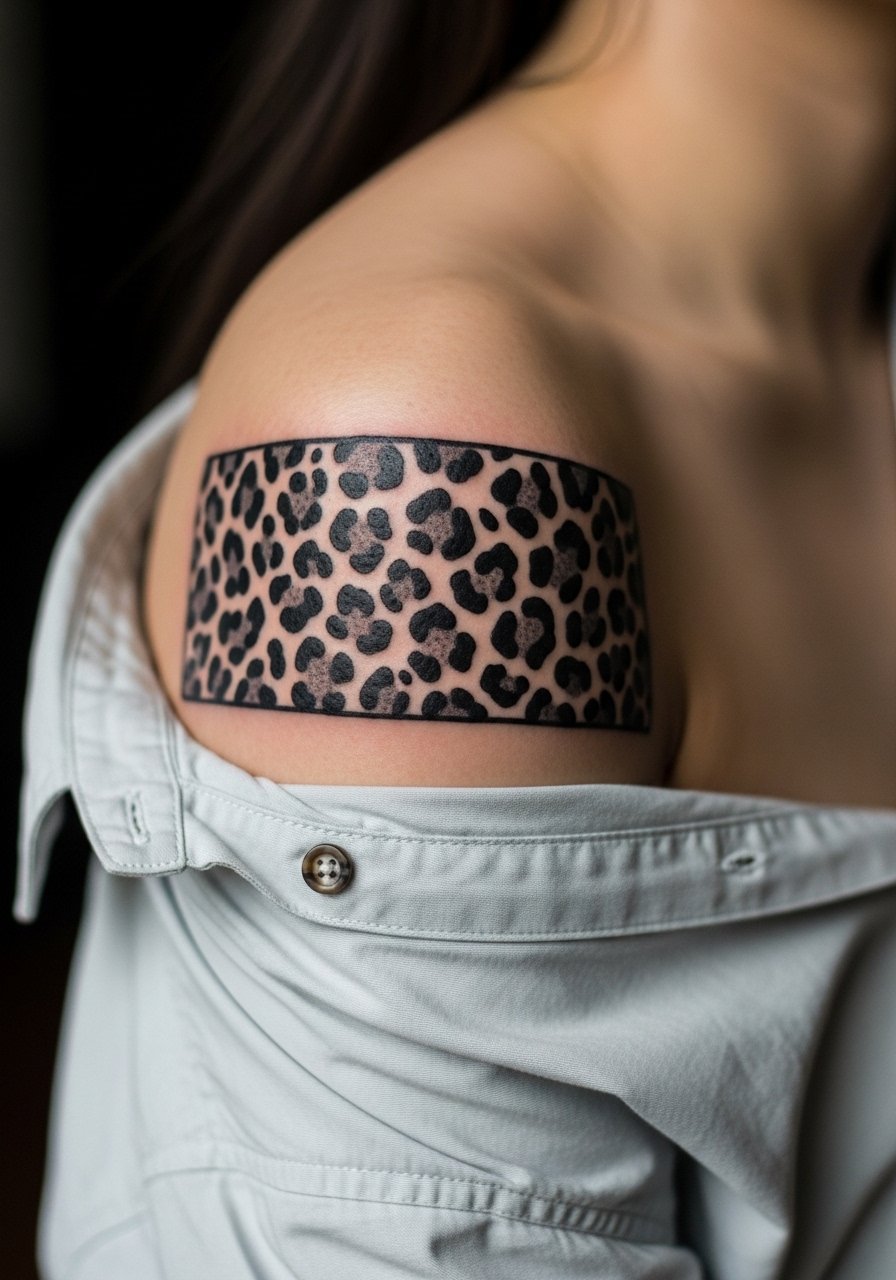
6. Inner Bicep Leopard Patch with Stipple Texture
The inner bicep is tender but gives a smooth canvas for a patch of leopard print. Fair warning about pain, many rate it higher than the outer arm. Ask your artist for stipple shading paired with slight whip shading on the spot edges so the texture reads at close range without needing heavy saturation. Over time that approach keeps spots from merging into a grey blob. The mistake here is packing dense shading into a small patch. For the session wear a tank top so the artist gets clear access while you stay covered.
Studio Day Picks
These upper-arm and ankle ideas above have different access needs, so a few small items make the session and the first week much easier.
- Stencil transfer paper kit. Lets you preview the band and placement directly on skin, which is handy for curved areas like collarbones and ankles.
- Topical numbing cream. Apply per package instructions to take the edge off inner bicep and rib sessions without changing linework.
- Breathable protective film roll. Keeps ankle and wrist pieces clean through the first few days of rubbing from shoes and cuffs.
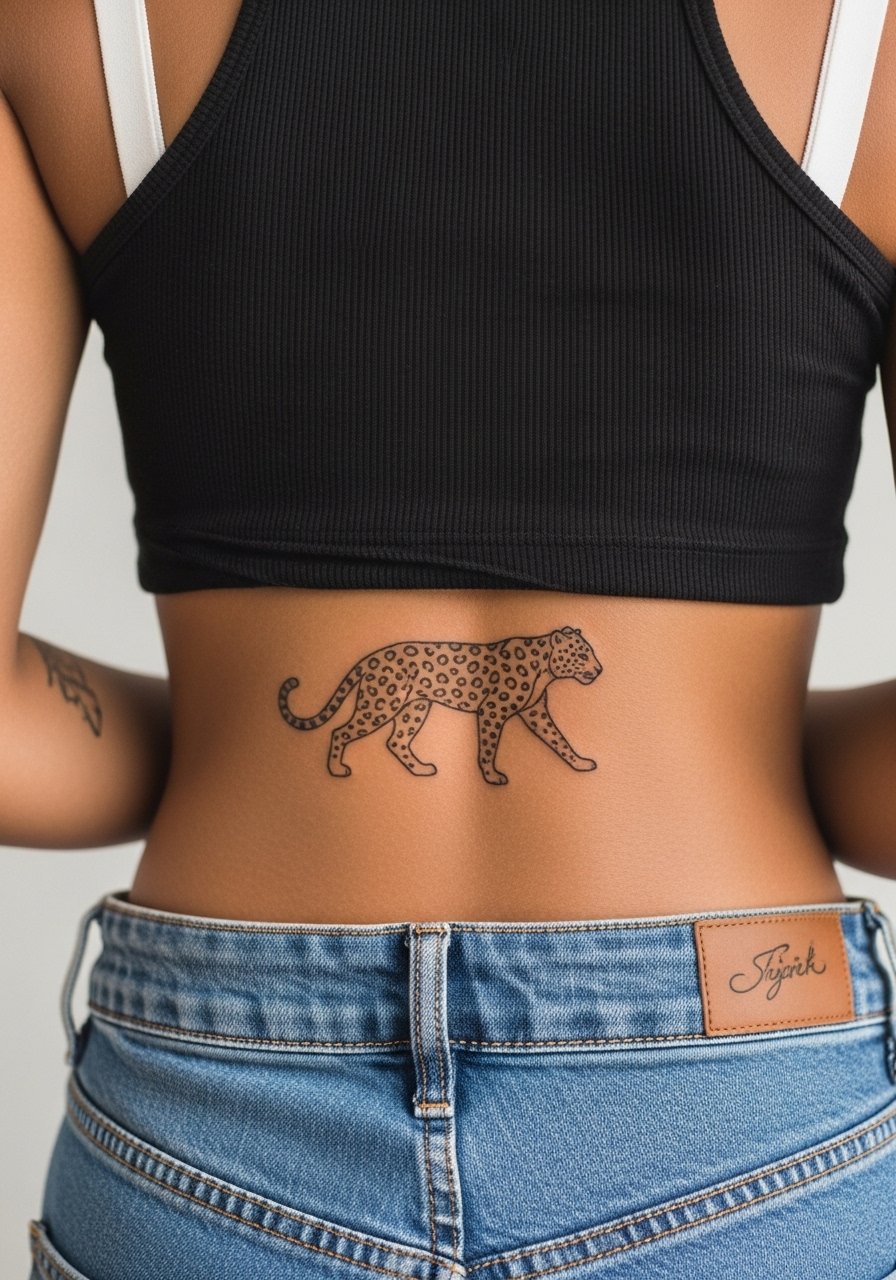
- Fragrance-free gentle body wash. Cleans healing skin without stripping the thin linework that small spot patterns need.
- Aquaphor healing ointment. A thin layer helps lock in moisture during the initial healing window so crisp contrast in fine spot edges stays intact.
7. Shoulder Cap Leopard Panel
A shoulder cap panel gives the pattern room to read at distance. I've seen this age very well when artists scale spots with the shoulder's curve in mind. Tell your artist to design spots that follow the deltoid, not cut across it. The session is medium length and relatively low on the pain scale. A common mistake is using identical spot sizes which flattens the design as the body moves. For the session, wear a loose button-down shirt you can pull aside so the artist has clear access to the shoulder.
8. Ribcage Watercolor-Grey Blend with Spots
Fair warning, the ribcage is notorious for a higher pain level. The controversy about fine detail on ribs is active. One group of artists says fine line loses clarity quickly because the skin there stretches and moves. Another group counters that with proper spacing and slightly heavier line weight, the look holds. I recommend scaled spots and a soft grey wash for people who want texture without tiny detail. Tell your artist you prefer touch-up planning at year two. For the session, choose a sports bra or cropped top you can lift so the artist has clean access.
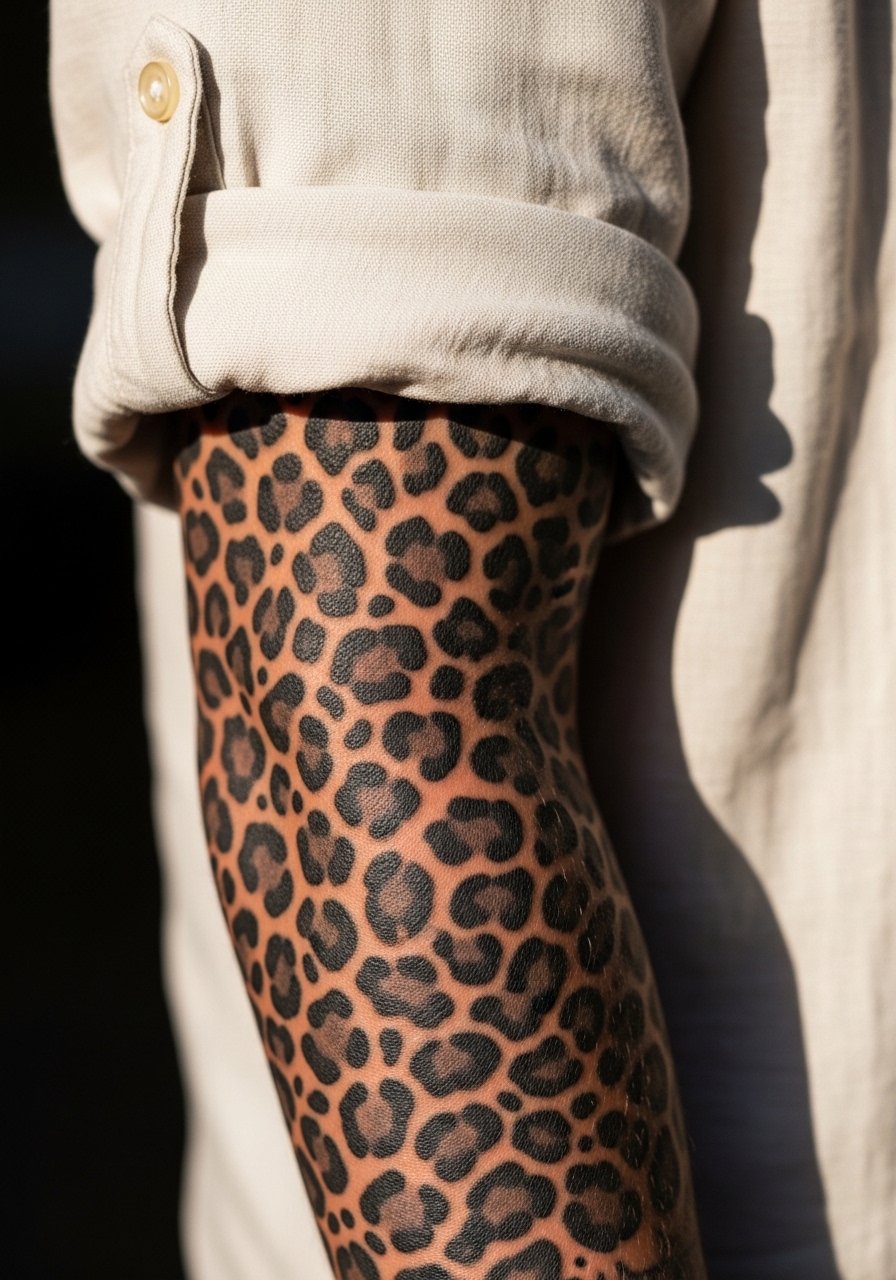
9. Full Sleeve Leopard Patchwork
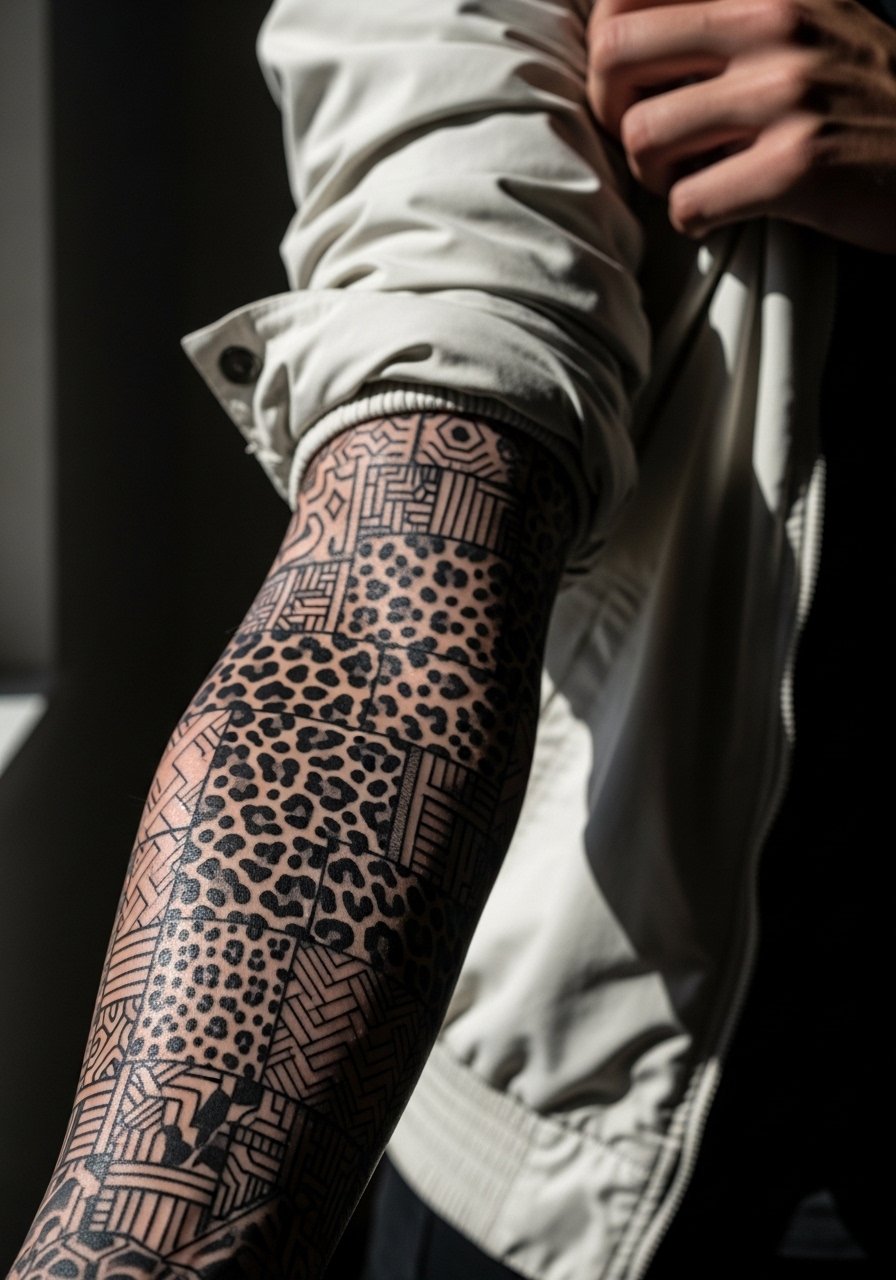
A sleeve gives you the freedom to mix scales and techniques across the arm. When I see successful sleeves the artist varies spot size and uses stipple and whip shading to create depth. During consultation, ask for reference areas showing scale transitions so there is a clear plan to avoid visual crowding. The session schedule will be multiple sittings. Expect touch-ups sooner if you pack dense micro spots near the wrist. For styling, rolled sleeves and short jackets frame the sleeve without hiding it.
10. Calf Stripe That Wraps the Lower Leg
Calf pieces tolerate more saturation and larger spots than thin wrist work. They also experience less daily abrasion from clothing. A calf stripe can be a good choice for people who want the look visible with shorts. Ask your artist to keep negative space between spots so the pattern reads as texture from a distance and as spots up close. Sessions are moderate to long depending on size. Avoid the common mistake of too many tiny details that will blur when the limb contours shift.
11. Finger Cluster, Small and Strategic
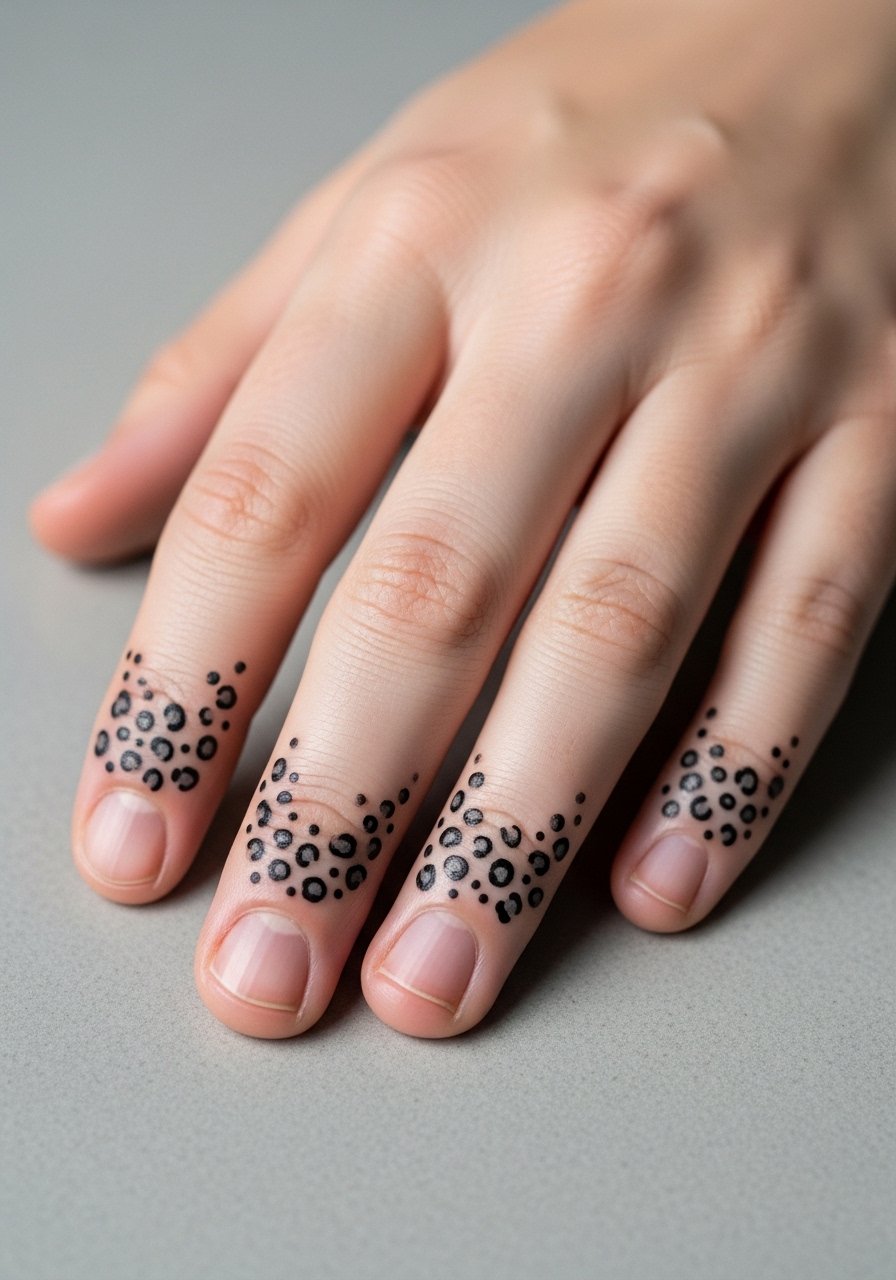
Finger tattoos come with trade-offs. Pain is sharp and constant, and the skin there tends to shed and wear away faster. One common mistake is packing too many tiny spots onto one finger. Instead, I recommend a small, strategic cluster across two adjacent fingers with bold outer dots and subtle grey fill. Expect to plan touch-ups at year one to two. For workplace considerations, remember finger work may affect certain job prospects. If you want to hide it occasionally, rings and long sleeves help.
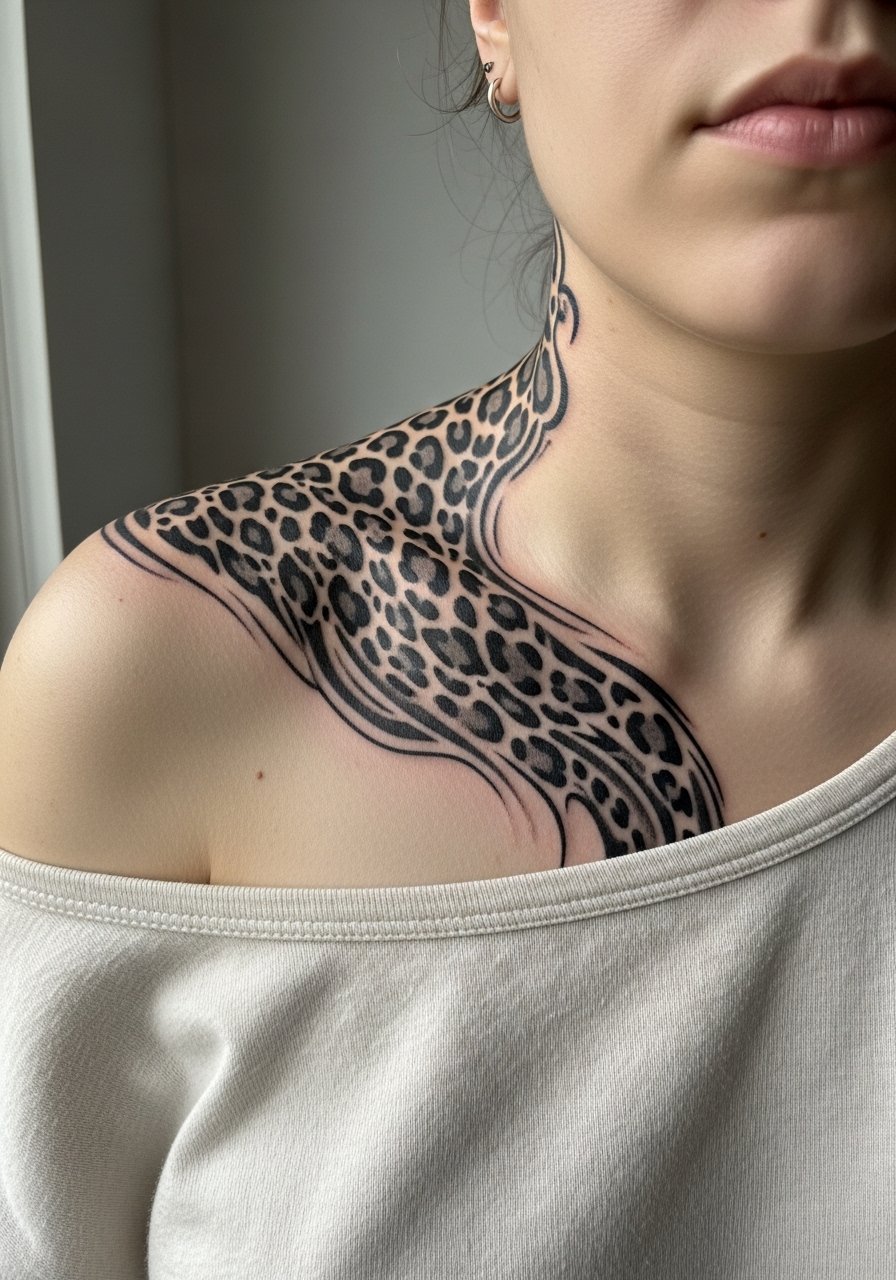
12. Back of Neck Leopard Strip
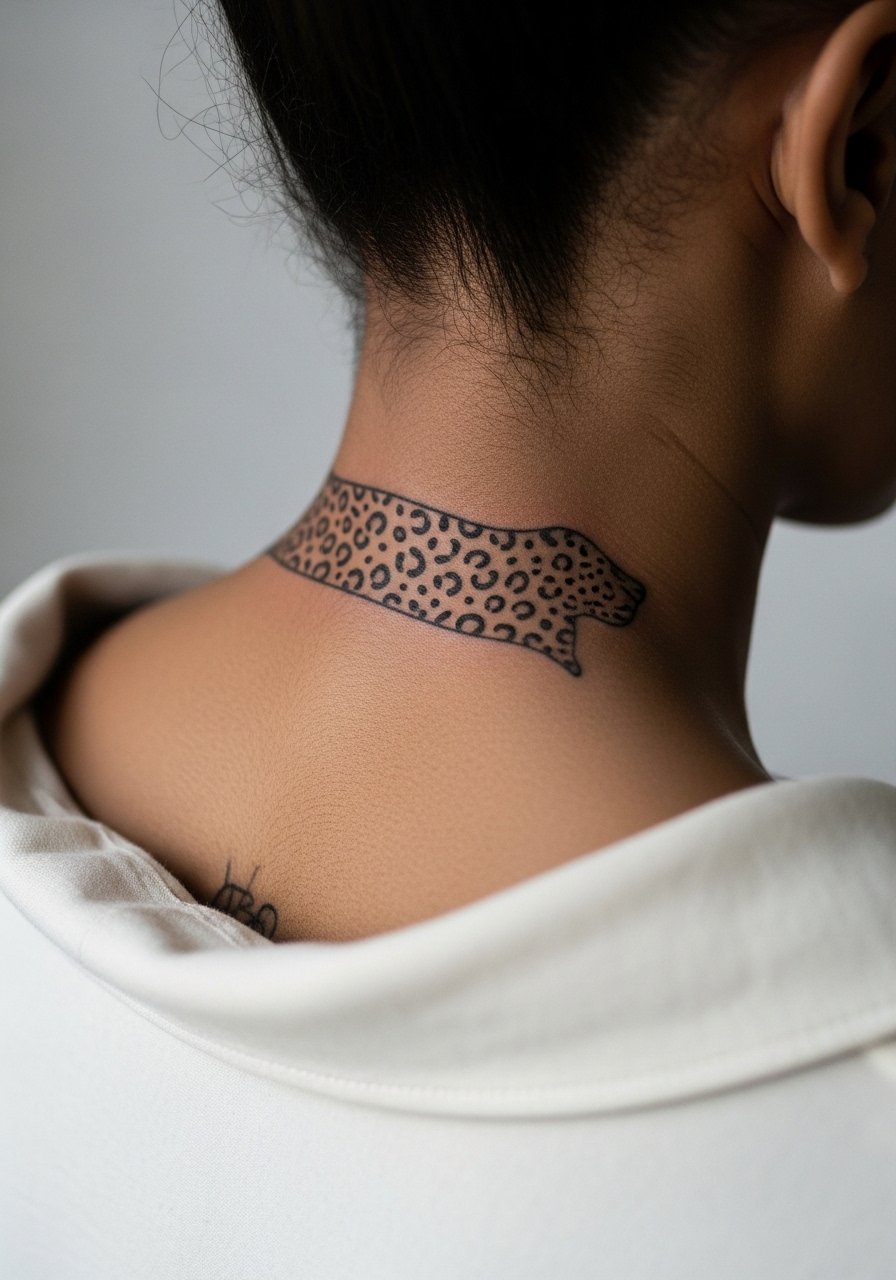
A back of neck strip reads like a subtle statement at the hairline. Tell your artist to keep shapes elongated vertically so they follow the neck's flow. Pain is moderate. This area sees sun exposure if you wear hair up, so consider slightly bolder linework to protect clarity. A common mistake is placing dense spots that vanish when hair is down. For showing it off, pair with short hair or updos. If you care about professional flexibility, discuss visibility with your employer expectations first.
13. Sternum Medallion with Leopard Accents
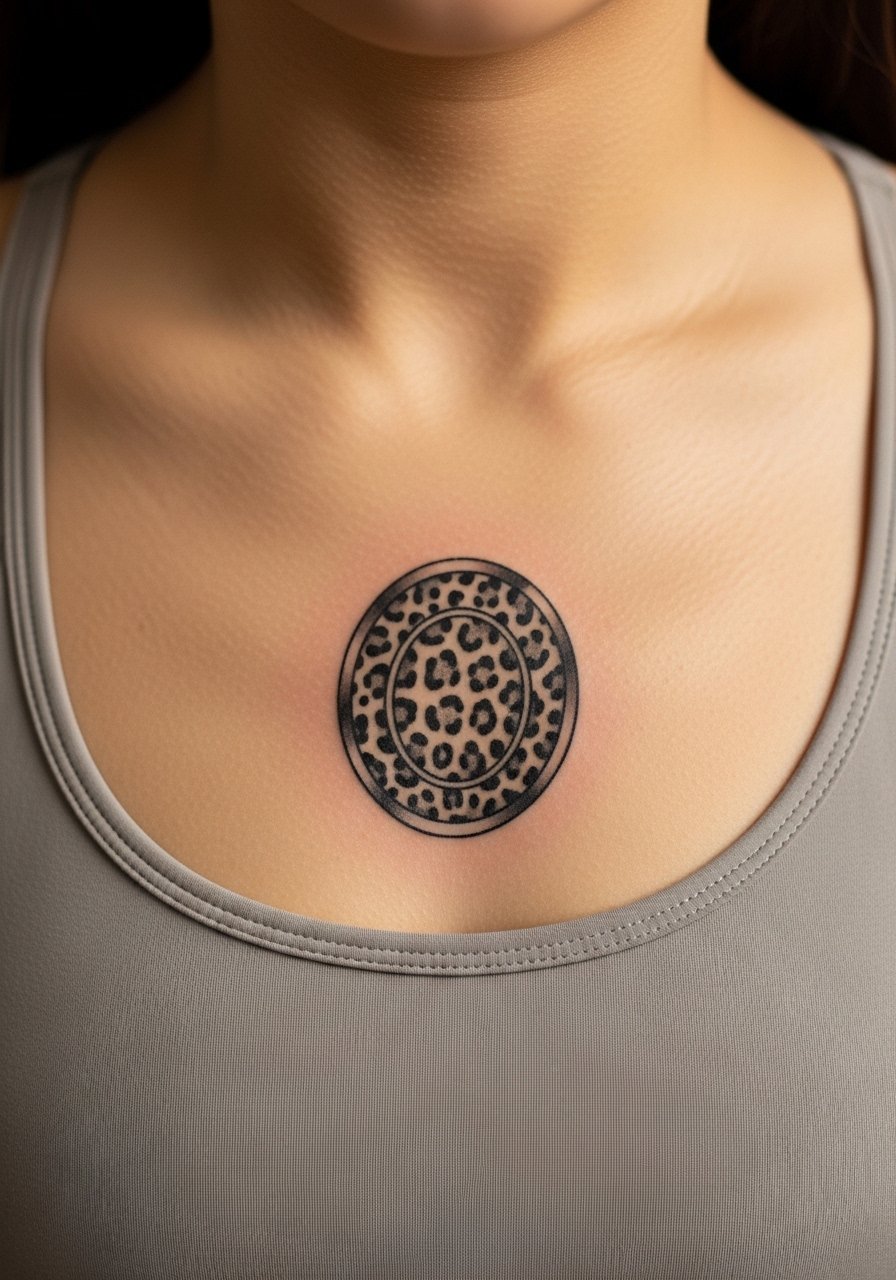
Sternum placements sit close to bone and midline, which changes how ink heals. Most people describe a sternum session as high on the pain scale. I recommend a medallion with leopard accents instead of all-over spots. Ask your artist to space those accents so they breathe against the central motif. The typical mistake is trying to cram a full pattern into a narrow central zone. For the session, wear a fitted sports bra you can lift slightly so the artist has access. Also consider that the sternum shifts noticeably with posture and weight changes.
14. Hip-Side Leopard with High-Waist Pairing
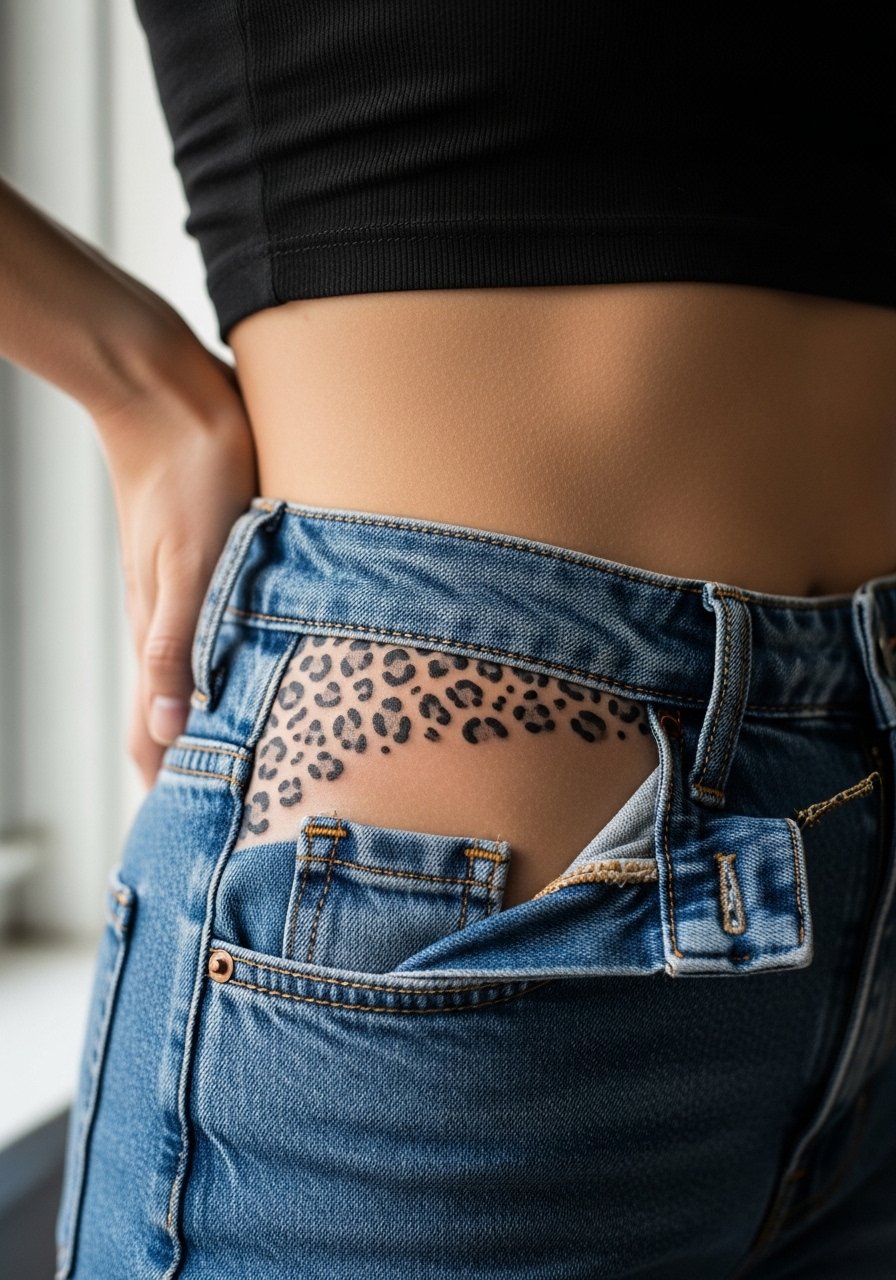
Hip placements are great for peeking patterns that stay private or show with swimwear. The skin there tolerates medium saturation well. For a leopard motif, ask for larger spots near the iliac crest and softer shading toward the waist. Session time is moderate. The common mistake is allowing waistband friction to sit over the densest part of the design. For outfits, high-waisted bottoms frame the pattern so it sits in the exposed gap rather than under a seam.
15. Scattered Sternum-to-Rib Flow
This flow ties central chest work into the ribs. Expect higher pain on the ribs and a more forgiving sensation near the sternum. Tell your artist you want spots to increase in scale as they move onto the ribs so the pattern reads consistent with the larger surface area. Two camps argue about fine work on ribs. One group warns that rib motion blurs fine lines rapidly. The other group says that scaled design plus thicker line edges prevents early merging. If in doubt, plan spots to be resolvable at a few inches distance rather than strictly microscopic.
16. Thigh Patch with Mixed Spot Scales
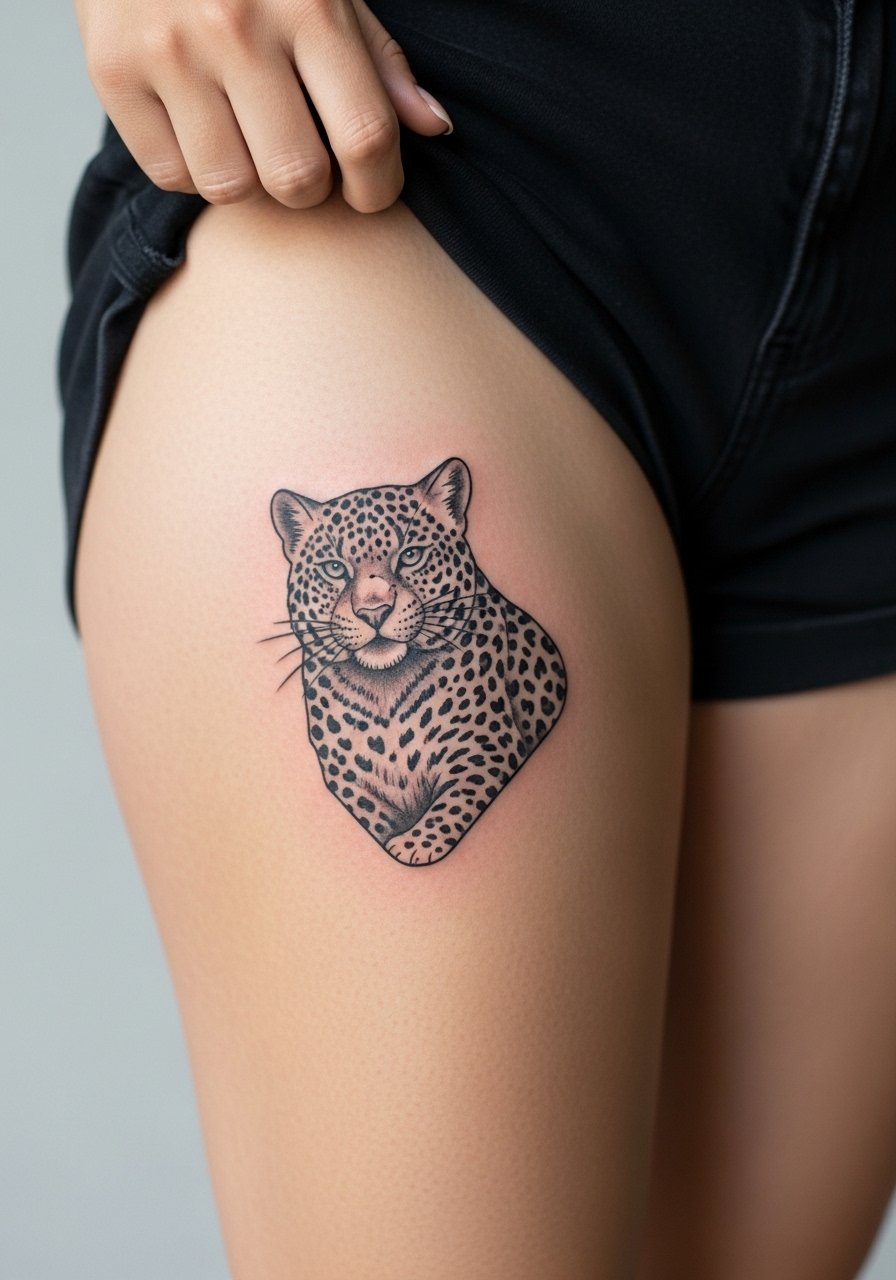
Outer thigh tolerates large and small scales well, which makes it an ideal place for a textured patch. The session is comfortable for most and allows for longer sittings. When you consult, bring references that show how spot sizes transition from dense near the hip to looser near the knee. A usual mistake is starting with uniform spots that make the piece look static. For the appointment, wear loose shorts or a wrap skirt so the artist can roll fabric without pressure on the area. If you often wear tight waistbands, position the densest part of the patch away from seams.
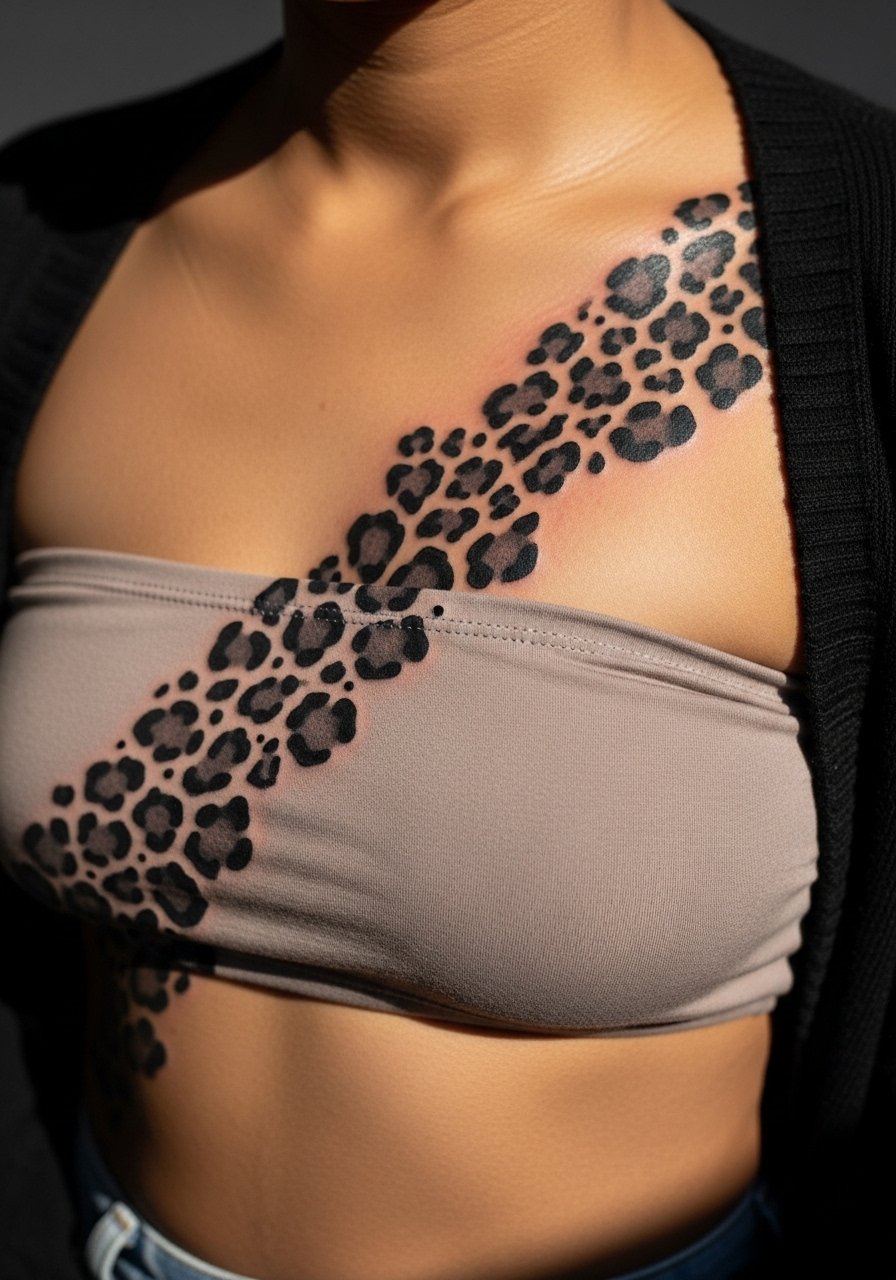
17. Collarbone to Shoulder Flowing Spots
This flow creates an organic movement across the upper torso. I suggest varying spot scale and direction to match muscle shape. The session feels moderate and the area tolerates repeated sessions well. A mistake people make is mirroring the exact pattern on both sides without accounting for asymmetry in muscle and posture. For show-off looks, open-neck tops create a jewelry-like frame for the pattern. Ask your artist for mockups that show how the design sits when you move.
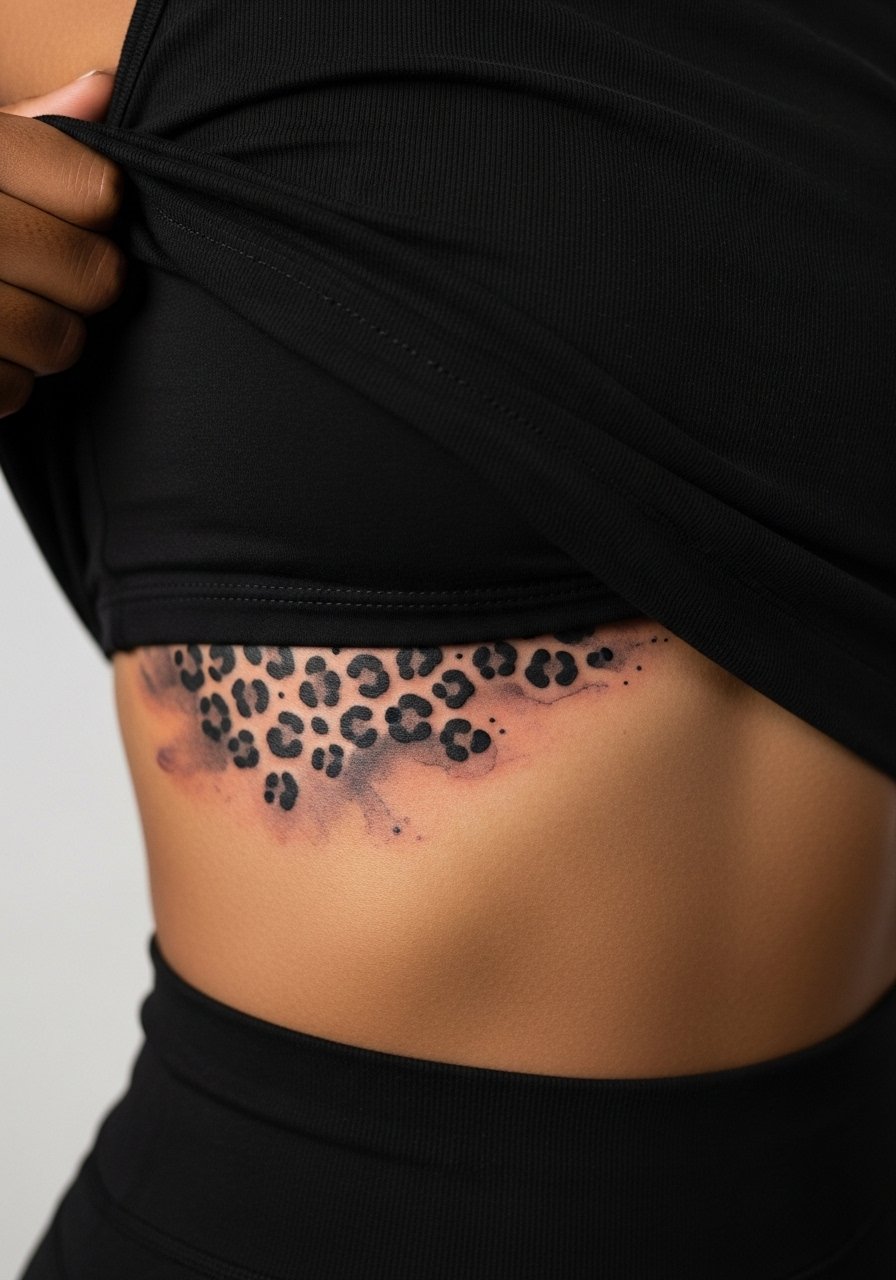
18. Lower Back Leopard Shelf
Lower back tattoos sit in a surface that moves with bending and twisting. Tell your artist to design a shelf shape that follows the lumbar curve so spots remain visible when clothed or bare. The session is typically medium in pain. One common mistake is placing the densest spots directly where waistbands hit. For clothing, low-rise jeans or cropped tops reveal the motif deliberately. Consider posture and how much you want the pattern to show during day-to-day movements.
19. Side Thigh Leopard Bands
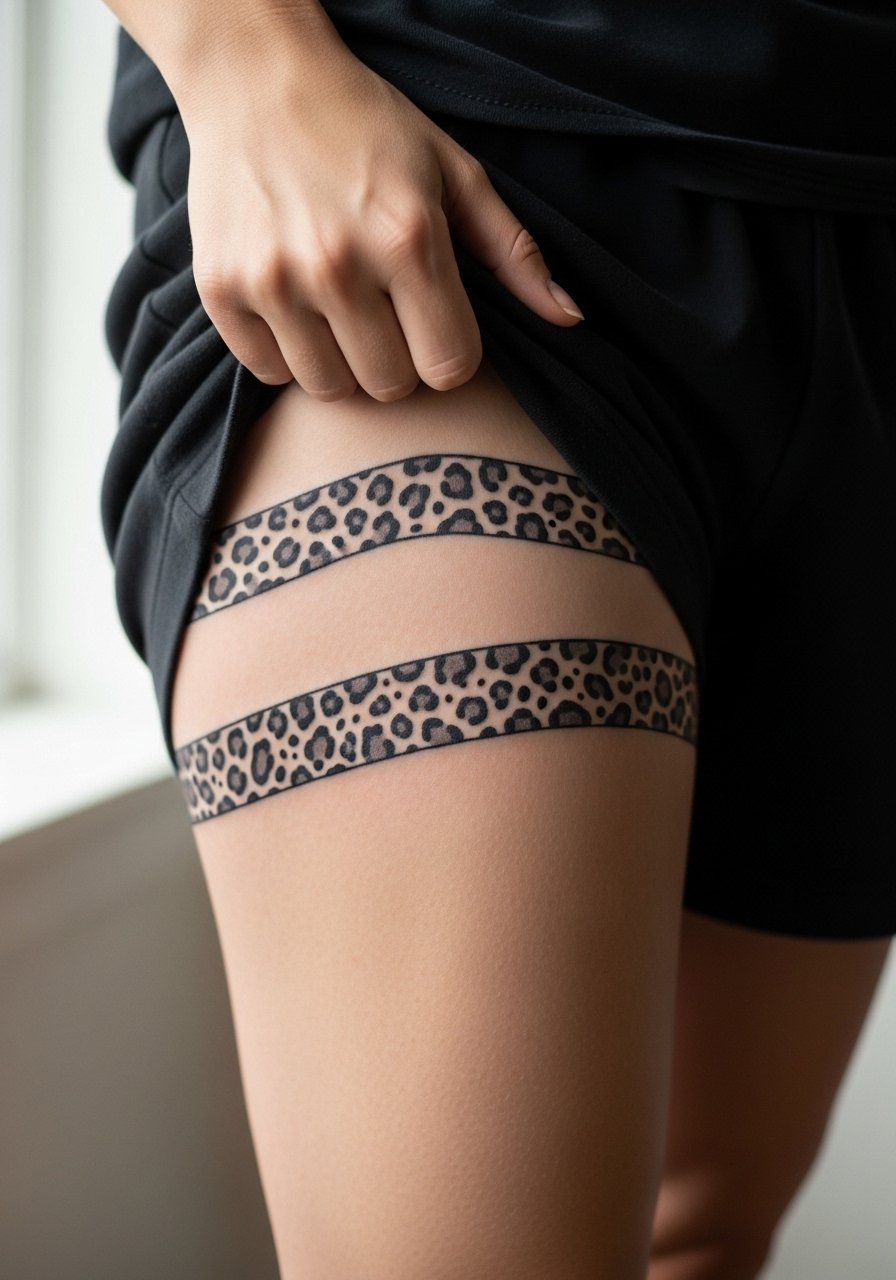
Side thigh bands offer bold visibility with less daily friction than the inner thigh. They are ideal for people who want to alternate visibility between swimwear and pants. Ask for clean negative space between bands so the pattern reads as distinct stripes, not a continuous block. Sessions are comfortable and often complete in one longer sitting. A frequent mistake is over-detailing the inner curves. For the session, wear shorts you can shift slightly so the artist has clear access without full exposure.
20. Small Chest-Top Leopard Accent
Upper chest accents sit near jewelry and necklines. Keep spot sizes modest and contrast slightly higher so the design reads against clothing fabrics. Pain is low to moderate. The common mistake is placing accents under necklace chains which can cause irritation during healing. For showing it off, a shallow V or scoop neck pairs well. Discuss exact placement with your artist so the piece sits just above the typical chain line rather than directly under it.
21. Full Back Panel with Leopard Negative Space
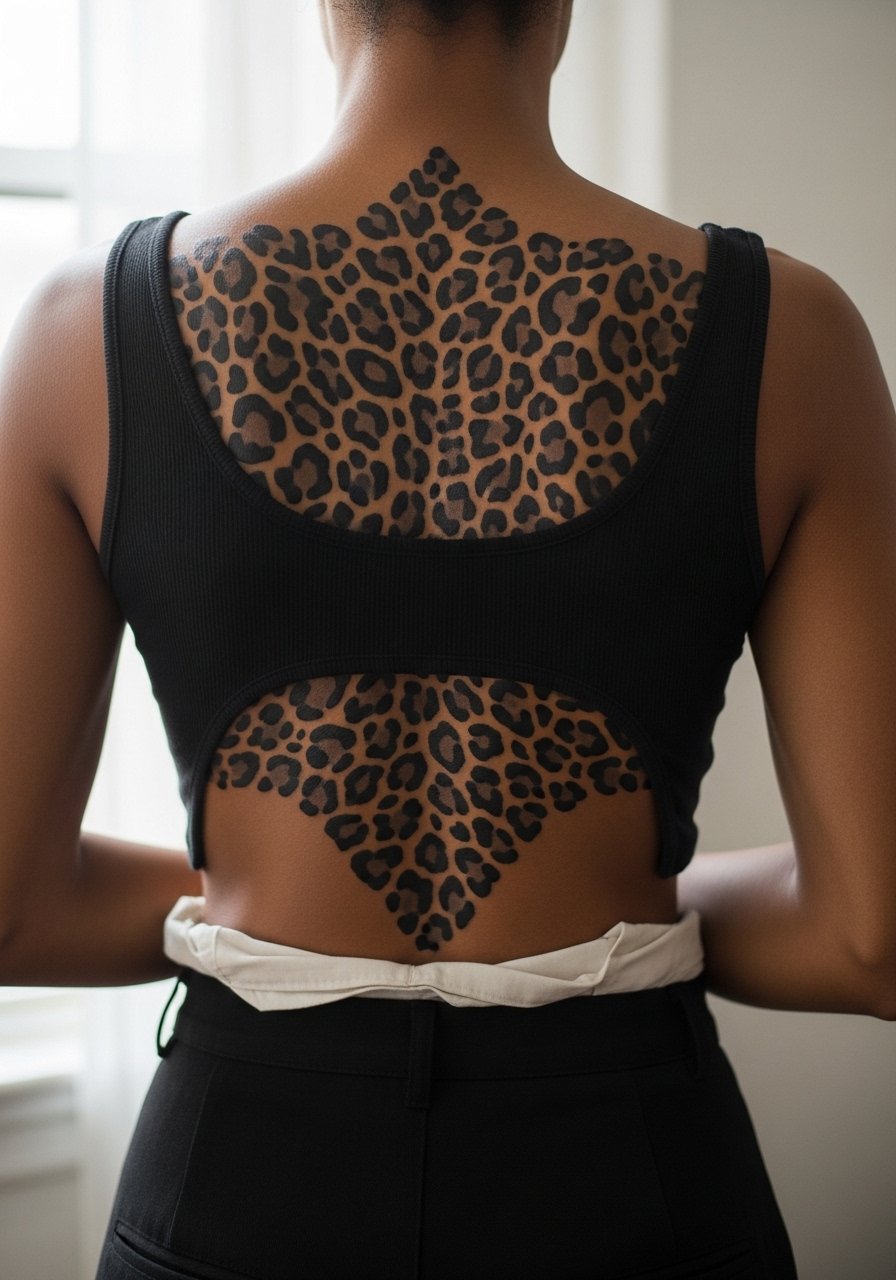
A full back panel lets negative space form the pattern by leaving skin between spots. This technique reads well from a distance and keeps the back from becoming visually heavy. Sessions are long and will be spread across multiple appointments. Ask your artist how they plan negative spacing so the pattern breathes with your shoulder blades and spine. A common mistake is overfilling the surface. Expect a multi-stage process with an initial layout session followed by saturation and blending.
Frequently Asked Questions
Q: How do black and grey leopard spots age compared to color pieces on the forearm and wrist?
A: From what I have seen, black and grey holds contrast longer on forearms than wrists because the wrist gets more friction and washing. Keep spots slightly larger and plan for touch-ups at year two to three for wrist work. Forearms often need less frequent touch-ups if spacing is generous.
Q: Will fine stipple shading in the leopard spots blur on the ribs or sternum?
A: It depends on scale and placement. Ribs move a lot with breathing so tiny stipple work is at higher risk. One camp of artists recommends larger spots on ribs. The other says careful needle depth can keep detail. If you love stipple, ask for slightly bolder anchors and expect a check-in touch-up at year two.
Q: Which clothing should I bring for a thigh or hip session to make the artist's access easier?
A: For those areas, loose shorts, a wrap skirt, or high-waisted bottoms you can shift are best. I usually suggest something you can step out of partially so the artist can work without the fabric pressing on the area. A single affiliate example that matches this idea is a pair of loose linen shorts.
Q: Do finger and hand leopard spots need more frequent touch-ups than other placements?
A: Yes. Hands and fingers shed and face constant washing and friction. Expect to plan for touch-ups earlier, often within the first year. Keep spot shapes bolder and avoid micro detail if you want longer-lasting clarity.
Q: How should I brief my artist if I want a sleeve that mixes solid spots and stipple textures?
A: Bring images that show transitions in scale and texture and describe where you want bold anchors versus airy fields. Ask for a layout session so the artist can map size changes along the arm. Also discuss a multi-session plan and a realistic touch-up timeline.
Q: Are there cultural concerns with leopard patterning I should consider?
A: Leopard print itself is a decorative animal pattern rather than sacred iconography. If you plan to combine it with cultural motifs like mandalas or tribal imagery, ask your artist about origin respect and opt for stylized interpretations rather than direct replicas.
