
Fine line tiger eyes can look delicate at first and still read crisp years later if the artist spaces the lashes and uses minimal dot work around the pupil. Trend photos push hyper-saturated palettes and extreme detail. The reality is that placement and spacing dictate longevity more than how loud the colors are. These 21 designs show practical ways to keep color vivid and linework readable over time.
1. Inner Forearm Fine Line Tiger Eye
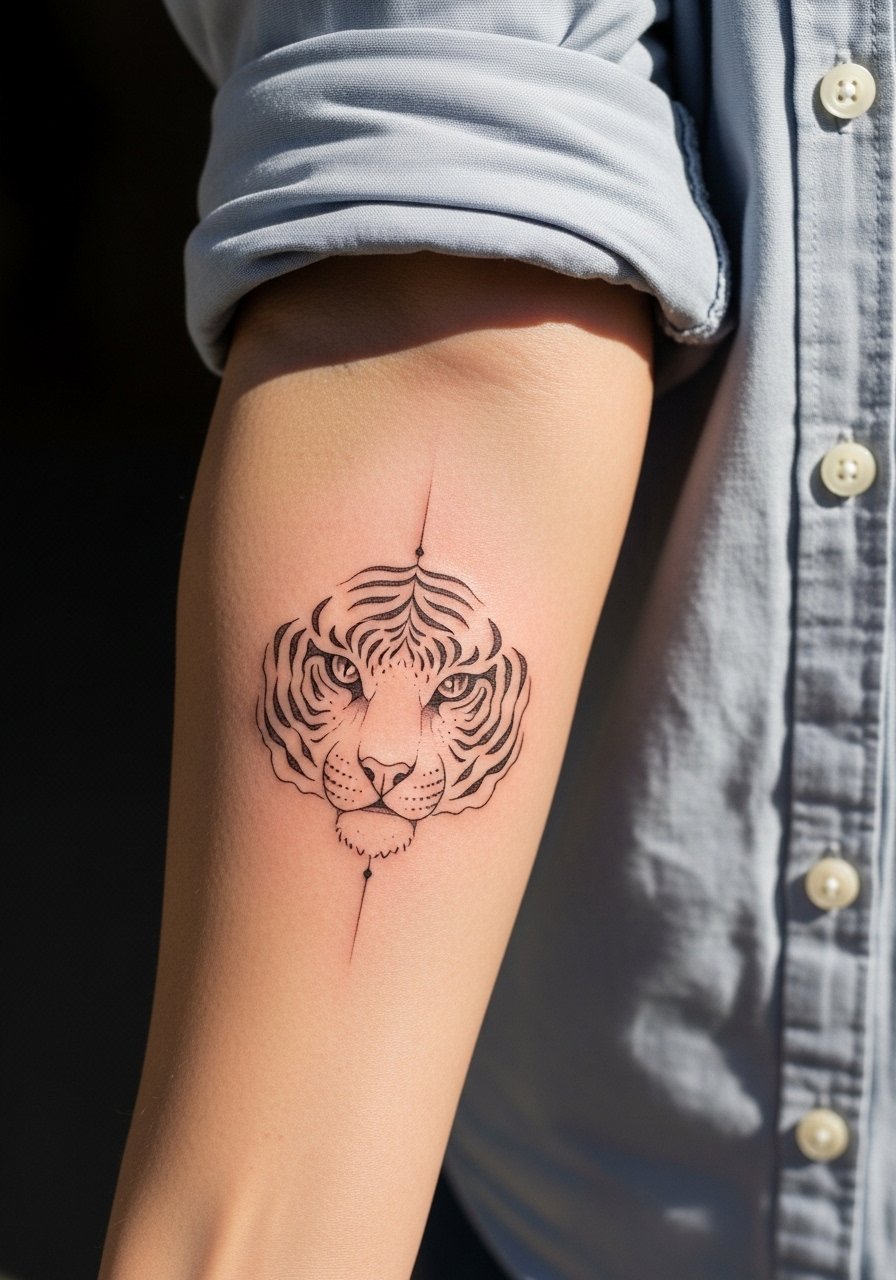
I've seen inner forearm pieces hold detail better than wrist tattoos because the skin moves less when you type or gesture. Ask your artist for slightly wider lashes and crisp dot work instead of dense stippling. Pain sits around a 3 to 4 for most people and session time is usually under an hour. Common mistakes are asking for micro texturing inside the iris that clumps as it heals. Expect touch-ups at year two to refresh saturation, especially with bright oranges. For showing it off, try a rolled linen shirt with sleeves pushed up so the eye reads clearly against neutral fabric.
2. Outer Forearm Color-Blocked Tiger Eye
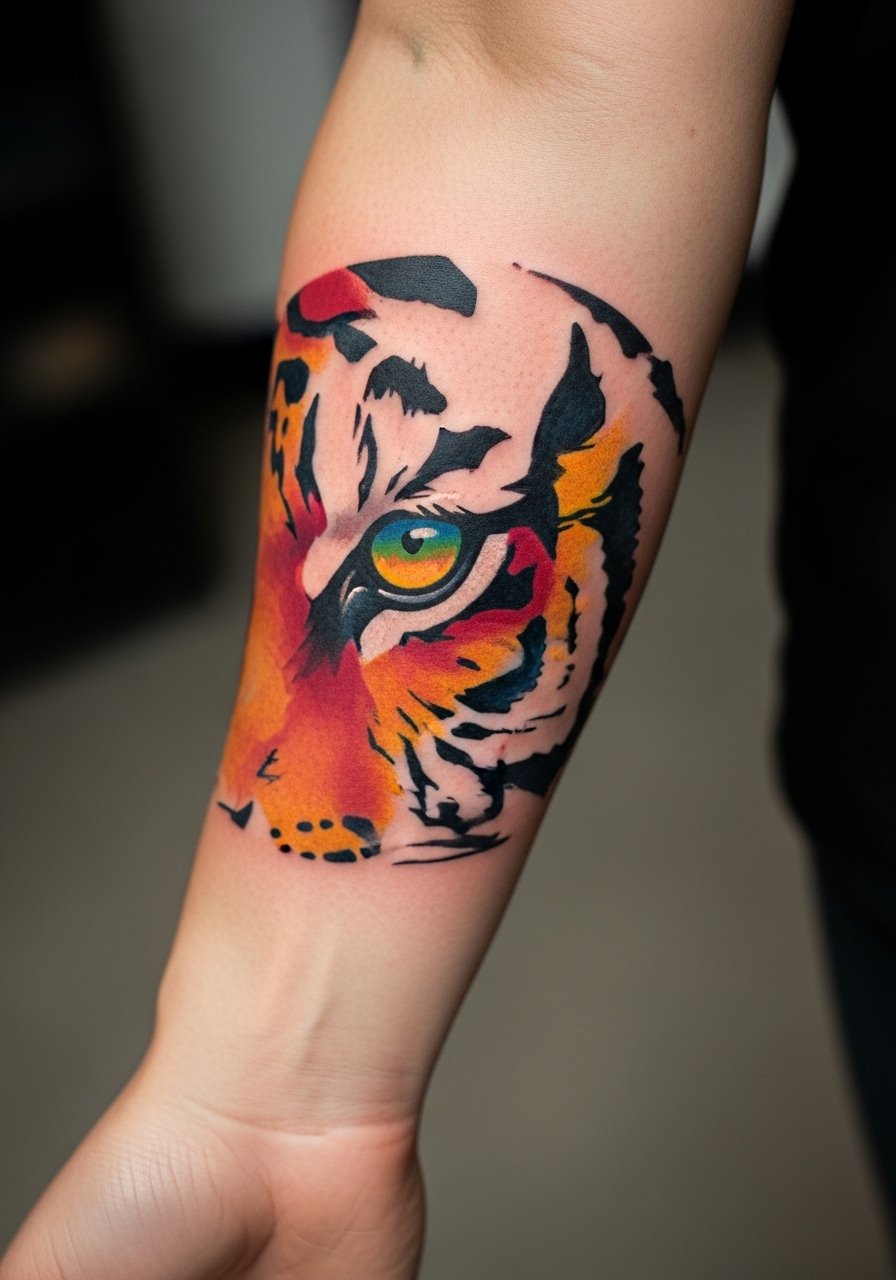
Visual impact leads here. Bold outlines with saturated color fields keep a tiger eye readable from a distance and they simplify touch-up work later. Tell your artist you want clean saturation patches rather than painterly washes. Pain is mild and sessions run 60 to 90 minutes depending on color layering. Aging tends to favor solid fields over fine gradient fills, which often splotch after a couple of years. A real mistake is asking for tiny color gradients inside the pupil. Pair this with a minimalist leather cuff to frame the forearm without competing with the color.
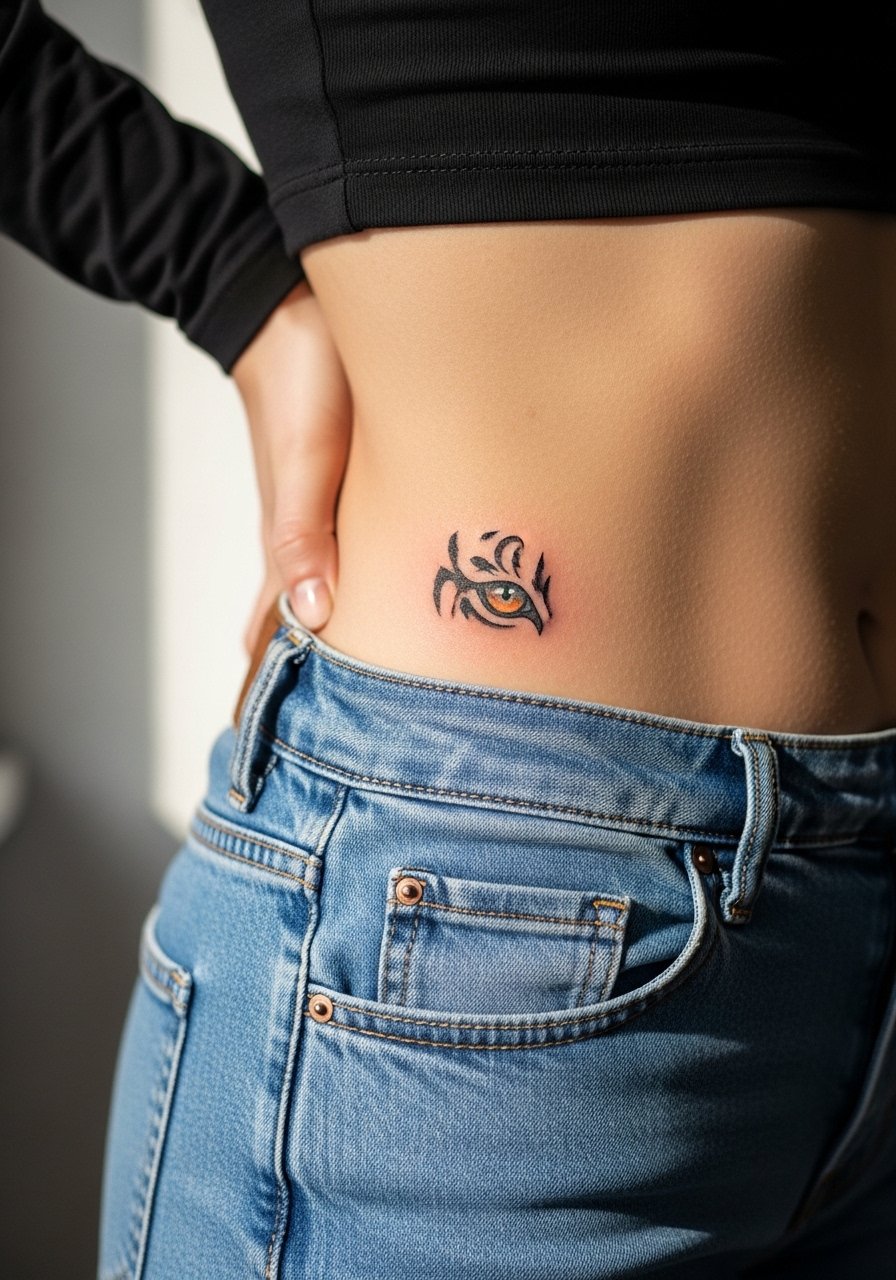
3. Tiny Wrist Tiger Eye with Dot Work Halo
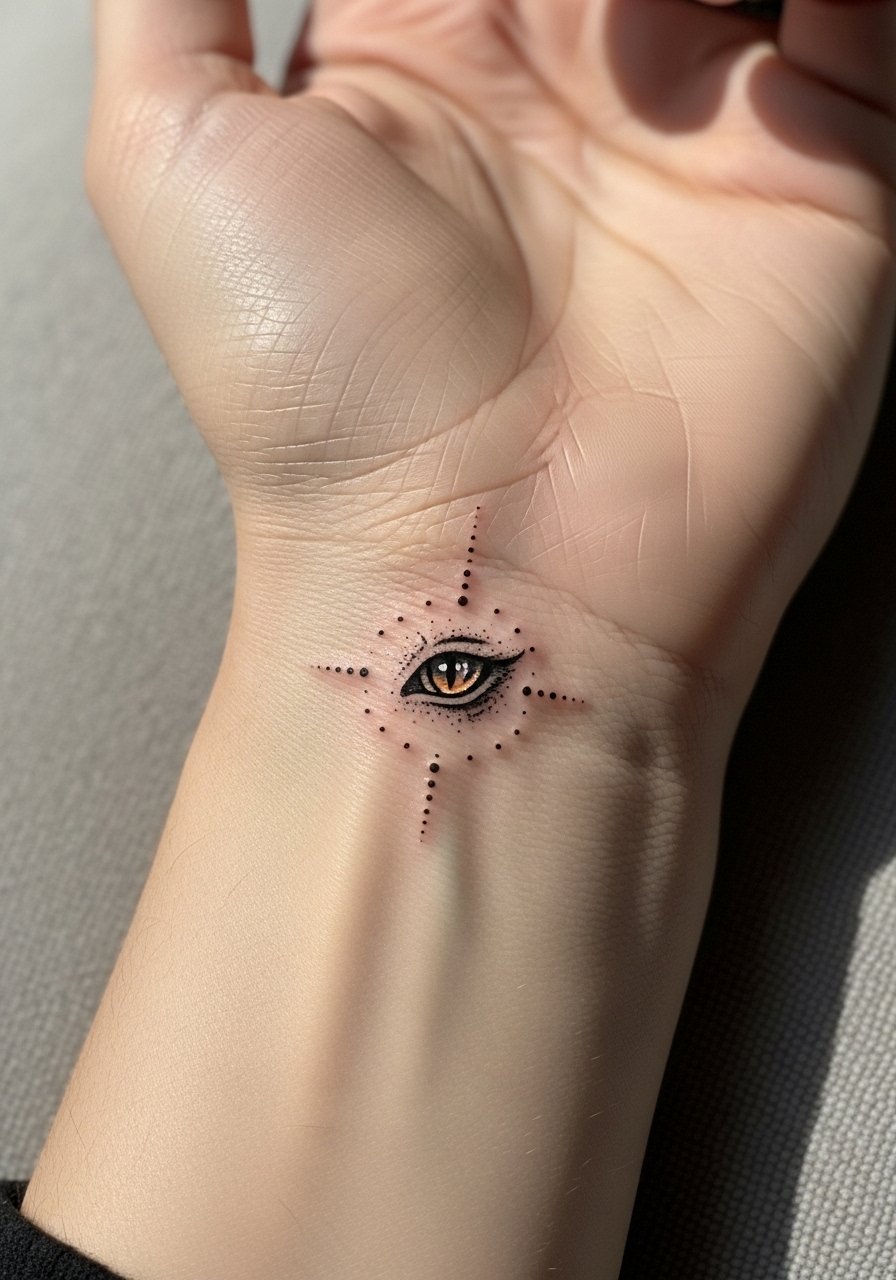
Fair warning: the wrist is a high-friction zone and the thin skin makes tiny detail blur faster. Keep the eye slightly larger than you think and ask for a clean halo of dot work spaced out enough to avoid early merging. Session time is short, usually 30 to 45 minutes, but expect touch-ups sooner than forearm pieces. Blowout risk exists on very thin wrists. Wear a thin chain bracelet to draw attention away from the edges and protect the immediate area from constant rubbing.
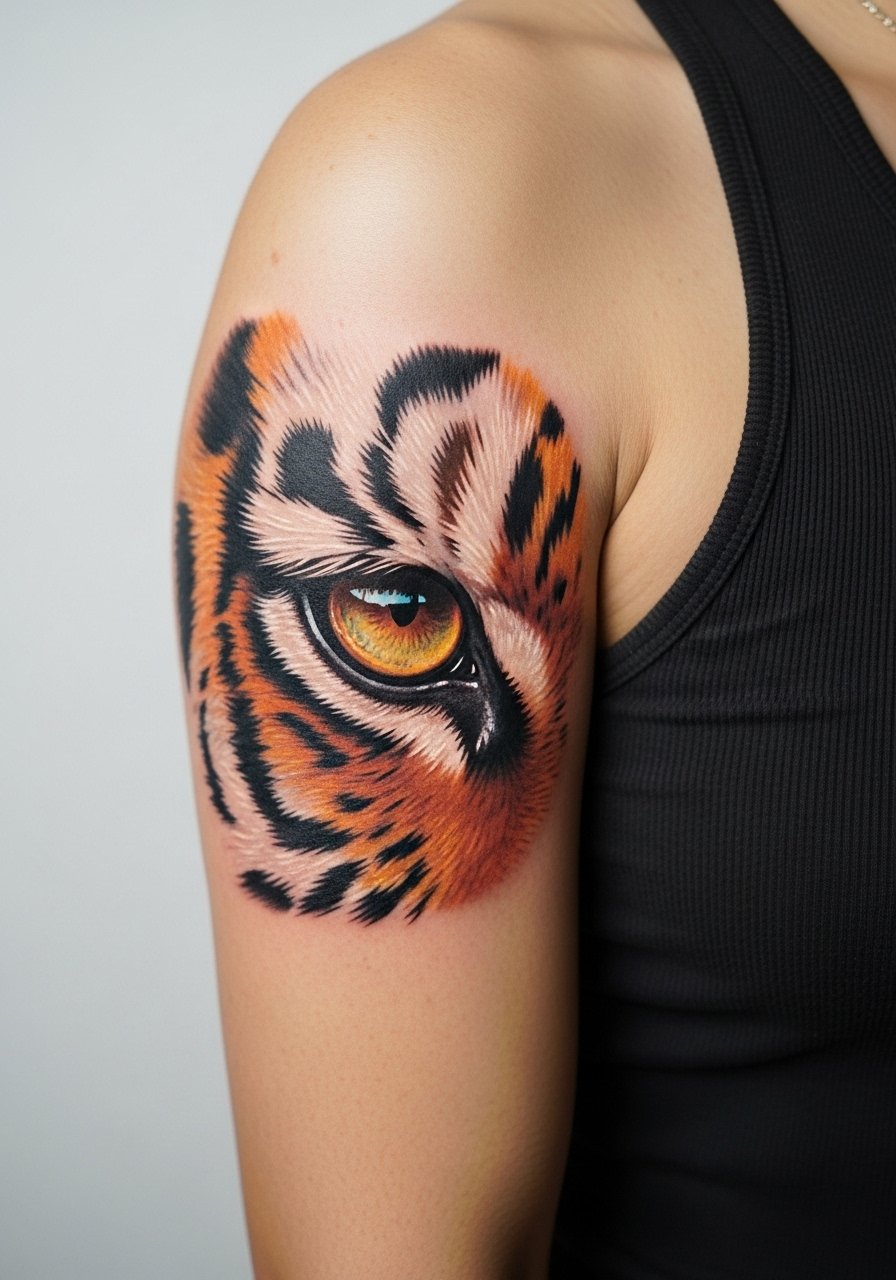
4. Shoulder Cap Micro-Realism Tiger Eye
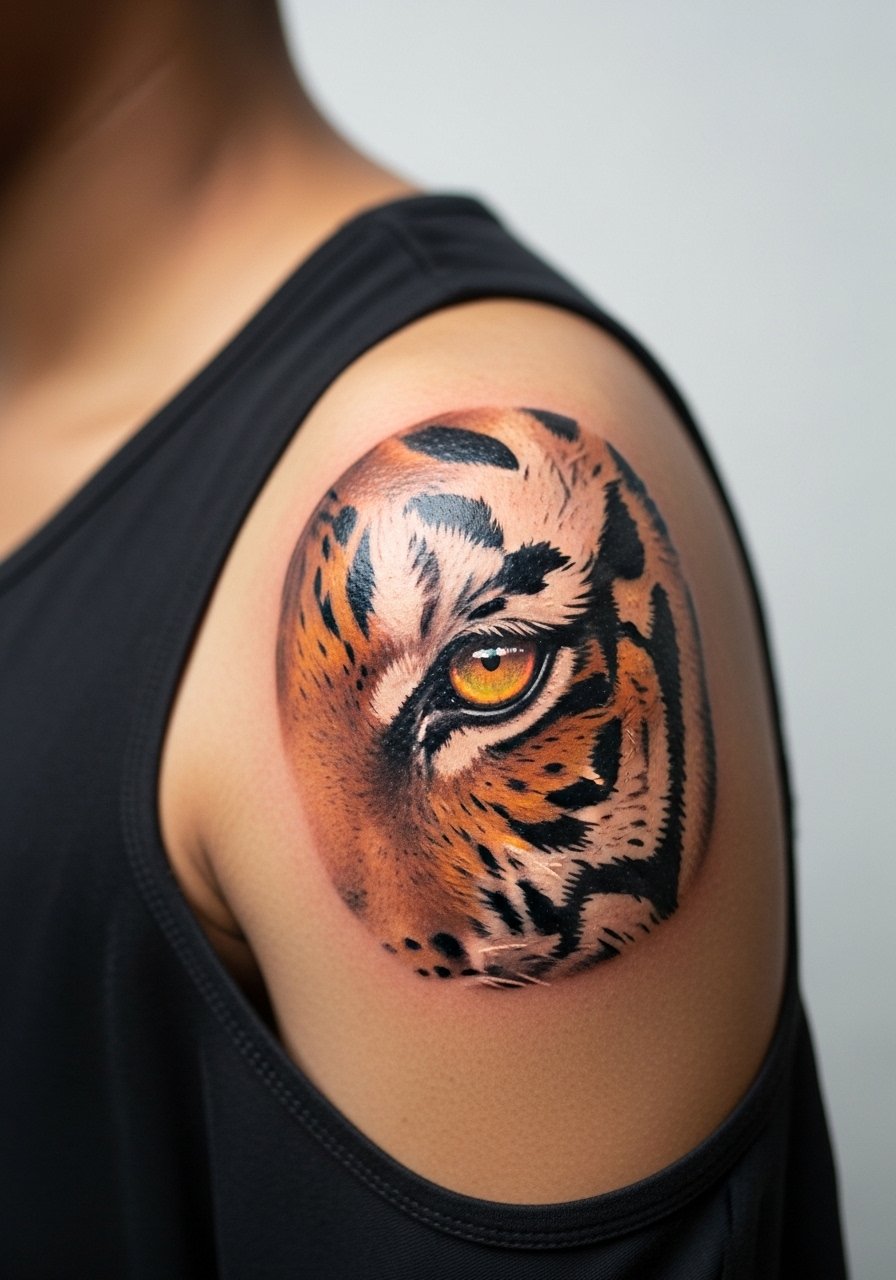
When you sit down with your artist for a shoulder piece, bring close-up references of real irises so the shading reads like glass rather than paint. Pain is mild and most sessions for a single eye run 90 to 150 minutes depending on color complexity. A common version that ages poorly uses too many tiny highlights that merge into white smudges after a year. This placement avoids daily friction so saturation tends to last longer. For the session wear, choose a loose tank top you can pull aside, and for showing it off a sleeveless dress frames the cap without overcrowding the shoulder.
5. Ankle Mini Tiger Eye with Geometric Frame
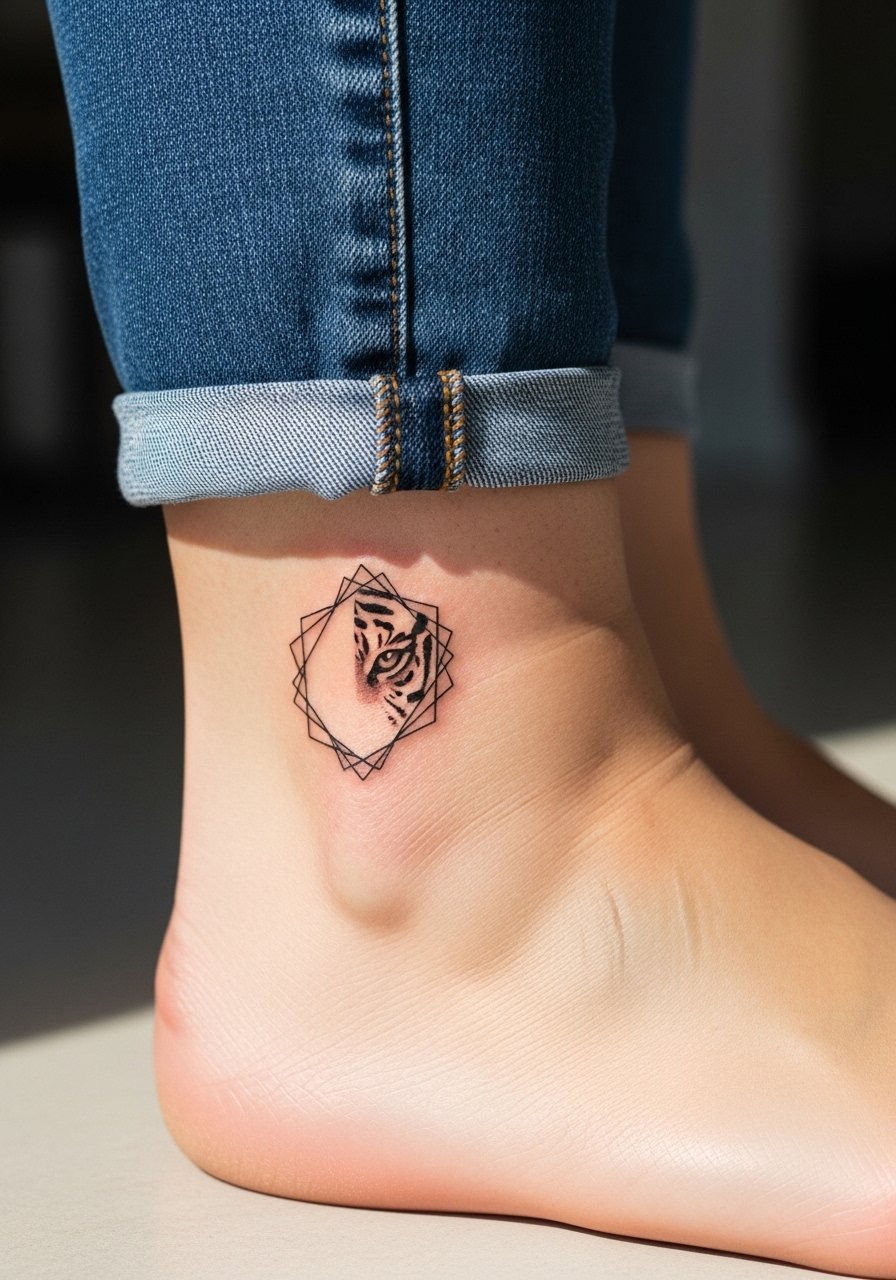
Visual impact lead works here because ankle pieces must read through footwear and socks. The geometric frame helps the eye hold its shape as color fades. Tell your artist to avoid heavy black packing close to the edge, which can migrate under thin ankle skin. Sessions are brief, often under an hour, but the area is prone to scabbing from shoe friction. Expect touch-ups at year two for color refresh. For the appointment, wear shoes you can remove easily and bring a pair of no-show socks so the artist can access the ankle without dragging fabric over the fresh tattoo.
6. Ribcage Watercolor Tiger Eye

Artists split on fine watercolor on ribs. One camp says the skin stretch and breathing blur soft washes within eighteen months. The other camp says with careful layering and intentional spacing, watercolor can settle beautifully on ribs. Pain on the ribcage is higher, often a 7 out of 10, and sessions are longer because of shifting breath. A big mistake is asking for dense color gradients with no negative space. For this placement, wear a cropped top that you can lift easily so the artist has access. Expect a touch-up to re-saturate washes after year two.
Studio Day Picks
Those ribcage and shoulder sessions above need different prep than quick wrist work. A few targeted items smooth the session and the first week of healing.
-
Stencil transfer paper kit. Lets you preview placement and line weight on skin before committing, which is useful for asymmetrical ribcage and ankle pieces.
-
Cooling gel pads. Help take the edge off longer shoulder or rib sessions without numbing the area so much that line depth is compromised.
-
Thin protective film roll. Keeps wrist and ankle tattoos cleaner during the first week of frequent washing and friction.
-
Fragrance-free saline spray. Gentle cleansing for areas that brush clothing often, like the forearm and collarbone zones.
-
Aquaphor healing ointment. A thin layer during the first few days helps seal in moisture for tight linework on places like the wrist and finger without clogging.
7. Collarbone Realistic Tiger Eye with Soft Background
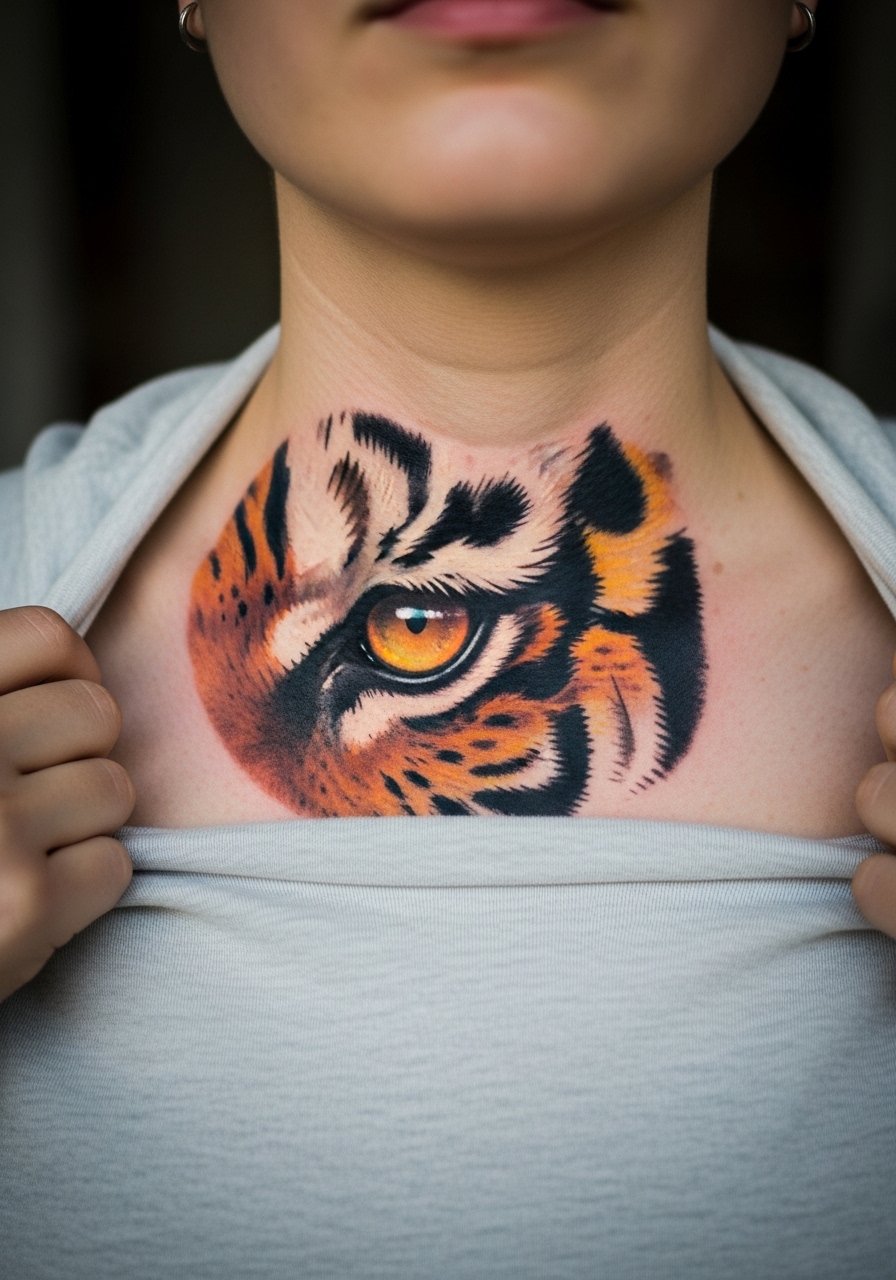
Aging reality lead fits here because collarbone tattoos are exposed to sun and clothing seams. Ask for a subtle soft wash behind the eye rather than a heavy background so the piece reads against shirts. Pain is a 5 for many people and sessions are typically 60 to 120 minutes. The common mistake is placing the eye too close to the collarbone notch, which creates distortion when you move. For showing it off, pair with an open collar blouse that keeps attention on the area without rubbing the tattoo during daily wear.
8. Calf Portrait-Scale Tiger Eye with Surrounding Flora

Personal observation lead. Big calf pieces let you add botanical frames that age better than tight detail. Tell your artist you want saturated edges and room between the eye and surrounding leaves. Pain is moderate and sessions can last two hours for a single large eye. The mistake is cramming in tiny highlights and linework similar to facial detail. Those elements blur over time on the calf. For outfits, calf work pairs well with mid-length skirts or boots that show the lower leg.
9. Thigh Hidden Tiger Eye with Subtle Color Bloom
Consultation lead. For thigh placement, request a slightly larger pupil and a soft color bloom rather than tiny stipple highlights. The thigh is forgiving for saturation so colors often remain vibrant. Pain is lower and sessions vary widely based on size. Common mistakes include asking for extremely fine textures that look great fresh but soften into blobs as the skin stretches. For the session, wear loose shorts and consider a high-waisted jean you can shift so the artist has access without feeling exposed.
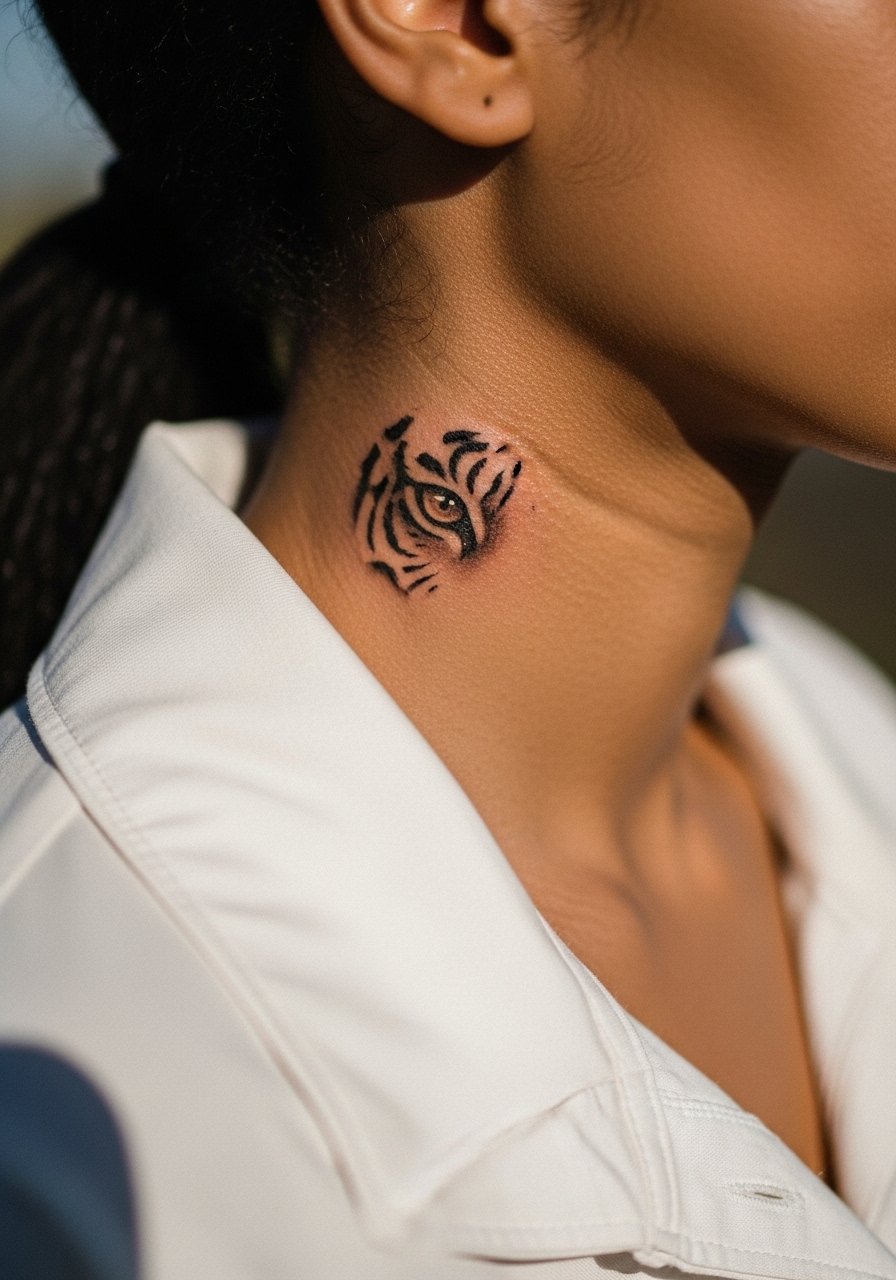
10. Back of Neck Small Tiger Eye Accent
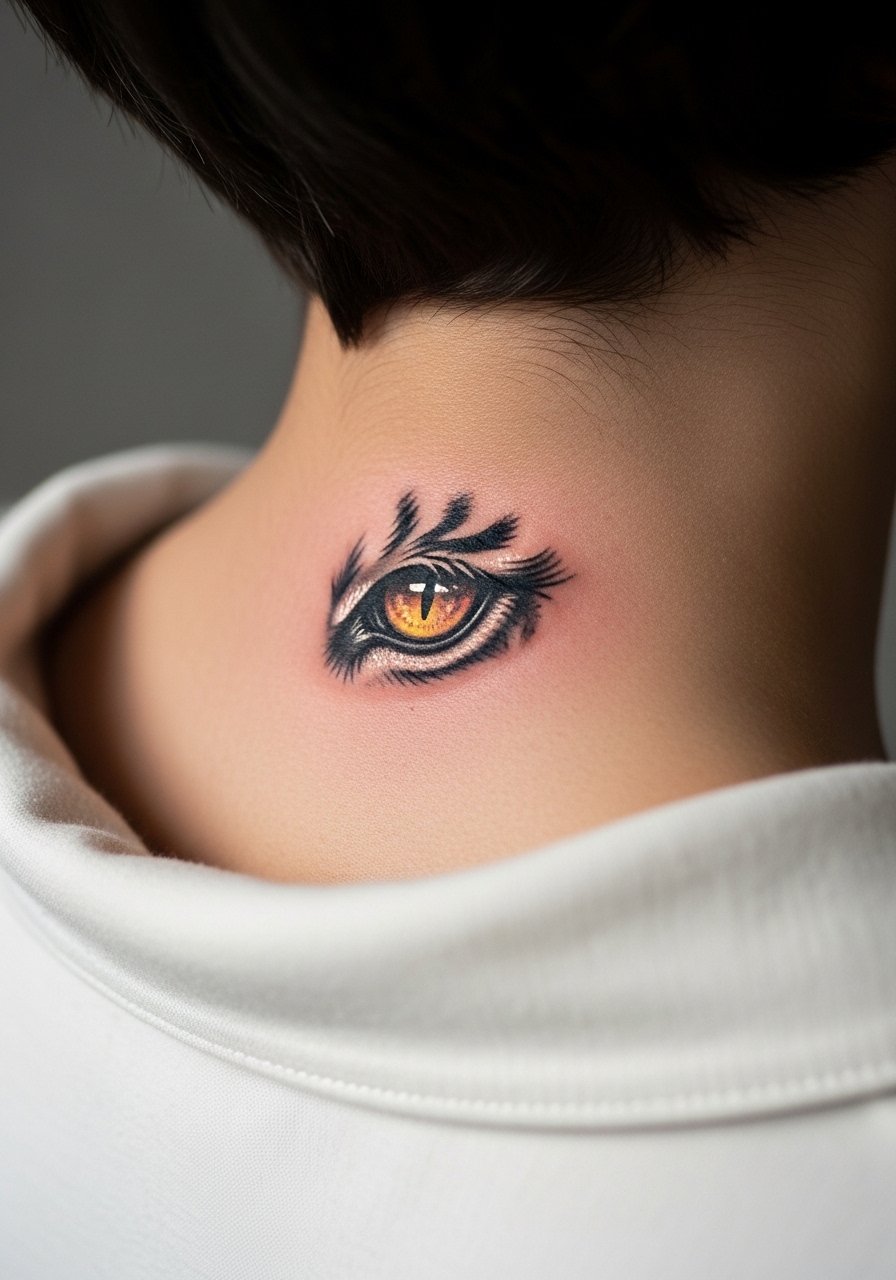
Mistake lead. The back of the neck reads best as an accent. Common errors are over-detailing a tiny piece and expecting it to stay crisp. Pain varies with individual sensitivity and sessions are short. This placement is visible in certain hairstyles and hidden with others, so think about your daily look during consultation. For showing it off without overexposure, try a wide-neck knit that can be pulled aside when you want to reveal the piece.
11. Hand-Side Tiger Eye with Minimal Shading
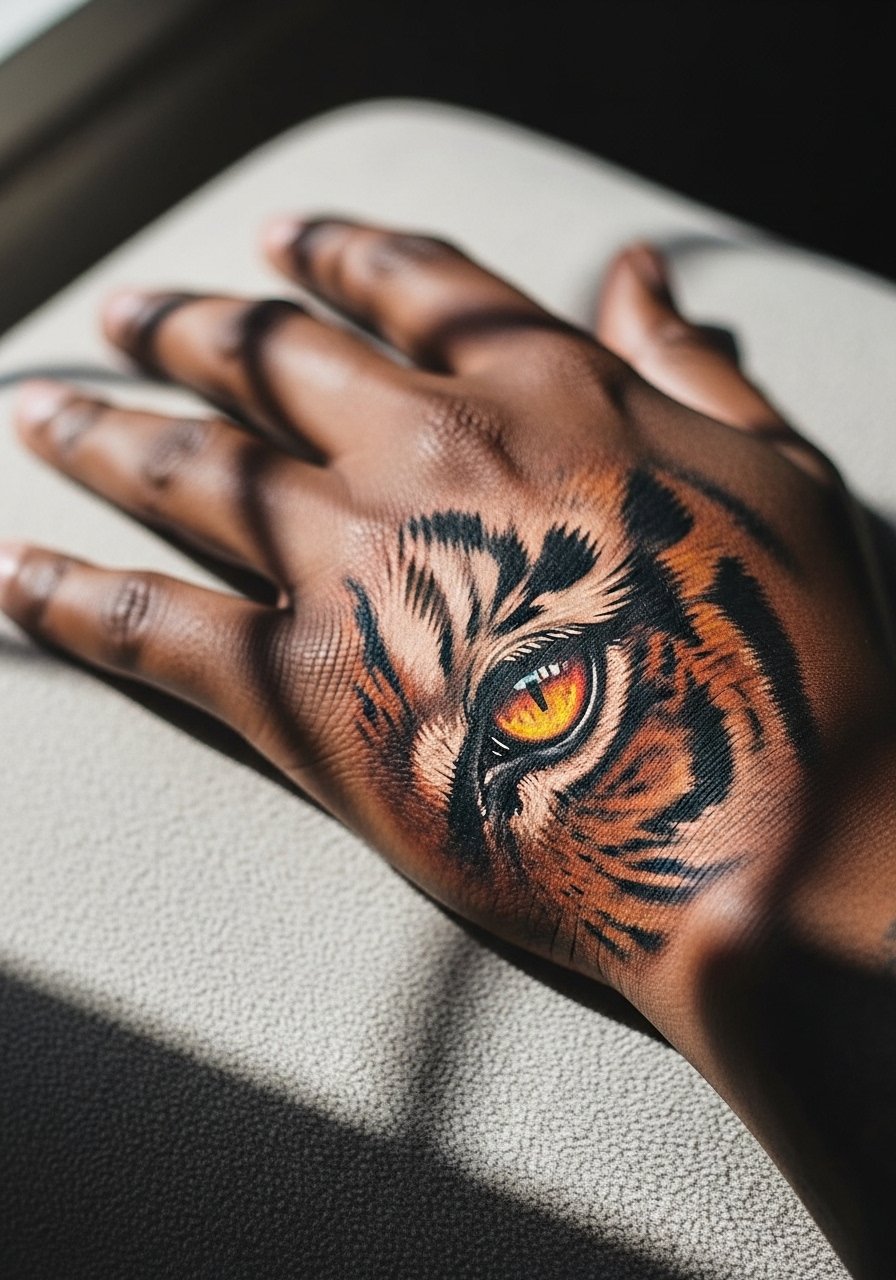
Controversy lead applies to hand tattoos because artists debate their workplace impact and longevity. One camp warns that hand skin and constant washing lead to early fading. The other camp says careful placement with bold contours can last surprisingly well if maintained. This placement is high friction and often needs touch-ups at year one. Pain is high for many people and session times are short. If you want to show it off, pair the piece with thin rings rather than chunky bands. Also consider that some workplaces still frown on visible hand tattoos.
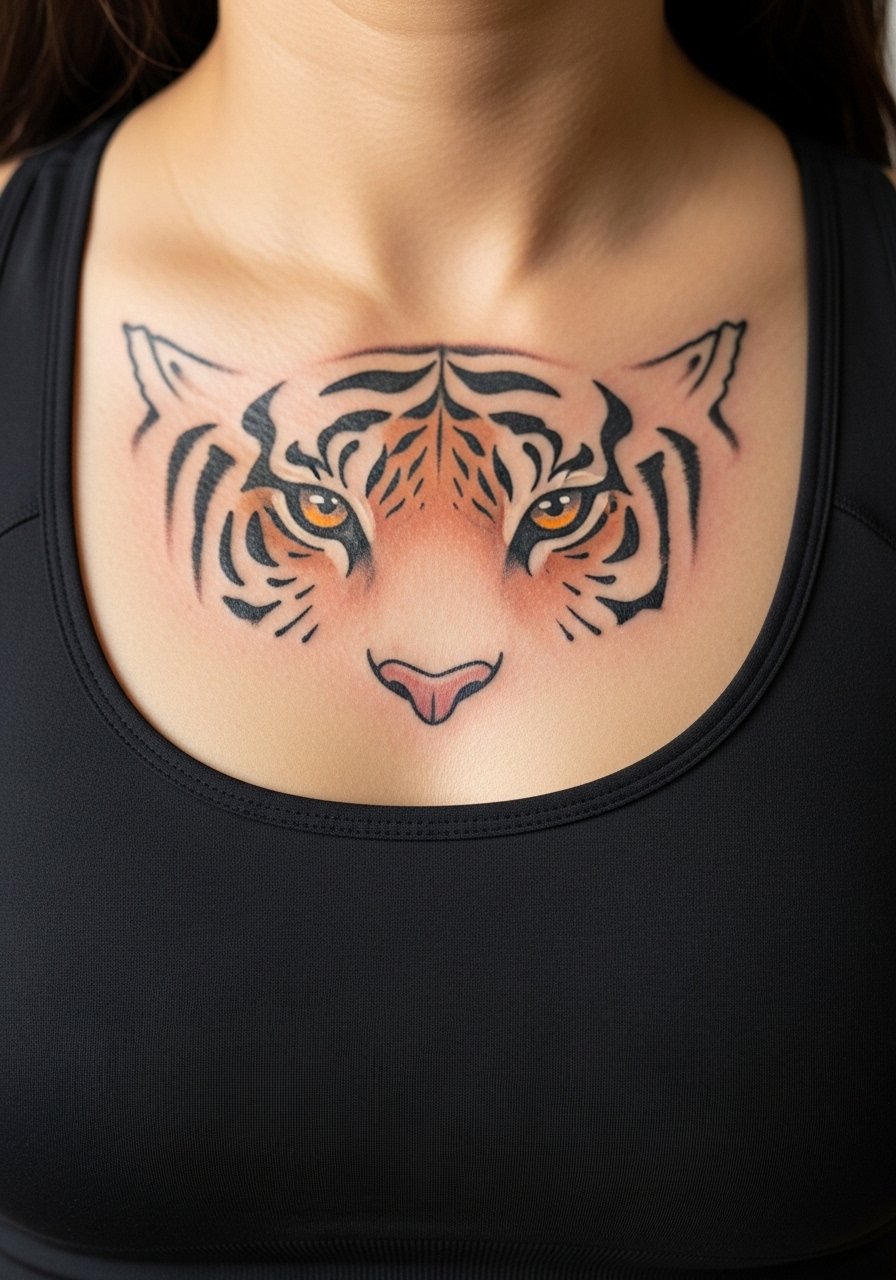
12. Upper Chest Pairing: Two Eyes with Mirrored Colors
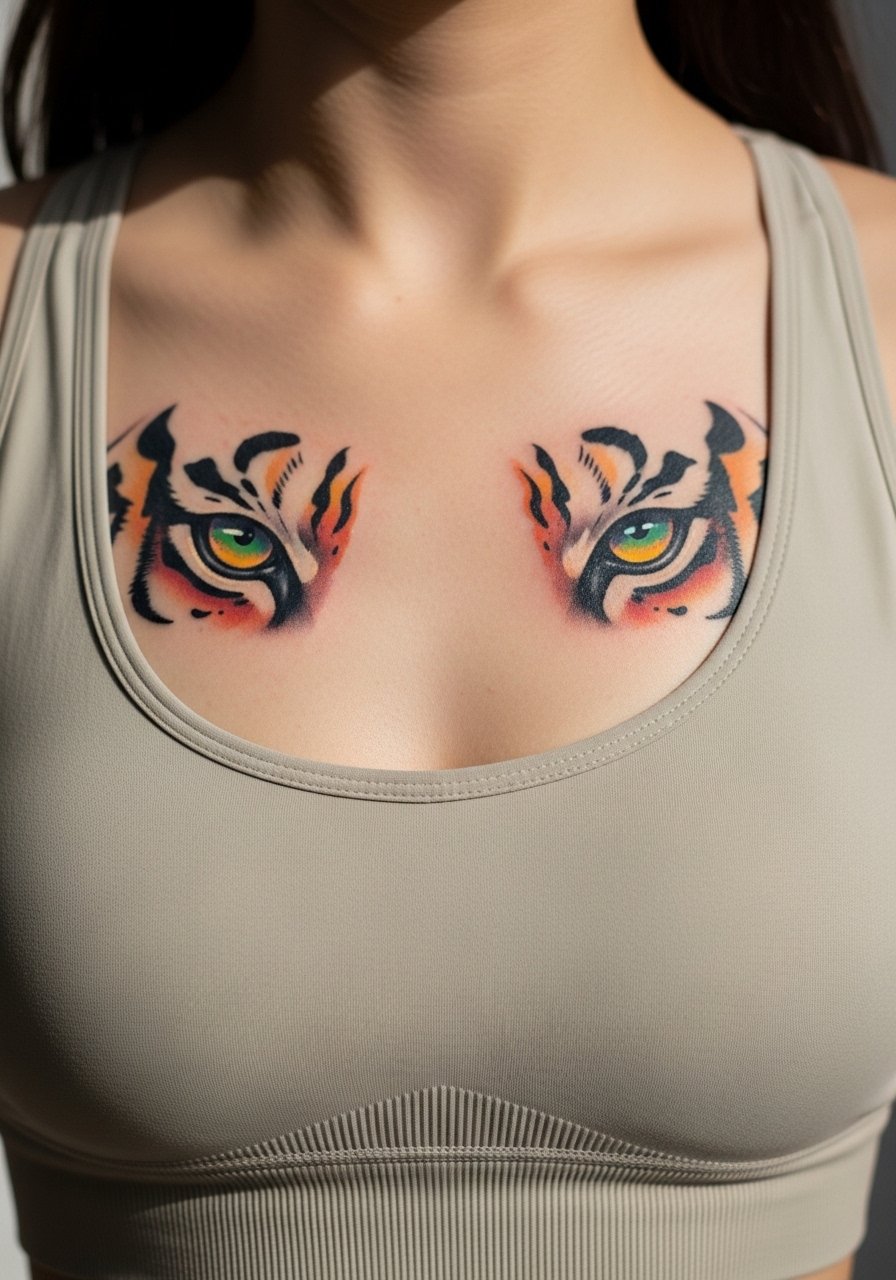
Aging/healing lead. Dual chest pieces let you play with mirrored palettes so each eye balances the other as color fades. The chest sees sun exposure and clothing friction which can dull bright pigments faster than darker tones. Pain runs a 6 for many people and sessions vary with size. A common mistake is putting the pair too close together, which causes visual merging when your chest moves. For the session, wear a fitted top you can unzip or pull aside for easy access.
13. Lower Back Tiger Eye with Blackwork Anchor
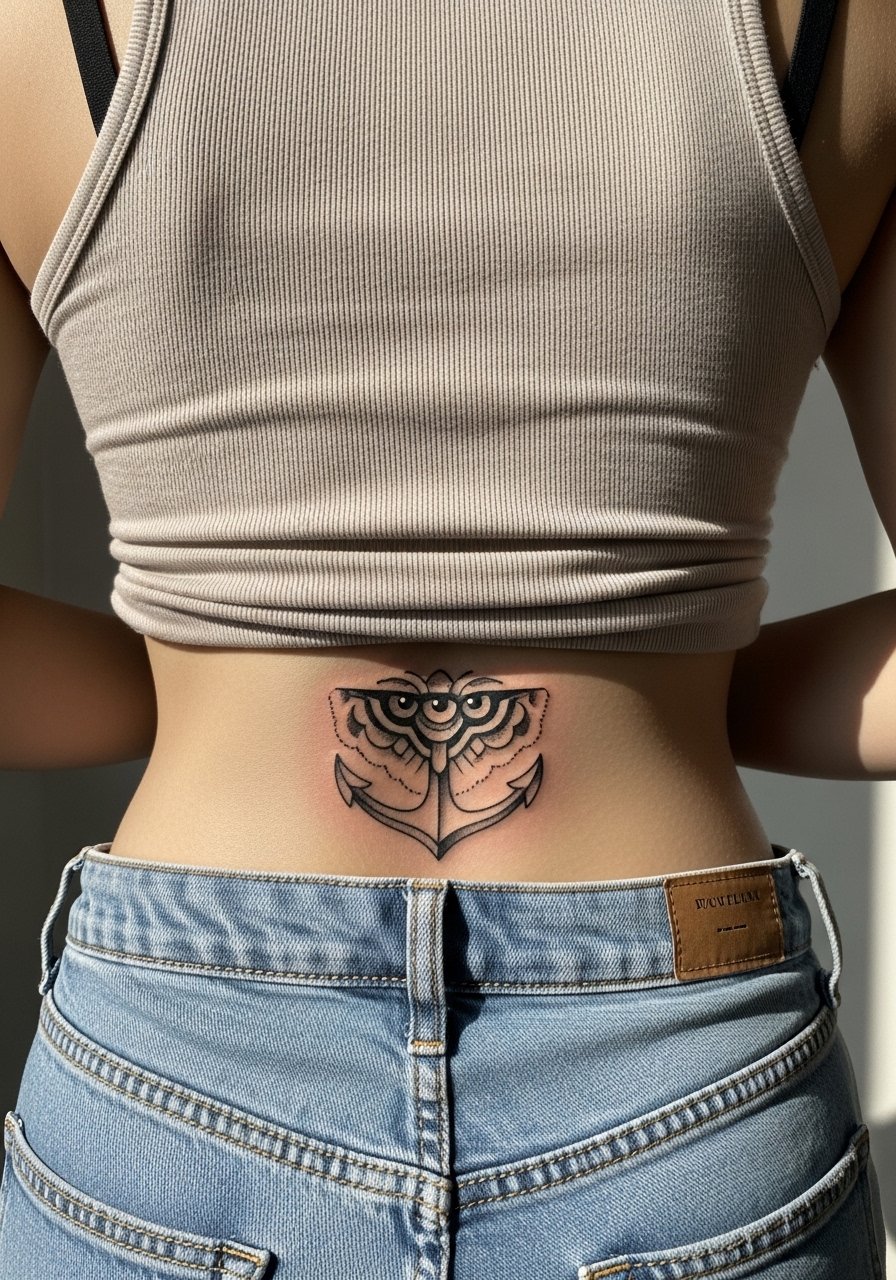
Visual impact lead. Combining blackwork anchors with a colorful iris gives longevity because black lines hold up best. Tell your artist you want the black anchor thicker at the base and the color to sit inside that frame. Pain on the lower back is moderate and sessions can be lengthy for large anchor pieces. Mistakes include skinny outlines that migrate under skin. For outfits, low-rise waistlines or cropped tops let the lower back read cleanly while avoiding constant seam pressure.
14. Behind-the-Ear Tiny Tiger Eye Accent
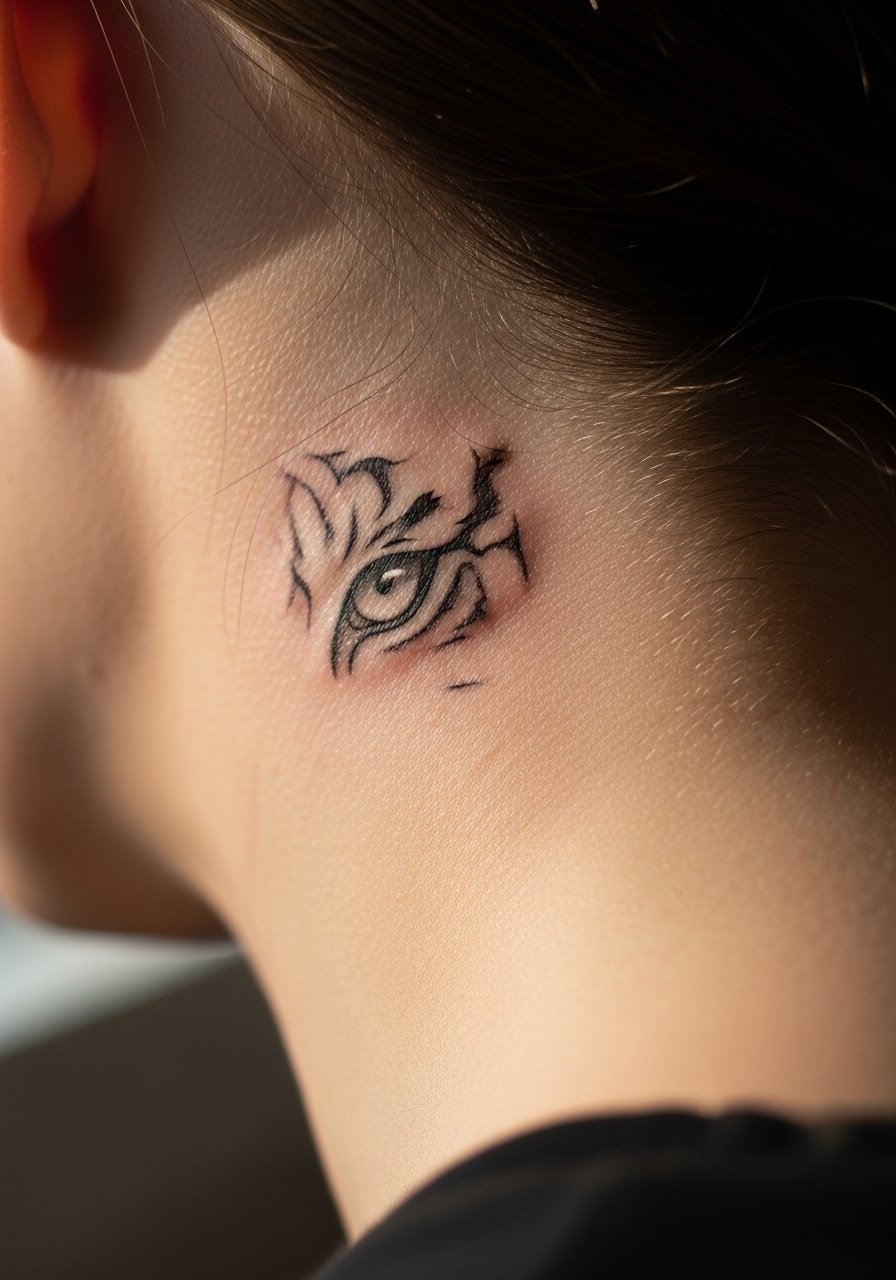
Personal observation lead. Behind-the-ear placements are intimate and subtle. The area needs careful spacing because the skin is thin and the hairline can obscure the work. Pain is lower yet sensitive and session times are brief. A common mistake is expecting a tiny detailed iris to stay sharp. If you want this spot, ask for slightly bolder lashes and a clear negative space around the pupil. For the appointment, pull your hair into a loose bun and bring a thin headband so the artist can see the area without hair falling forward.
15. Finger Side Micro Tiger Eye
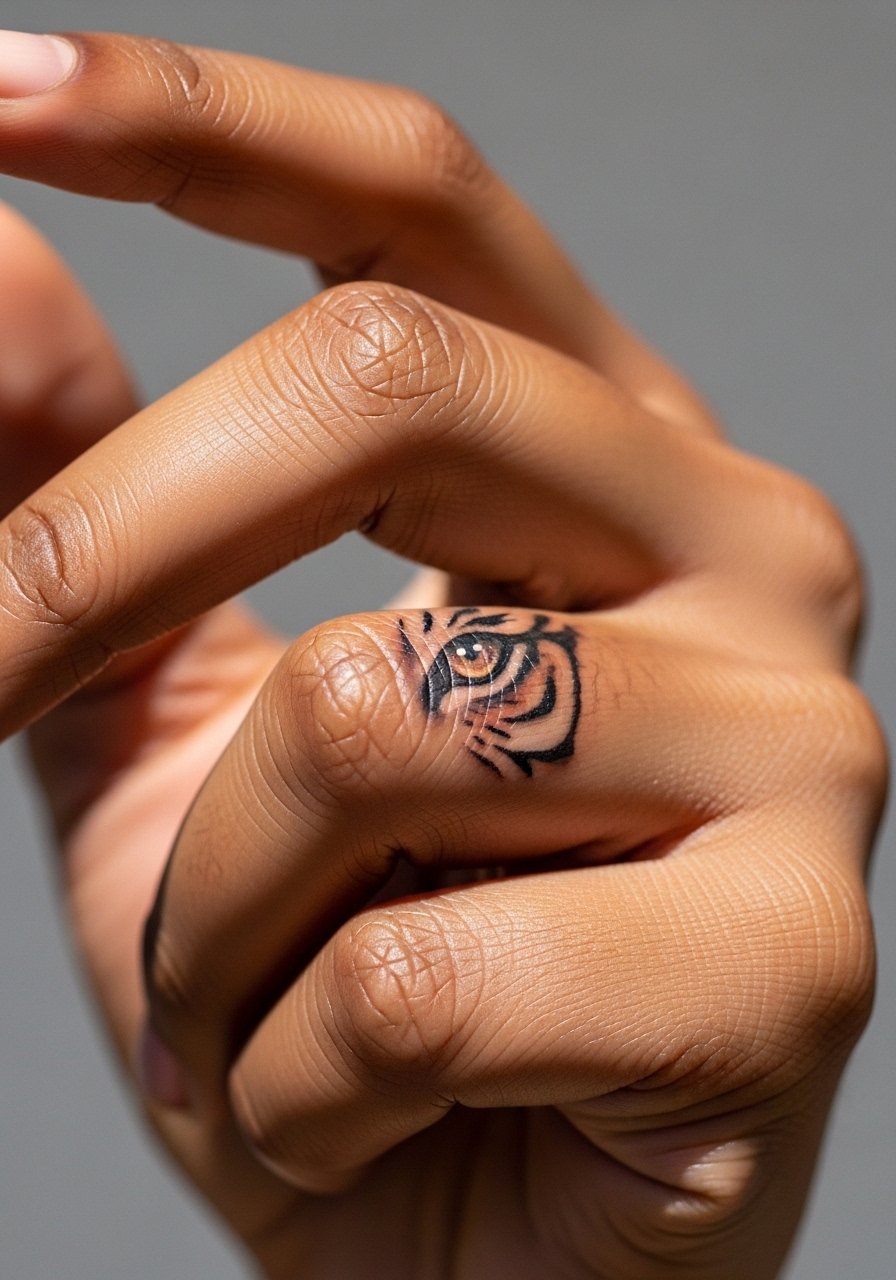
Mistake lead. Finger skin sheds and endures constant contact, so micro details often disappear. Ask for thicker linework and a slightly larger pupil so the essential shapes persist as the outer pigments fade. Sessions are quick but expect the highest touch-up frequency of any placement, often within a year. This design works best as a subtle marker rather than a tiny masterpiece. For showing it off, try a thin, open-band ring that complements the scale without covering the art.
16. Full Sleeve Tiger Eye Motif Cluster
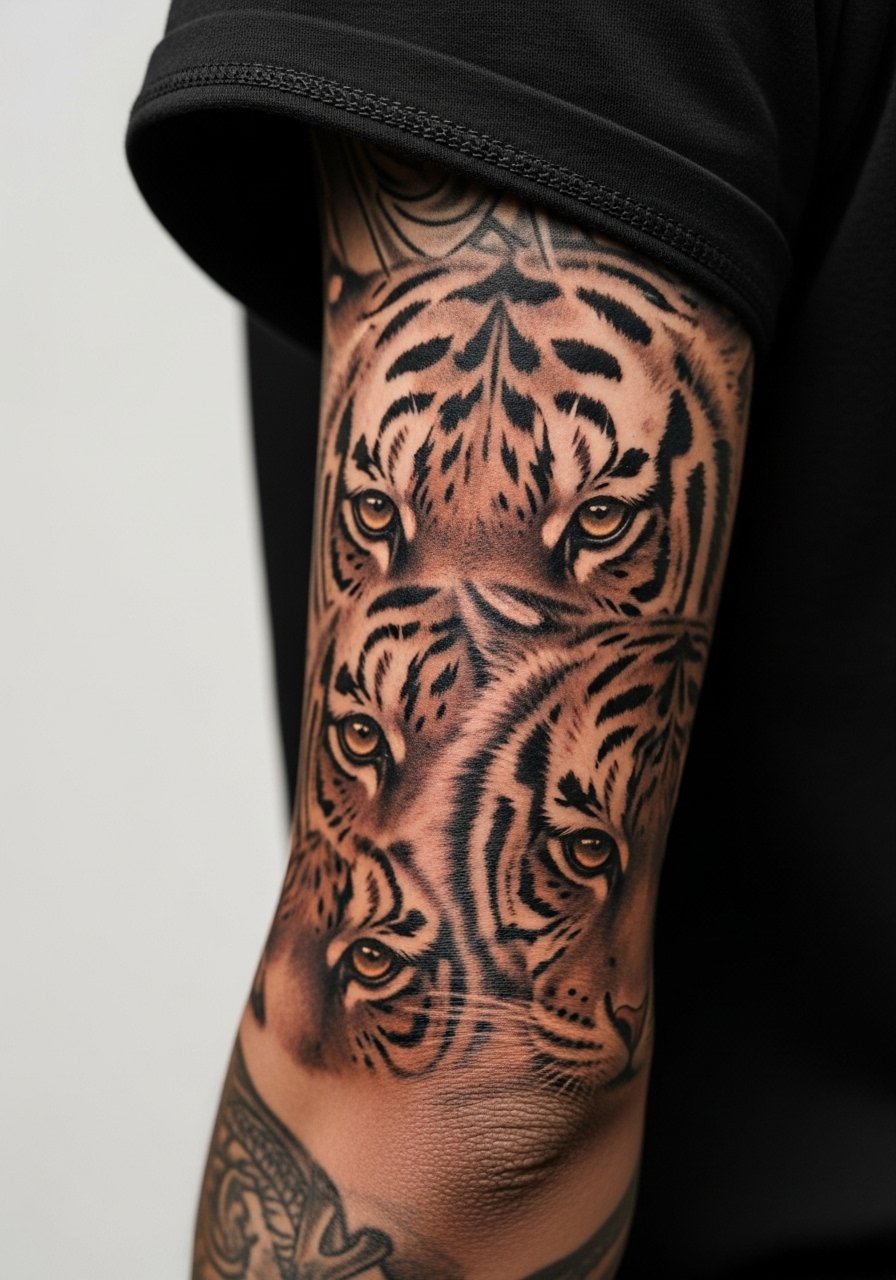
Consultation lead. Sleeve work demands a cohesive plan so each eye connects without visual clutter. Tell your artist how you want negative space to function between eyes and which colors you want to repeat. Sessions are long and multiple visits are standard. A common aging issue is over-detailing every eye in the same tiny scale. Varied scale helps longevity and reduces the need for frequent touch-ups. For showing a sleeve off, rolled short sleeves and a casual button-down shirt let the composition read as a whole.
17. Calf Wrap Tiger Eye Band
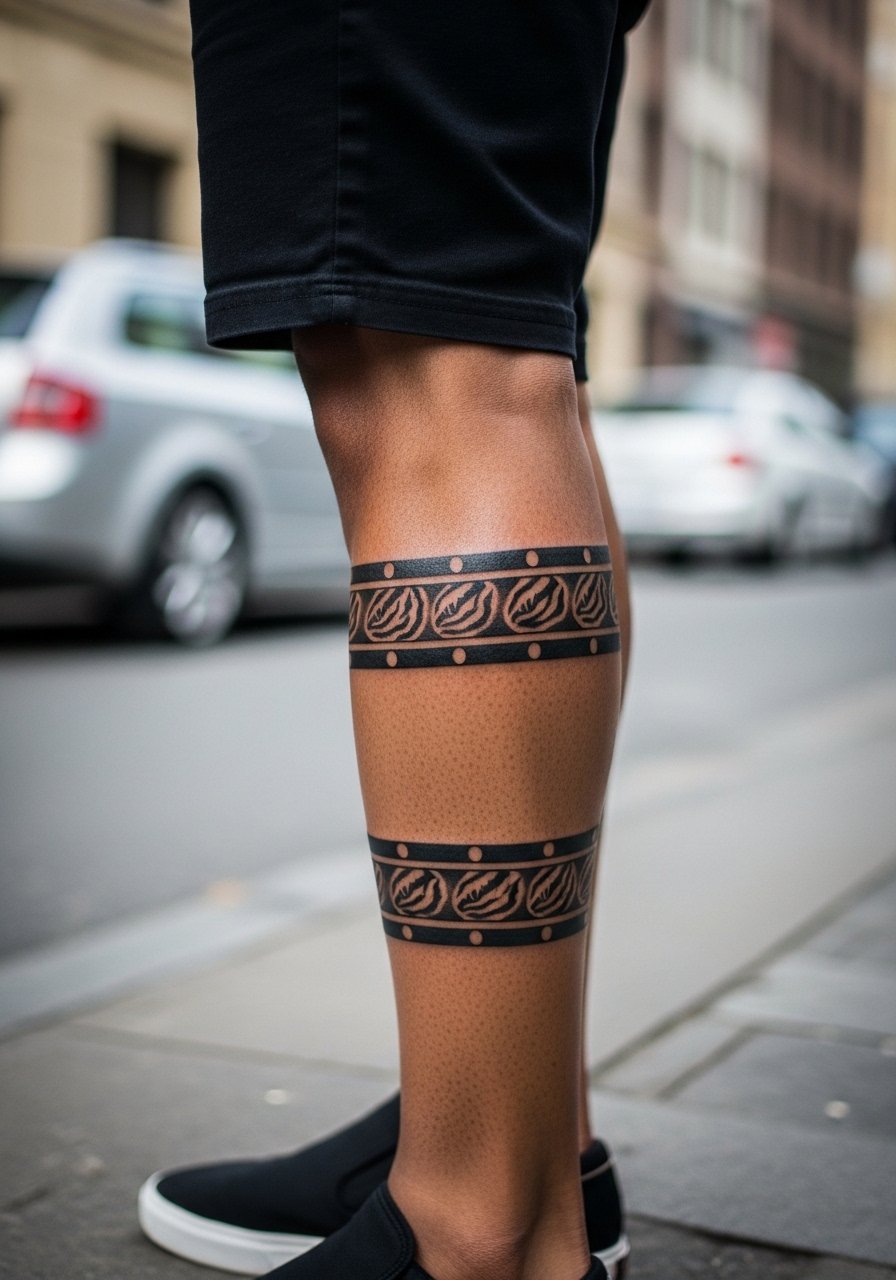
Pain warning lead. Wrap bands can feel tight during sessions because you may need to stand or sit in specific positions for extended minutes. The wrap allows repetition so small fading in one section does not ruin the effect. Avoid asking for ultra-fine interiors in each eye. Those details are the first to fade. Sessions are staged in parts so plan for two shorter visits rather than one long sitting. Pair with a mid-calf boot when you want the band to peek through clothing.
18. Sternum Central Tiger Eye with Radiating Lines
Pain warning lead again because sternum work can be intense. Artists debate whether dense radiating lines are appropriate here. One group warns those lines can blur with the chest’s natural movement. The other group suggests shallower lines with spacing to preserve the radiating effect. Sessions may be split and pain is higher. A common mistake is packing tiny radial details too close to the breastbone. For the session, bring a fitted top you can pull aside so the artist has clean access without discomfort.
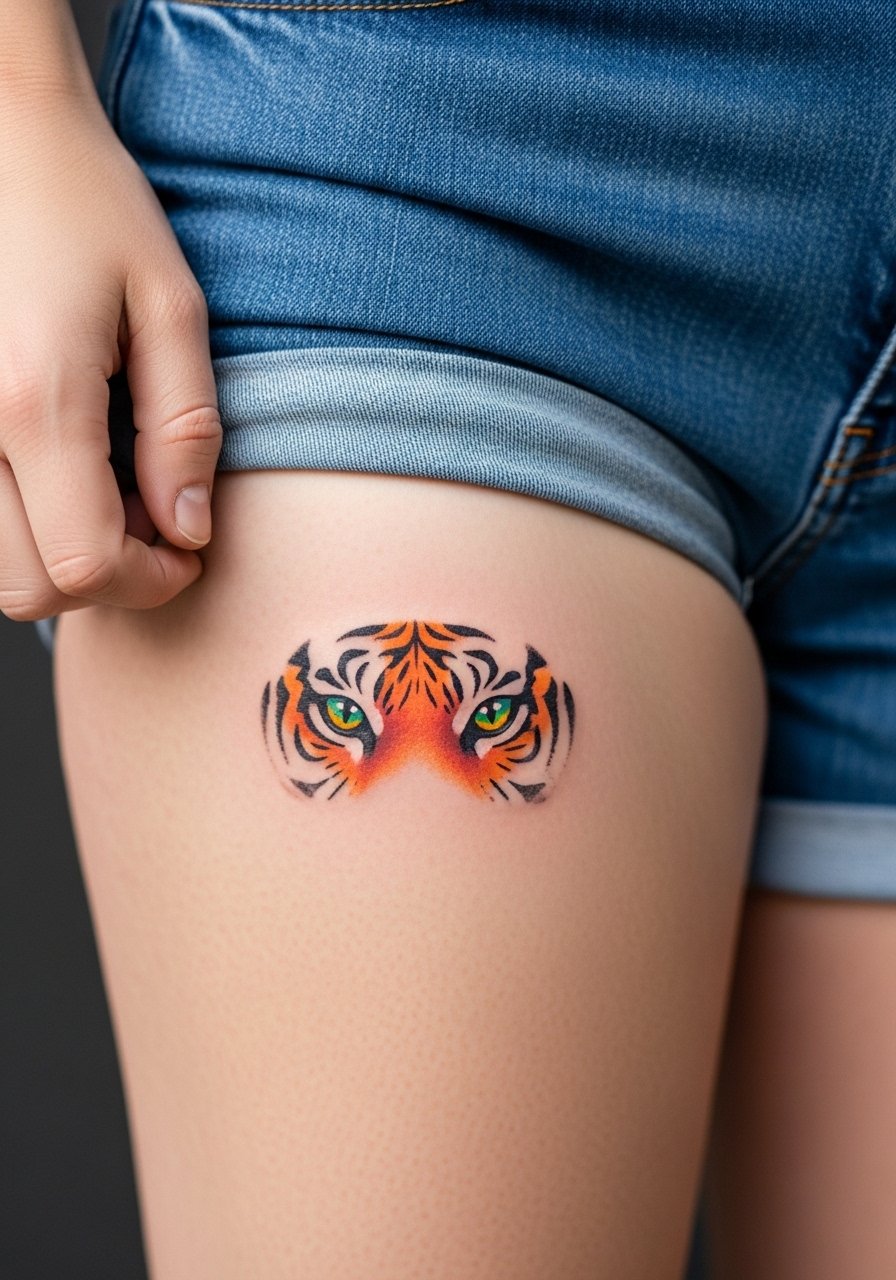
19. Hip Petite Tiger Eye with Pearl Accents
Visual impact lead. The hip is a great hiding place that still reads during beach season. Pearl-like white highlights can be requested, but too many tiny whites will fade into fuzzy spots. Pain is moderate and sessions are short for petite work. Mistakes include asking for a dense field of micro-dots that the skin cannot hold. For the session, wear high-waisted bottoms that you can shift. Consider a high-waisted swim bottom if you plan to show it off seasonally.
20. Inner Bicep Tiger Eye in Micro-Realism
Pain warning lead for the inner bicep. The area is softer and sensitive but results can be very rewarding if spaced correctly. Tell your artist to avoid extremely tight lashes near the fold of the arm. Sessions can be short but expect tenderness for several days. A mistake is asking for dense stipple on the inner fold where scabbing can obscure detail. For appointment comfort, wear a tank top so the artist can work without you feeling overheated.
21. Neck Side Petite Tiger Eye with Script Accent
Decision-pressure lead. Neck pieces force an intentional choice because they are hard to hide. If you want an added script, provide the exact short phrase during consultation and specify font weight. Pain can be sharp and sessions are quick. A common mistake is requesting too many tiny highlights or a script that is too fine. Those elements lose legibility quickly. For showing it off, a wide-neck shirt frames the work without exposing more than you want.
Frequently Asked Questions
Q: Will bright watercolor pigments in a tiger eye fade faster than solid color fields?
A: From what I have seen, watery pigments tend to diffuse with washout sooner than solid saturated patches. Solid blocks of color usually give a clearer read as they age. If you want watercolor effects, plan for a touch-up at two to three years to keep the bloom lively.
Q: How risky is fine line detail inside the pupil on high-movement placements like the wrist or ribs?
A: It depends on placement and your skin. Fine inner-pupil detail works best on areas with less stretch. On the wrist or ribs, ask for slightly bolder contouring and extra negative space around the pupil to prevent early merging.
Q: Can I still wear jewelry over a new wrist or hand tiger eye during healing?
A: I would avoid tight rings and bracelets for the first week to reduce rubbing and scabbing. Thin, loose accessories are safer while the area forms a protective layer. If you need jewelry for an event, put it on after the initial crusting stage.
Q: If I want a tattoo artist, where should I look besides Instagram?
A: Try local directories, tattoo conventions, and community forums. Hashtags and shop listings can direct you to portfolios, and in-person conventions let you see healed pieces up close before booking.
Q: Do colorful tiger eyes require different session-day clothing than blackwork pieces?
A: For high-color sessions you may sit longer and require access to a larger area. Loose button-downs and tanks are useful so the artist can work without you readjusting. A lightweight zip hoodie also works for chest and rib sessions.
Q: Are touch-ups more common for ankle and finger tiger eyes than for forearm work?
A: Yes. Areas with more friction like fingers and ankles usually need touch-ups sooner. Forearm and shoulder pieces typically keep saturation longer because they face less constant abrasion.
