
Fine line collarbone tigers are everywhere on saved boards, and the trend versus reality gap matters more than the initial photo. Many people expect delicate whiskers to stay crisp, forget collarbone sessions can be surprisingly sharp on pain and prone to early fading from sun and friction, and overlook how clothing changes the way the piece reads. Read on for collarbone-specific designs and what to ask at booking.
1. Small Irezumi-Style Tiger Along the Collarbone
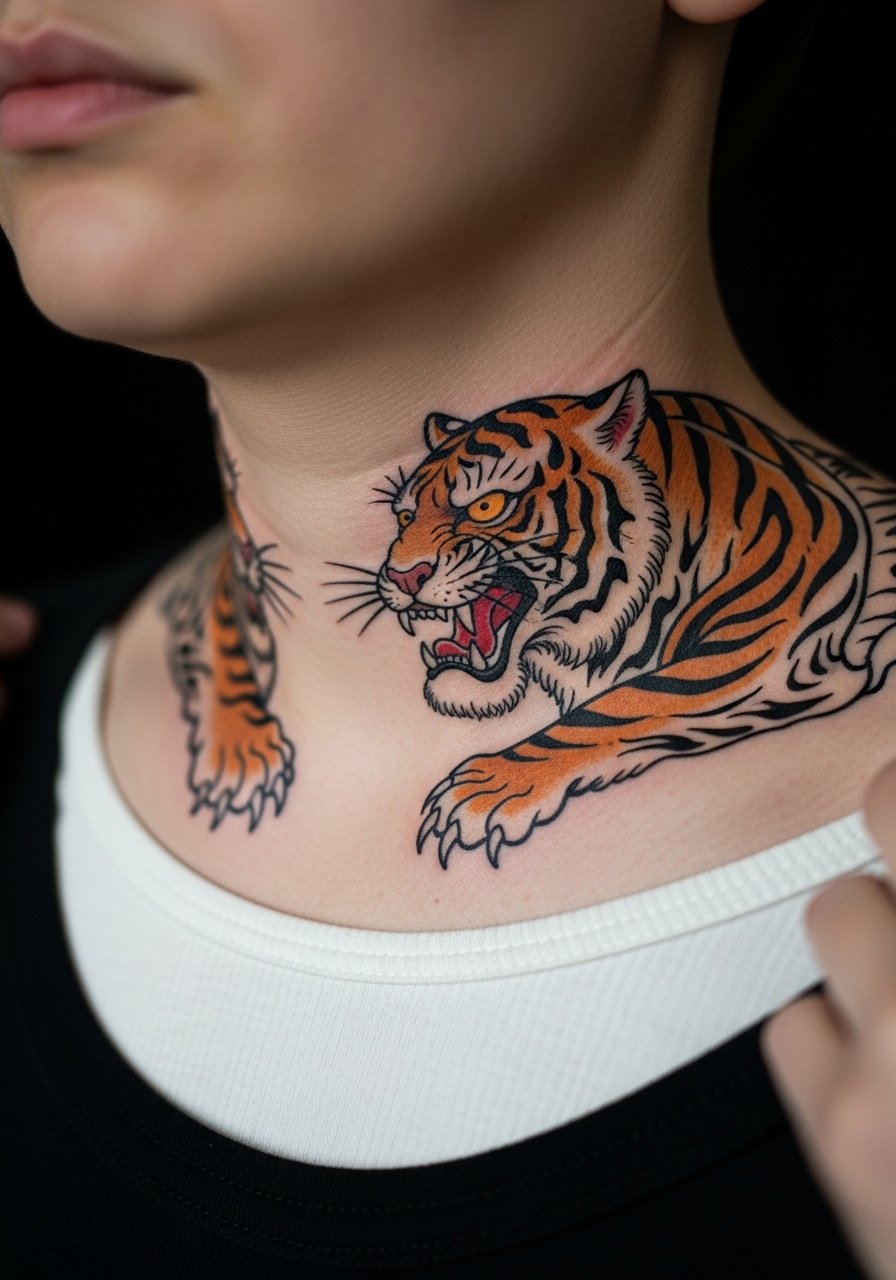
I recommend this compact Irezumi interpretation when you want the tiger language but need something that fits under workplace dress. Fair warning, collarbone skin is thin so the session feels sharp in spots. Ask your artist to keep outlines bold enough to survive stretching and UV exposure, and request moderate spacing between patterns so stipple shading does not merge over time. A common mistake is asking for tiny facial details that blur after a couple years. For showing it off, pair with an open-neck blouse that frames the collarbone without pulling focus.
2. Half-Tiger, Half-Cloud Traditional Split
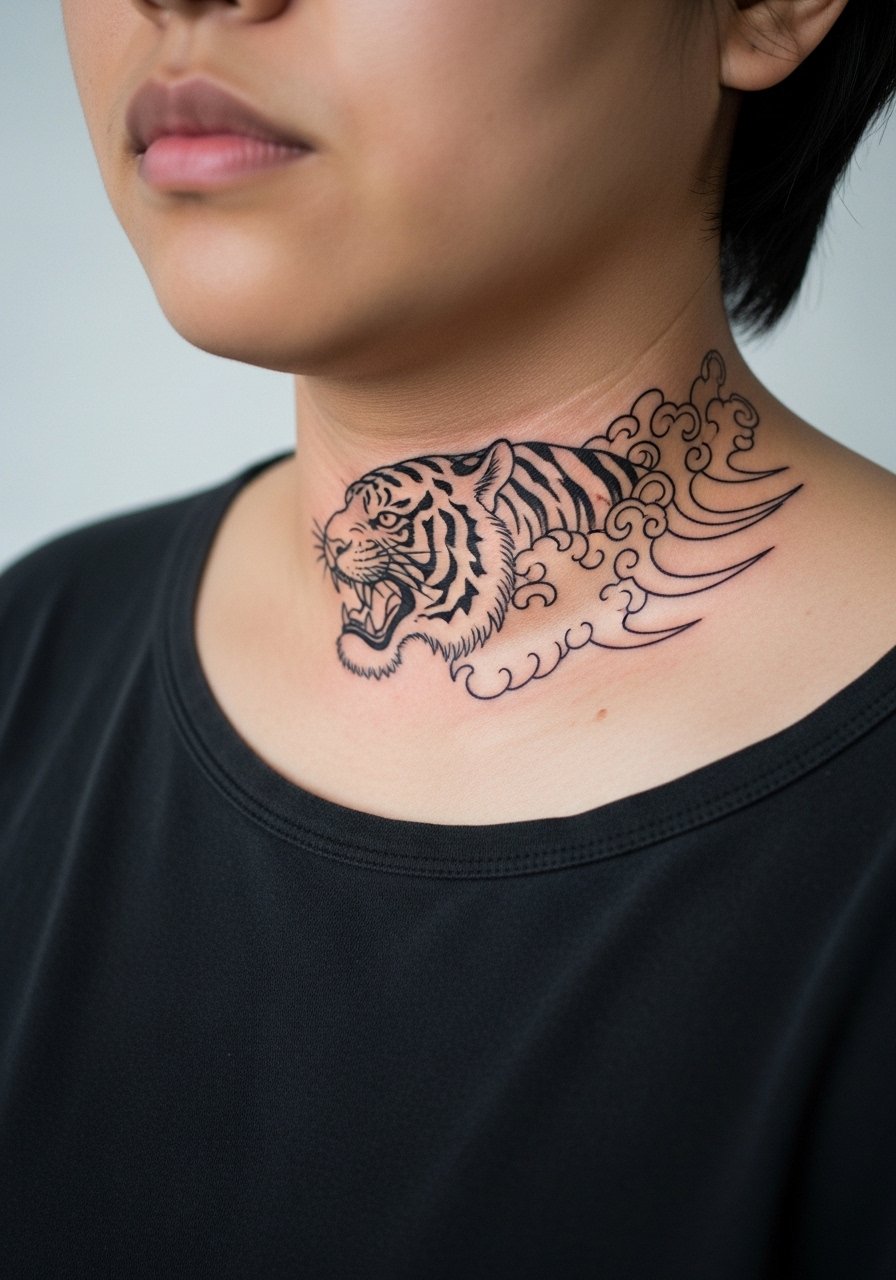
I've seen this split design work best when the tiger faces inward toward the sternum. During consultation, ask for heavier black anchors in the tiger and lighter whip shading in the clouds so the two halves age differently but harmonize. Pain peaks over the bone, so plan a 60 to 90 minute session with short breaks. The usual error is packing too many tiny curls into the cloud fill, which turns into a muddy patch at year three. Wear a wide-neck sweater to highlight the composition after healing.
3. Minimal Line Tiger Crest With Red Accents
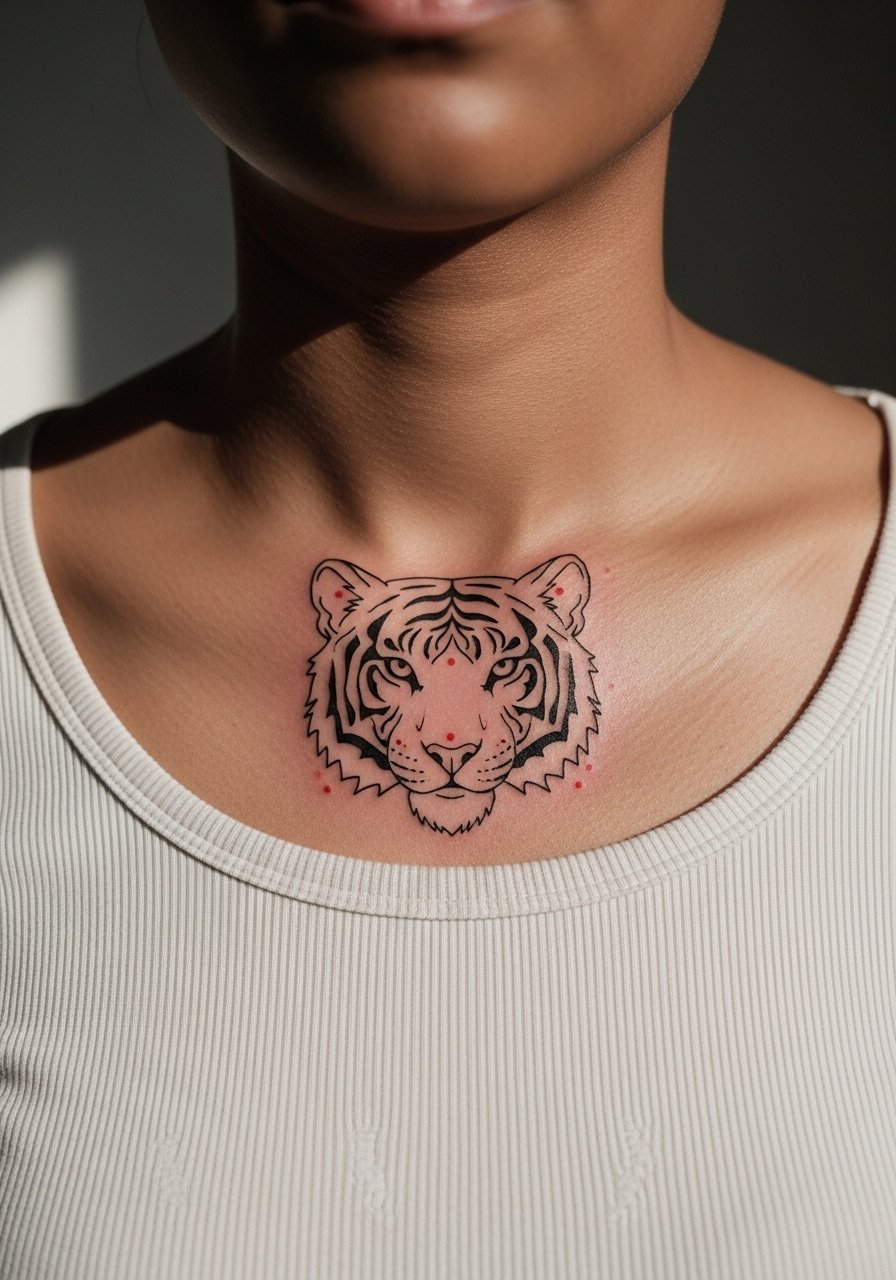
This version keeps the tiger reduced to confident linework and a splash of red for the mouth or eye. The visual impact is high while the session stays short. Most people ask for lines too thin at booking and then come back for a touch-up, so tell your artist you want slightly stronger linework than the reference. Over time the red accents fade faster than the black, so expect a color touch-up around year two for medium to dark skin tones. Pair with a simple thin chain pendant necklace that sits just above the design and keeps attention on the collarbone.
4. Bold Blackwork Tiger With Negative Space
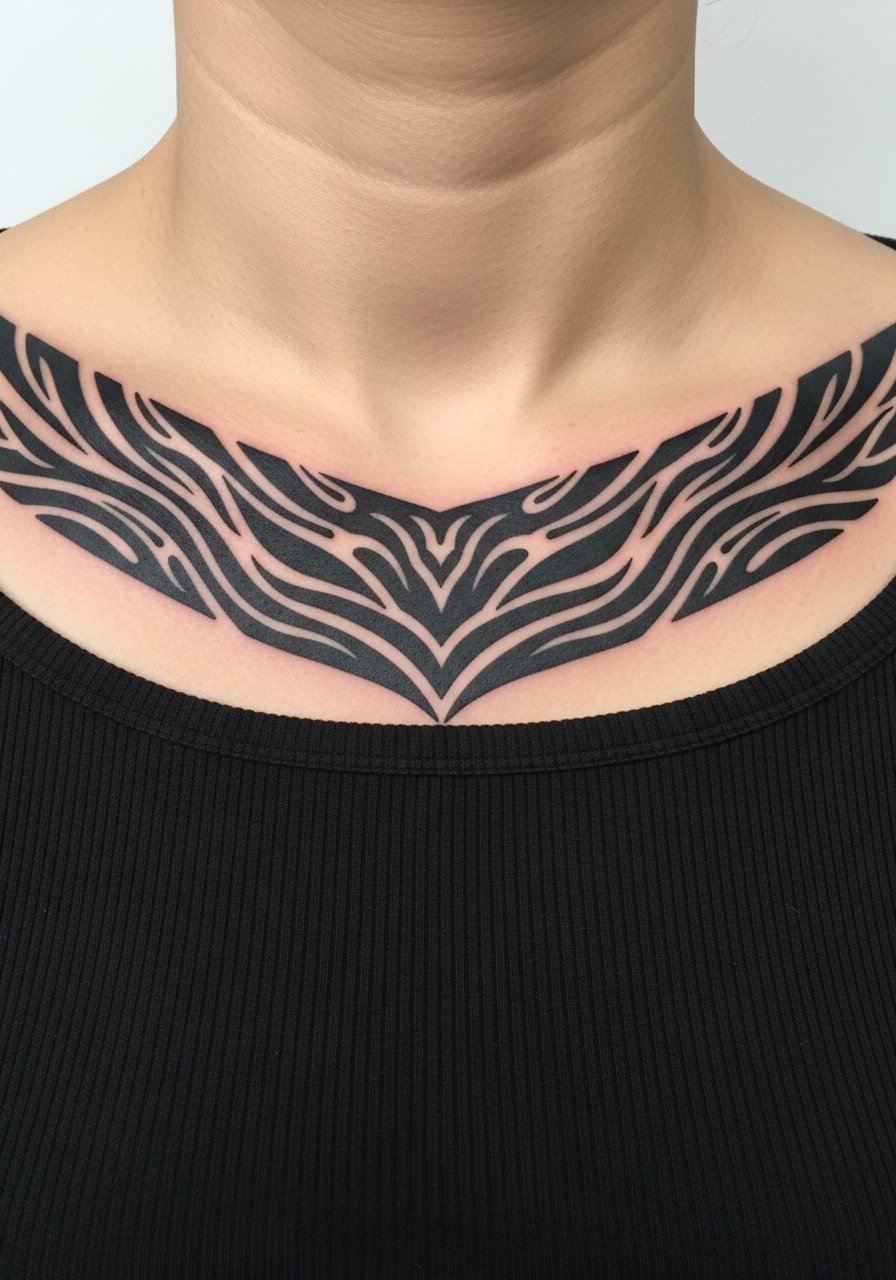
Artists split on heavy blackwork at this placement. One camp says large saturated fields hold up best because saturation ages well. The other camp argues that heavy black over thin collarbone skin can trap ink under the skin and risk subtle blowout. I recommend a middle path: strong outlines and reserved blocks of black that avoid overly dense fills on the thinest bone edges. Sessions will be longer and slightly more uncomfortable, and you might need a touch-up at year five to refresh saturation. For after-healing outfits, an off-shoulder knit frames the blackwork without covering it.
5. Micro-Realism Tiger Eye Accent Over the Collarbone
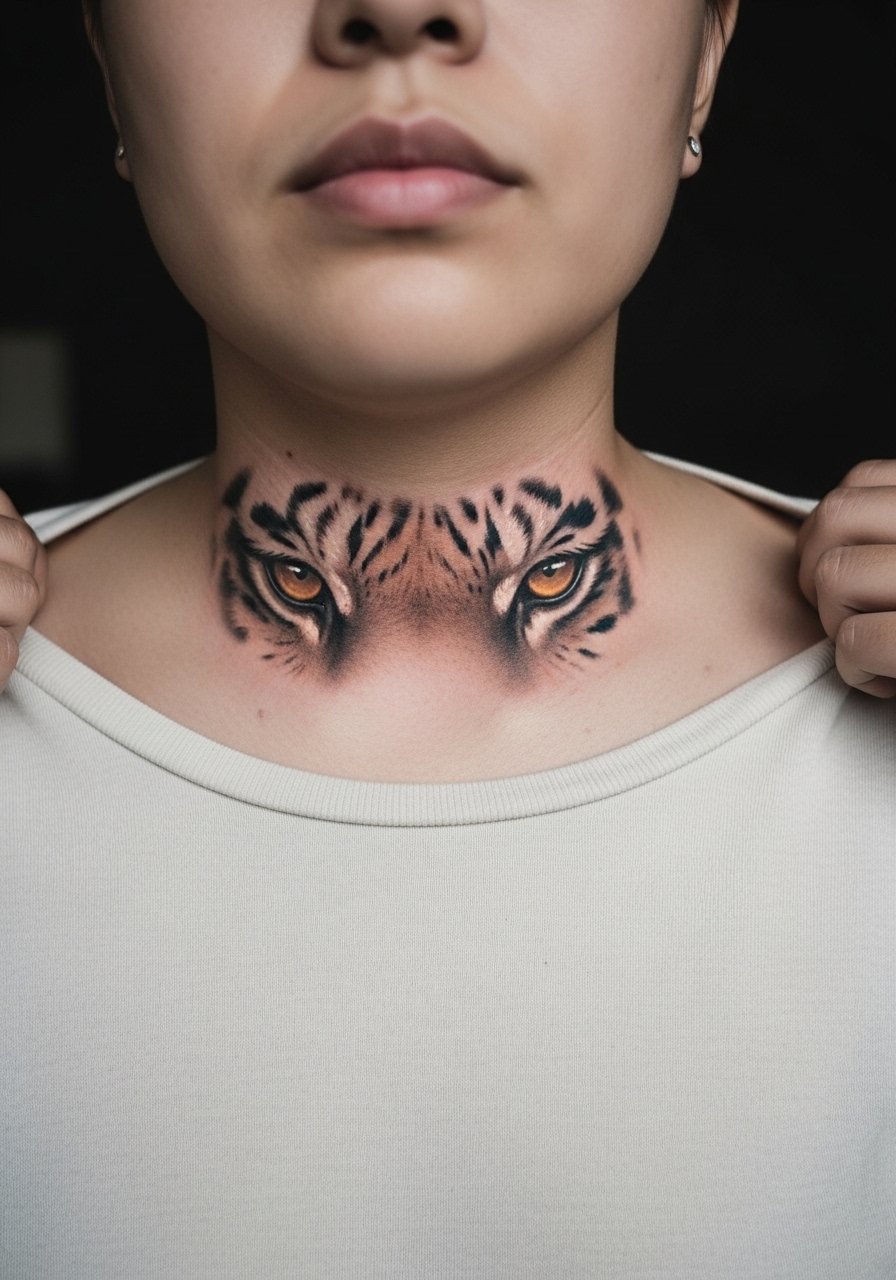
For a single-eye portrait, the consultation should focus on contrast and placement so the eye reads from a distance. Small realism pieces here can look stunning at first but tend to soften faster than on fleshy areas. Expect to plan a two-stage session if you want tight pupil detail plus soft surrounding fur. The main mistake is asking for photoreal tiny lashes that merge within two years. If you want to keep the effect crisp, budget for a touch-up at year three. Wear a v-neck tee to let the eye peek through casual outfits.
6. Curved Tiger Spine That Follows the Collarbone Line
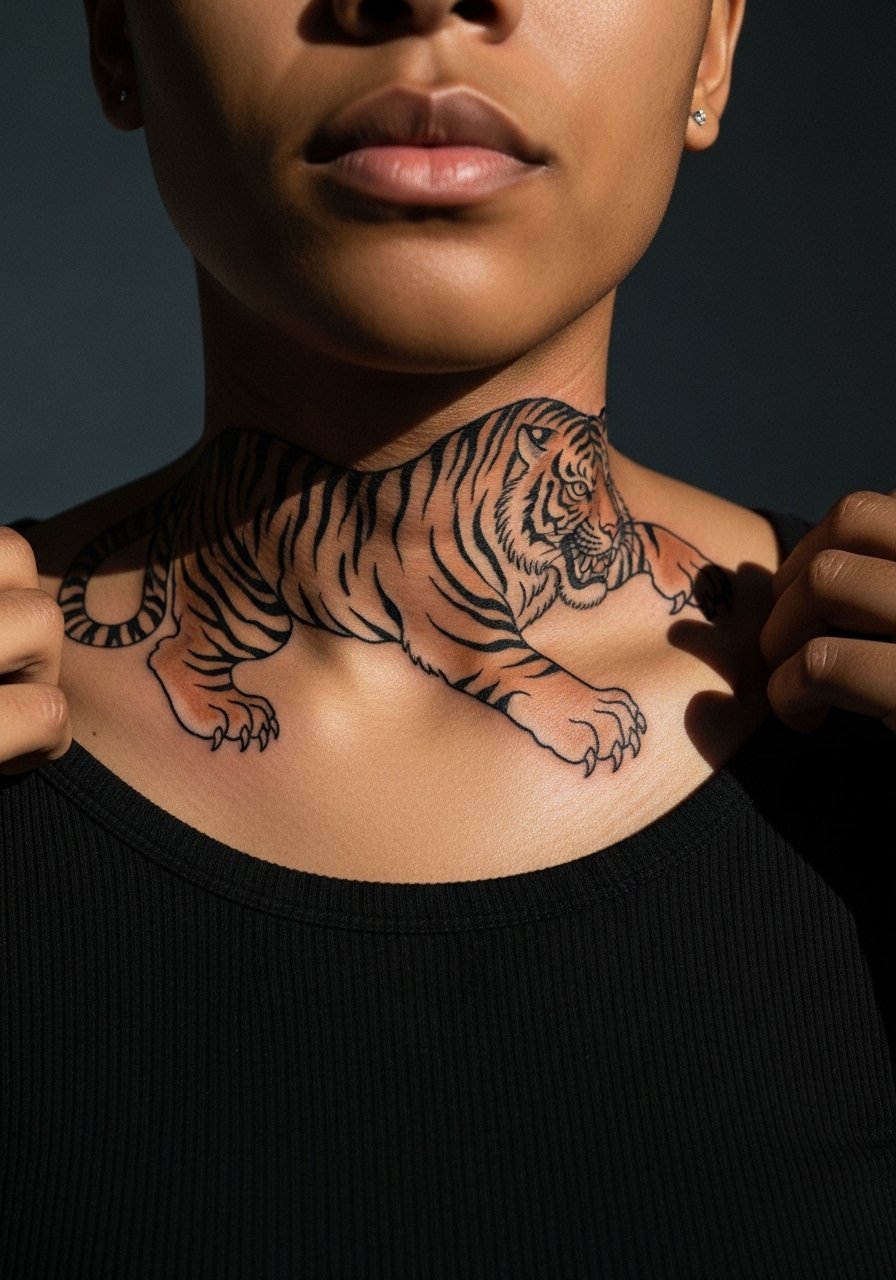
This flowing approach uses the collarbone as the composition axis. When you sit with your artist, point to how the bones move when you breathe and ask them to stencil while you change posture. The session feels rhythmically different because the artist follows the curve; small shifts in stencil placement matter. The common error is placing the tiger too close to the shoulder joint where movement accelerates fading. Expect a touch-up at year three to sharpen the curve if you wear straps that rub the area. For evenings out, an asymmetric blouse keeps the curve visible and flattering.
Studio Day Picks
The collarbone pieces above mix fine detail and bold anchors, and a few small items smooth the session and first week for these placements.
-
Stencil transfer sheet kit. Lets you test the curve of a collarbone stencil on skin before the needle touches ink, which avoids repositioning mid-session.
-
Reusable cooling gel pack. Applied between breaks it eases the sharp sensations over the bone and shortens the need for long rests.
-
Thin protective film roll. Useful for protecting collarbone work from shirt friction during the first 48 hours.
-
Fragrance-free gentle body wash. Cleanses without stripping natural oils, which helps fine line and color retention on exposed collarbone tattoos.
-
Saniderm adhesive bandage sheets. A protective film option that reduces scabbing friction and keeps collarbone work clean in the first few days.
7. Water-Brush Tiger With Soft Washes

Watercolor techniques on the collarbone read like a wash of motion. Most watercolor pieces fade faster because the pigments sit more superficially. If you choose this, ask for slightly more depth in the areas you want to keep vibrant and request a staged color top-up at the six to twelve month mark. The session is usually tolerable as the needles glide over the bone, but avoid asking for tiny layered washes in the same session. For daytime looks, an off-shoulder sundress highlights the transitional colors without overwhelming them.
8. Neo-Traditional Tiger With Floral Frame
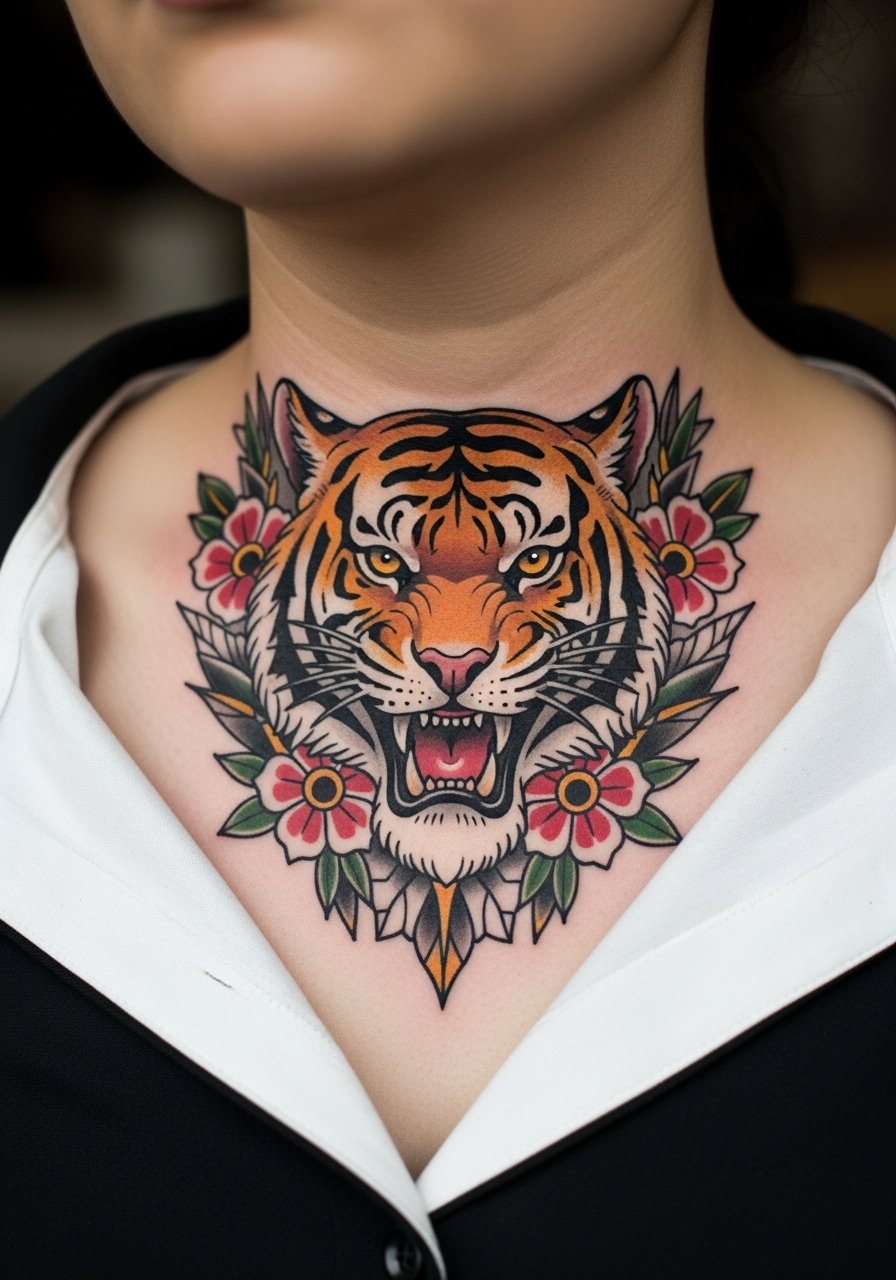
Neo-traditional work gives strong outlines and controlled saturation, which can be forgiving on collarbone skin. Tell your artist you want the flowers slightly larger than your reference so petals keep negative space as they age. A frequent mistake is compressing too many small flower details into the frame, which causes blotchiness at year three. Expect a comfortable session with brief breaks and a touch-up in years three to five depending on sun exposure. Pair the piece with a cropped blazer for a modern edge that also keeps the collarbone visible.
9. Single-Stripe Tiger Claw Accent
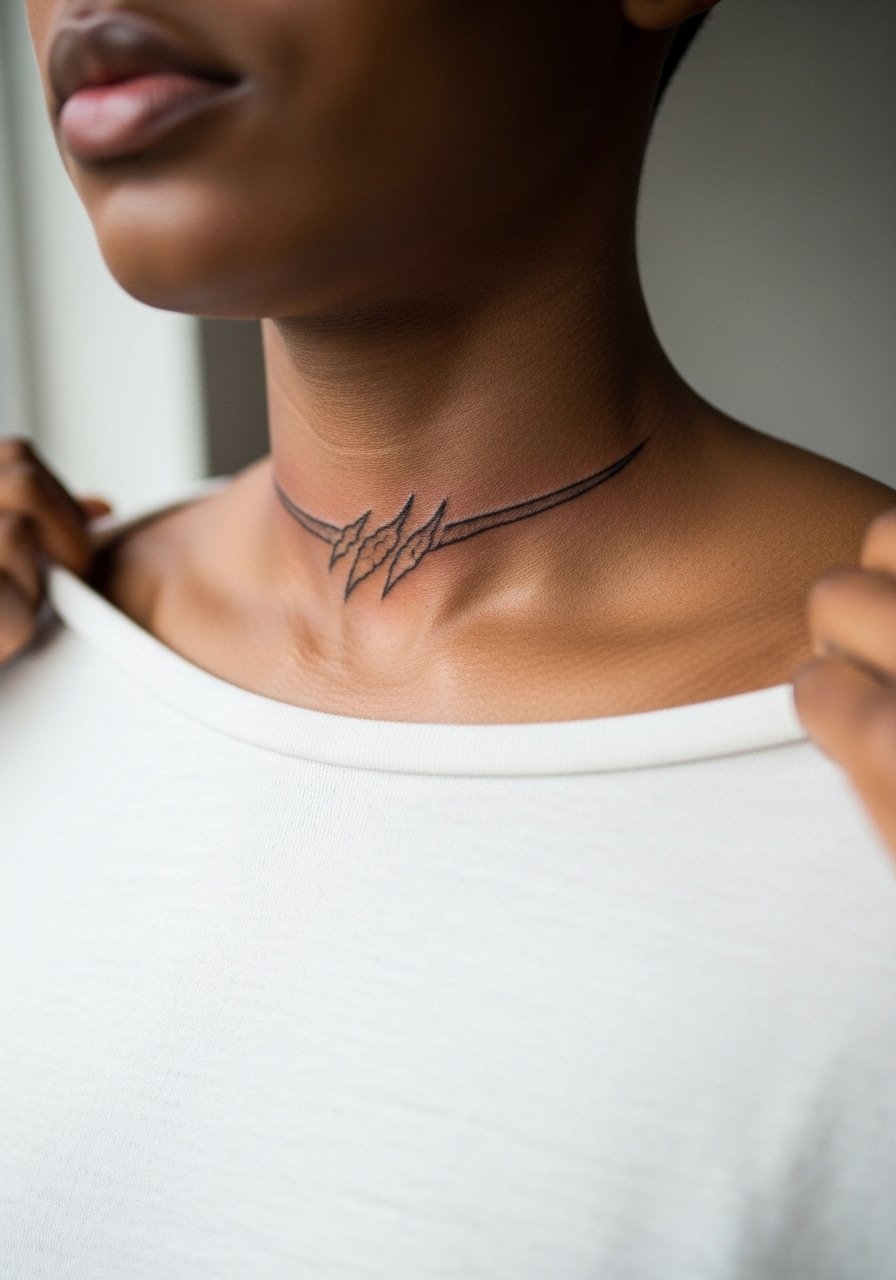
This ultra-minimal stripe is session-friendly and ages predictably if you avoid micro detailing. The main mistake is asking for the stripe too fine. Lines on the collarbone need a little width to stay sharp. The session is quick and the pain is brief where the skin sits over bone. Plan for a touch-up at year two to refresh the stripe if your wardrobe or sun exposure causes fading. For jewelry, a delicate choker can frame the stripe without crowding the collarbone.
10. Angry Tiger Head With Bold Whiskers
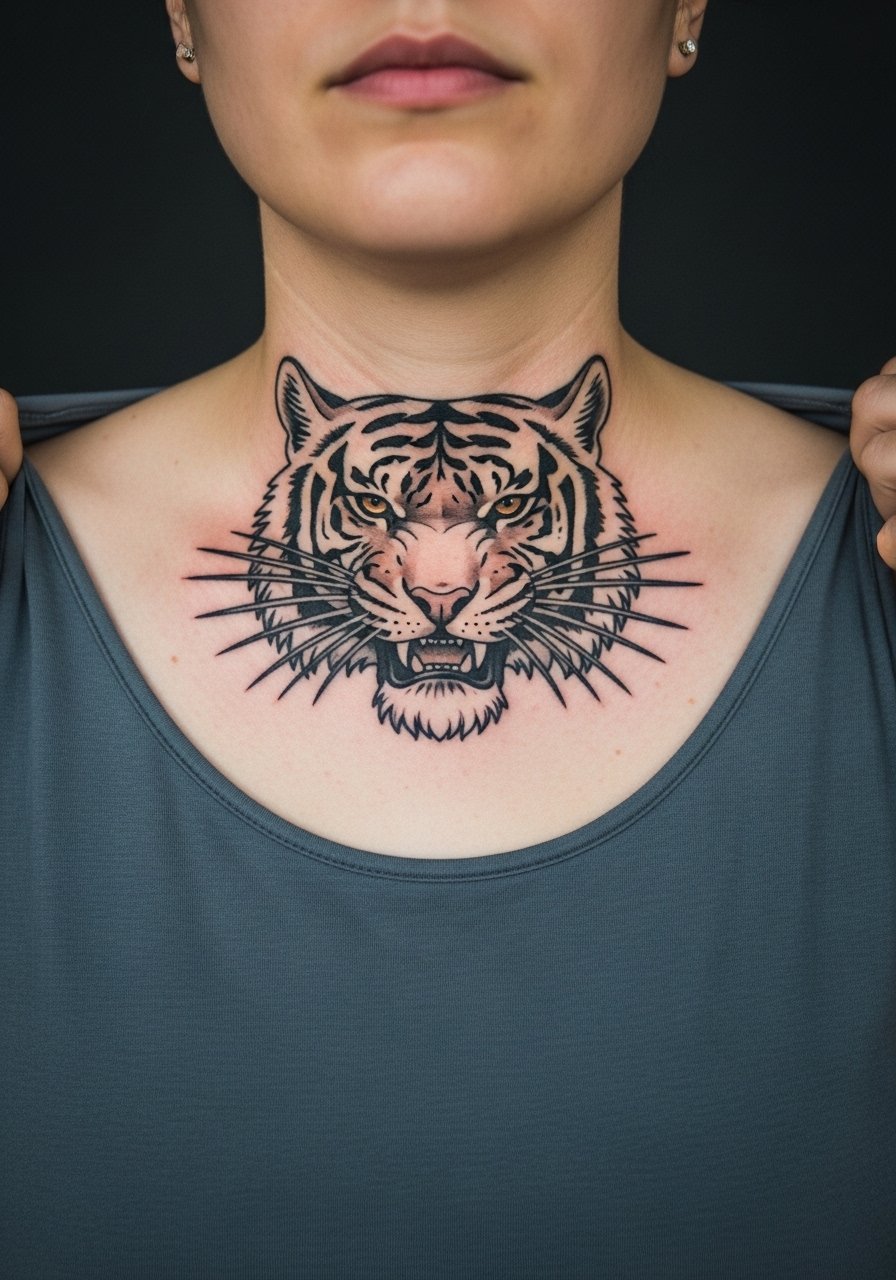
There is a visceral quality to an aggressive head across the collarbone. When you bring references, point out the jawline placement you prefer because small shifts change the facial expression. People often ask for too much fine fur detail, which blurs on thin skin. This piece tolerates bolder strokes, and black whisker anchors help the expression survive years. Expect sharp sensations on the bone and a session of about 90 minutes. For nights out, an asymmetric tank puts the face on display without covering it.
11. Ceremonial Irezumi Tiger With Subtle Symbolism
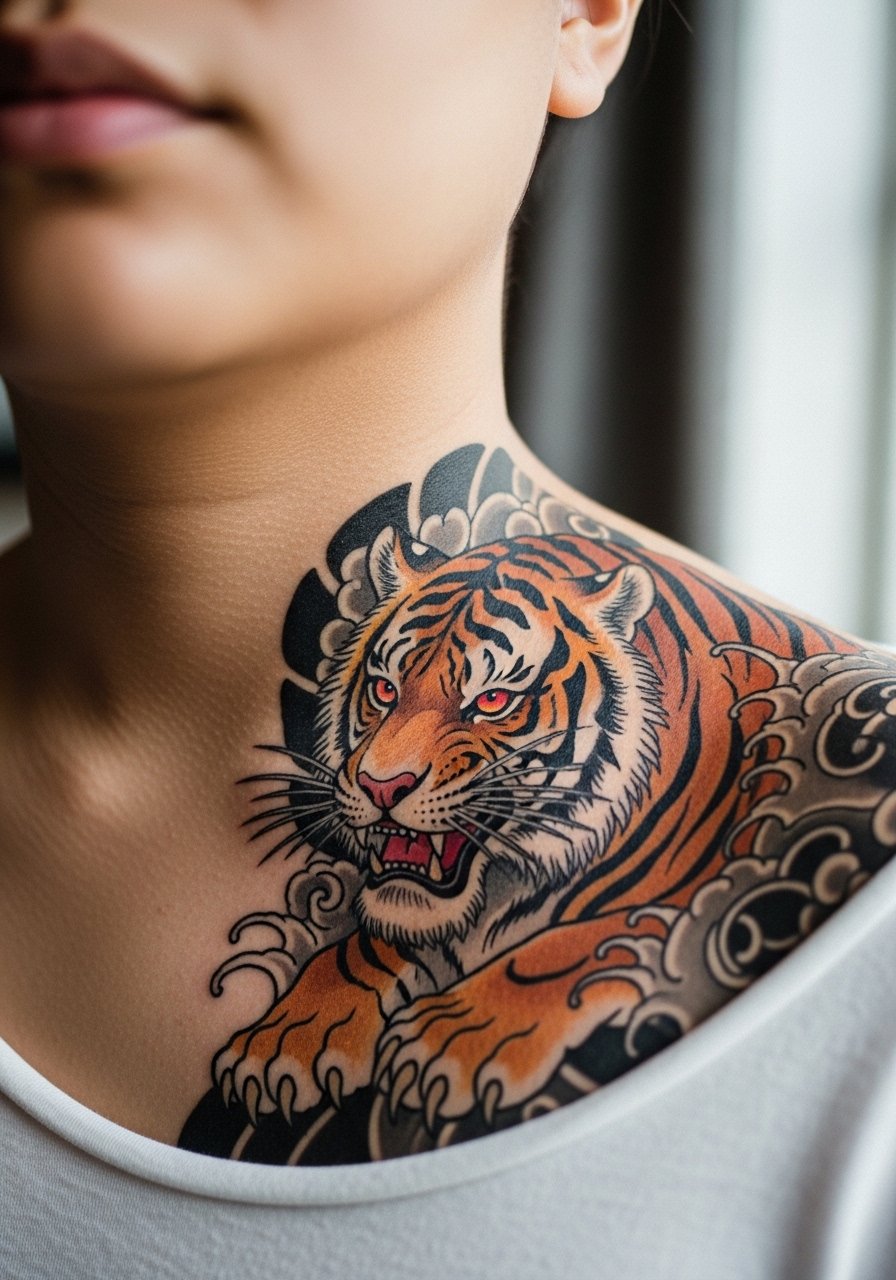
This design raises a cultural debate. One camp treats traditional Irezumi motifs as adaptable inspiration. The other camp stresses that direct replicas can harm cultural meaning. My suggestion is to discuss symbolism with your artist and consider subtle adaptations rather than exact copies. That way you respect the source and still own the piece. The collarbone placement exposes the cultural motif to more viewers, so be intentional about how literal you want the iconography. If this is your first time with Japanese imagery, ask about historical references and how the artist recommends adapting them.
12. Subtle Geometric Tiger Outline
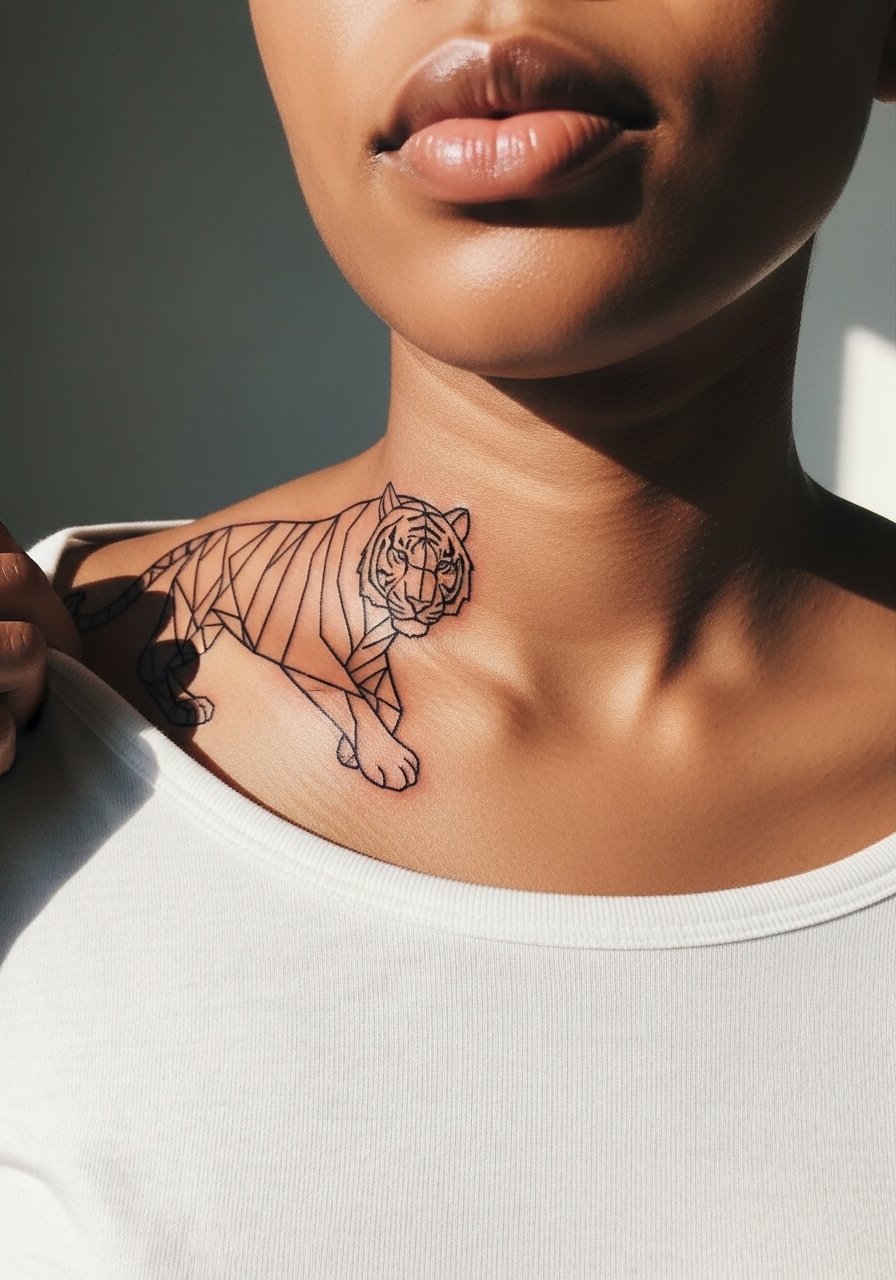
Geometric reduction turns a complicated subject into a series of planes. For success ask your artist to map the geometry on skin rather than scaling a flat reference. The biggest mistake is shrinking the grid too small, which causes the angles to soften after healing. This style reads better with slightly thicker linework on the collarbone. Sessions are steady and less painful because the needle work is consistent. Pair this with a structured collared shirt that lets the angles echo in your outfit.
13. Collarbone Tiger With Wave Motif Background
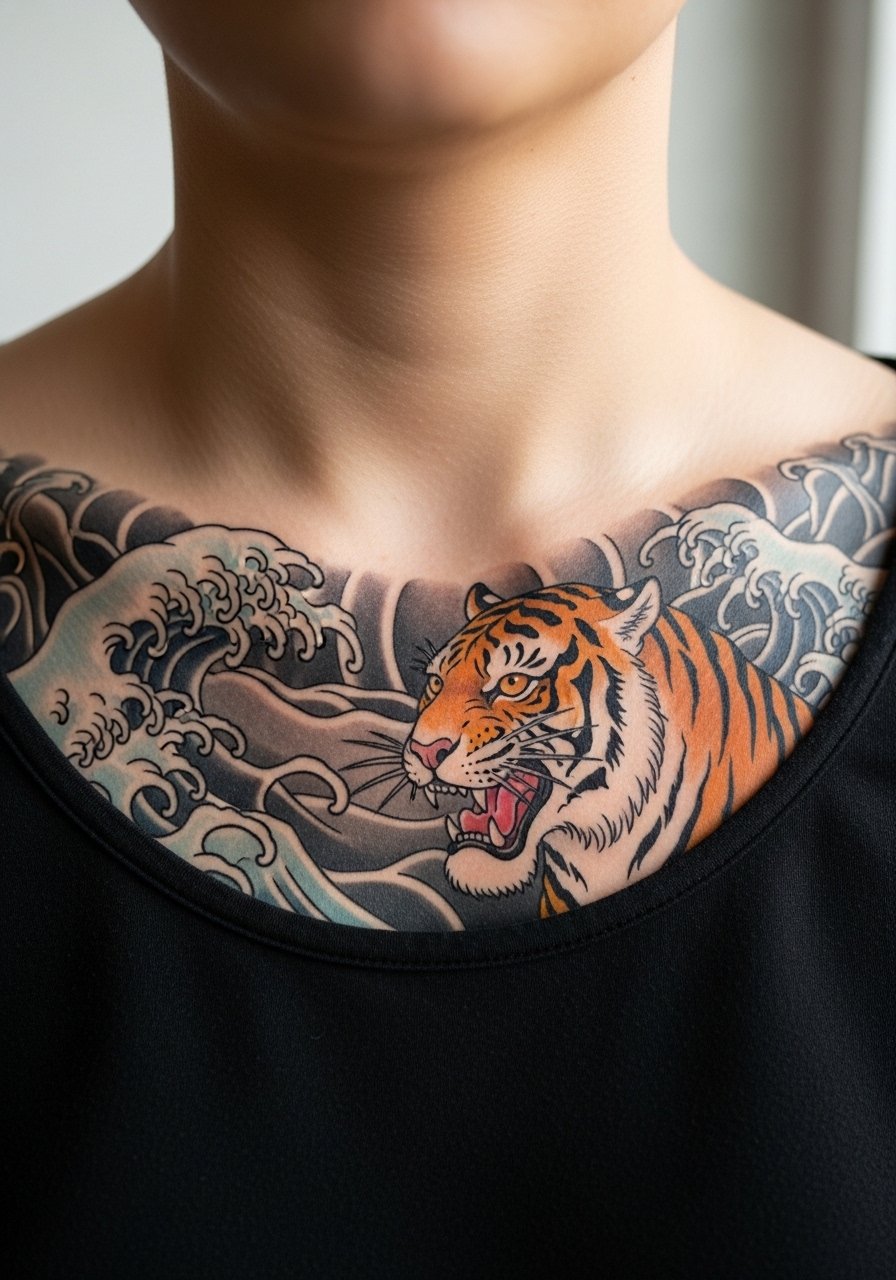
The wave element gives movement and balances the tiger's mass. Tell your artist you want the waves to sit lighter than the tiger so the foreground keeps visual priority. A common error is overworking the wave detail too close to the bone edge, which complicates healing. The session tends to require more time because of the background fill. For summer looks, an off-shoulder swimsuit top shows the full composition without distraction.
14. Tiny Japanese Tiger With Kanji Accent

When adding text, specify the exact character to avoid errors. For kanji include the exact glyph during consultation so the stencil reads correctly. Tiny text next to detail is a high-risk combo on collarbone skin because letters can bleed; make the kanji slightly larger than your reference to keep clarity. Expect a 45 to 75 minute session and a likely touch-up at year two for the glyph. For delicate evenings, a thin silk scarf worn loosely keeps attention on the tiger and the character.
15. Dynamic Pose Tiger Facing Outward
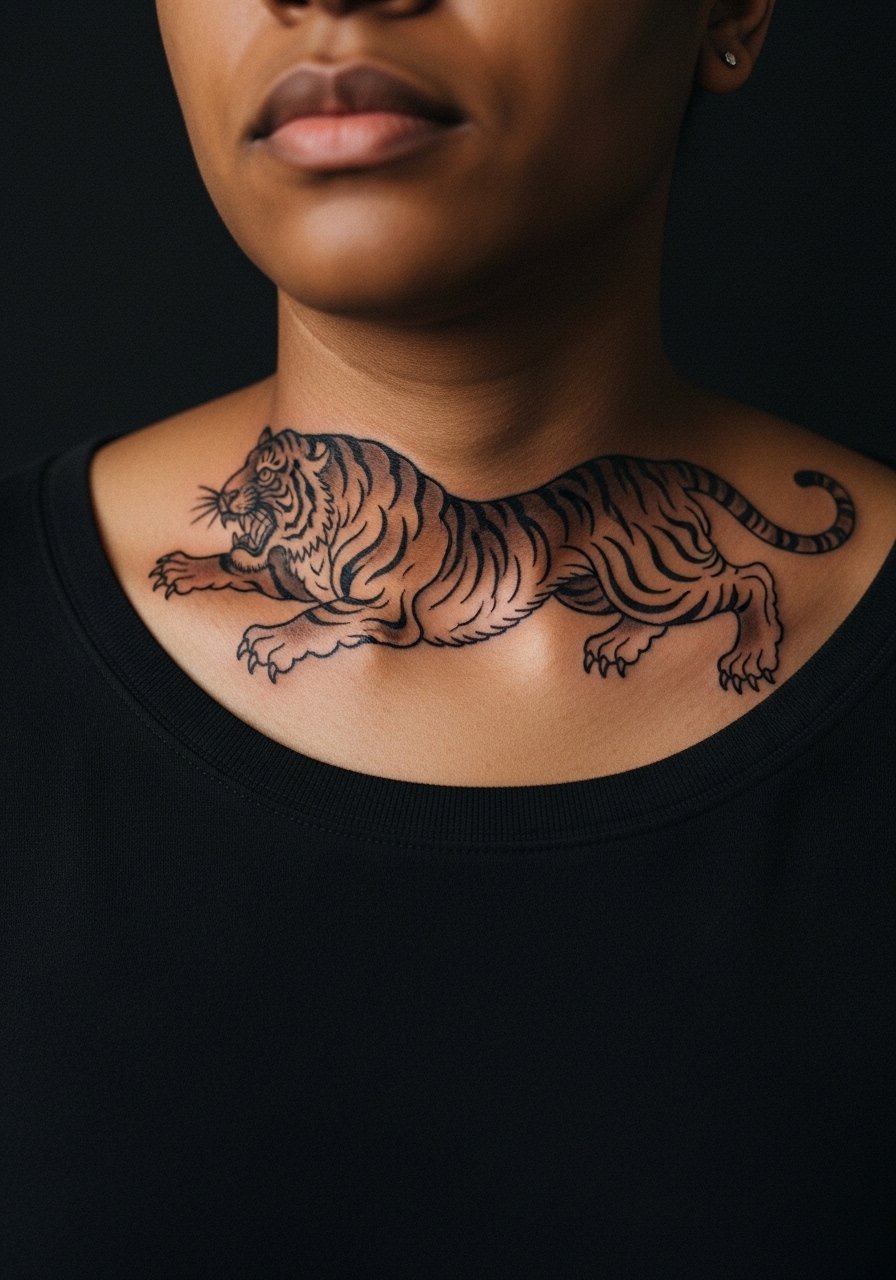
A tiger that faces outward reads confidently when you move. In consultation, point at how you usually hold your shoulders so the artist can place the face to catch light and shadow correctly. The mistake is centering the face too close to clothing seams where rubbing accelerates fading. Expect moderate discomfort over bony ridges and a session length of about 90 minutes. For daytime layering, a button-front shirt left slightly open frames the outward gaze.
16. Collarbone Tiger With Peony and Maple Leaves
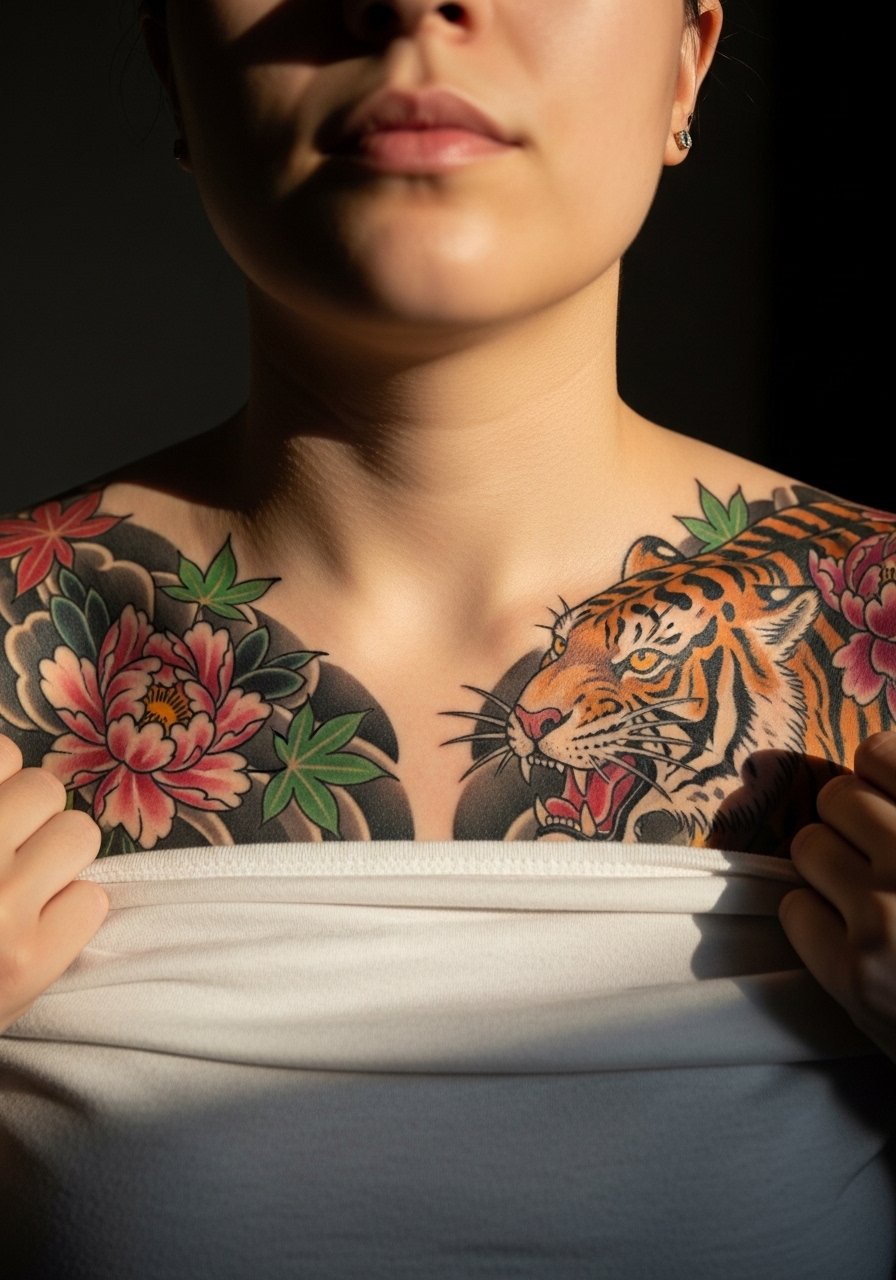
Combining flowers and leaves around a tiger helps mask future softening because the botanicals age differently from the fur detail. Tell the artist you want the peony petals larger and the veins in maple leaves simplified to prevent crowding. People often pack too many small leaf veins that merge over time. Sessions will be layered and may require two sittings to complete color depth. For transitional seasons, an open-neck cardigan keeps the artwork visible while protecting it from sun.
17. Negative-Space Striped Tiger Band

A band that uses skin as the highlight can be subtle but requires telling the artist you want the negative stripes intentionally wide. The typical error is making the gaps too small, which leads to merging. The session is quick but needs steady handwork to ensure even spacing. Over time the negative areas may show slight ink migration, so plan for a touch-up in three to five years. Pair the band with a minimal pendant necklace that echoes the stripe without competing for attention.
18. Collarbone Tiger in Sumi-E Brush Style
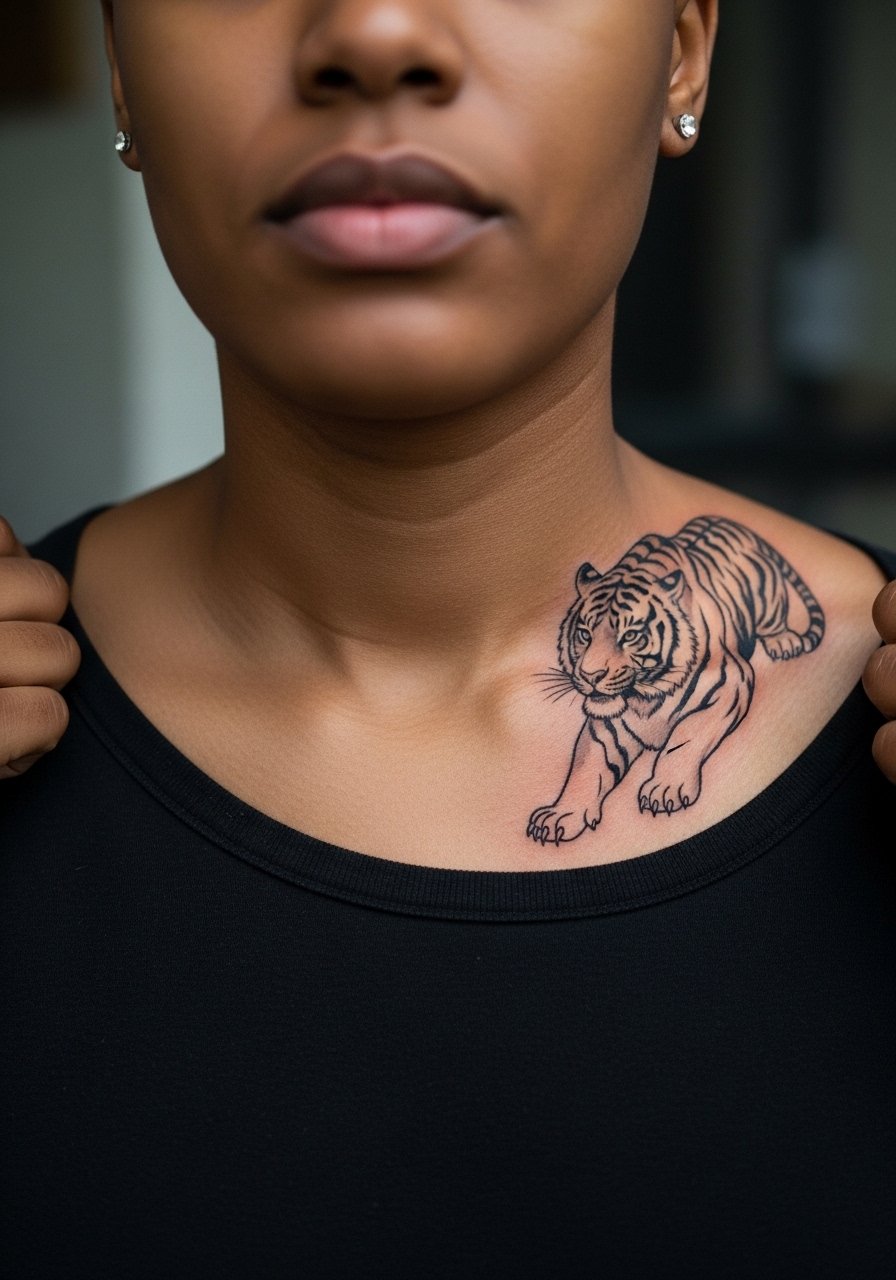
Brush-style tattoos borrow from ink painting and depend on confident strokes. Ask your artist to practice the heavy-to-light transitions on paper and then adapt the pressure for skin so lines do not break. The main mistake is asking for micro-gestural brush marks that do not translate to healing skin. This style can last well because strokes are intentionally bold in places. Expect a session that feels rhythmic rather than pinprick focused. For gallery nights, an asymmetric silk top suits the brushy aesthetic.
19. Collarbone Tiger With Subtle Gold Leaf Ink
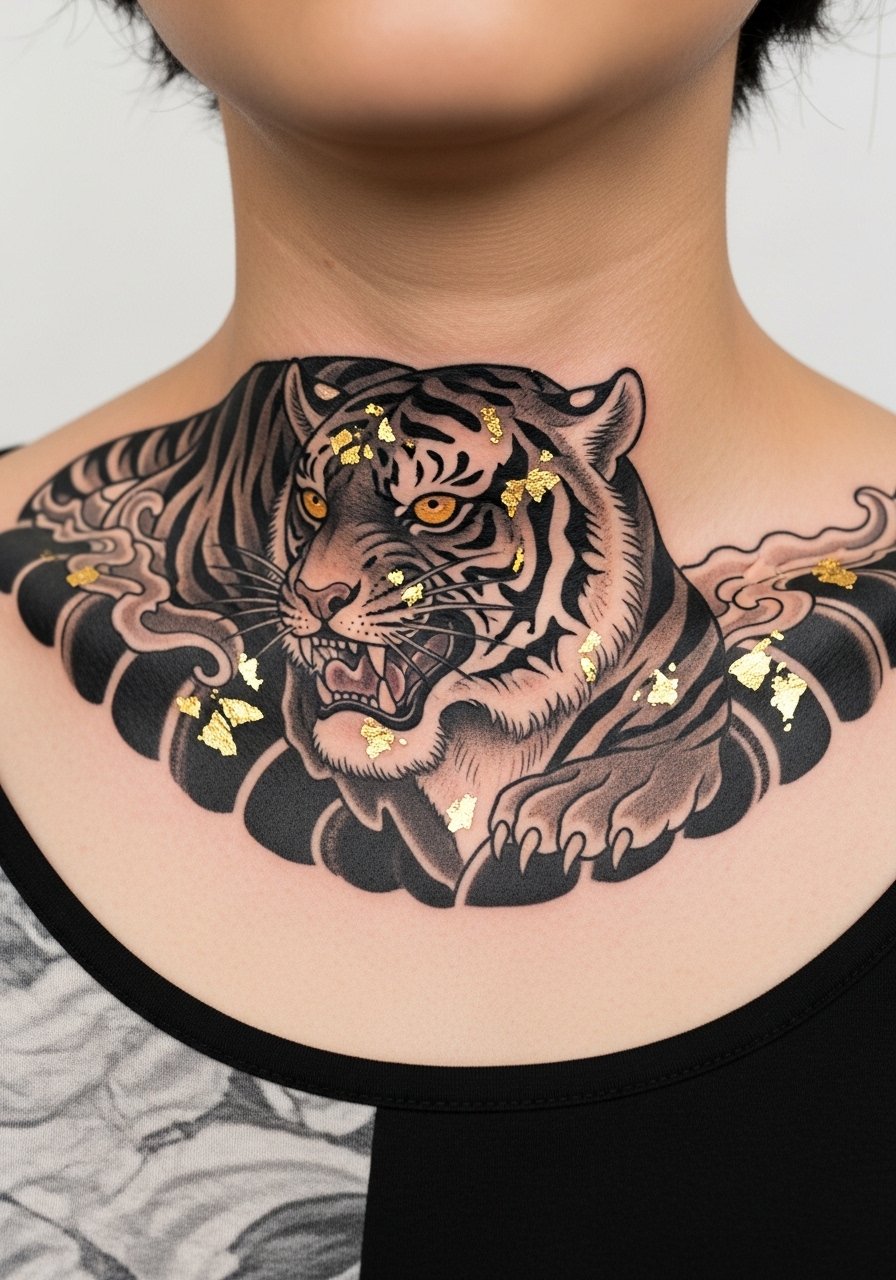
Metallic inks have a specific look and fade differently than traditional pigments. If you want gold accents, ask your artist about the exact pigment and the recommended placement because metallic tends to lose pop faster. A frequent error is using metallic for thin lines that vanish; use it sparingly for highlights only. Expect touch-ups earlier for metallic spots, likely within two years. For evenings, a delicate gold chain complements the ink without competing.
20. Tiny Hidden Tiger Tag Near the Collarbone
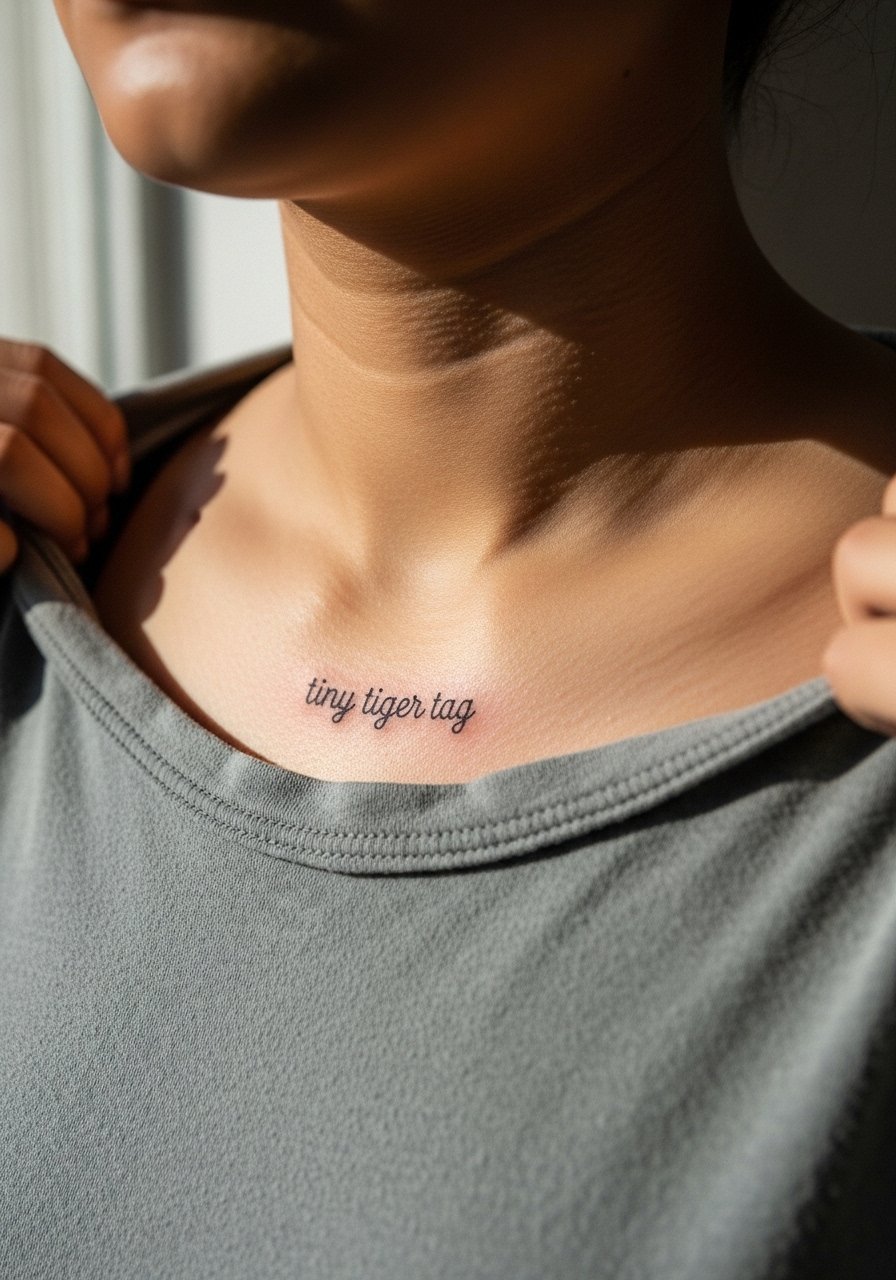
Small hidden tags are great if you want a subtle personal mark. The mistake is placing it too close to clothing edges where friction erodes detail. Ask your artist to position the tag about a finger's width from any seam and to use slightly bolder linework for longevity. The session is fast and the pain is brief. Plan for a one-year check and touch-up if the line softens. Keep it private by pairing it with a soft cotton tee that can cover or reveal it as you like.
21. Collarbone Tiger With Lightning Motif
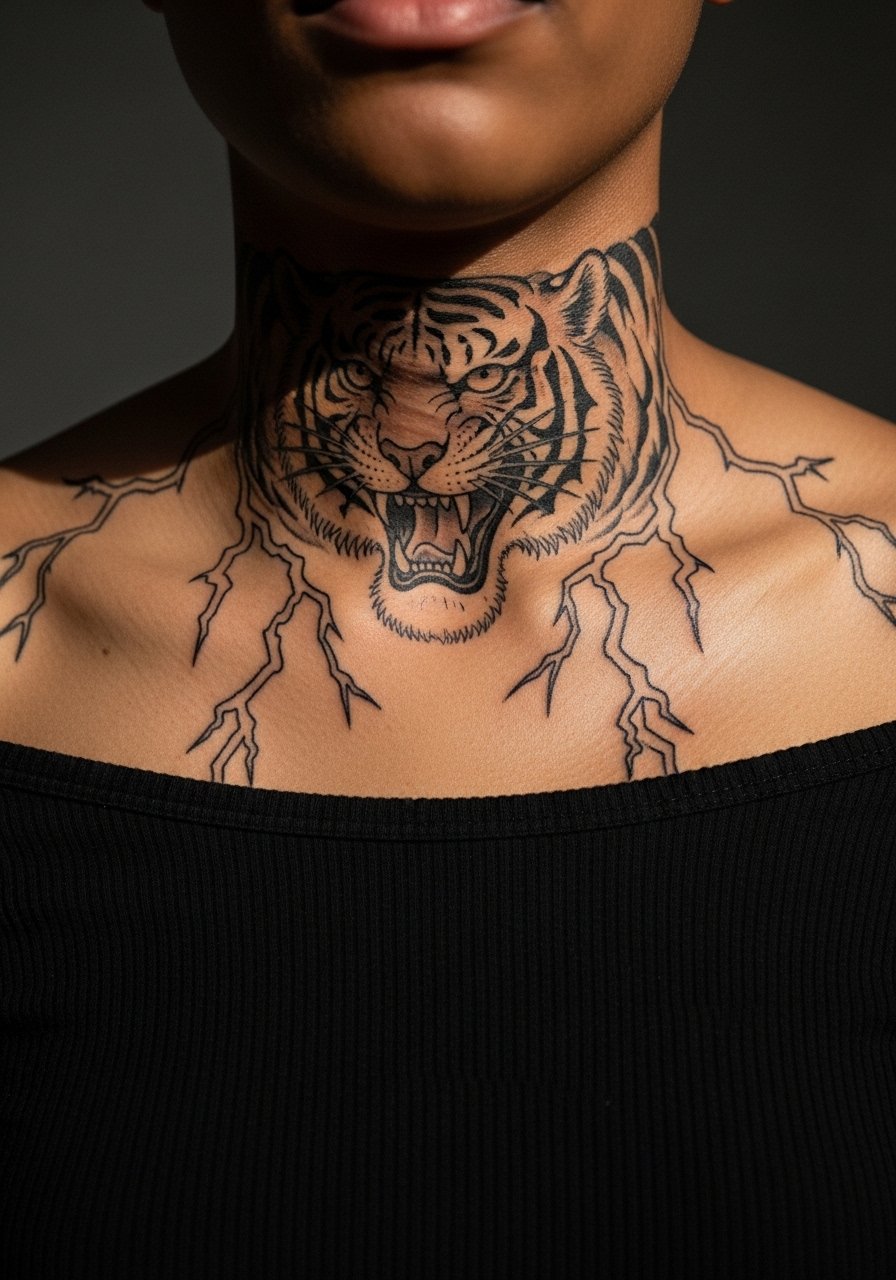
Adding lightning gives kinetic energy to the piece. During consultation, tell the artist which points of the bone you want emphasized so the streaks hit highlights naturally. A typical mistake is overlapping streaks with intricate fur detail that leads to visual confusion with age. Sessions will be moderate in discomfort and may take 90 minutes for clean separation. For edgy outfits, a leather jacket with a low collar frames the lightning and the tiger without covering the collarbone.
22. Collage-Style Tiger Patchwork
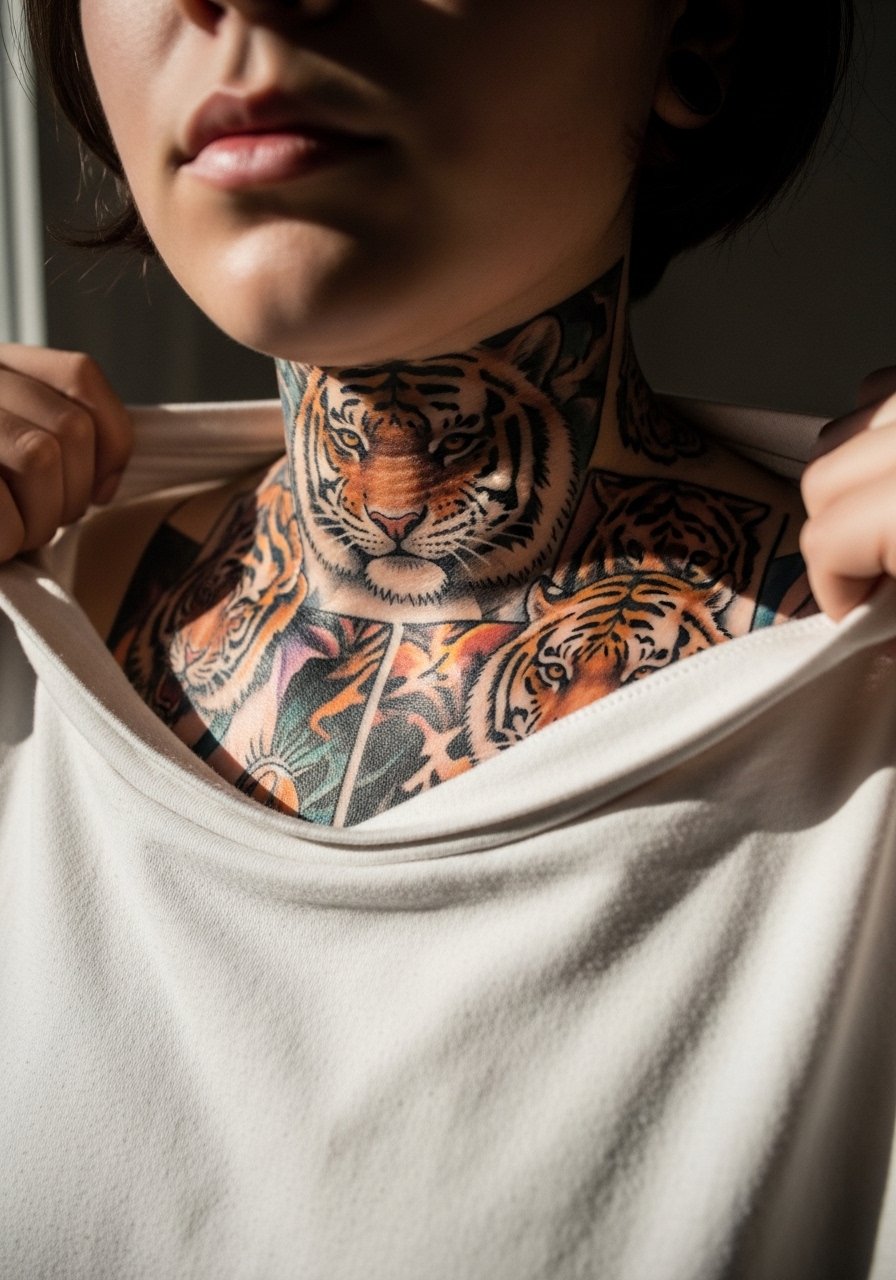
Patchwork designs combine different techniques and they need a cohesive palette. Ask for a limited color range so the disparate blocks age in concert. The common mistake is letting too many styles sit too close, which reads messy after healing. Sessions can be split into multiple appointments to let certain patches settle before moving on. For layered looks, an open-front kimono complements the eclectic composition while keeping the collarbone visible.
23. Tattooed Collarbone with Script and Tiger Tail

Combining a tail with a short script creates a narrative line. Be precise about the script font and size in your consultation. Tiny script next to curved tail work often needs slightly larger lettering for clarity. People commonly pick overly ornate fonts that blur over time. Expect a short session and plan to re-ink the script if it softens around year two. A lightweight pendant necklace can sit just above the script without crowding it.
24. Collarbone Tiger With Subdued Background Wind Bars

Wind bars add a directional backdrop that reads well on the collarbone. Ask for the bars to be lighter than the tiger so they do not compete as the piece ages. A common error is making the bars too dense, which competes visually after a few years. Sessions are steady and not overly long, but spacing the background work can help preserve contrast. For everyday wear, a soft tank top shows the wind lines without exposing too much skin.
25. Collarbone Tiger With Masked Teeth and Open Jaw

Focusing on the mouth creates a high-impact piece that centers on expression. Tell your artist whether you want the jaw to align with the clavicle notch so the teeth sit on a flatter area. People often ask for microscopic tooth detail that does not hold up on thin skin. Expect a longer session with moments of sharpness and a touch-up at year three to restore crisp tooth edges. For nights out, an open-collar blazer keeps the mouth visible without revealing the whole sternum.
26. Subtle Halftone Shaded Tiger Strip
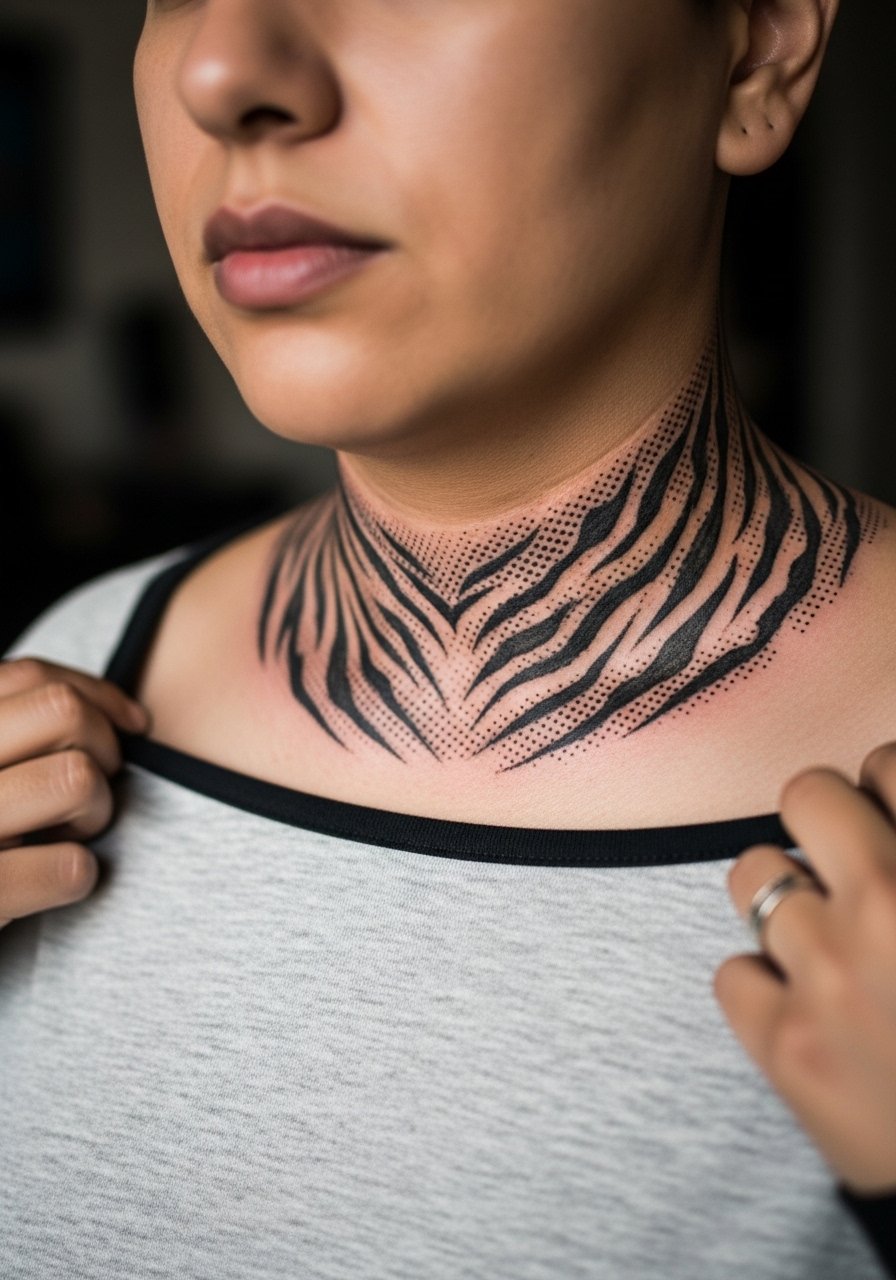
Dot work or stippling provides texture and can age gracefully if the dots are spaced correctly. Ask for slightly larger dot spacing over the bone to avoid early merging. A common mistake is overpacking stipple in tight zones which turns into a blur later. Sessions are methodical and may take longer because dot work is time consuming. Pair it with a lightweight cardigan that you can wear open to show the delicate texture.
27. Bold Collarbone Tiger Anchored With a Crest

This finishing option gives a strong central focal point with a crest to balance the composition. In consultation, ask for crest details that sit off the bone to avoid overworking the thinnest skin. The main mistake is cramming small crest ornamentation too close to the clavicle ridge which causes detail loss. Expect a heavier session with noticeable sensations and a likely touch-up window at year three to five for saturation refresh. For presentation, an open-neck dress keeps the crest readable without competing.
Frequently Asked Questions
Q: How painful is a collarbone tattoo compared with other placements?
A: Collarbone sessions feel sharper because the needle crosses close to bone and the skin is thin. Pain varies by person and by how long the session runs. Short sessions with breaks reduce discomfort and a topical numbing product can help if you discuss it with your artist.
Q: Will fine line tiger details blur faster on the collarbone than on a forearm?
A: From what I've seen, fine line on the collarbone tends to soften sooner than on fleshier areas like the forearm. The culprit is thin skin and movement. Ask for slightly stronger line weight and spaced composition to extend clarity, and plan realistic touch-ups.
Q: Is it inappropriate to get a traditional Japanese tiger if I am not from that culture?
A: There are two views. One side sees tasteful borrowing as appreciation, and the other cautions against direct replication without understanding meaning. My advice is to research symbolism, adapt elements thoughtfully, and discuss respectful modification with your artist.
Q: How long should I expect to wait before a touch-up for collarbone color work?
A: It depends on sun exposure and clothing friction, but many people schedule a check between 12 and 24 months for color pieces and again at years three to five for durability checks. Lighter pigments usually need refreshing sooner.
Q: What should I wear to a collarbone tattoo session for easy access and comfort?
A: Wear something with a wide-neck or a button-front so you can reveal only the collarbone area. A loose wide-neck shirt or a button-down makes it easy for the artist to work and helps you stay comfortable during breaks.
