
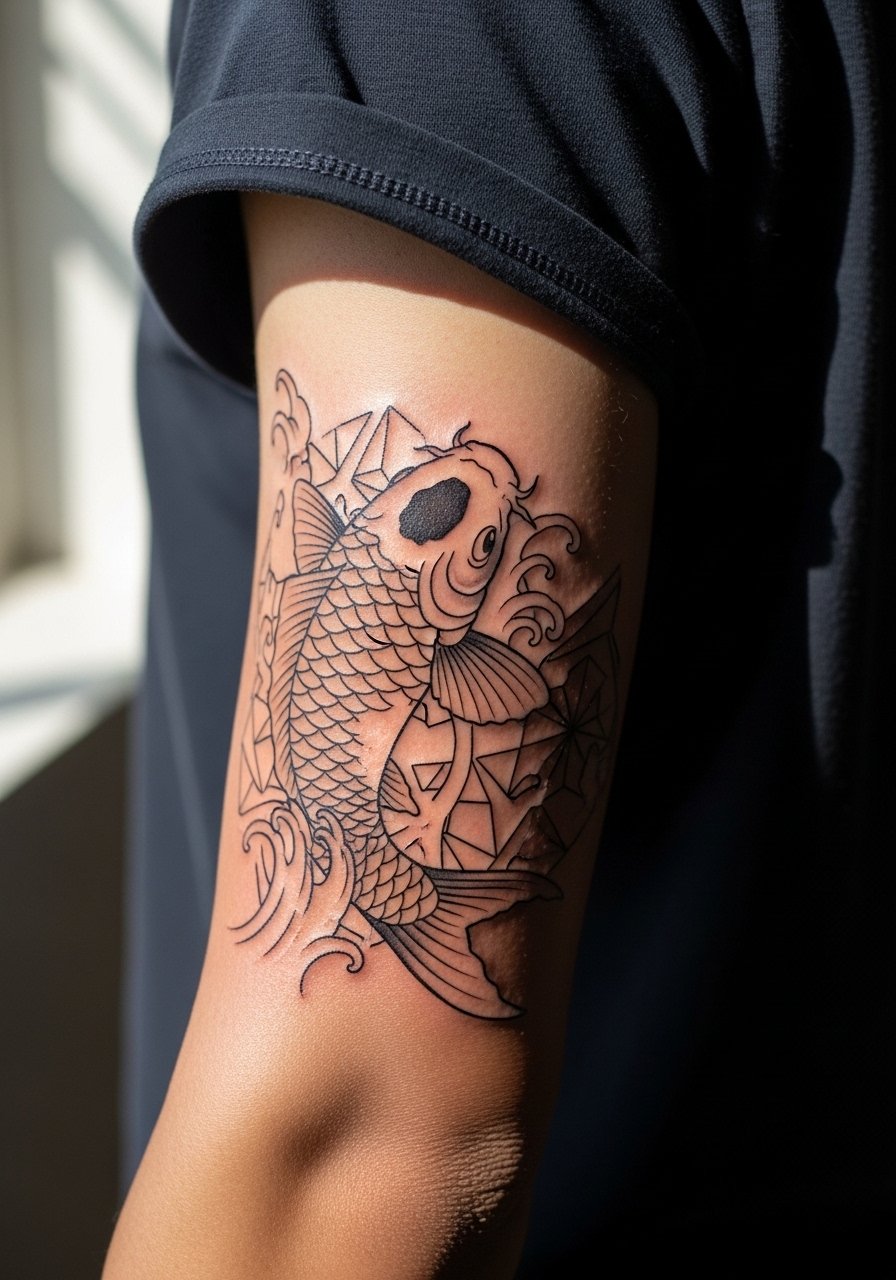
Fine line koi tattoos look fragile in photos, but their longevity comes down to placement and spacing, not just needle skill. The trend toward hyper-realism on small canvases means more people ask for aquarium-level detail on wrists and ribs. Pick the placement that matches how you live, and bring targeted notes to the consultation so the artist can scale detail for long-term wear. The first idea jumps straight into a forearm placement that balances detail and durability.
1. Inner Forearm Micro-Realism Koi with Soft Color
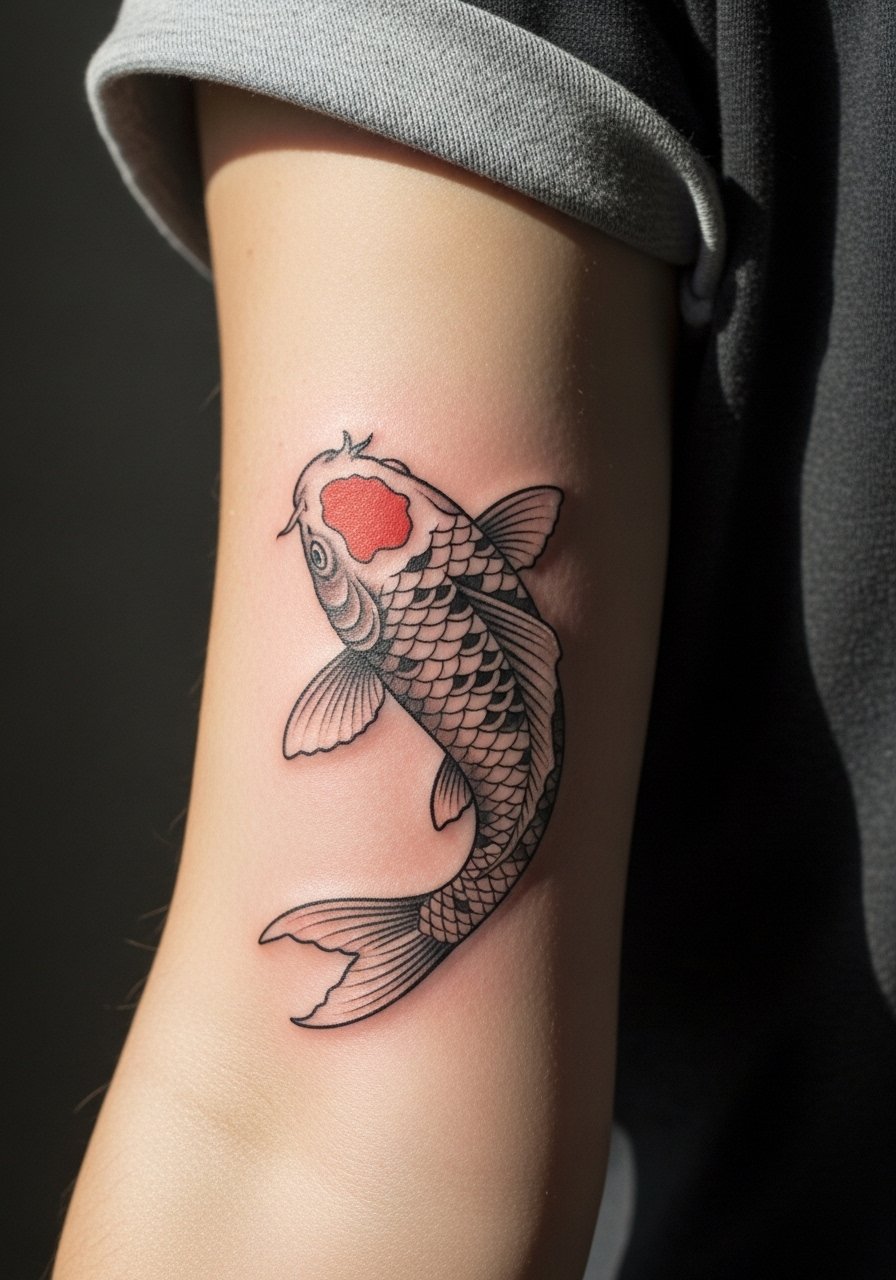
I have seen inner forearm koi hold detail well when kept a bit larger than people expect. For this placement, tell your artist to prioritize slightly thicker linework around the contour and lighter stipple shading in the scales so the texture stays readable after two years. Pain is mild, session time is usually one to two hours for a single medium piece, and a common mistake is asking for micro scales at a size that will blur. For showing it off, roll up sleeves and pair with a thin chain pendant necklace so the arm reads like intentional styling.
2. Upper Arm Half-Sleeve Koi in Flowing Water Composition
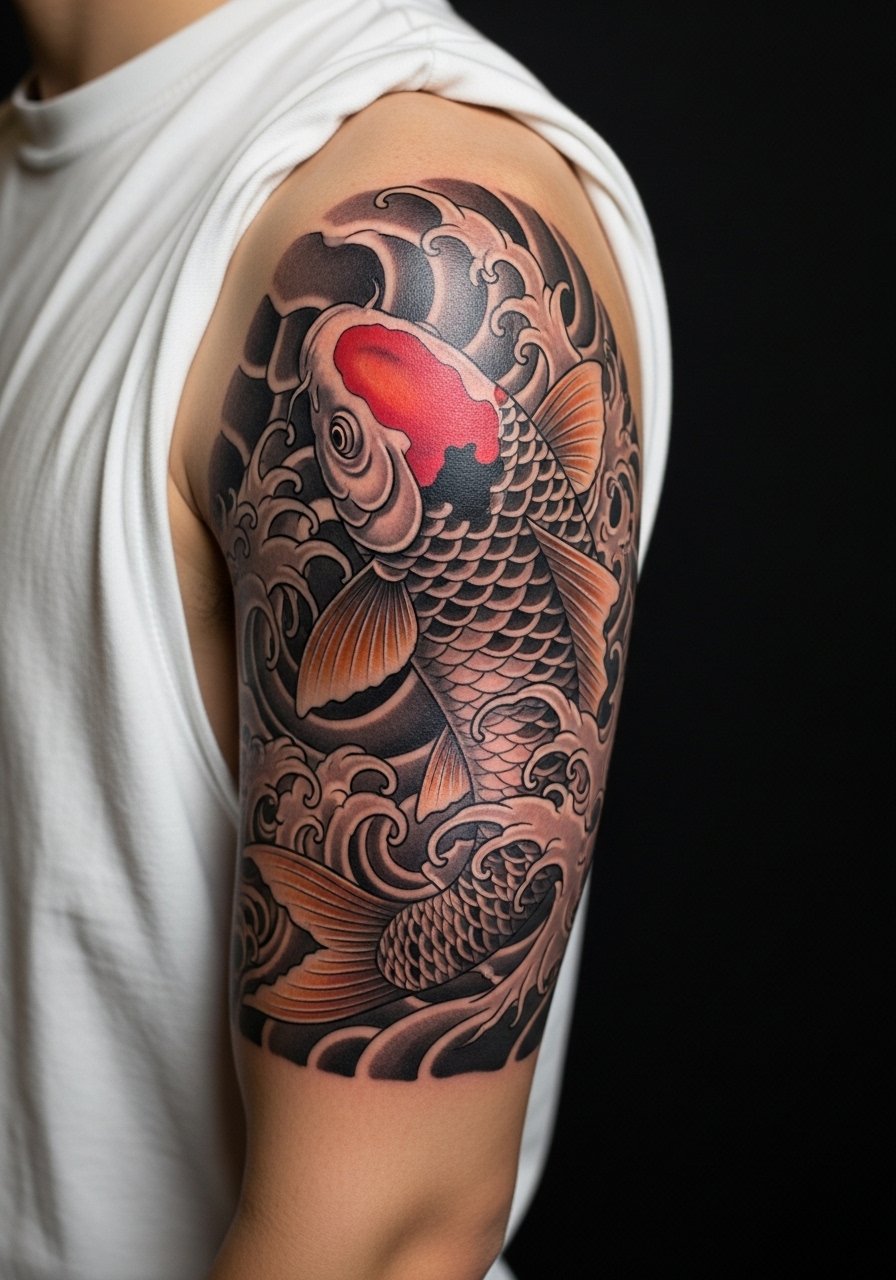
Most half-sleeves age well because there is room for saturation and contrast, which the koi design benefits from. In consultation, ask for bold anchor points where the fins meet the head so the silhouette reads from a distance. Expect two or three sessions depending on color saturation and background water work. A frequent error is overfilling the water background with dense texture that competes with the koi. For session comfort bring a loose tank top you can lift or slide aside without twisting your torso.
3. Ribcage Flowing Koi with Floral Accents
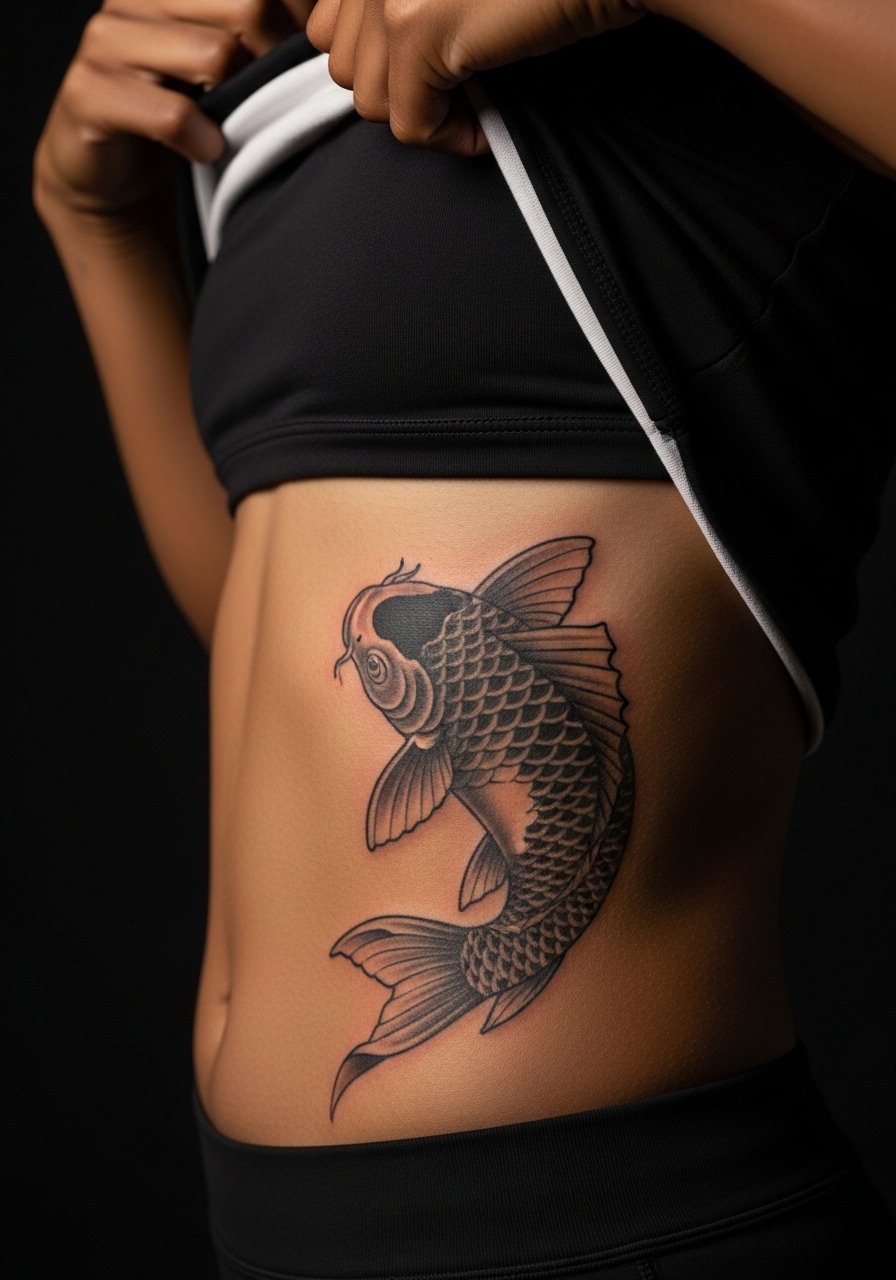
Fair warning, ribs are a higher pain zone and a tricky place for fine detail. Artists split on fine line on ribs. One camp says the skin stretch and breathing make lines blur quickly. The other camp says correct needle depth and spacing let fine line settle well. If you want this piece, ask the artist how they handle depth on rib flesh and request slightly larger scale for the floral accents. Expect the piece to look crisp at six months and to soften by year three, with a likely touch-up needed. For the session, wear a loose cropped top you can lift to expose only the tattooed area.
4. Twin Koi Mirror on the Lower Back with Subtle Shading
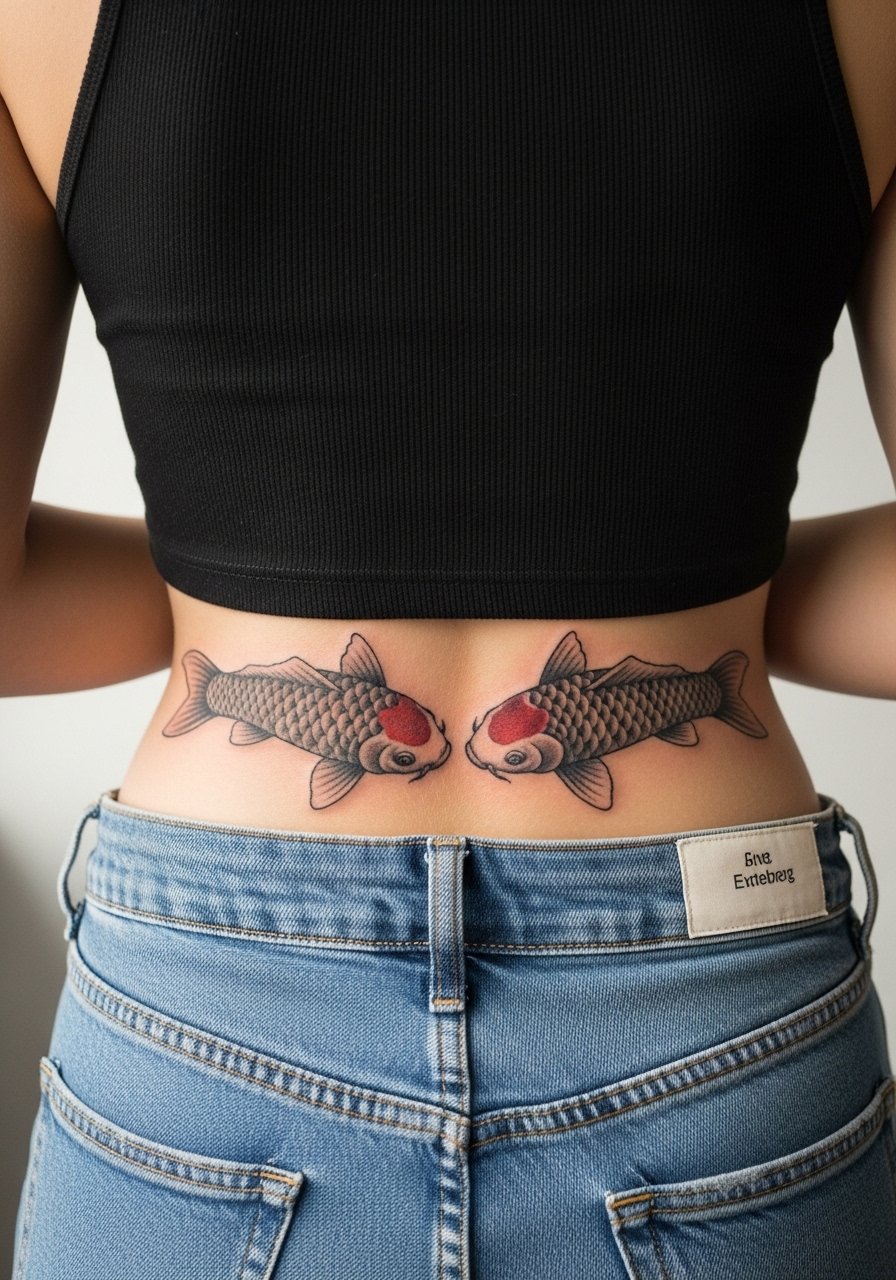
There is something about mirrored compositions on the lower back that balances movement and symmetry. The lower back gives a broad canvas so artists can build detailed scales without cramming. Pain is moderate. Sessions vary from two to four hours depending on how much background you want. A common mistake is asking for tiny text or intricate filigree that does not hold on that curvature. If you plan to show this off, pick low-rise waistlines or a tank top with a low back so the central symmetry sits in frame.
5. Calf Vertical Koi with Wave Motion and Contrast
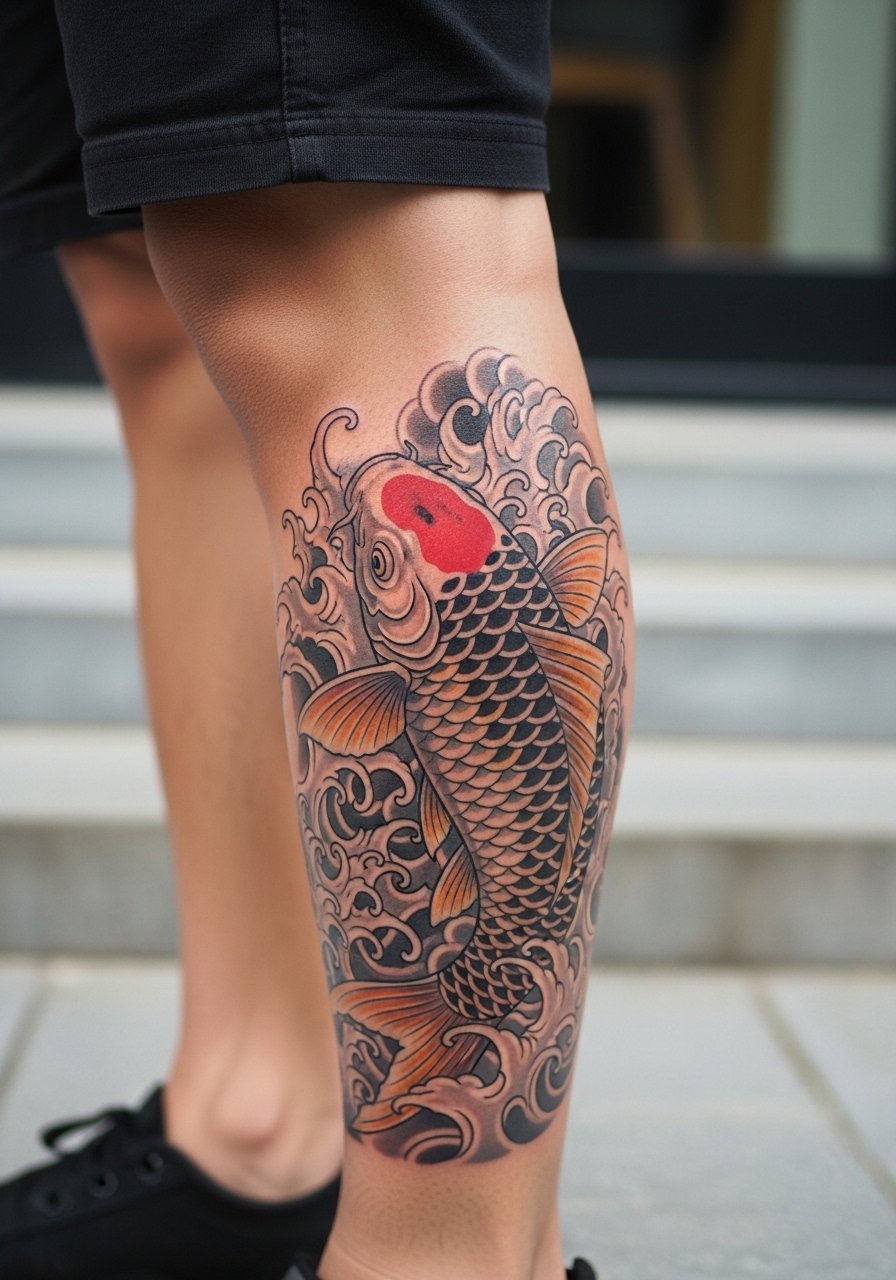
Calf placements allow taller compositions that read well when standing or walking. I recommend asking the artist to increase contrast along the spine of the koi so the form remains legible when movement compresses the skin. Expect one to two sessions and moderate pain. A mistake people make is clustering background elements near the belly of the calf where friction from clothing can speed fading. For showing it off, wear rolled-up shorts or a loose drawstring linen pant that you can slide up for visibility.
6. Ankle Mini Koi with Accent Scales
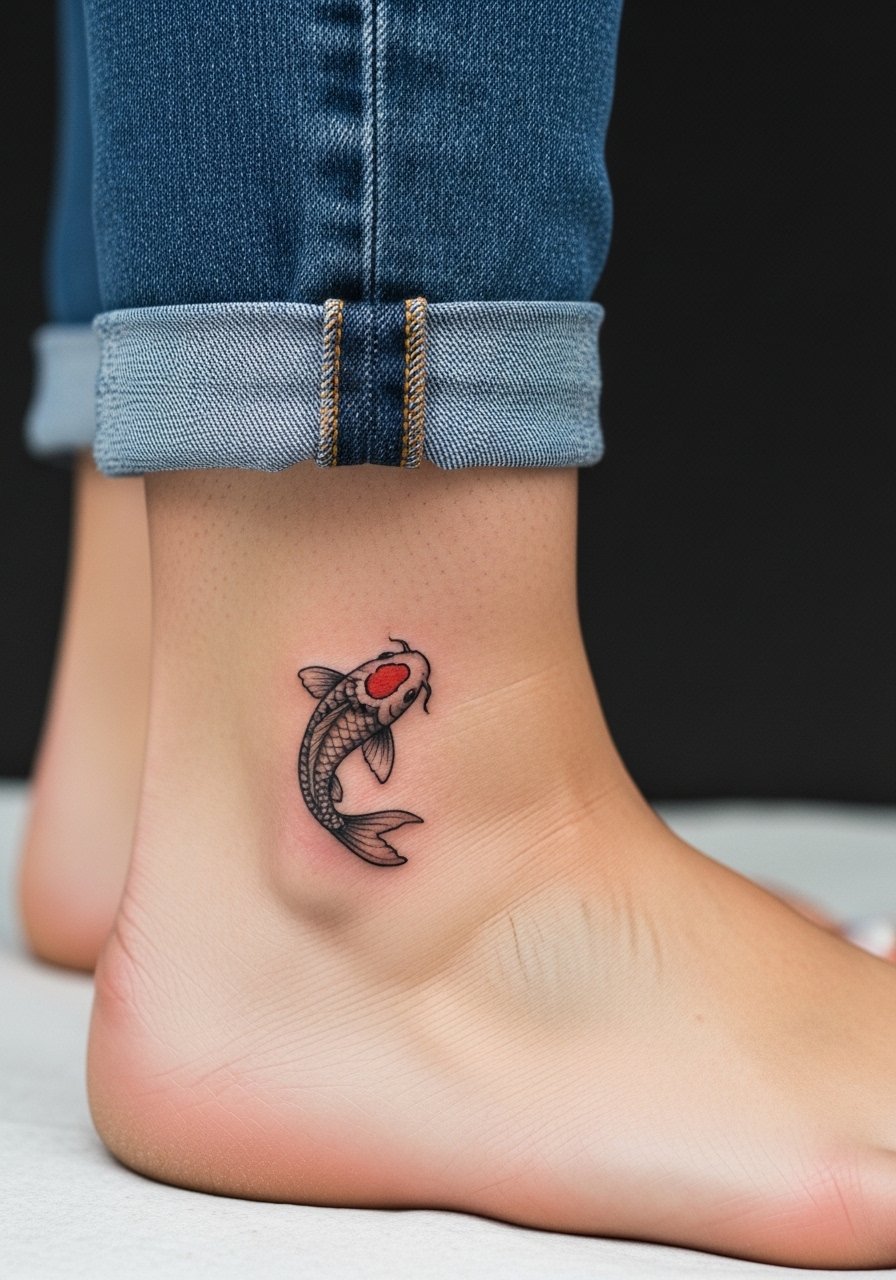
Tiny koi at the ankle read charming but they have a high risk of losing fine scale detail. Most artists recommend larger simplified scales and slightly heavier outline so the shape stays clean. The ankle is one of the trickier zones because of constant shoe friction and movement. Session time is short, often under an hour, but expect touch-ups sooner than for larger pieces. For the appointment, bring footwear that is easy to remove and a pair of sandals or slides so you do not compress the fresh ink.
Studio Day Picks
The forearm, calf, and ankle pieces above each face different exposure and friction challenges, so a handful of items smooth the session and early healing window.
-
Stencil transfer paper kit. Lets you preview placement and scale at home, which helps avoid tiny details on ankle or rib pieces that blur later.
-
Topical numbing cream. Useful for rib and sternum sessions to take the edge off while keeping the artist's linework consistent.
-
Thin protective film roll. Keeps wrist and ankle tattoos cleaner during the first week of boot and sock friction.
-
Fragrance-free gentle body wash. Cleans the area without stripping color, which matters for delicate koi shading.
-
Aquaphor healing ointment. A thin layer in the first days helps keep fine line work moist without suffocating the skin.
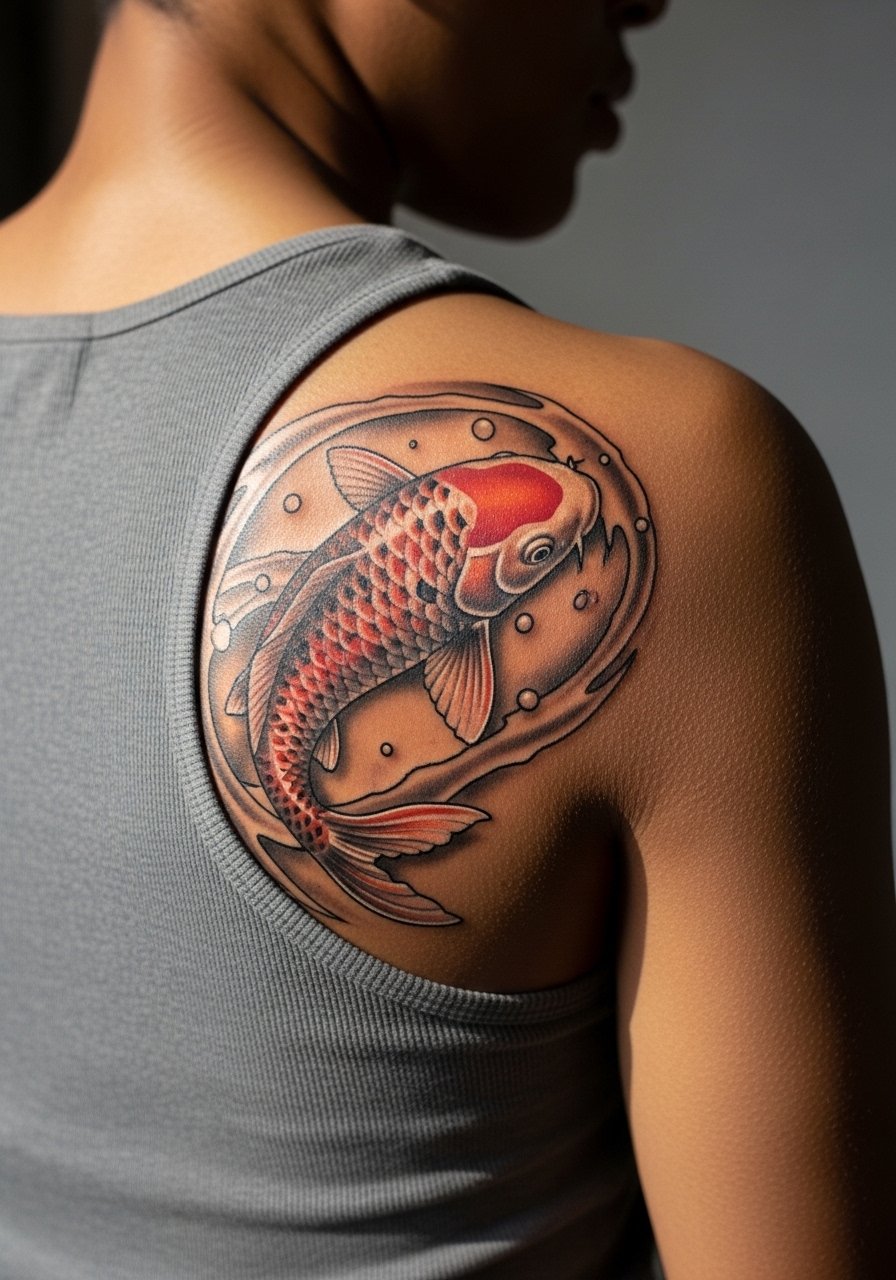
7. Shoulder Cap Koi with Floating Fins
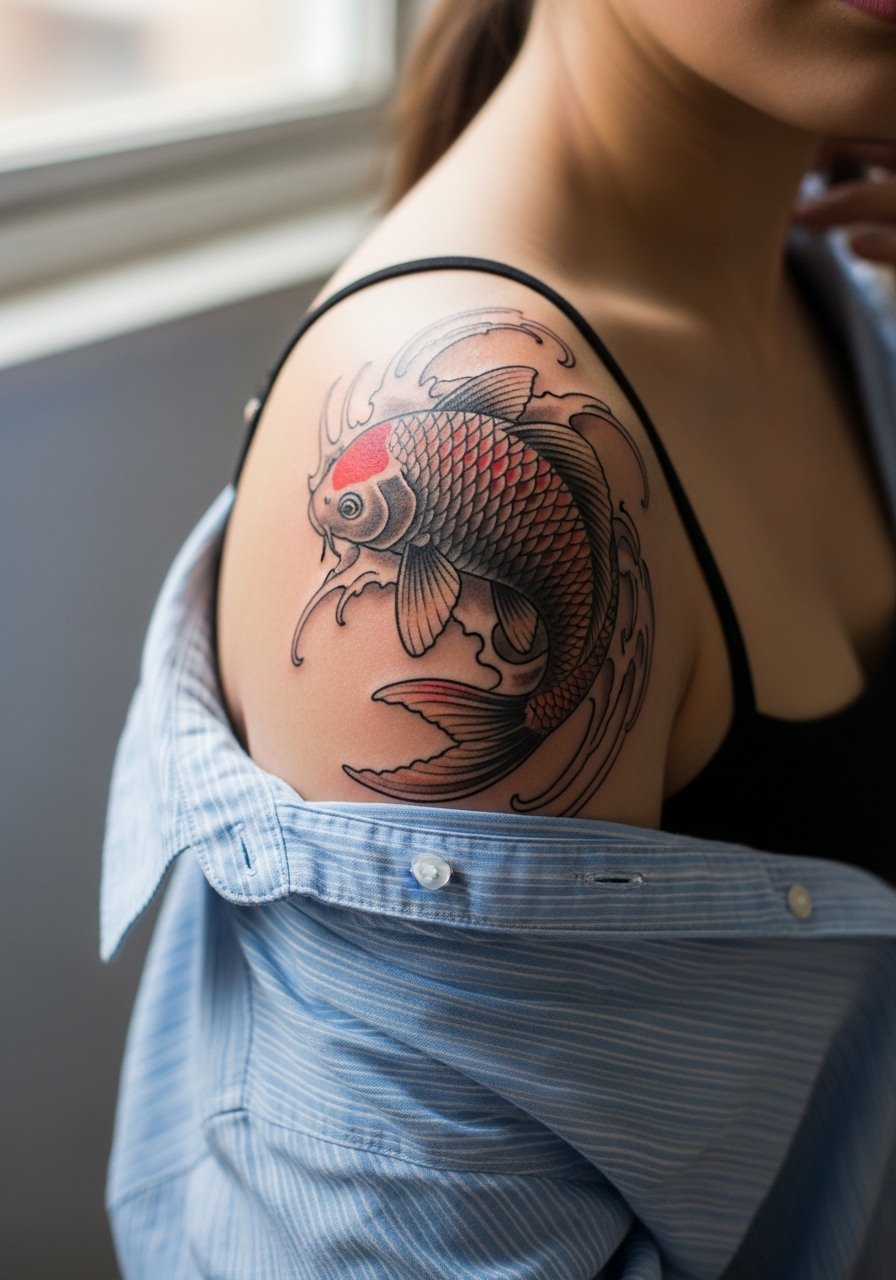
This placement gives a soft canvas for fins that look like they are in motion. I have seen shoulder koi stay readable for years if the artist leaves negative space around the fins. During consultation, ask for light stipple shading in the fin rays and slightly more saturation in the head so the fish has a focal point. Pain is mild to moderate and sessions are usually one to two hours. For the session wear a loose button-down shirt you can pull aside without twisting.
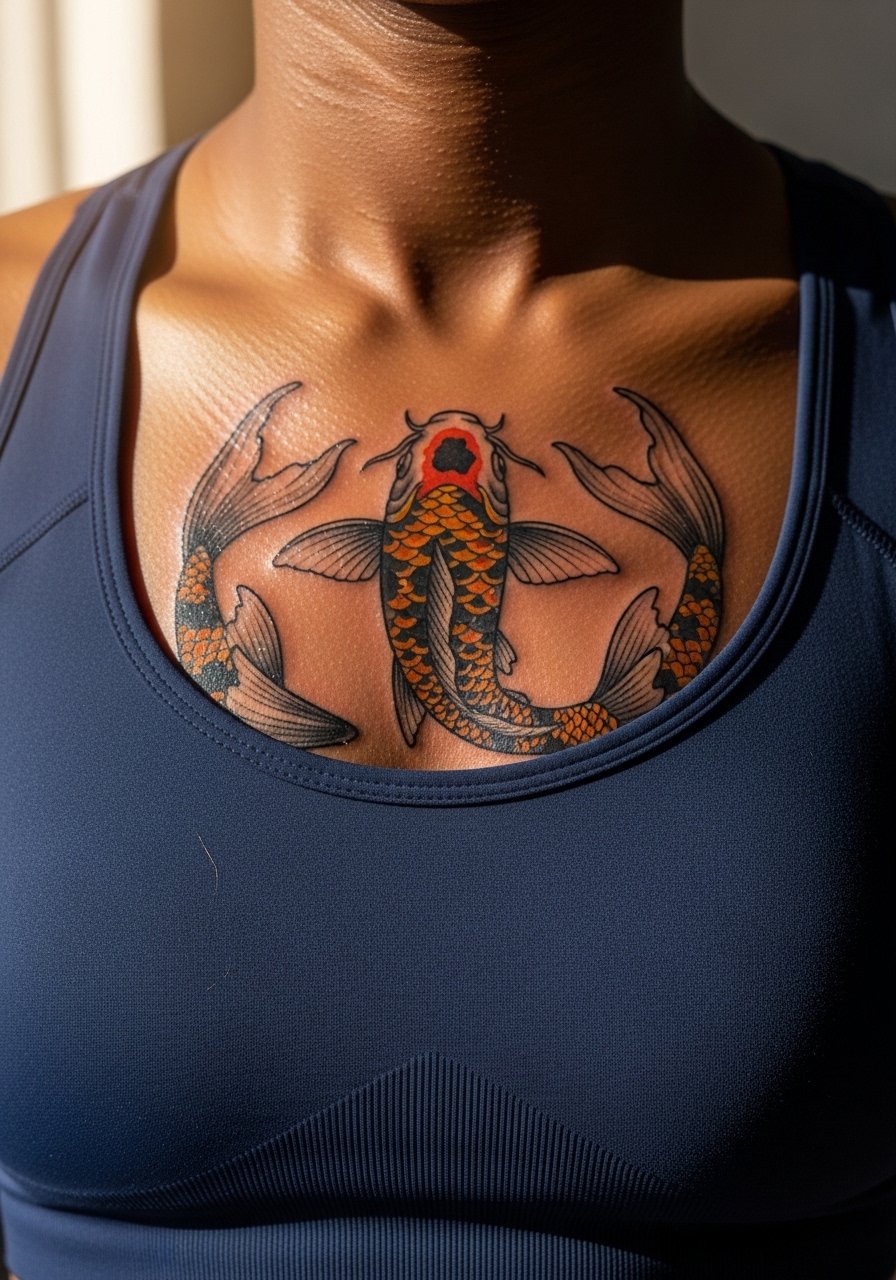
8. Chest Koi Swimming Across the Sternum
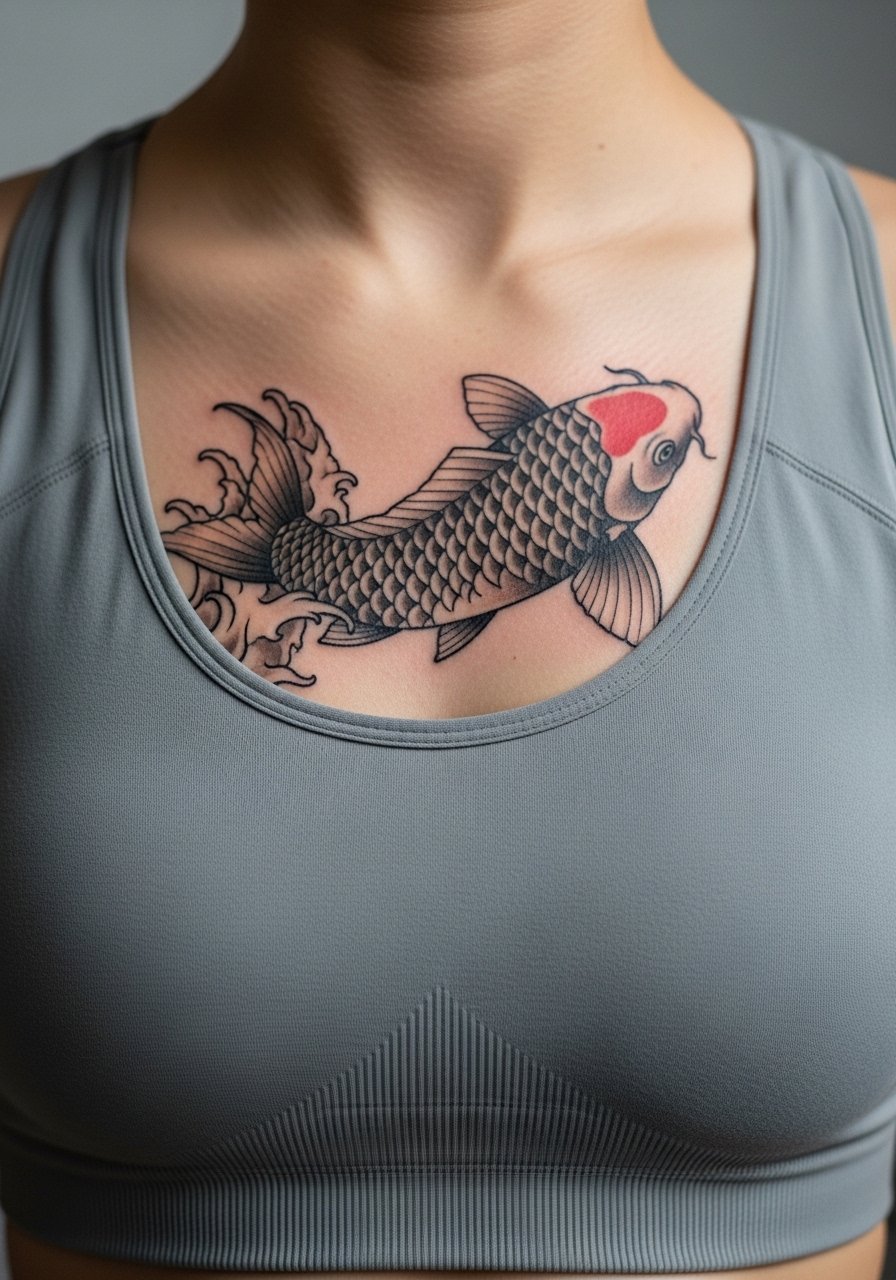
Most sternum pieces sit in a high-movement zone so they need spacing that anticipates stretching. The sternum can make dense linework merge if placed too close together. Describe how you want the fish to sit across the chest and request that the artist map the scales with some open skin between clusters. Pain is higher and sessions may be broken into shorter sittings. For career-sensitive placements consider visibility and plan clothing choices that let you control exposure without stress.
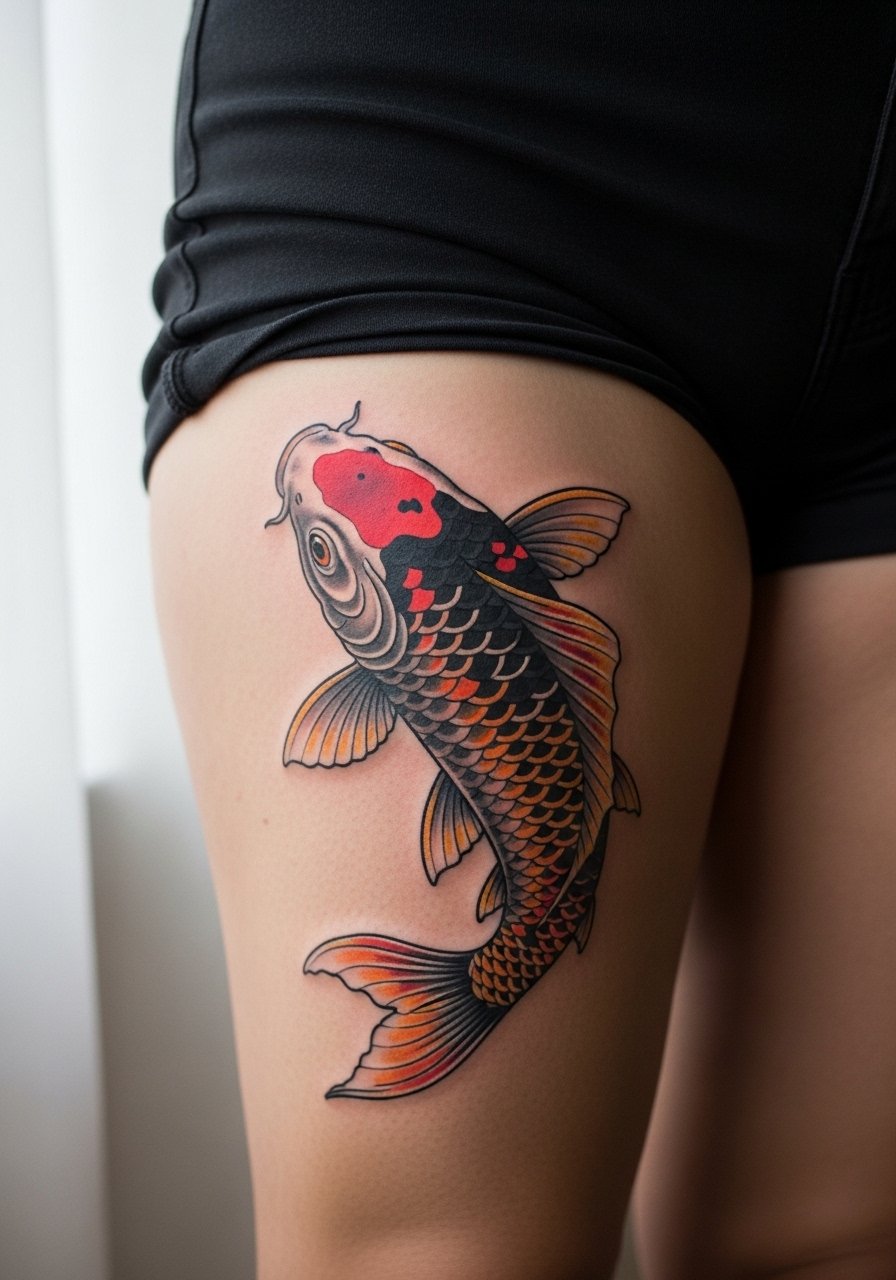
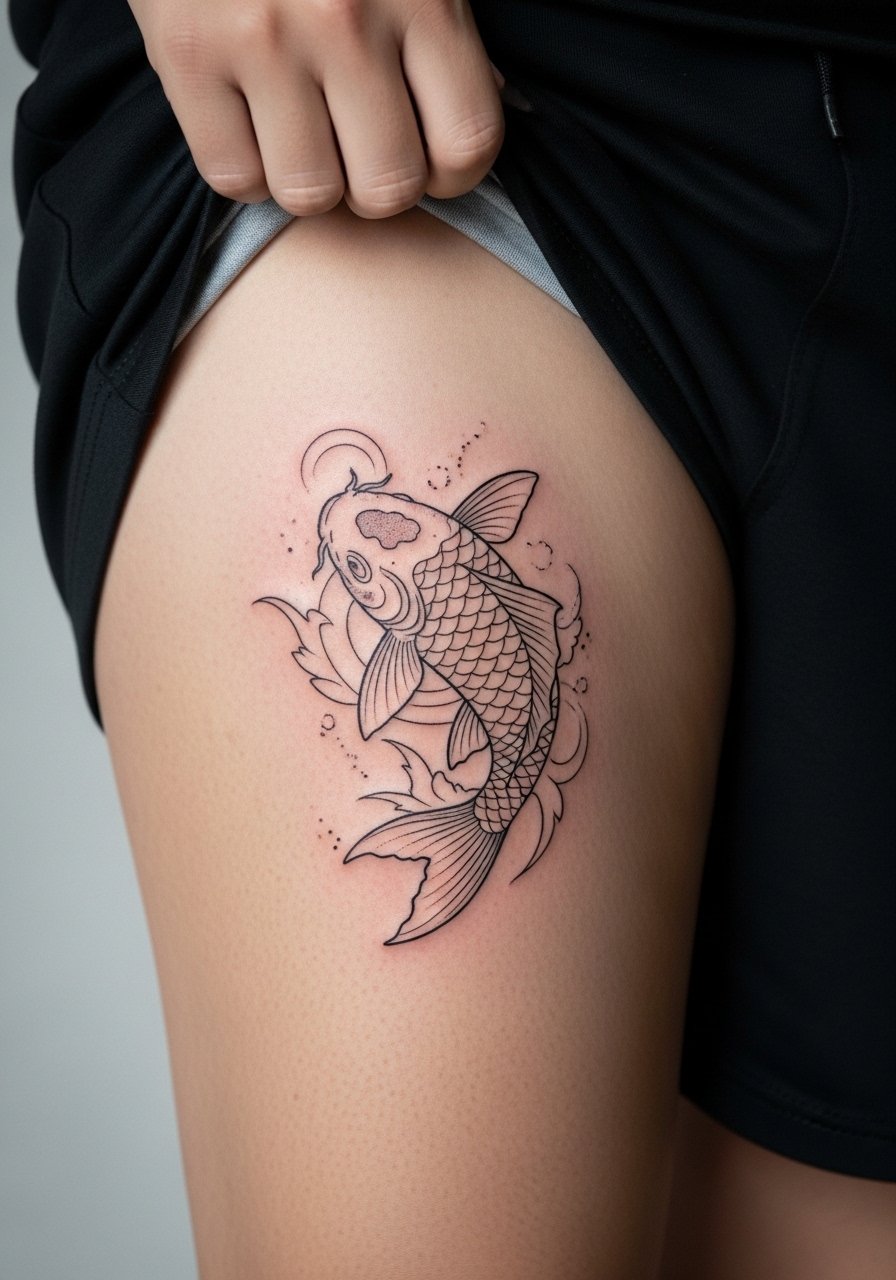
9. Full Thigh Koi with Botanical Background
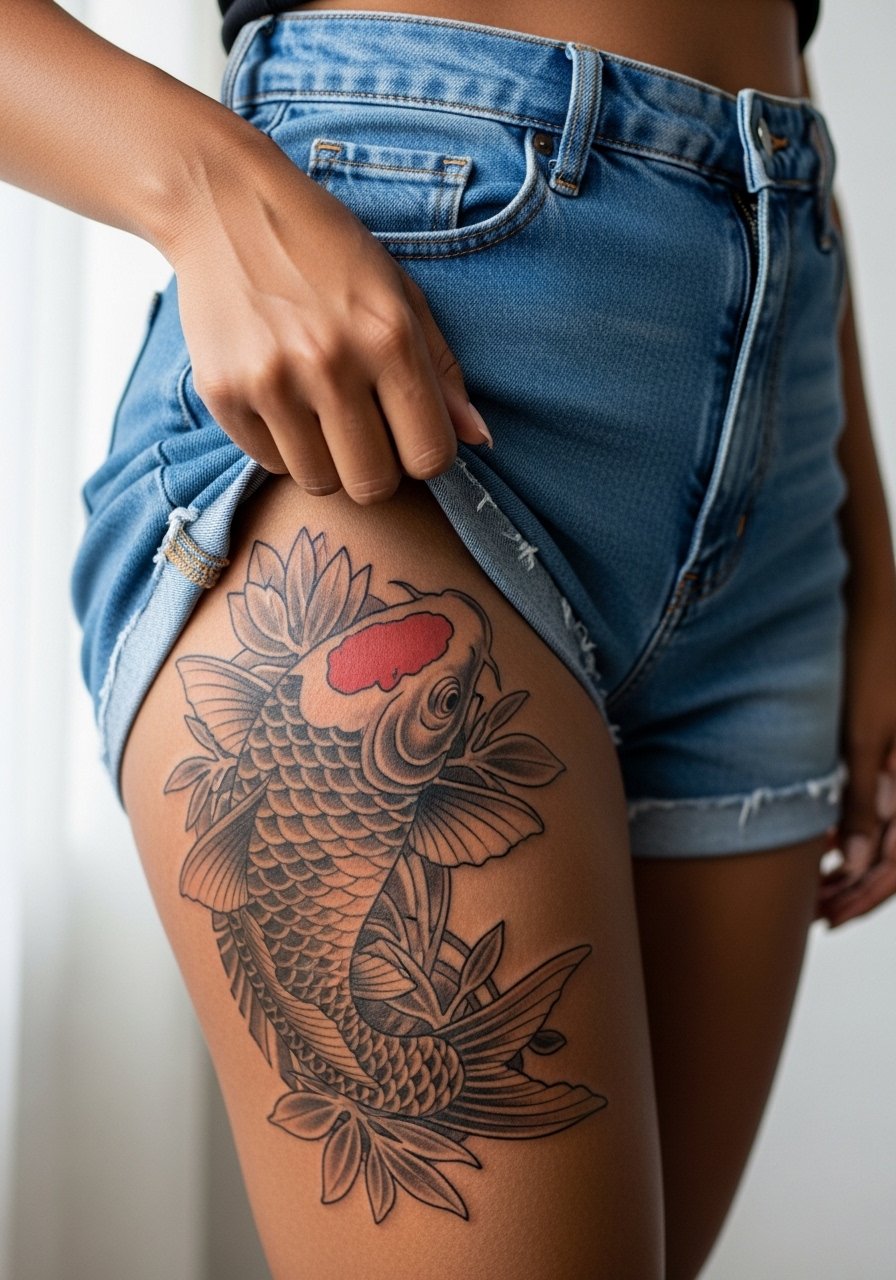
Thighs are ideal for large realistic koi because the area tolerates dense detail and saturation. I recommend asking the artist to place bolder anchor scales near the knee or hip so the form reads when you sit. Session time is longer and pain varies with inner versus outer thigh. A common mistake is asking for a full wrap without planning clothing or athletic wear that can rub the tattoo while healing. For the appointment wear easy shorts or a high-waisted denim short.
10. Collarbone Koi Accent with Light Watermarks
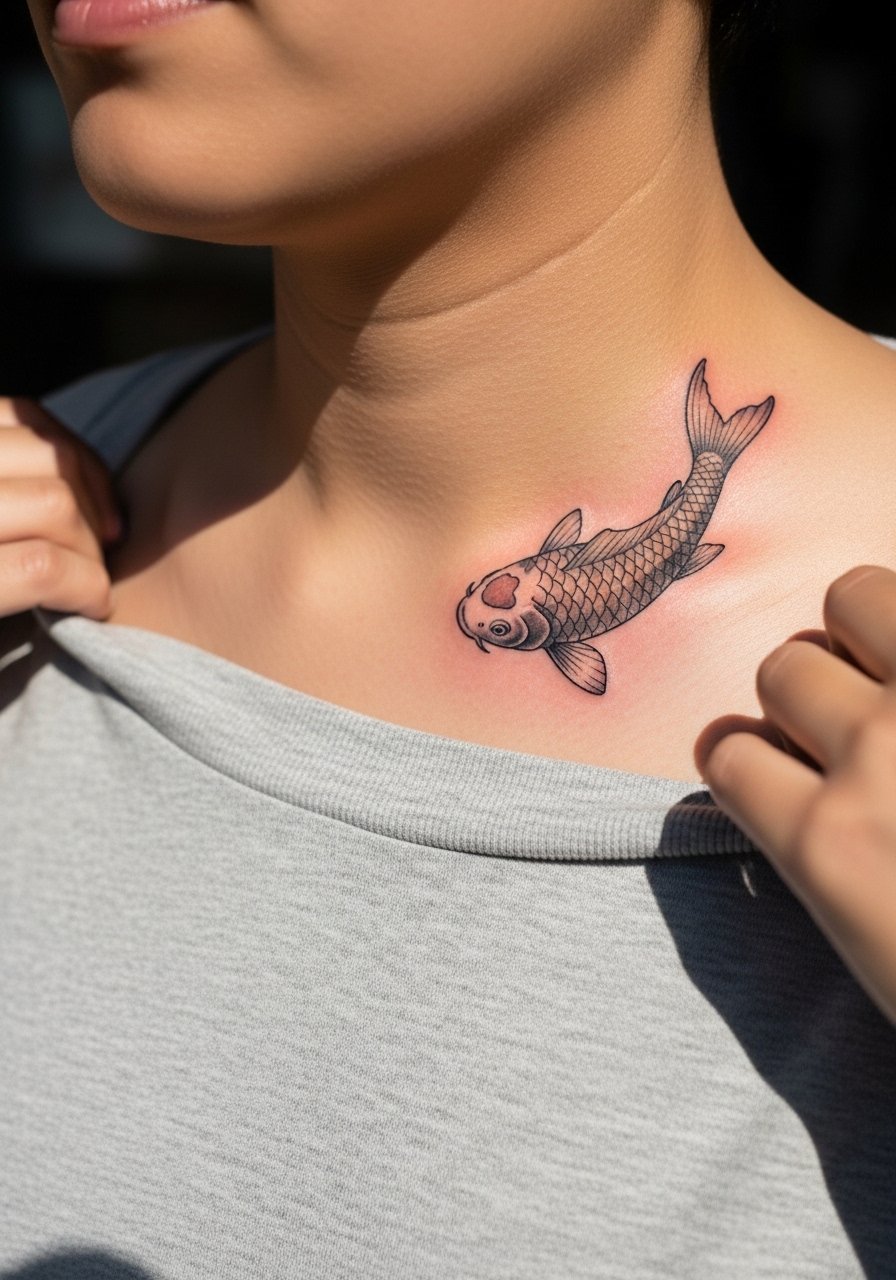
Collarbones show well with koi accents if the design follows natural bone lines. Expect moderate pain and a session under two hours for a small piece. The main mistake is forcing a large, dense composition into the shallow collarbone area where blowout risk is higher. Ask your artist for larger scale on key features like the eye and head so the silhouette holds up. For showing this off pick wide-neck tops or a thin chain pendant necklace that sits just above without crowding.
11. Hand-Edge Koi with Minimalist Shading
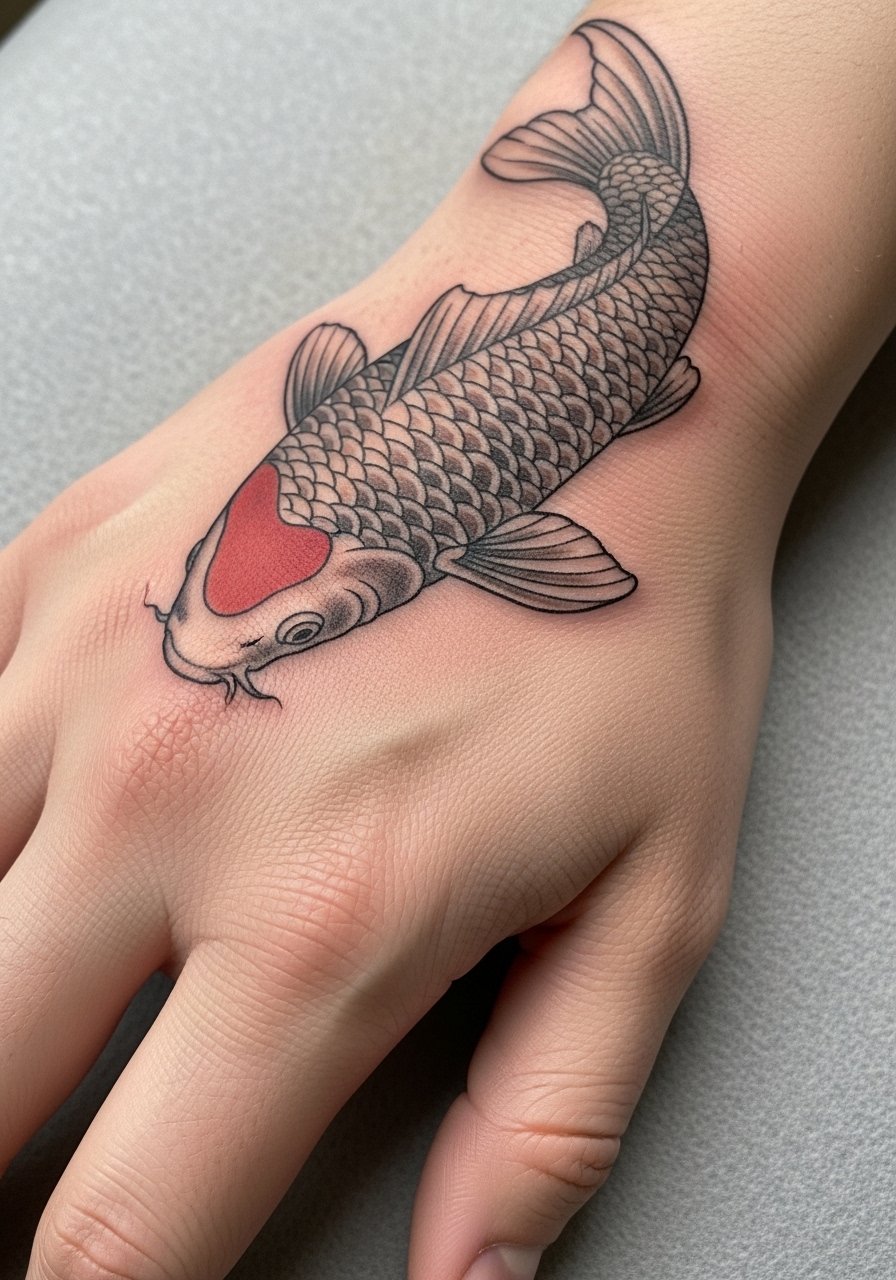
Hand placements are high visibility and high maintenance. Artists split on whether hands are worth the trade. One group warns that constant washing and sun cause faster fade. The other group says with strategic placement and bolder linework, a simple koi can remain distinct for years. If you pursue this, request simplified scale patterning and accept a touch-up plan. Hand tattoos also influence hiring in some industries, so consider career context. The session is quick but often painful because skin is thin.
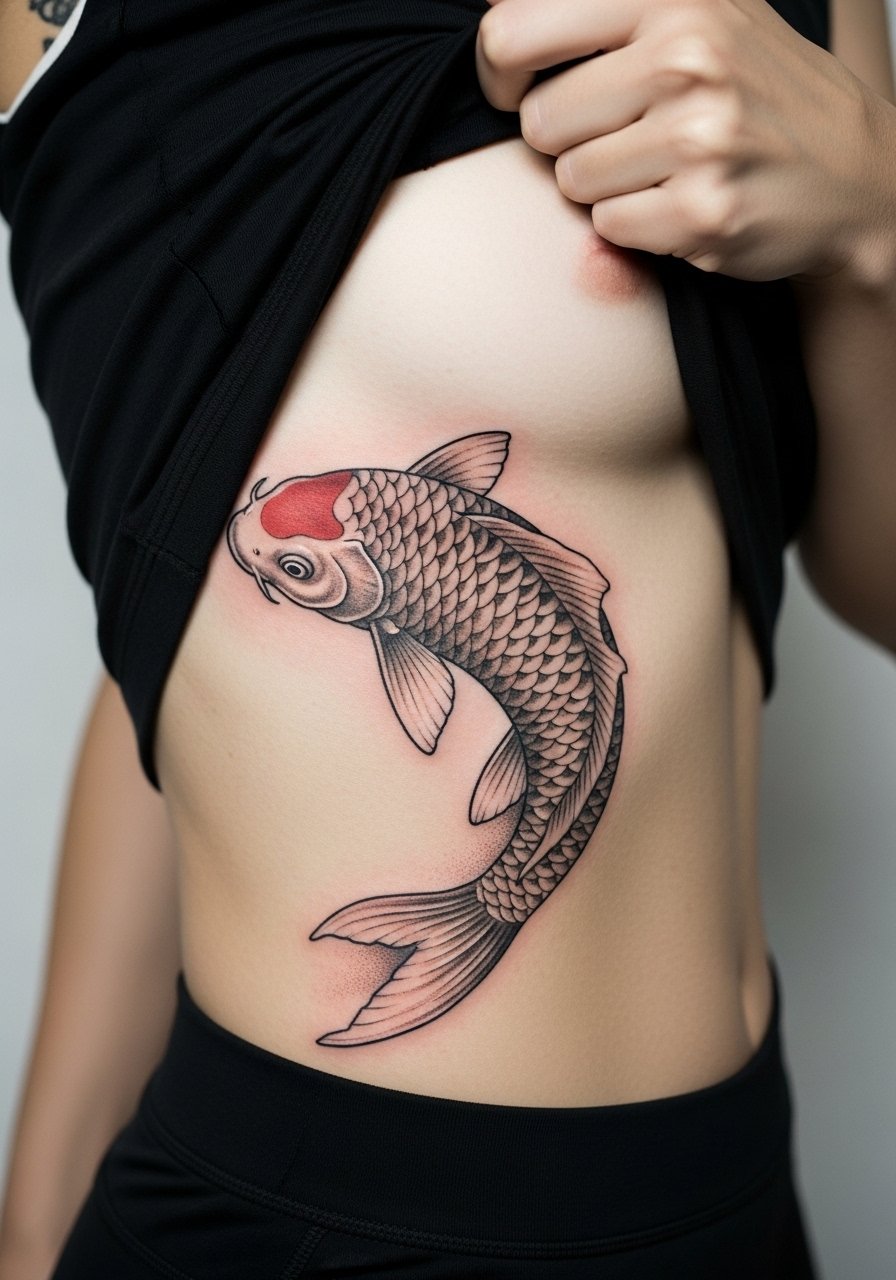
12. Side Torso Koi Flowing into Hip Accents
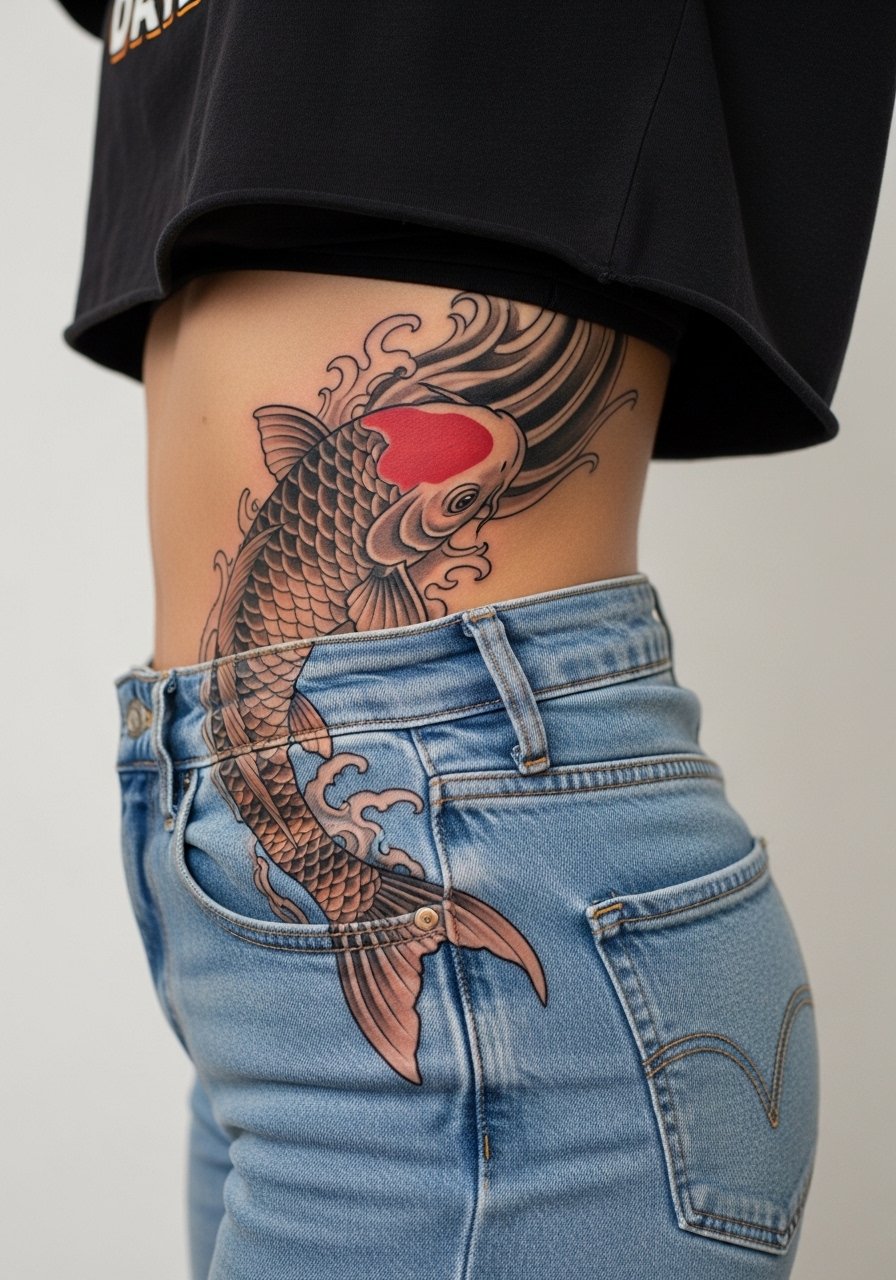
Side torso designs favor elongated compositions where the koi can swim with the body's curve. The skin there stretches with breathing, so ask your artist to test the stencil while you inhale and exhale to see how the line follows motion. Expect moderate pain and longer sessions. A common error is compressing detail near the hip crease where fabric rub accelerates wear. For the appointment pick a cropped tee and high-waisted bottoms so the artist has clean access without exposing more than needed.
13. Sleeve Accent Koi Among Geometric Background
There is visual impact when realism meets geometry, but balance is everything. When you sit down with your artist, bring references that show the exact ratio of fish to pattern you want. The common mistake is letting the geometric elements compete in scale with the koi. For longevity, ask for negative space buffers around the fish. Sessions are modular and may need three or more visits. Pair this with a rolled sleeve or a loose button-down for nights you want to showcase the work.
14. Calf Band Koi with Negative Space Waves
A calf band gives a neat circular motion and reduces blowout risk because the artist can use bolder strokes. This piece reads well from distance while keeping enough finesse up close. Consultation should include how much wrap you want and where the anchor point sits relative to the knee. Sessions are moderate in length. A typical mistake is too much tiny texture in the band that loses definition once the skin settles. For showing it off pick shorts or cropped pants that frame the band.
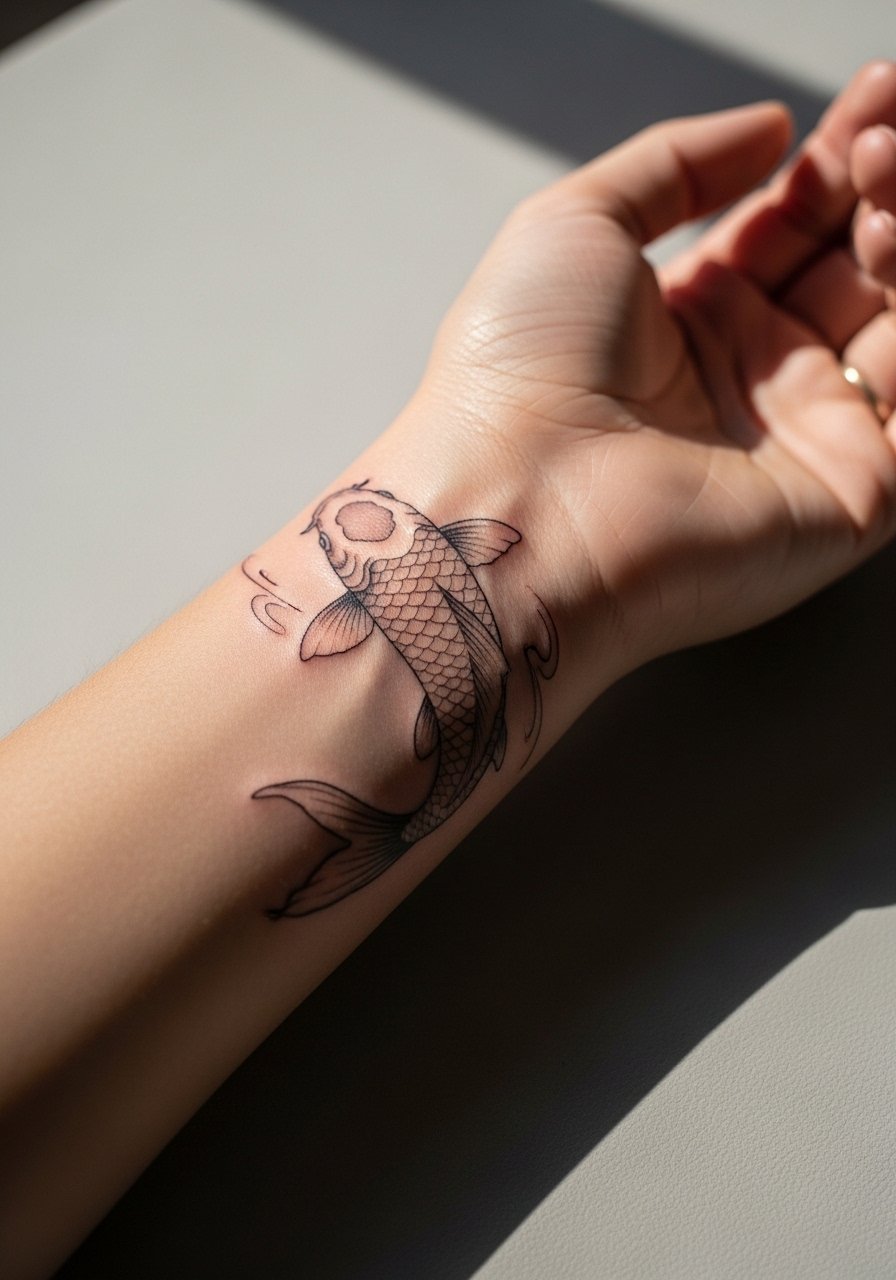
15. Subtle Wrist Koi with Accent Fin
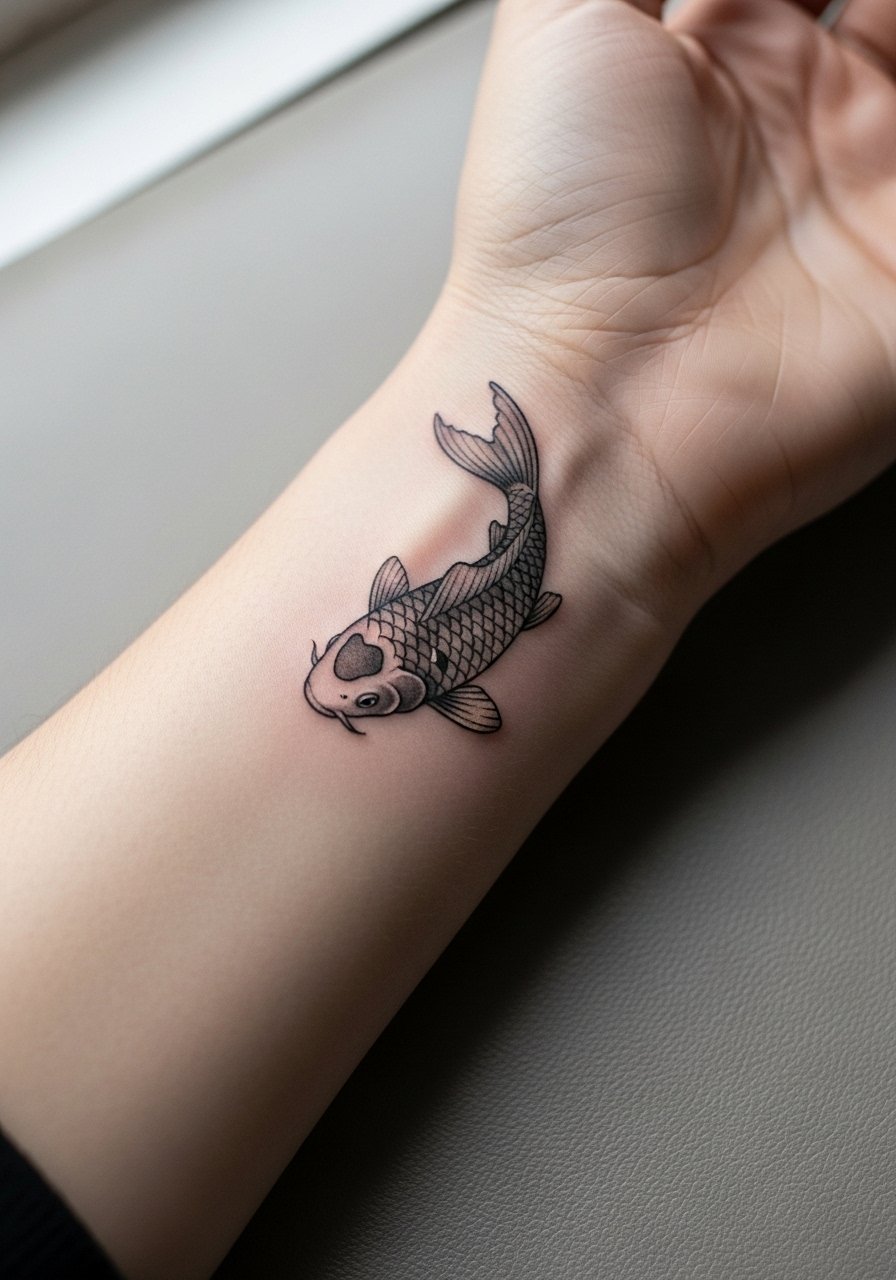
Wrist tattoos are great for subtle koi but they are exposed to sun and wash cycles. I recommend asking for increased contrast in central features and simplified scales along the tail. The wrist is sensitive, session time is short, and a common mistake is requesting fussy internal detail that does not hold. For the appointment, bring a shirt with sleeves that roll easily and consider pairing the finished piece with stacked delicate bracelets like a thin chain bracelet so the wrist reads as styled rather than bare.
16. Upper Back Single Koi with Minimal Background
Upper back gives a generous canvas and less day-to-day friction than limbs, which helps saturation and detail hold. When consulting, ask for an anchor shadow behind the koi head so the fish pops without heavy background that ages poorly. Sessions may be longer and split by artist preference. A mistake is packing the area with heavy clouds or filler that attracts sun and flattens the design. For the session wear a loose tank top that you can shift to expose only the work area.
17. Neck-Shoulder Transition Koi with Soft Edges
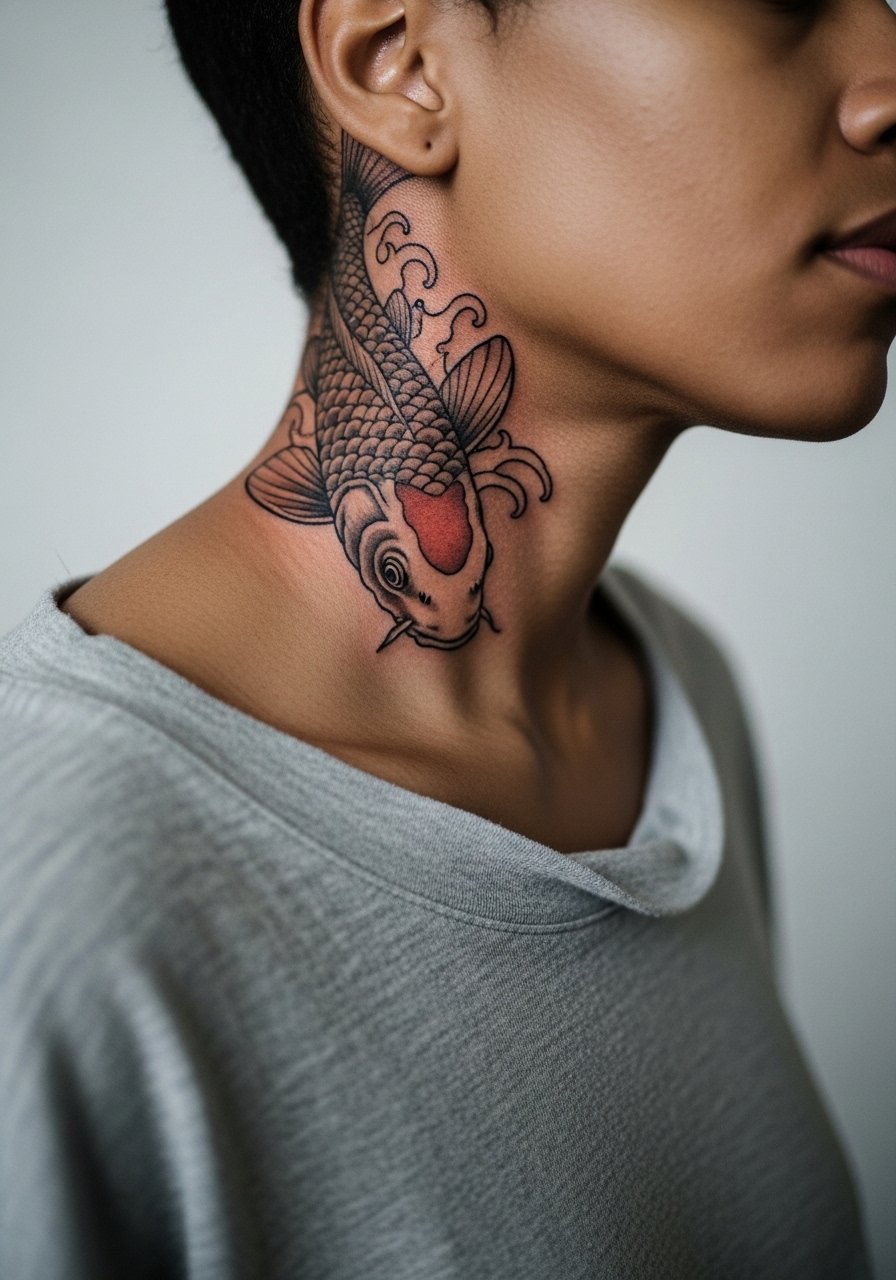
Neck pieces are visible and require an artist who understands skin movement and hairline interaction. Pain is higher and touch-ups are more common. The mistake is demanding extreme small detail; instead request stronger outlines at the transition points so the form does not blur. For the appointment wear a wide-neck top you can pull aside so the artist has access without exposing other areas. Consider how visibility affects work and social situations before booking.
18. Inner Bicep Koi with Delicate Scale Work
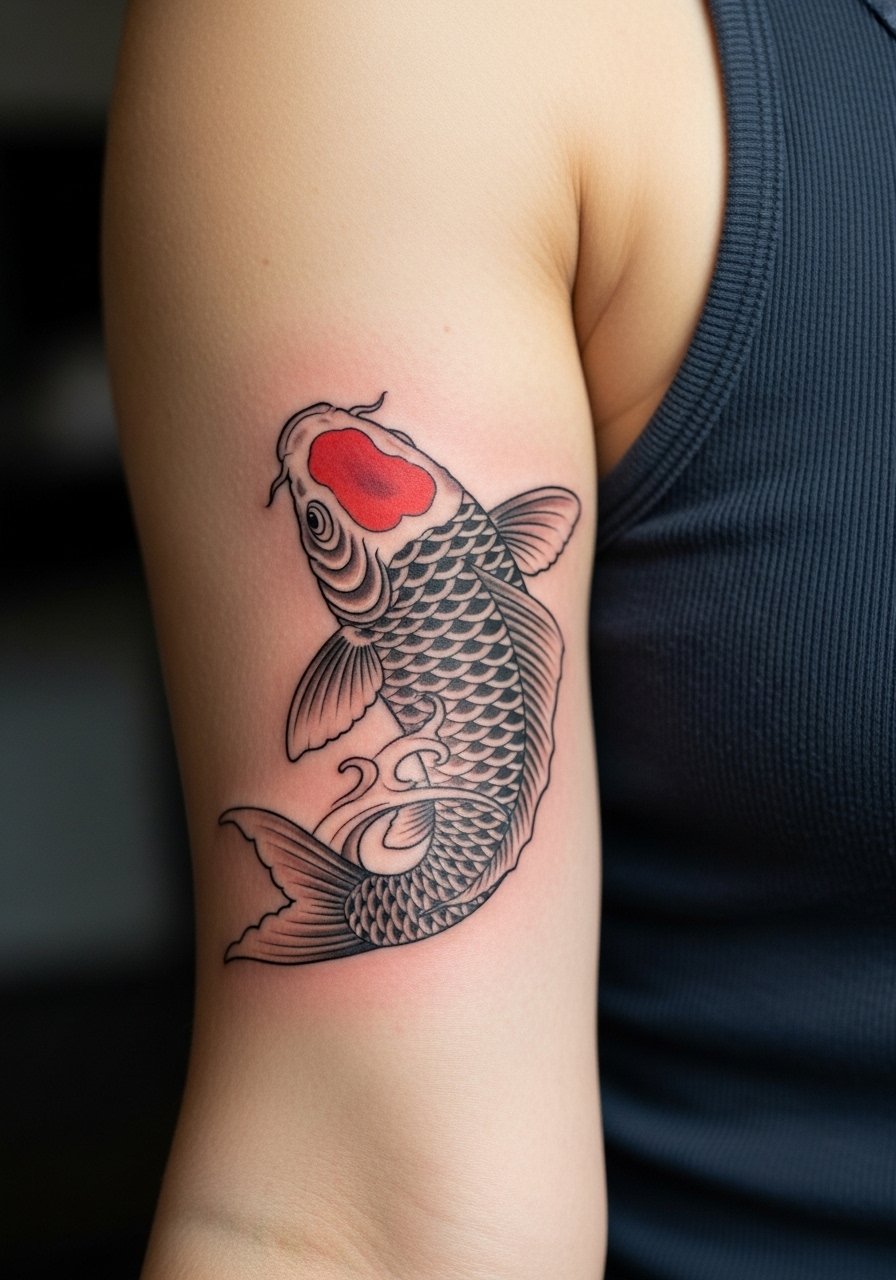
Inner biceps are a softer surface and can retain delicate shading if the artist spaces the scales. Pain is moderate and sessions are usually segmented to avoid extended pressure on that area. Tell your artist you want slightly looser scale spacing to prevent merging as the skin settles. One mistake is placing dense dark backgrounds right against the fish body where blowout risk climbs. For the session choose a tank top that allows the arm to be raised with no fabric pulling.
19. Neo-Traditional Koi on the Outer Thigh with Bold Saturation
Bold saturation suits the thigh because the area tolerates pigment and contrast. When asking for neo-traditional touches, show color swatches so the artist matches the hue family you expect. Sessions are longer and often split for color. A common mistake is asking for tiny color gradients that do not read well at distance. For showing this off pick garments with a clean hemline like high-waisted shorts or a skirt so the koi sits within the wearable frame.
20. Wrist Wrap Koi with Negative Space Tail
Wrap pieces on the wrist need careful negative space so the tail reads without crowding the tendons. Expect a short but precise session and plan for touch-ups in year one. The biggest mistake is forcing the full body of the koi into a narrow circumference. Ask your artist to prioritize head and mid-body detail and simplify the tail. For showing it off use stacked minimalist bangles or a minimalist watch that frames the wrist without covering the art.
21. Sternum Accent Koi with Symmetry Lines
Sternum work splits artists into two camps. One side argues that frequent chest movement and breath make fine lines merge quickly. The other side believes that careful spacing and stronger contour work allow pieces to age well. When you want symmetry, ask the artist how they compensate for stretch across the sternum and request slightly larger key features. Pain tends to be higher and sessions are often shorter and repeated. For the appointment wear a fitted sports bra that exposes only the target area.
22. Rib-Arching Single Koi with Subtle Dot Shading
Rib pieces demand tolerance for discomfort and an understanding of how breathing changes the canvas. Ask your artist to test the stencil while you breathe to ensure the arch holds in motion. Expect higher pain and a possible split session. A common mistake is asking for dense stipple across the entire belly of the rib where the skin is thin. For the session wear a cropped athletic top so the artist can work without exposing more than that area.
23. Foot Arch Koi with Minimal Color
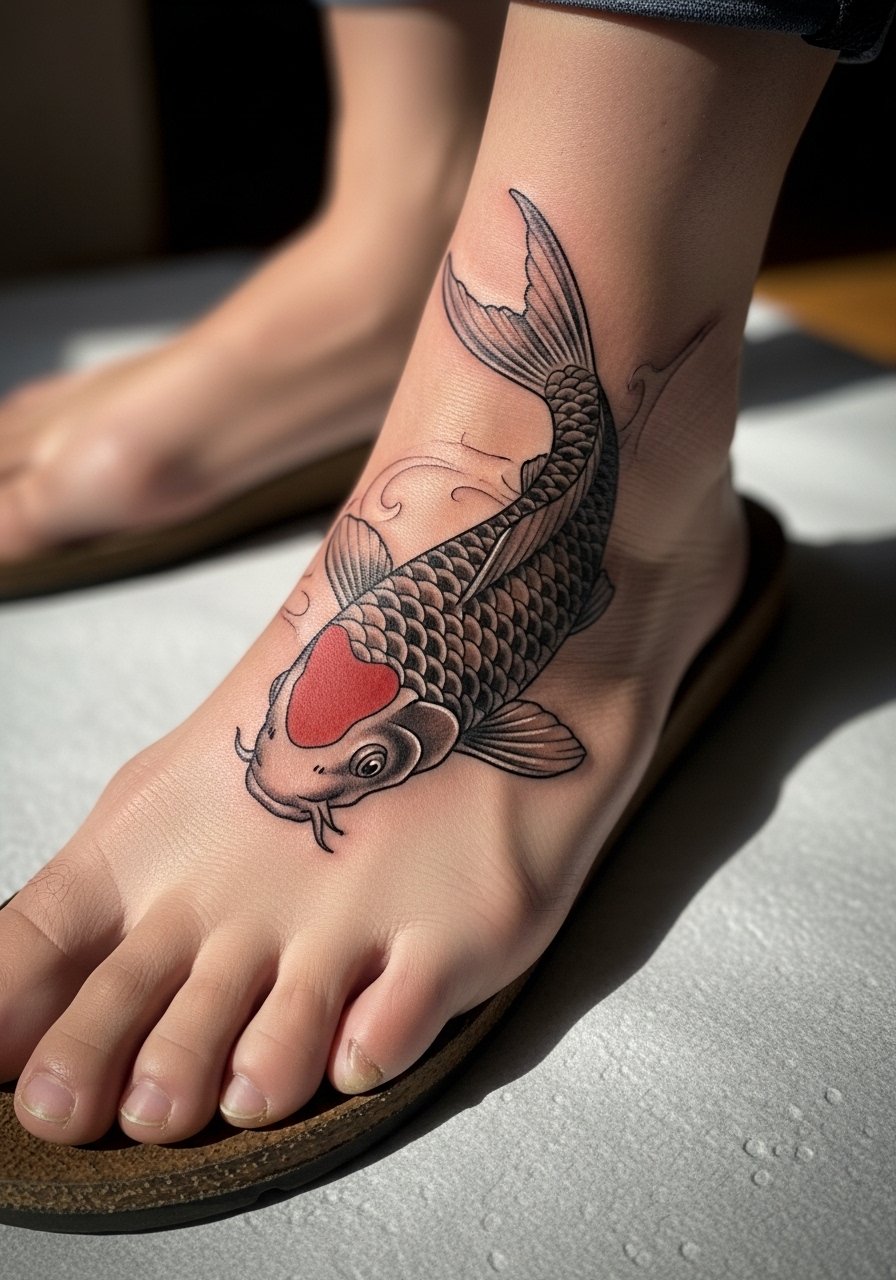
Foot tattoos take a beating from shoes and gait, so keep detail minimal and shapes bold. I recommend asking for simplified scale patterns and avoiding heavy background fills that wear down quickly. Sessions are short but healing is fussy because of friction. For the appointment wear sandals or slides that avoid compressing the fresh ink. Foot koi are best for people willing to accept more frequent touch-ups.
24. Small Behind-the-Ear Koi Accent
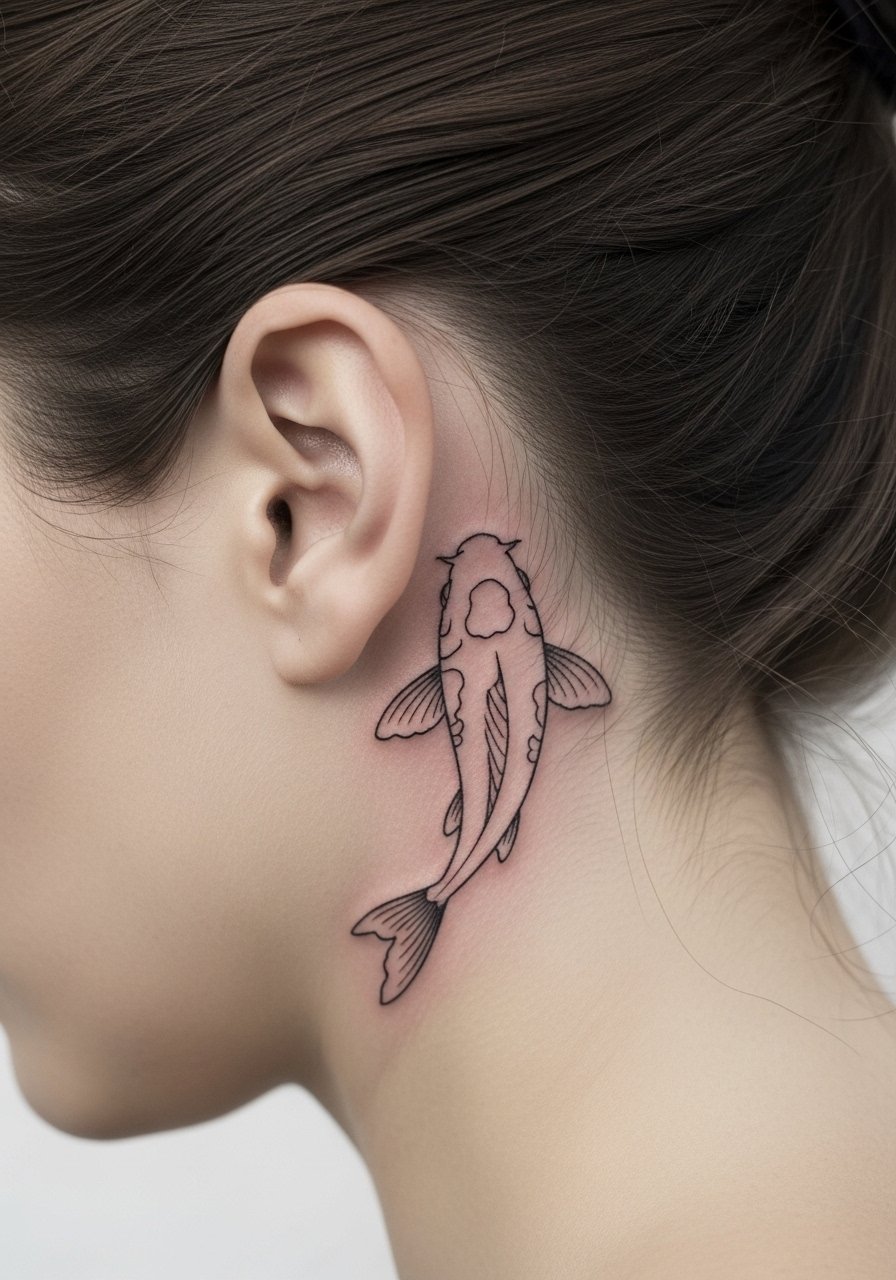
Behind-the-ear placements need a delicate hand and careful stencil placement because visibility is limited and lines must be clear. The area is sensitive and sessions are quick. A typical mistake is asking for heavy shading in a tiny spot where blowout risk is higher. For the appointment style your hair up and request the artist show you the stencil so you can confirm placement. Also consider how often you want that visibility in daily life.
25. Floating Koi on the Shoulder Blade with Open Water
Shoulder blade pieces benefit from negative space that suggests water without filling the entire area. Tell your artist you prefer open washes and anchor points at the head and tail. Pain is mild and sessions tend to be comfortable. A common error is too much dense background that competes with the koi. For showing it off wear a low-back top or a tank top worn backwards to keep attention on the art.
26. Inner Thigh Koi with Fine Dot Shading
Inner thigh work hides well and takes detail, but healing requires care because of friction from clothing. I suggest requesting looser scale spacing and stipple shading instead of dense color to avoid patchy fade. Sessions may be moderately painful and often require a break. Wear loose shorts or a skirt to your appointment and bring a change of underwear to reduce rubbing post-session. Inner thigh tattoos usually need a couple of touch-ups depending on activity level.
27. Full Back Koi Scene Swimming Upstream
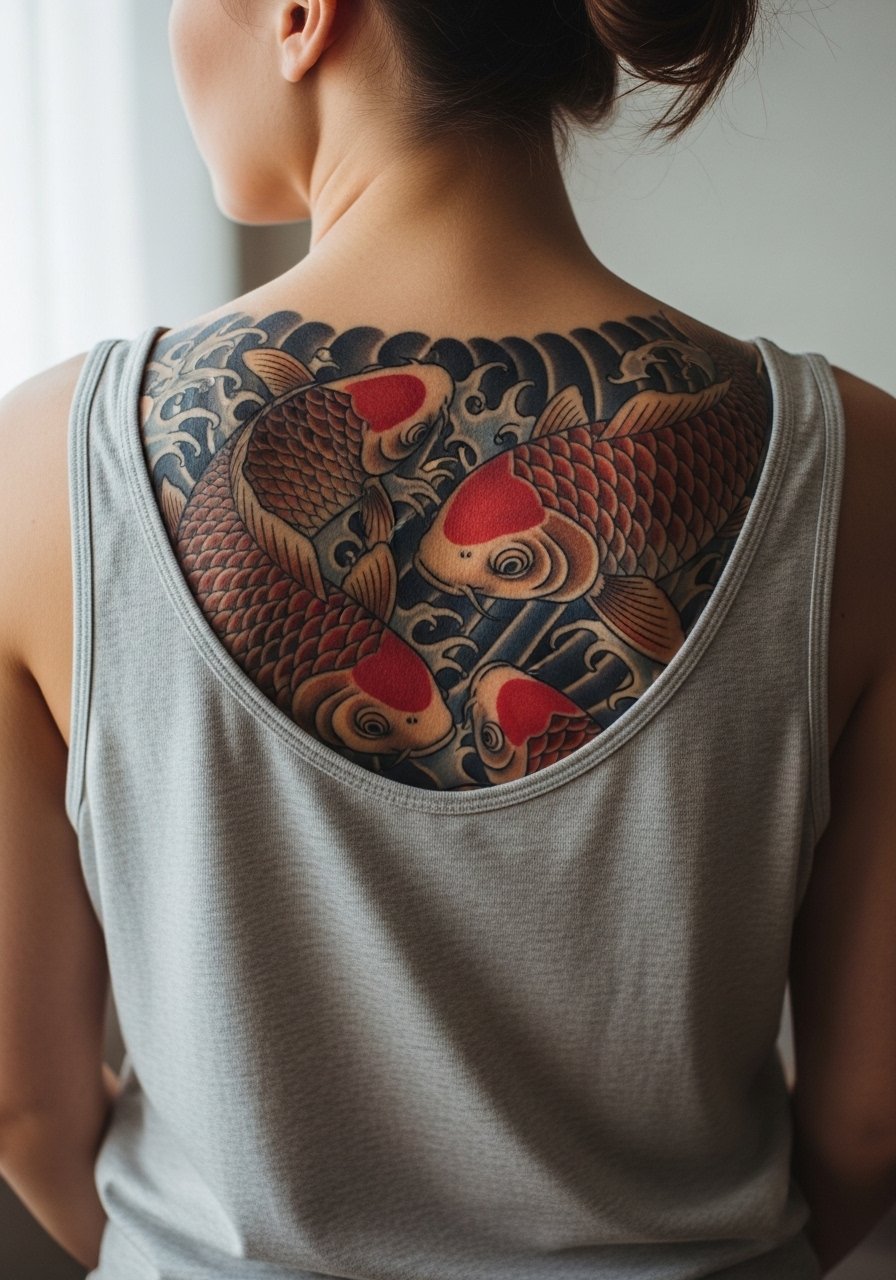
Full back compositions let artists create narrative motion and place multiple koi without compromise. When booking, ask the artist for a mapped plan across sessions so you know which areas will be shaded and when. Expect multiple long sessions and a staged healing schedule. Mistakes include asking for too many tiny focal points that dilute the central flow. For the show-off stage consider open-back garments to frame the scene on special occasions.
Frequently Asked Questions
Q: Will a fine line realistic koi still read after five years on the wrist or ankle?
A: It depends on placement and aftercare. Wrists and ankles are exposed and face friction, so expect some softening by year three to five. If the artist increases contour thickness slightly and leaves negative space around detail, the image will remain readable longer. Plan for touch-ups in that window if retention matters to you.
Q: How should I describe scale texture to my artist so it does not blur over time?
A: Ask for varied scale sizes with sparser detail toward the edges and stipple shading rather than dense cross-hatching. Tell the artist you want larger anchor scales near the head and simplified texture toward the tail. Bring close-up photos of healed work you like so they can match the sizing rather than copying fresh photographs.
Q: Are there clothing choices that help show off a koi on the thigh or back for events?
A: Yes. A high-slit skirt or high-waisted shorts frame a thigh piece and keep the composition visible without exposing too much. For back pieces, an open-back midi or a open-back midi dress highlights the central motion while still feeling intentional.
Q: Should I be worried about blowout on the ribs or sternum for realistic work?
A: Blowout risk increases on thin, mobile skin like ribs and sternum. Ask your artist how they approach needle depth and spacing in those areas. Artists split into camps on whether fine line belongs there, so get a clear explanation of their technique and a touch-up plan before booking.
Q: How often will a large back koi need touch-ups compared with a small ankle koi?
A: Generally large back pieces with good saturation need fewer frequent touch-ups because there is more pigment and contrast. Small ankle pieces face shoe friction and may require touch-ups sooner. Lifestyle, sun exposure, and how your skin heals will dictate the timing more than size alone.
