
Sitting in the chair with the stencil across the small of the back is one of those moments where decisions stick. The stencil can lie flatter than expected. The line weight looks thinner under studio lights. A choice about scale or spacing made there affects how the piece reads with jeans and a crop top ten years from now. These 21 lower back approaches solve for movement, wardrobe, and aging so the work looks deliberate the day it heals and for years after.
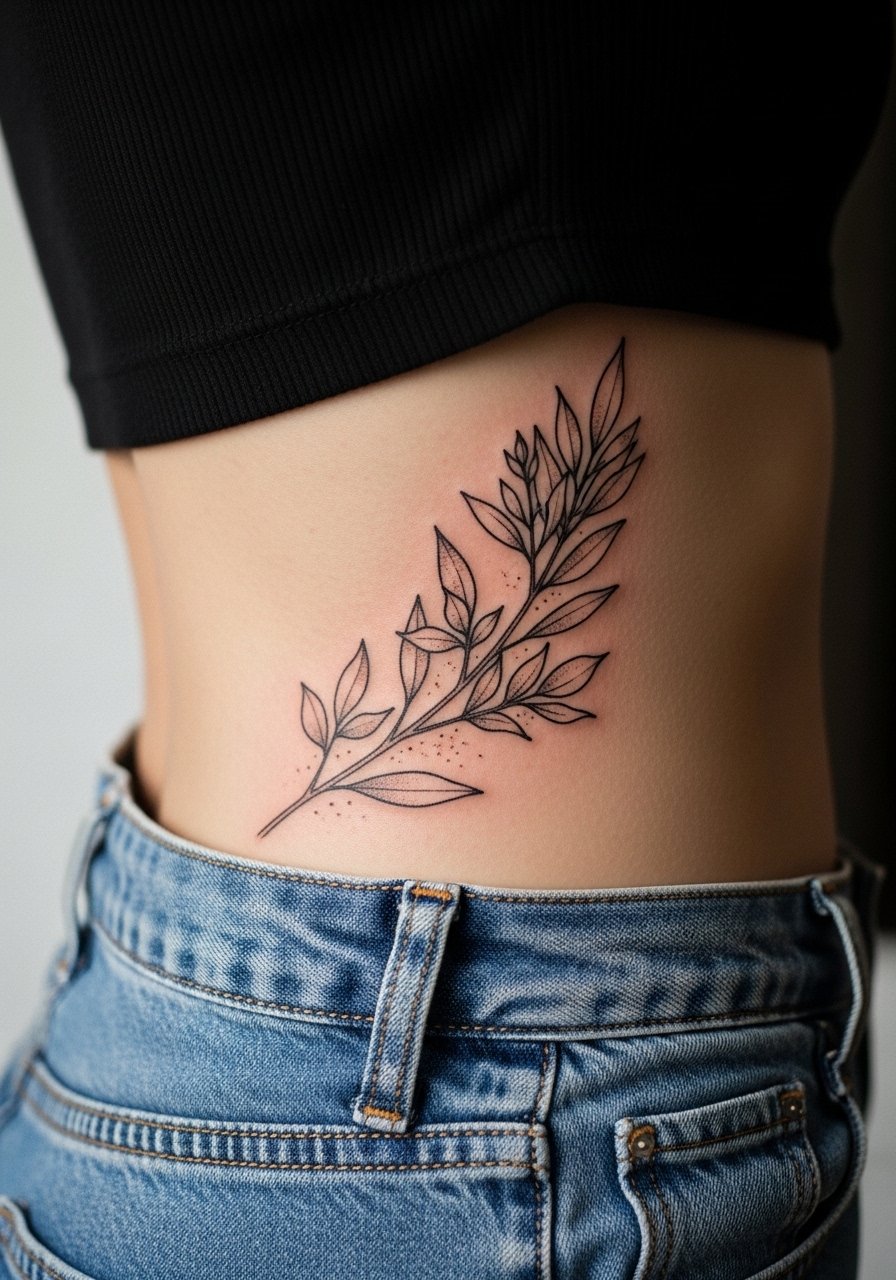
1. Fine Line Floral Vine Along the Dimpled Groove
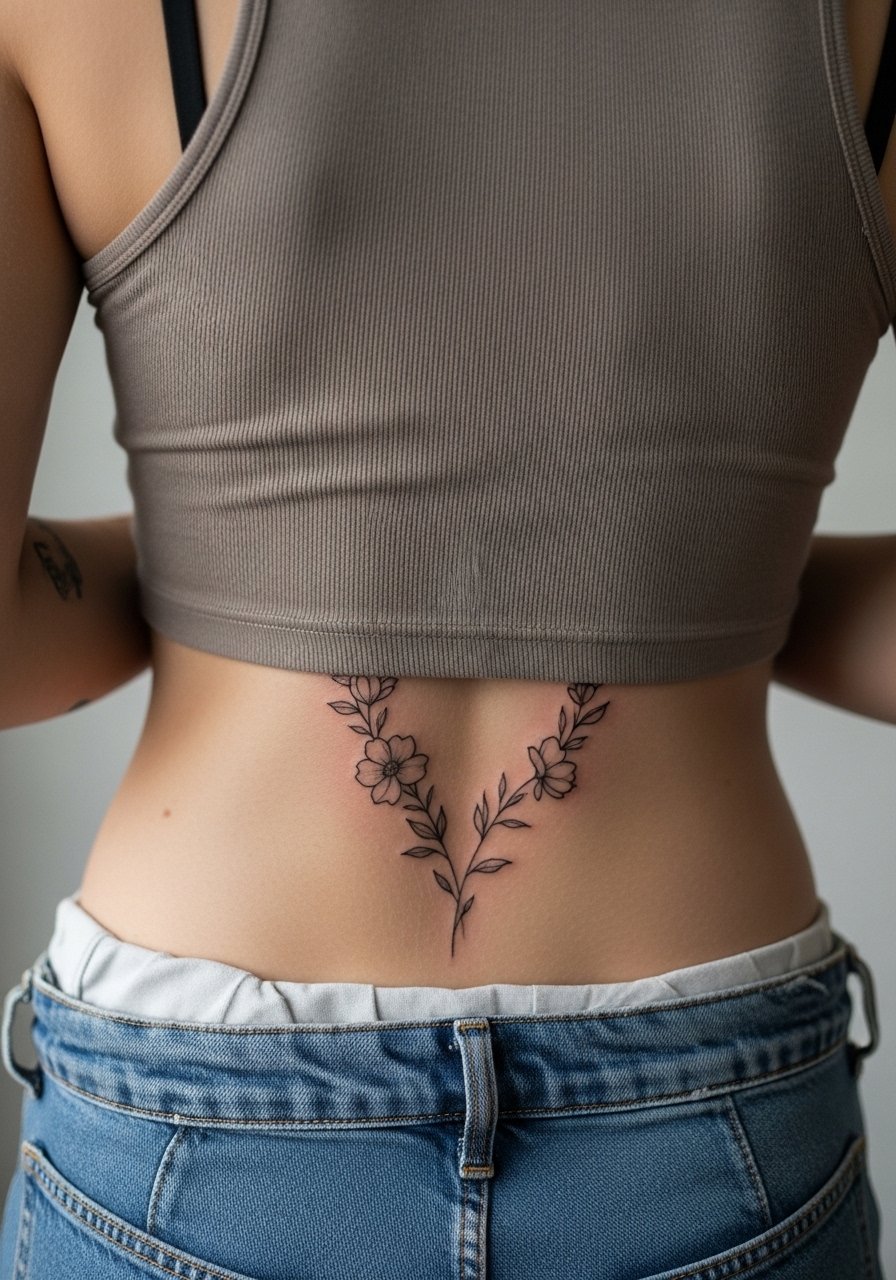
This is the gentle version of lower back work that reads like jewelry. I recommend slightly bolder linework than the thinnest flash, so the vines keep their definition as skin shifts. Tell your artist you want clear linework with light stipple shading behind petals, not full wash shading, and ask them to test a single petal on the stencil for scale. Expect a medium pain level across the sacrum area and a one to two hour session for a modest spread. A common mistake is asking for hairline lines across a wide area, which increases blowout risk and forces touch-ups sooner. For showing it off, a low-back crop top works well with high-waisted jeans.
2. Micro-Realism Butterfly Centered Above the Spine
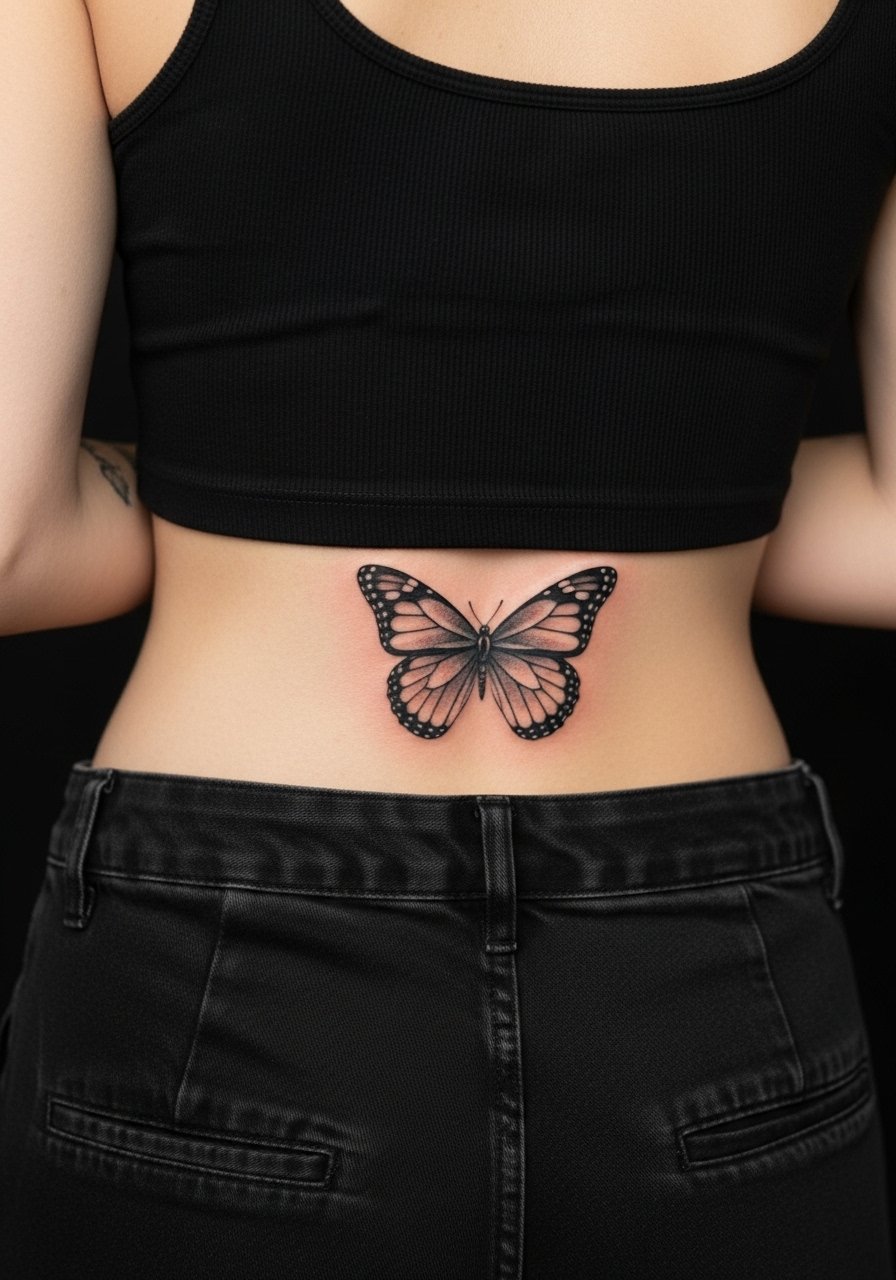
Micro-realism gives the lower back a delicate focal point. When done small and too detailed it can blur by year two. Ask for slightly larger scale than your reference image and request stipple shading rather than dense gray wash in the wings. The session feels like steady linework with light shading passes and usually takes an hour to two. Blowout risk increases if the artist paces too fast in the spinal center, so discuss needle depth and spacing. For the session, wear a loose tank top so the artist can access the midline without shifting your clothes.
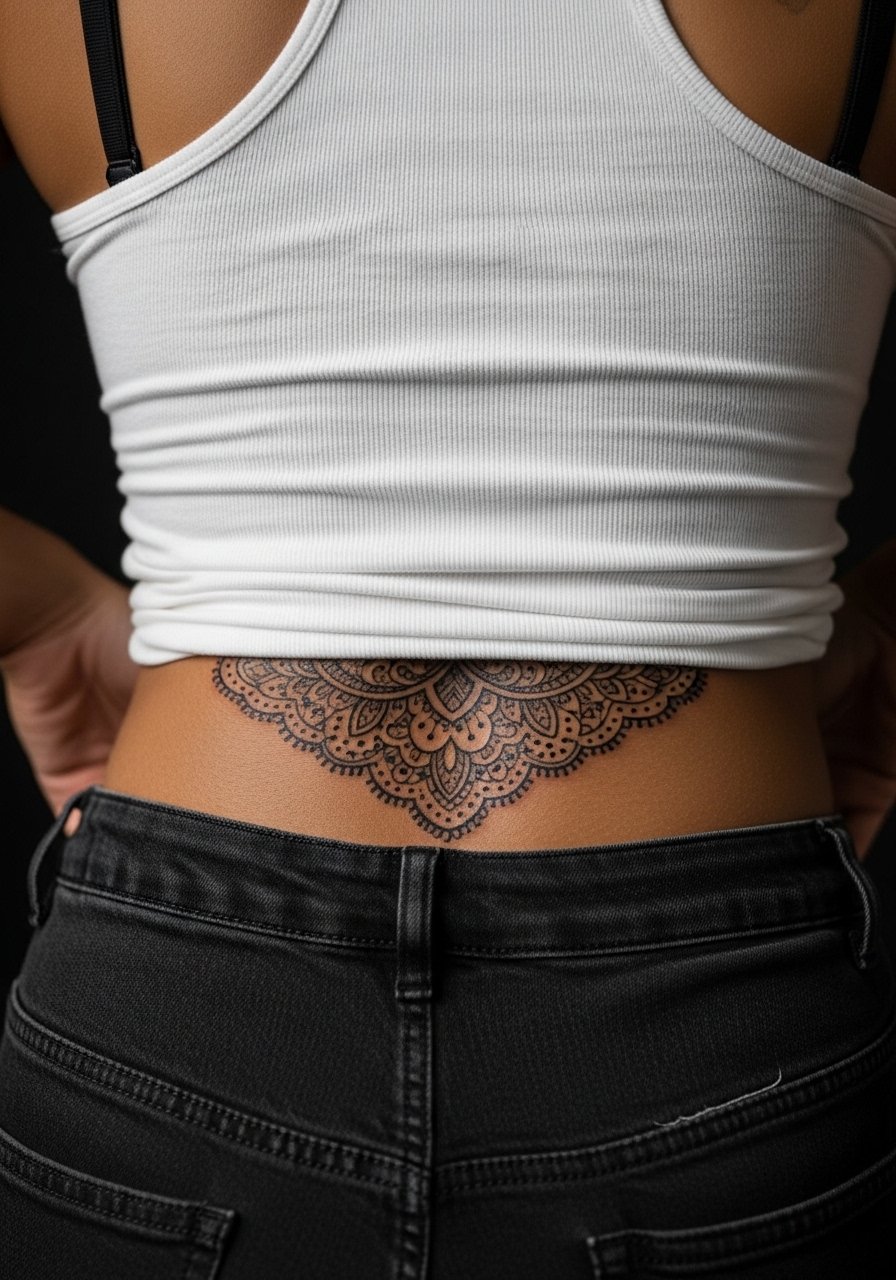
3. Symmetrical Blackwork Mandala Framed by Small Dots
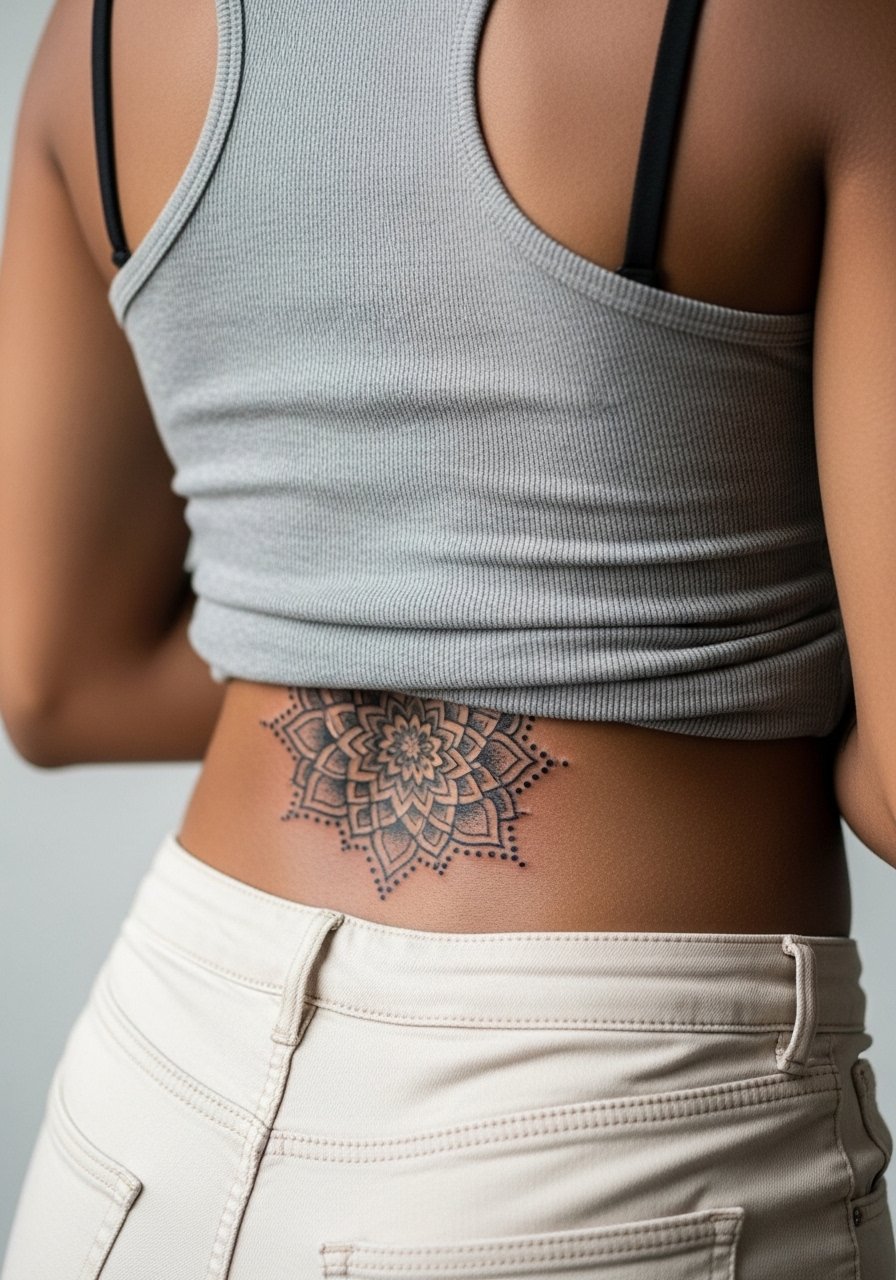
A bold mandala reads from a distance and holds up well because saturation ages predictably on the lower back. One camp prefers heavy black outlines and high saturation for longevity. The other camp argues lighter stipple shading keeps texture without risking a heavy block that looks flat when faded. Name both preferences in your consult so the artist can show examples of each on similar skin tones. This piece typically needs two to three hours for clean linework and layered stipple. During the session wear a wide-neck shirt you can shift aside without exposing more than the tattoo area.
4. Small Script Banner Nestled in the Curve
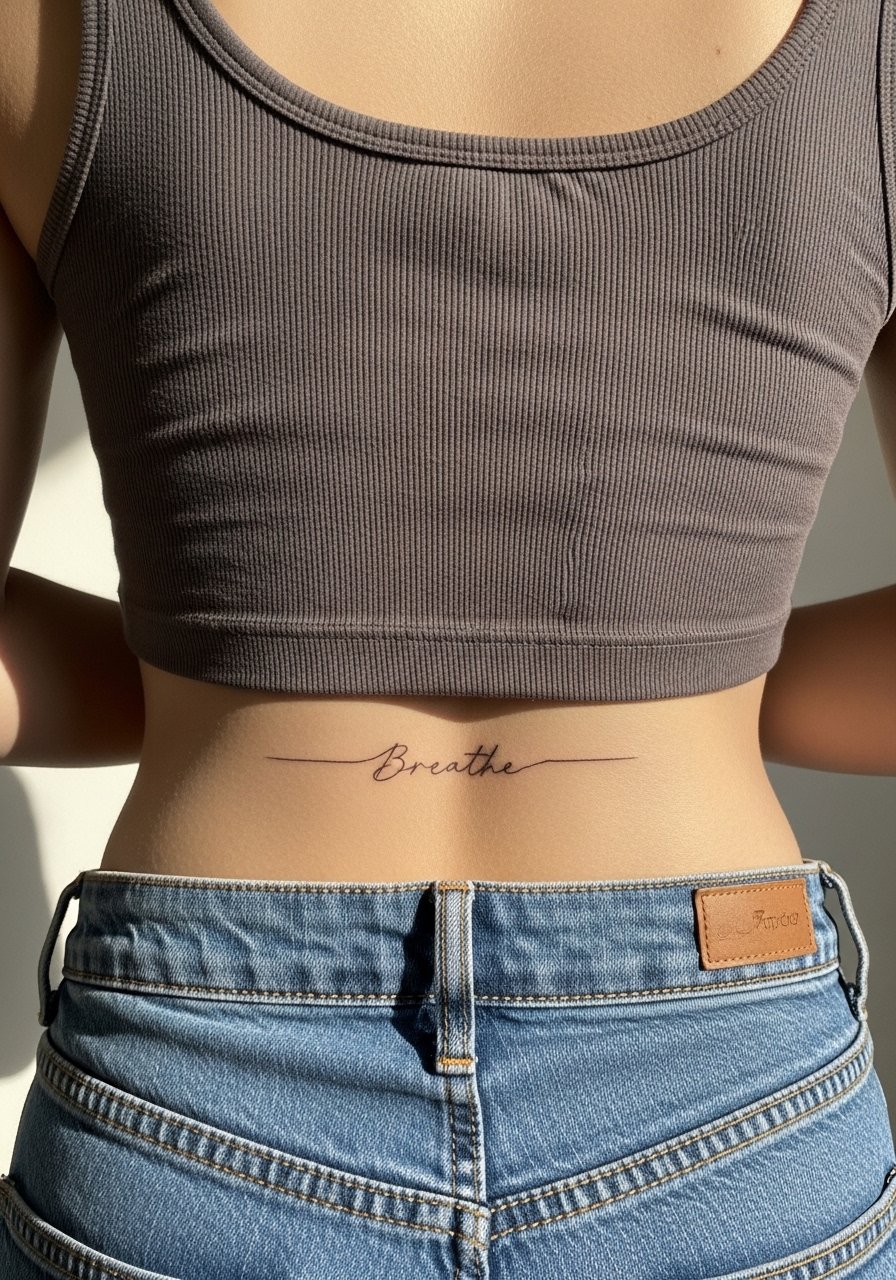
Text on the lower back looks clean if spacing and font are treated like architecture. Ask your artist to stencil the exact text at life size so you can check kerning and how letters sit on the curve. Expect a short session under an hour for small script. A typical mistake is picking a font that looks great on paper but collapses when applied across the spine curve. If the wording holds personal meaning, consider slightly heavier linework so the letters keep shape at year three. For showing it off, a backless midi dress frames a small banner without competing with the typography.
5. Botanical Spray That Follows Hip Lines
This diagonal botanical piece uses movement along the hip to flatter clothing lines. I tell clients to bring photos of how their favorite jeans sit so the spray can sit above or along the waistband intentionally. Pain centers near the hip can spike, so expect a two hour session for a moderate-length spray. Aging holds better when leaves use stipple and soft shadow rather than dense gray shading that can merge. For outfits, a pair of high-waisted jeans pulled slightly lower shows off the curve without risking fabric rubbing in the healing window.
6. Bold Black Crescent Anchored at the Tailbone
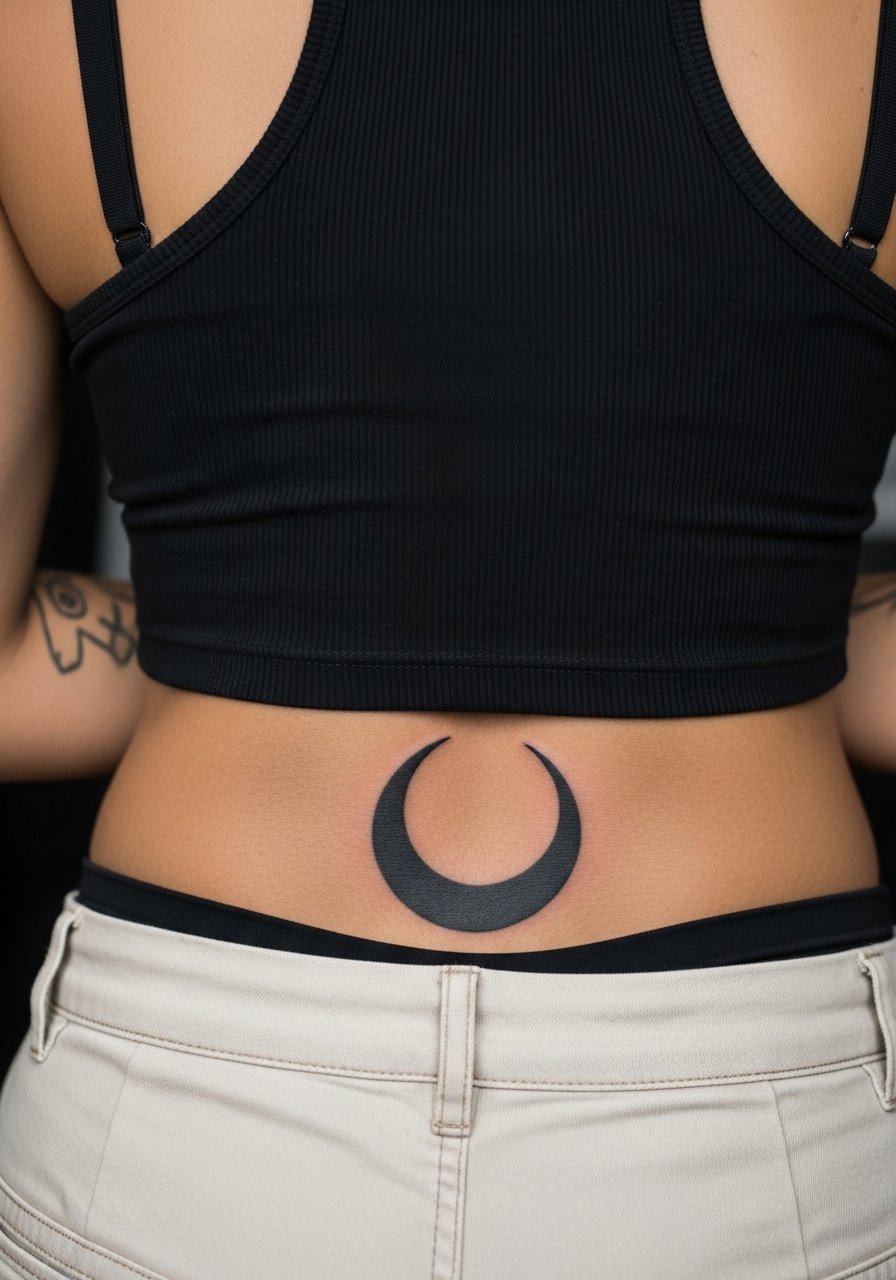
Black crescents are simple and durable because saturation is concentrated. Expect a firmer session around the tailbone and sacrum, rated higher on pain charts. The biggest mistake is asking for a crescent too thin across a high-motion zone, which can lead to early feathering. Tell your artist you want solid saturation with a touch-up included in the plan, since touch-ups for high-contrast black pieces are common at year two. This design is great for people who want a bold symbol with minimal session time. For the appointment, a loose drawstring pant keeps pressure off the area during travel home.
Studio Day Picks
These first six lower back ideas include both fine line and saturated black work, so a few smart items make the session and first week easier.
- Stencil transfer paper kit. Lets you try placement on skin for asymmetrical sprays and centered pieces, which is handy when the design crosses the waistband.
- Topical numbing cream. Applied per directions it softens the tailbone and hip sensitivity for longer sessions without affecting linework.
- Thin protective film roll. Keeps lower back pieces protected from friction against clothing during the first few days.
- Fragrance-free gentle body wash. Cleanses the tattoo area without irritating delicate linework or stipple shading while showering.
- Aquaphor healing ointment. A thin layer can lock in moisture for small script and fine line pieces in the initial 48 hours.
7. Realistic Floral Cluster with Shadow Anchors
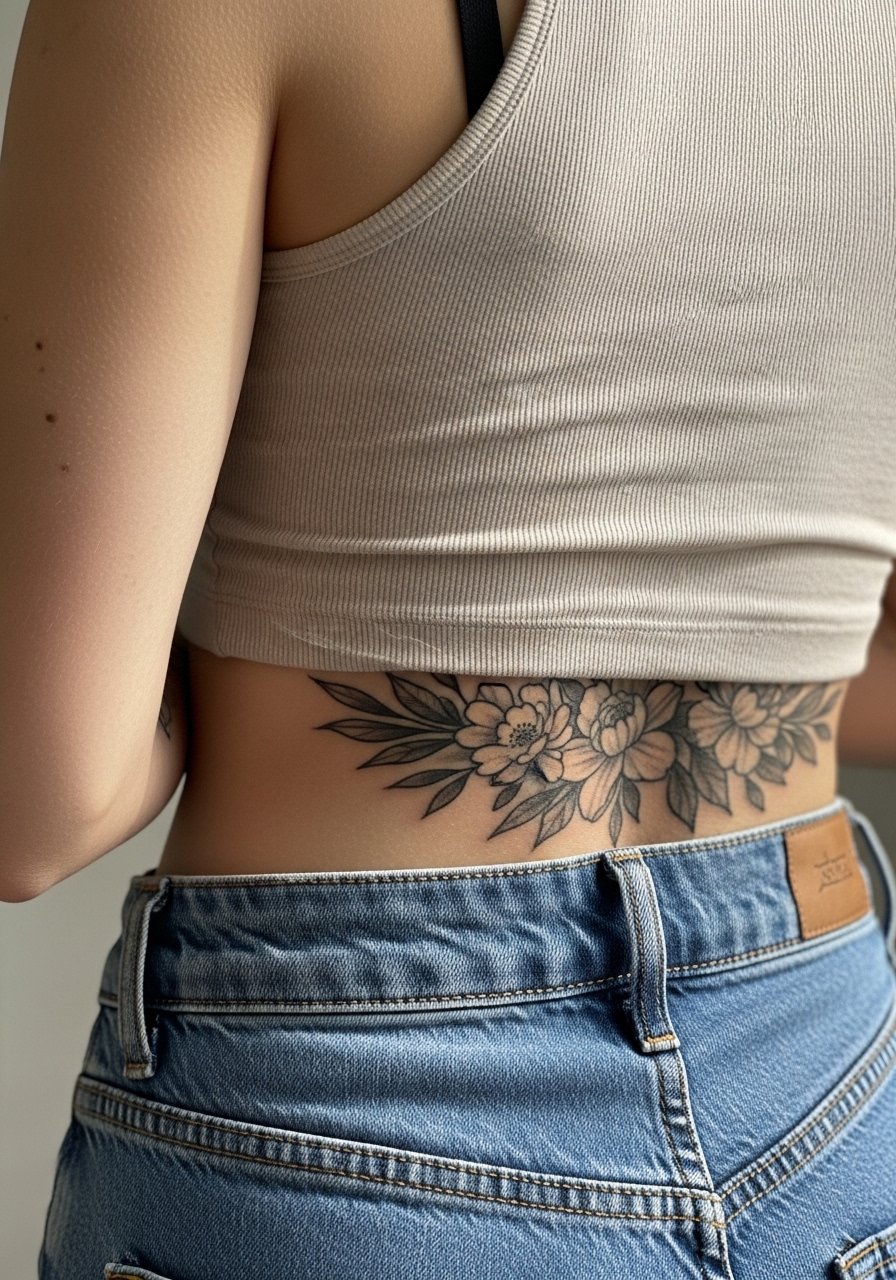
Micro-realistic florals rely on contrast and soft shadow to read as form rather than flat decoration. Tell your artist you want spot saturation under petals and stipple shadow, not a full gray wash that can flatten on the lower back. The session often runs longer, three to four hours, as artists layer delicate texture. A common aging issue is losing midtone separation, so plan a touch-up at year two if you want crisp petals long term. This design pairs well with a backless camisole for nights out.
8. Sympathetic Spine Linework That Mirrors the Backbone
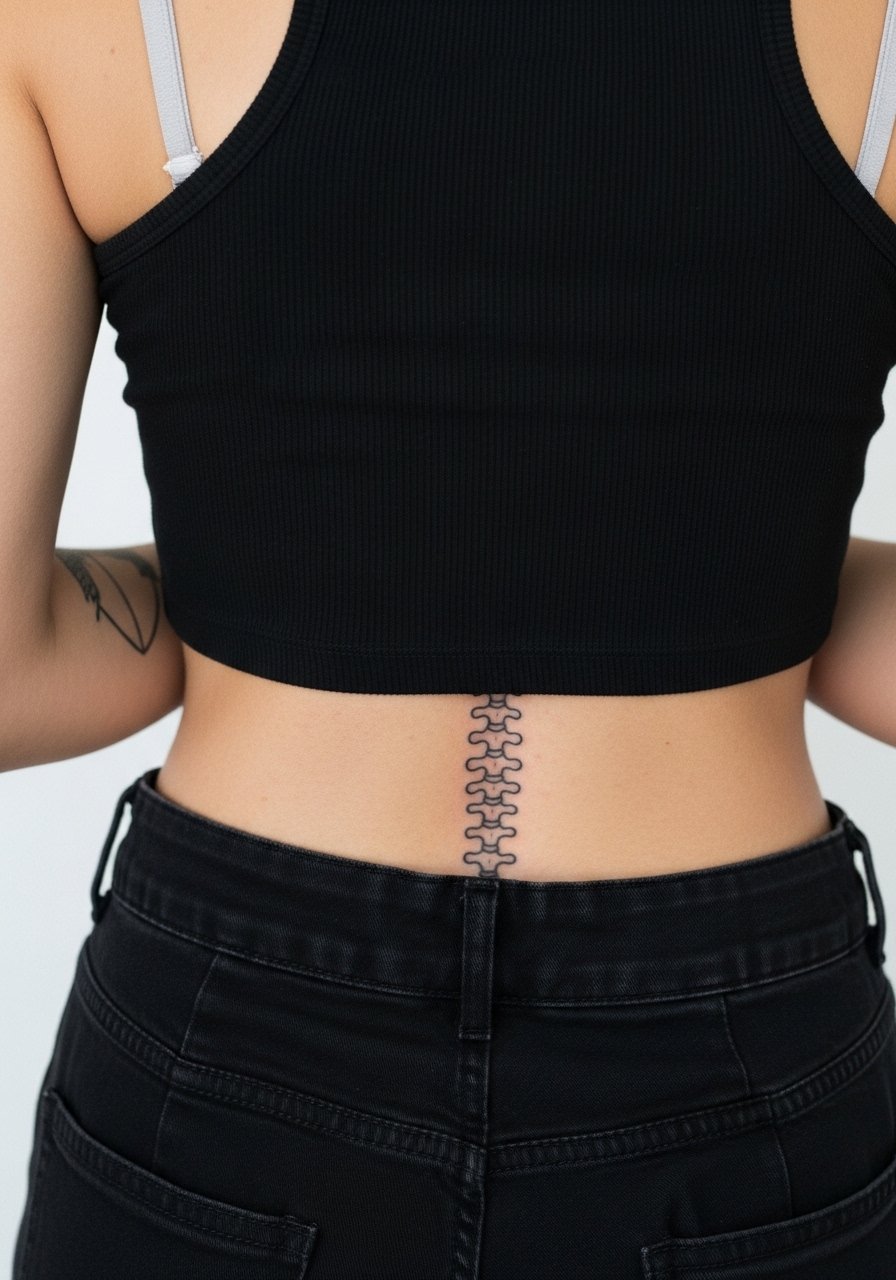
A narrow column of linework that follows the spine can accentuate posture. I suggest slightly increased spacing between repeated motifs so lines do not merge as skin shifts. The main mistake is compressing too many elements into a tiny vertical strip, which invites blowout. Sessions are usually one to two hours, and the area can feel tender when sitting. For the appointment consider a zip-up hoodie you can open to access the midline without pulling garments over your head.
9. Ornamental Lace Panel That Tucks Under Clothing
Lace panels feel custom and feminine, and they age well when negative space is preserved. One camp favors dense linework to ensure longevity. The other camp prefers airy dot work to keep texture. Name both perspectives to your artist, and request a test patch of dot work on the stencil. Sessions often run two to three hours for complex lace. A frequent issue is over-detailing in thin areas, which leads to softening later. For photos and dressing, a high-waisted skirt with a low back frames the panel nicely.
10. Tribal-Inspired Flow That Follows Muscle Contours
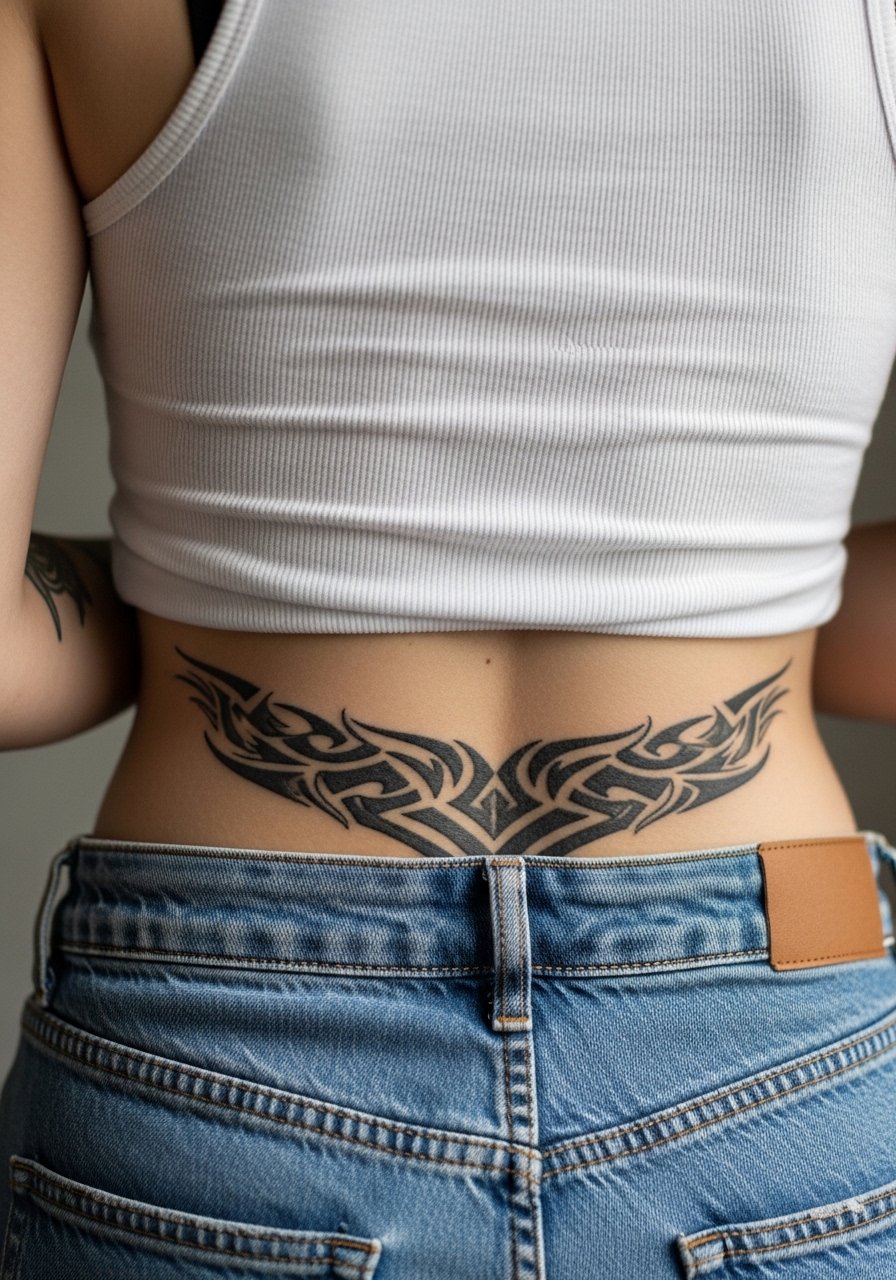
Contemporary tribal work borrows flowing lines rather than cultural emblems. If you want historically rooted imagery, mention origin and request respectful adaptation. The flow style works because it moves with the erector spinae muscles. Sessions vary from one to three hours depending on scale. Mistakes include copying sacred motifs without context, so ask about lineage if you want a direct cultural reference. For everyday wear, low-rise denim lets the flow peek above the waist.
11. Minimal Geometric Bar That Sits Horizontally
A simple geometric bar is deceptively difficult. Straight lines need to account for body curvature or they will look off once you move. Tell your artist you want the stencil applied while standing and seated to ensure the bar reads balanced in daily posture. Sessions are short, often under an hour, but the margin for error is small. The most common mistake is relying on a flat photo reference without life-position checks. For showing it off try a cutaway crop top that aligns with the bar line for photos.
12. Micro-Realism Portrait Small and Centered
Tiny portraits on the lower back need careful scale decisions. They look best slightly larger than the client initially imagines so facial features do not melt into one another as it heals. Expect a three to four hour session depending on reference complexity. A common error is bringing a low-resolution photo that adds guesswork to shading. For ethical considerations, avoid direct cultural or religious figures without clear permission and context. Touch-ups are likely at year two to reestablish tiny facial contrasts.
13. Watercolor Splash Behind a Central Motif
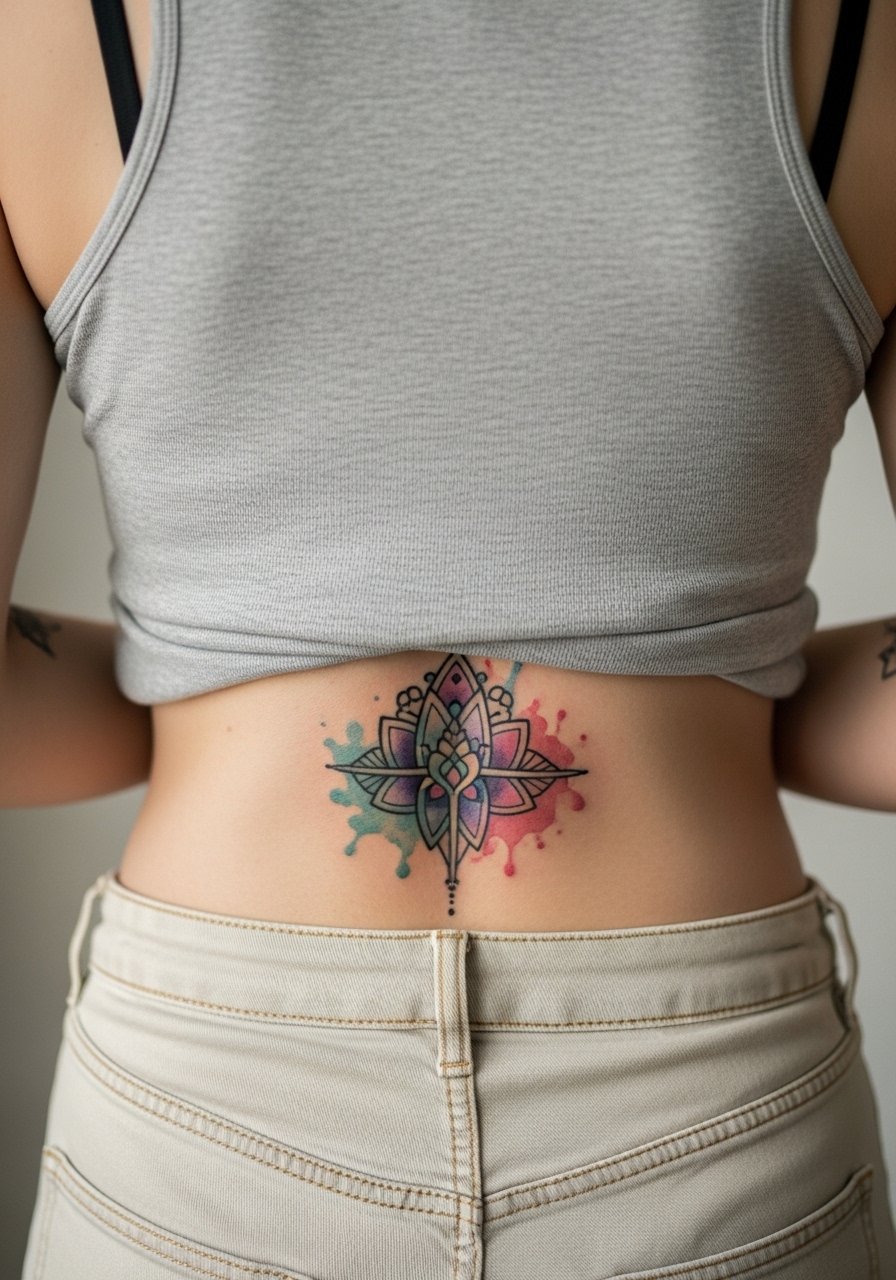
Watercolor on the lower back can look airy, but it needs containment. One camp says watercolor should be avoided in areas with lots of movement because color diffusion can blur. The other camp uses more deliberate washes with defined anchors to keep the feel while preventing migration. Ask for anchored outlines or dot work that stabilizes the wash. Sessions often combine color layering and take two to three hours. For dressing, a backless sundress lets the color show without overexposure.
14. Nautical Compass Centered with Soft Compass Rose
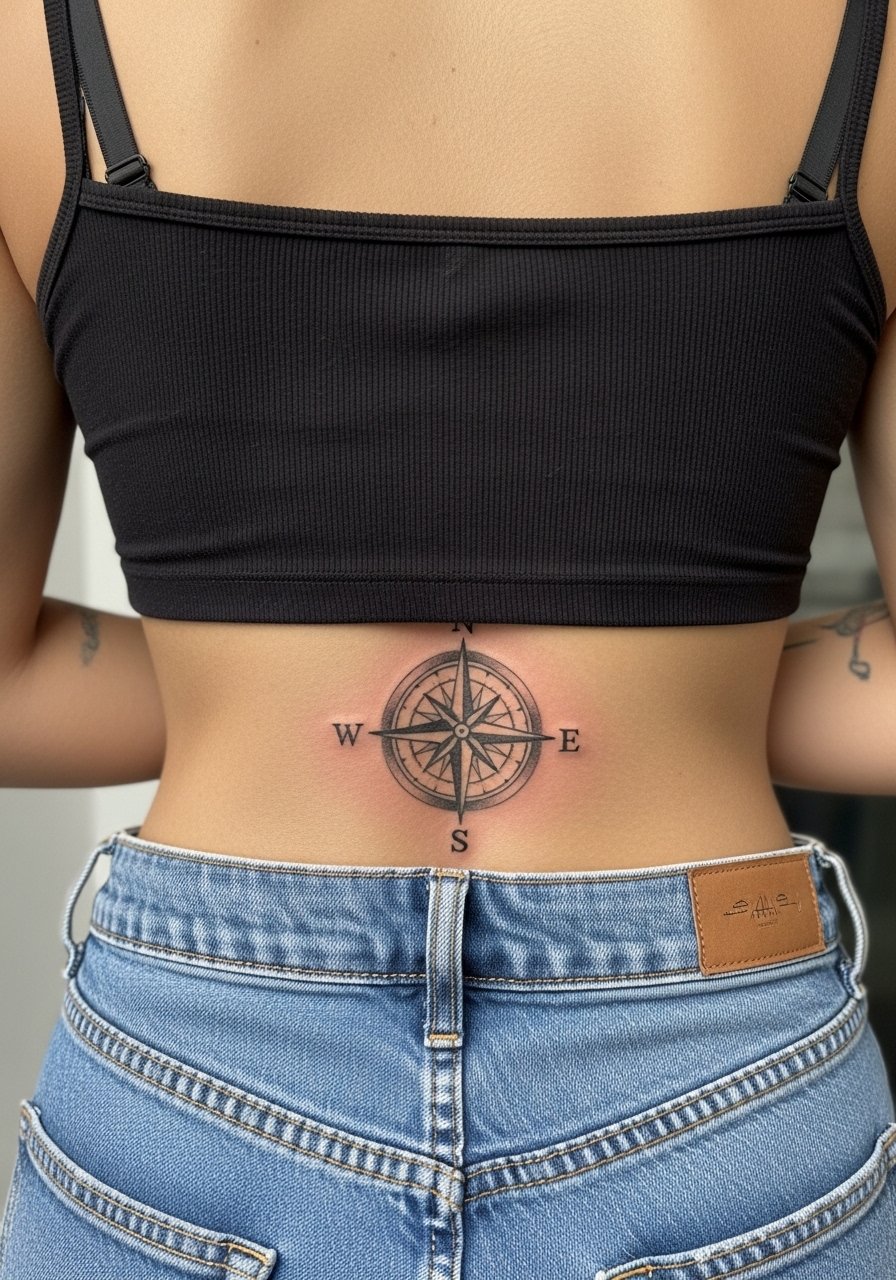
A compass makes a clear lower back anchor and it ages well when linework is given breathing room. Tell your artist you want distinct cardinal points with slightly heavier dots at the ends so orientation stays readable over time. The session runs one to two hours depending on size. A common mistake is packing in tiny ornamental letters that blur. This piece plays nicely with a low-back swimsuit for poolside reveals.
15. Decorative Anchor Paired with Rope Detail
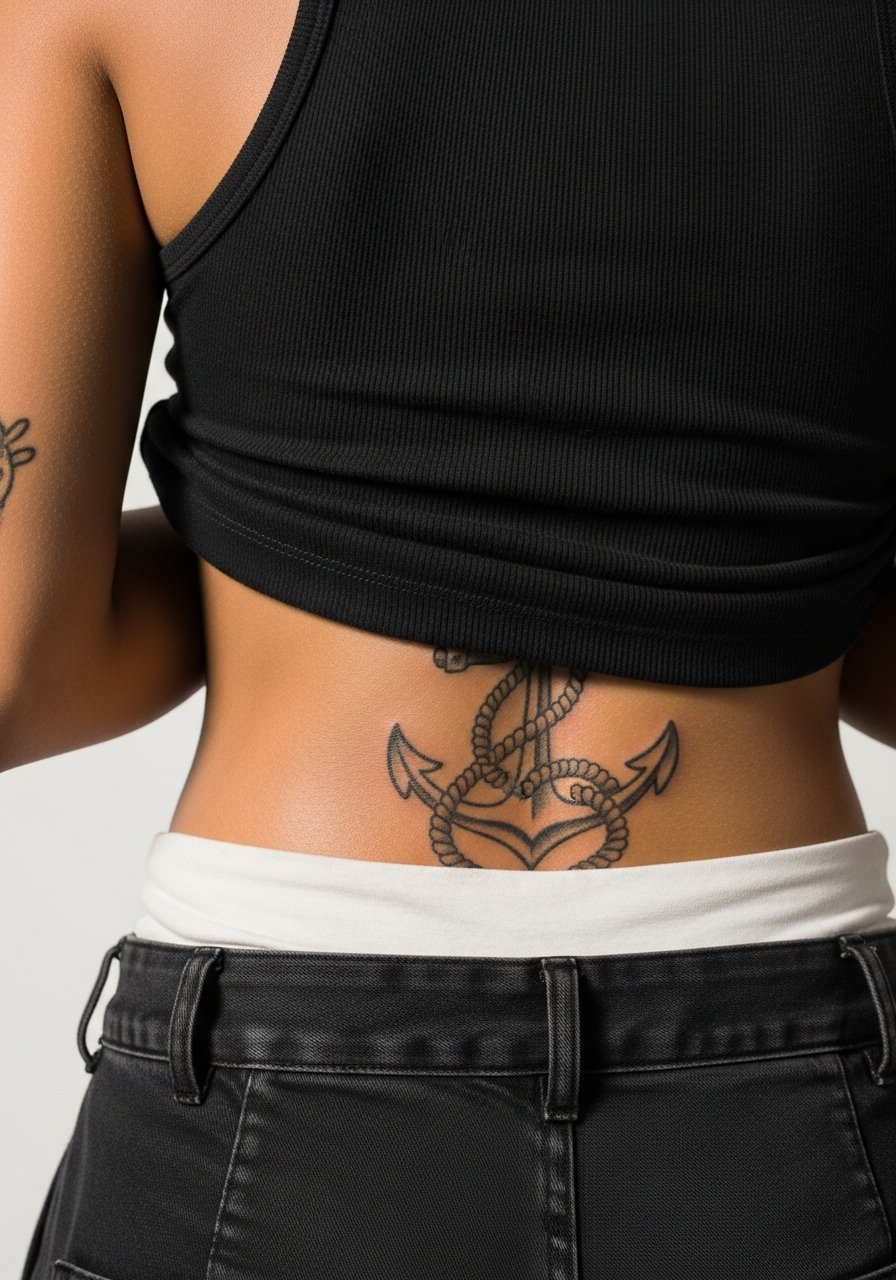
Anchors and rope lines read as classic motifs. Ask for slightly softened rope shading to prevent thick blocks of gray that can flatten. The session is usually one to two hours with some areas requiring layered passes for depth. A pitfall is asking for ultra-thin rope detail across a curved surface, which can merge over time. For outfit advice, a high-waisted skirt slightly lowered frames the anchor without rubbing it during healing.
16. Ornate Crescent with Dot Work Halo
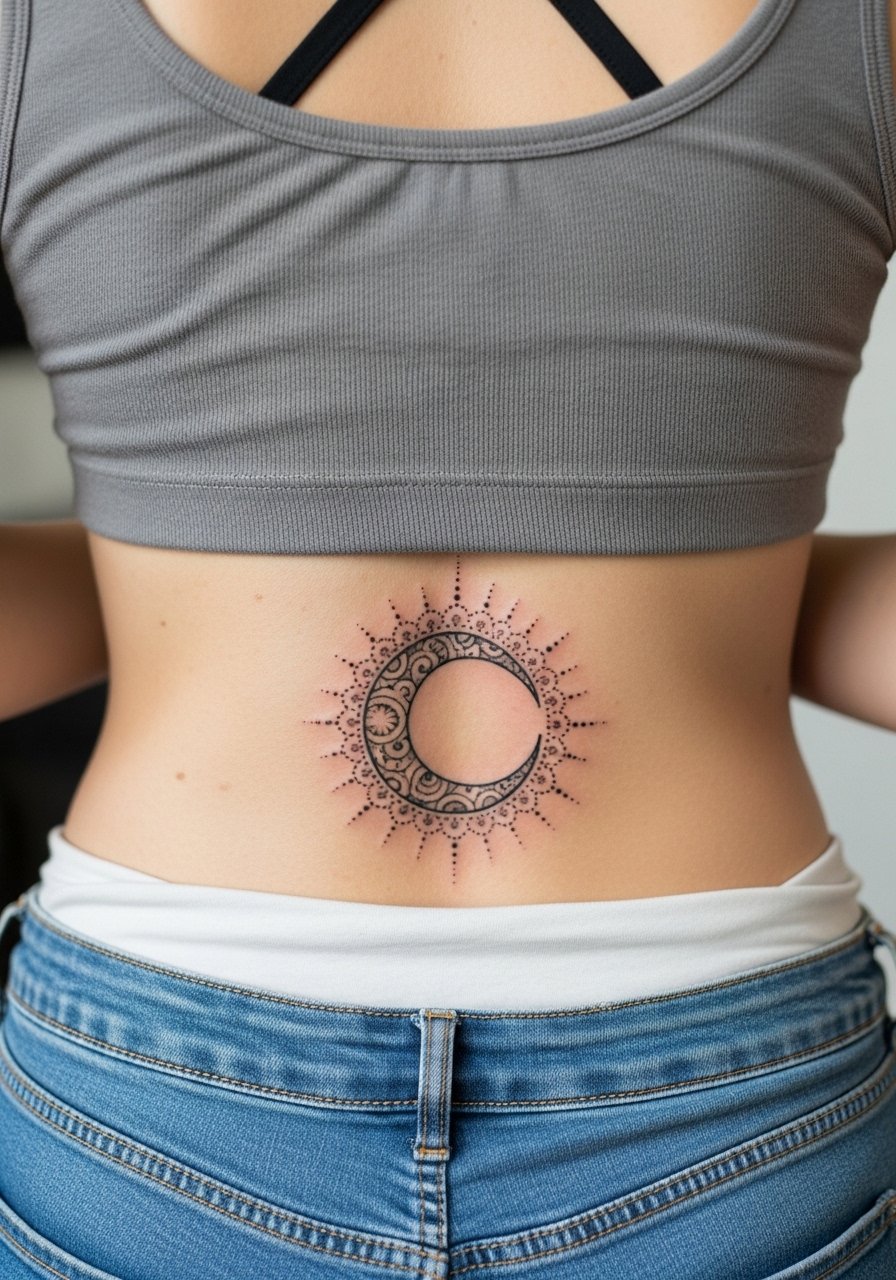
This piece balances bold silhouette and delicate texture. Dot work halos age more predictably than thin hatch shading on shifting skin, so request stipple rather than long linear shading. Sessions take two to three hours for consistent dot density. Mistakes include squeezing too many dots into a small halo, which creates a murky tone later. When dressing, a backless top with a low cuff shows the halo artfully.
17. Scripted Coordinates Hidden Underelastic Band
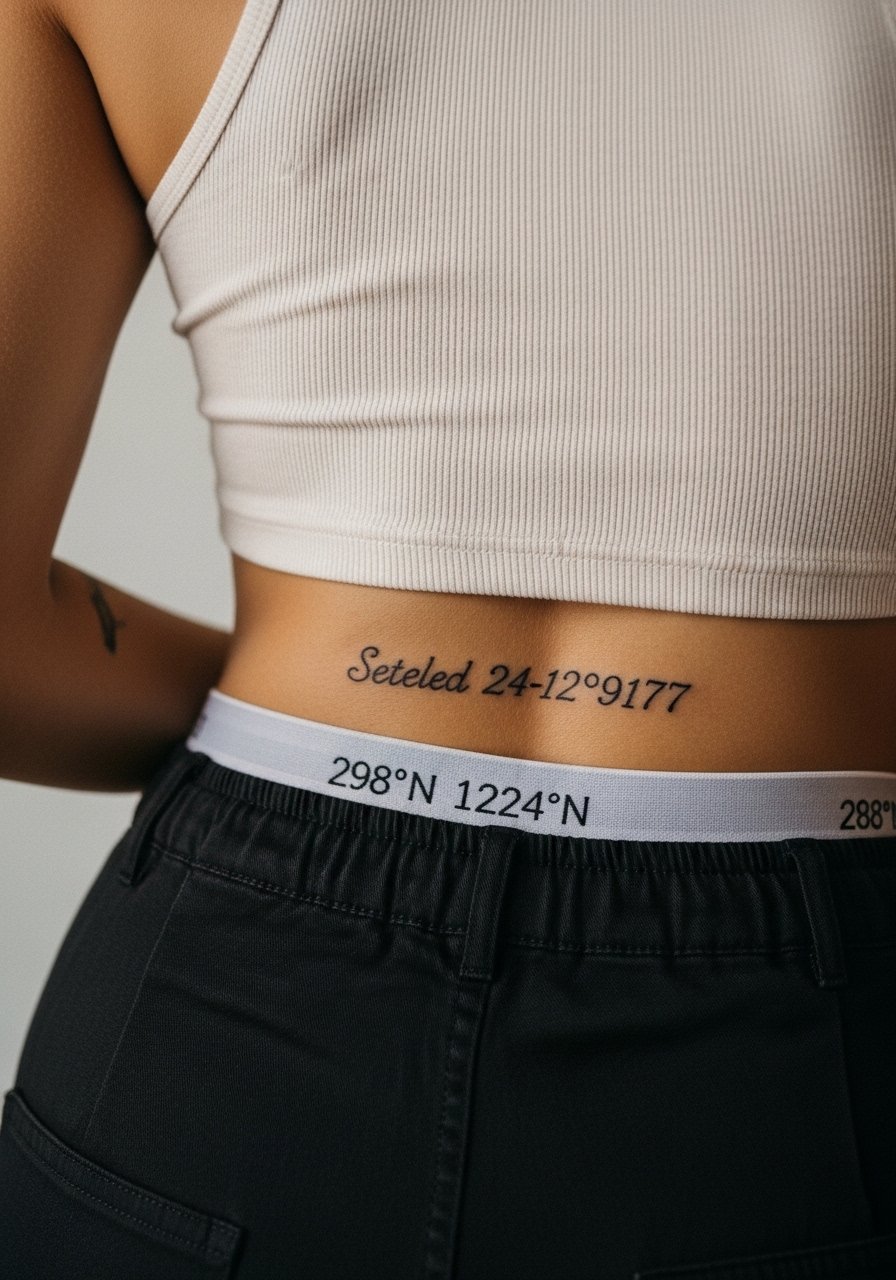
Coordinates feel private but intentionally placed. The main consultation point is how the tattoo sits relative to waistbands, since repeated pressure can affect healing. Ask the artist to place the script just above any elastic line to avoid daily friction. Sessions are brief, under an hour for small scripts. A common mistake is putting the ink directly under a belt or tight band which can cause irritation and scabbing. For sessions choose high-waisted pants with an elastic-free top to minimize pressure on the freshly inked area.
18. Stylized Animal Motif Spanning the Small of the Back
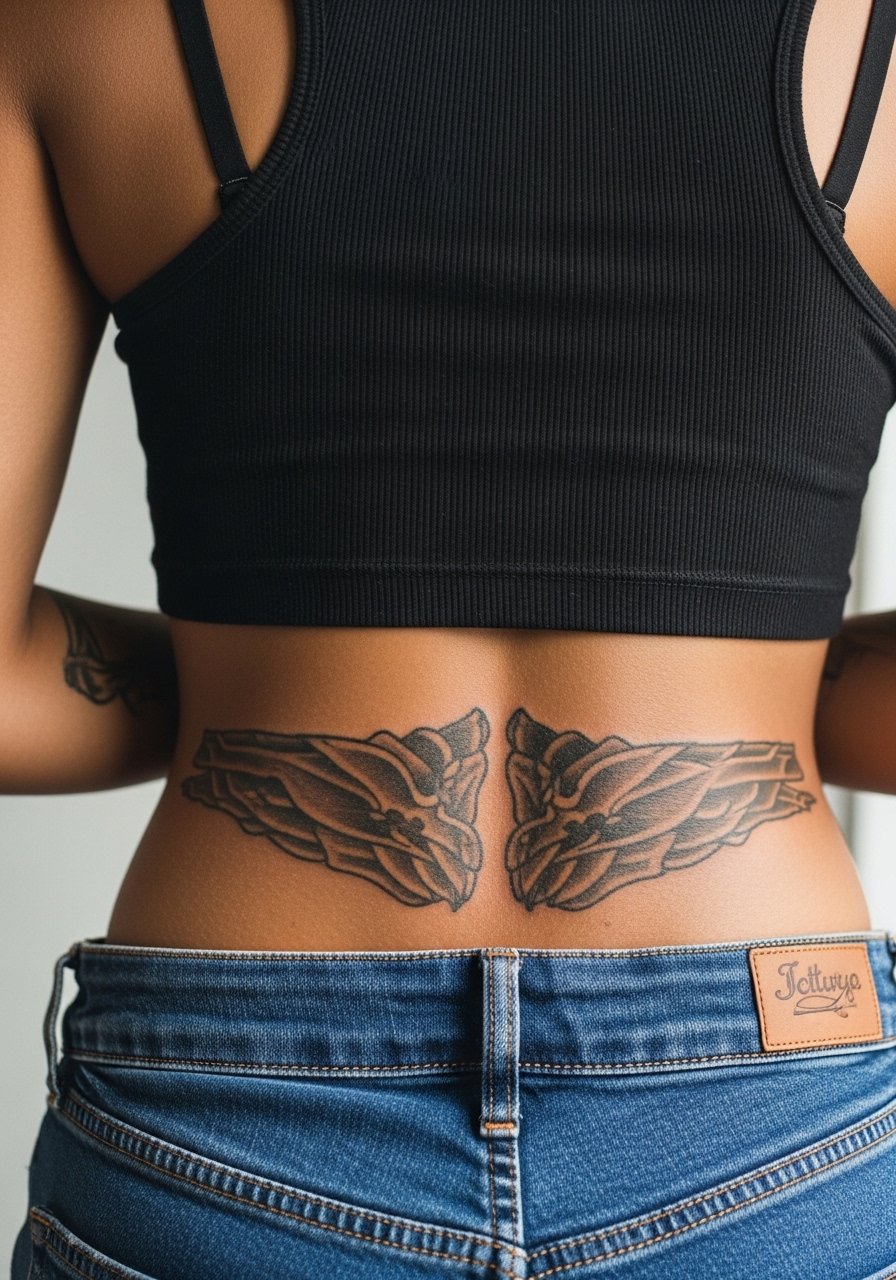
Animal motifs bring personal symbolism, and they benefit from compositional breathing room. If you want a realistic animal, increase scale slightly for facial detail. Abstracted or stylized motifs can be smaller and hold shape. Sessions range widely, often two to four hours based on complexity. The common mistake is forcing a full-body animal into a narrow lower back space without simplifying forms. For showing off, a low-back maxi dress complements the horizontal span.
19. Crescent Moon Trio Along the Waist Crease
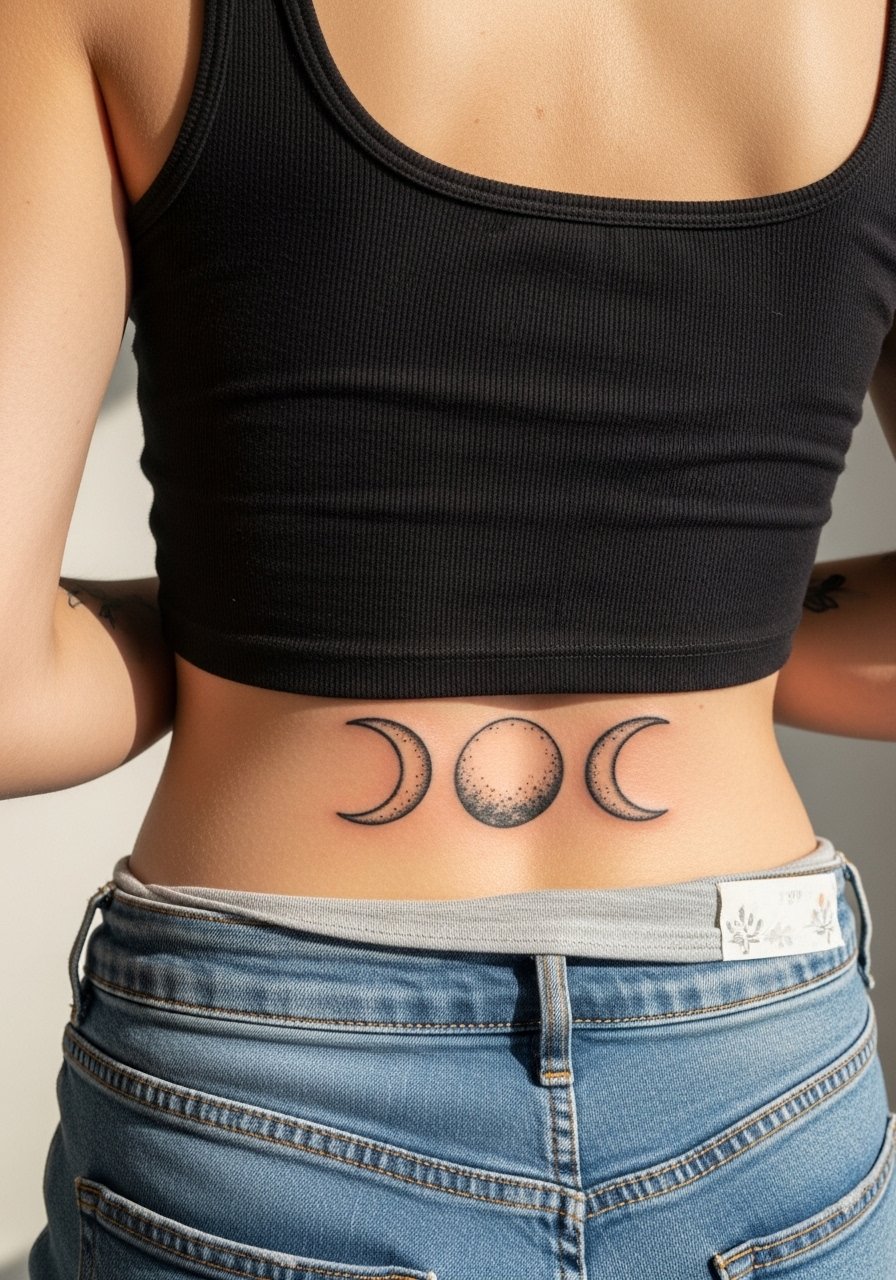
Small repeating moons are simple but must be spaced for longevity. The main aging risk is placing tiny crescents too close, producing a blended blob. Request consistent negative space between moons and slightly bolder outer lines. Typical session time is under an hour. A smart wardrobe choice for reveals is a low-rise skirt or pants that lets the trio sit above the waistline in photos.
20. Geometric Spine Panel That Reads Vertically
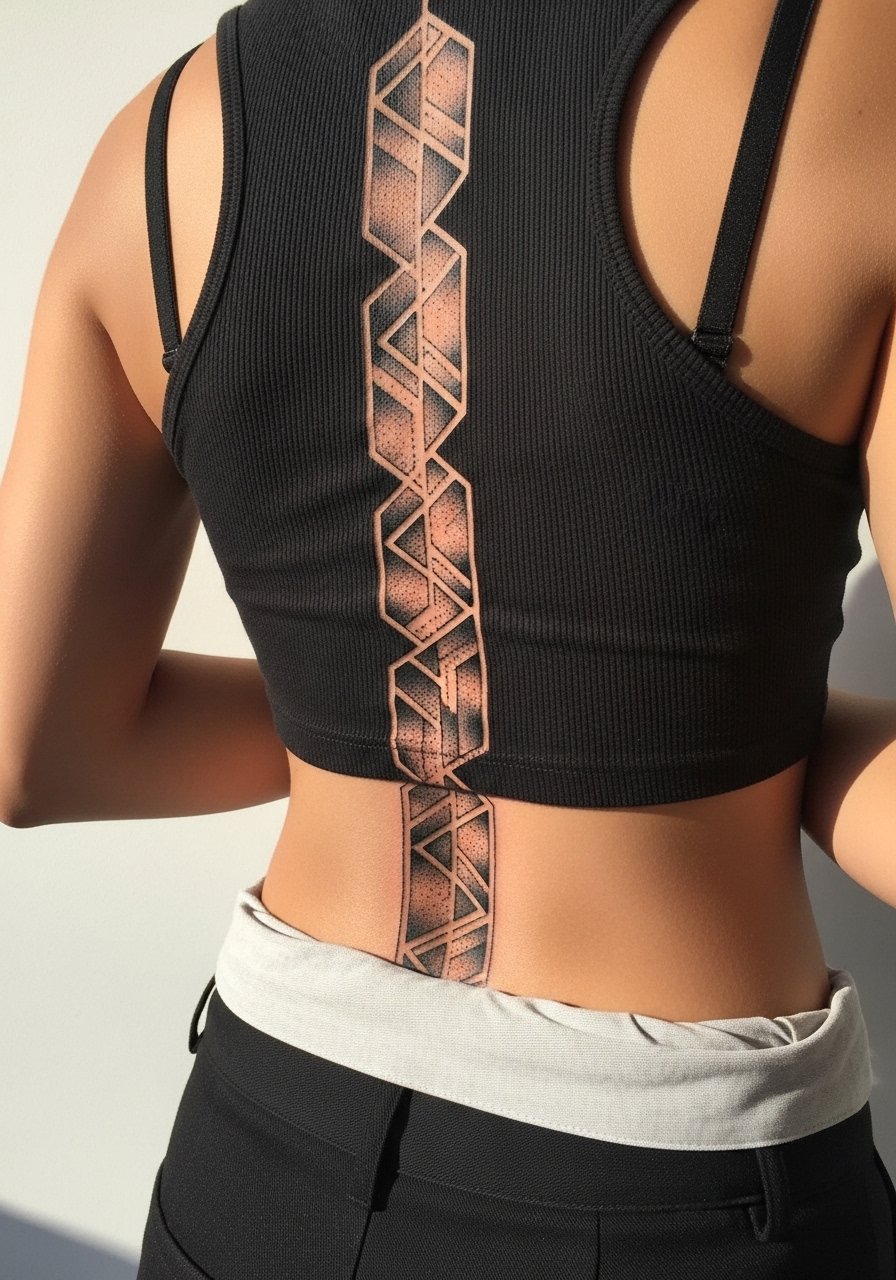
Vertical panels benefit from alternating negative space and solid forms so they do not merge. Ask for a life-size stencil and check how the panel sits when you bend and stand, because posture affects how vertical geometry reads. Sessions typically run two to three hours. A mistake is using identical repeated shapes with no variation, which accelerates the visual merge. For dressing try a cutout back top to highlight the vertical flow.
21. Hidden Constellation That Peeks Above Swimwear
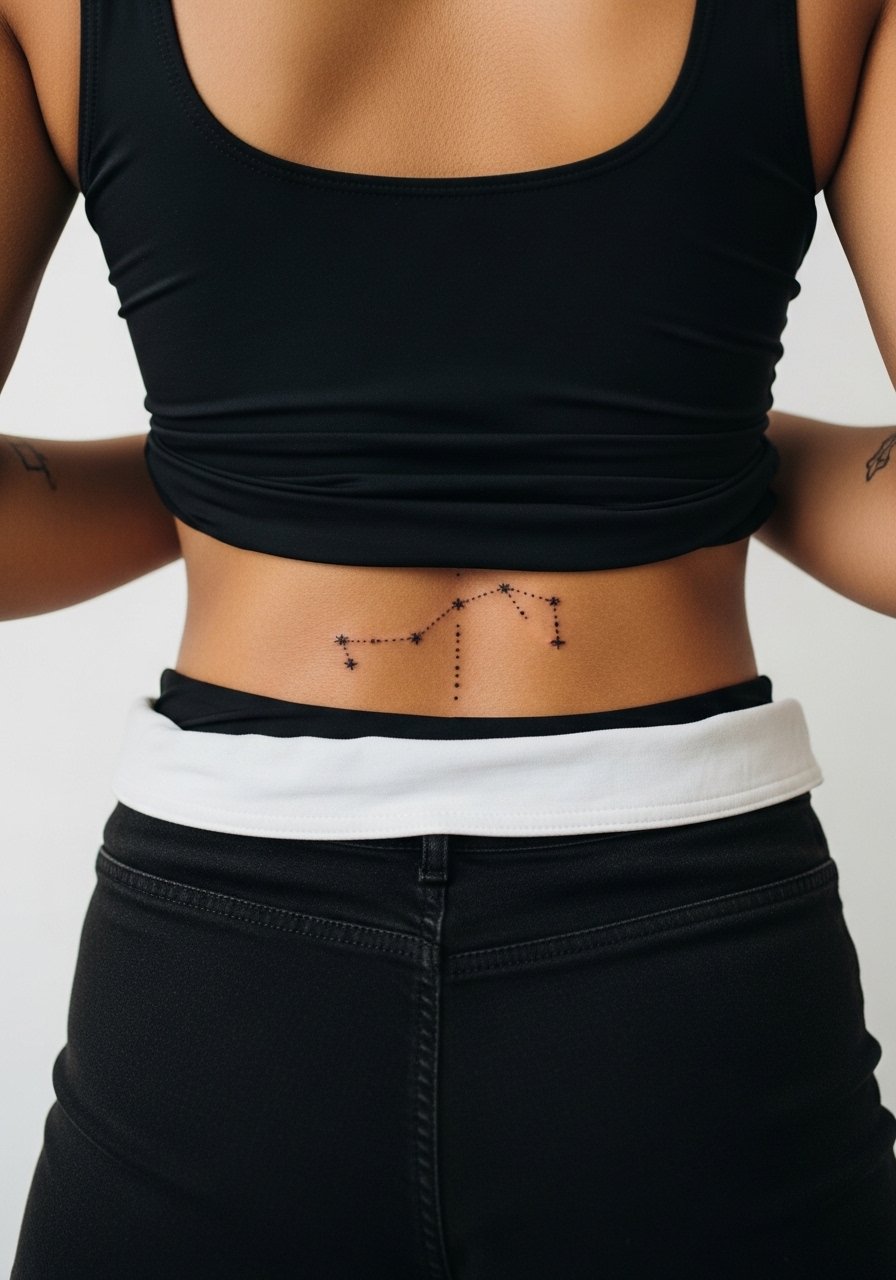
Constellations can be tiny and meaningful, and they work great tucked above the swimwear line. The key is spacing between stars and slight variation in dot size to maintain readability. Sessions are short, often under an hour. The common error is compressing stars into a cluster that later looks like a gray spot. For the beach pack a low-rise bikini bottom that frames the piece without constant rubbing.
Frequently Asked Questions
Q: How does fine line work differ from saturated black on the lower back in terms of aging?
A: Fine line relies on thinner linework and can blur sooner if placed on high-motion zones, while saturated black holds shape better because of concentrated pigment. One camp advises avoiding the thinnest lines near the spine. The other camp says spacing and needle technique can make fine line last. It depends on scale, spacing, and your skin type.
Q: Will a large lower back mandala need touch-ups more often than a small script?
A: Large mandalas that use stipple and layered dot work tend to hold texture for years, but they may require touch-ups to refresh midtones. Small script often needs less area correction but may need line reinforcement if the letters were ultra-fine. Plan for a touch-up conversation during your consult.
Q: What should I wear to my appointment for a lower back tattoo to give the artist clear access?
A: Wear a top you can pull up slightly without exposing more than the tattoo area, like a tank top you can shift aside, and loose bottoms that sit comfortably below the work. Avoid tight waistbands that press on the area immediately after the session.
Q: Are there career or social considerations specific to lower back tattoos?
A: Lower back tattoos tend to be private and easy to conceal with most clothing, so they pose fewer visible-workplace issues than hand or neck tattoos. If you expect frequent professional uniform changes, consider how often your chosen wardrobe will reveal the piece.
Q: Do certain skin tones affect the design choices for lower back tattoos?
A: Yes. High-contrast blackwork often reads strongly across tones, while subtle color washes sometimes need adjusted saturation on darker skin to maintain vibrancy. Ask to see healed examples on skin tones similar to yours when possible.
Q: How do I find an artist who understands lower back composition without naming anyone directly?
A: Use discovery pathways like local studio directories, convention portfolios, hashtag searches showing healed work, and community forum recommendations. Look for healed photos of lower back placements in artist portfolios, and ask to see close-ups of linework and stipple on similar skin tones during consultation.
