
The band’s imagery reads like a tattoo reference book: wartime jackets, fallen roses, and lyric lines that stick in your head. If you want a My Chemical Romance piece that looks like a photograph rather than a sticker, the choices you make now determine whether it still reads clearly at year five. These realistic ideas pair band symbolism with placements and styling that help the work age better, and the first one below shows a simple way to keep detail where it matters.
1. Portrait Fragment on Inner Forearm

I recommend a cropped portrait, not a full face, for an inner forearm piece. The arm gives enough flat surface to hold fine detail but small faces blur if you go too tiny. Tell your artist you want the eyes and a patch of hair in focus, with stipple shading to suggest texture rather than thick blended grey. Fair warning the wrist area toward the hand is a higher blowout risk, so keep the portrait centered on the inner forearm. Session time for a fragment is usually under two hours and the pain is mid-range. At six months the contrast softens, and at two to five years expect the finest dots to merge. Wear a rolled linen shirt when you want to show it off, sleeves cuffed to frame the work.
2. Lyric Script Along the Ribcage

Fair warning: ribs are painful and demanding on detail work. A thin lyric in elegant serif will look gorgeous fresh but most artists split into two camps on this placement. One camp says fine script blurs quickly because the skin stretches and breathes. The other camp says with slightly heavier line weight and clean spacing the text can last years. Ask where your artist stands and request a mock stencil with room between letters. Expect a one to two hour session and a possible touch-up in two to three years. For the appointment wear a zip-up hoodie you can lift without shifting your whole shirt.
3. Marching Soldier Jacket Detail on Upper Arm
This piece leans into costume detail rather than a portrait. The upper arm accepts saturation well so the buttons and seams stay readable longer than tiny facial features. The common mistake is trying to crowd too many small decorations in a compact space. Instead, ask for larger motifs with bold outline anchors and softer internal dot work. Expect moderate pain and a two to three hour session depending on how much tonal work you want. At year two the edge will soften but a solid outline keeps the silhouette legible. Pair the upper arm with rolled sleeves or a short-sleeve button-down to show off the detailing without crowding the look.
4. Single Red Rose Over the Heart

This placement reads as intimate and symbolic. A realistic rose over the sternum works if you keep the bloom slightly offset from the center to move with the body. The sternum and upper chest shift with breathing, so ask for slightly bolder petals and a higher contrast between shadow and highlight. Sessions can be painful because of the bone beneath, and some artists recommend two shorter sittings rather than one marathon. At six months expect the black contrast to settle into a soft grey and at year three you may want a touch-up to revive the red saturation. For showing it off choose an open-back midi dress that leaves the upper chest framed.
5. Realistic Raven on the Shoulder Blade
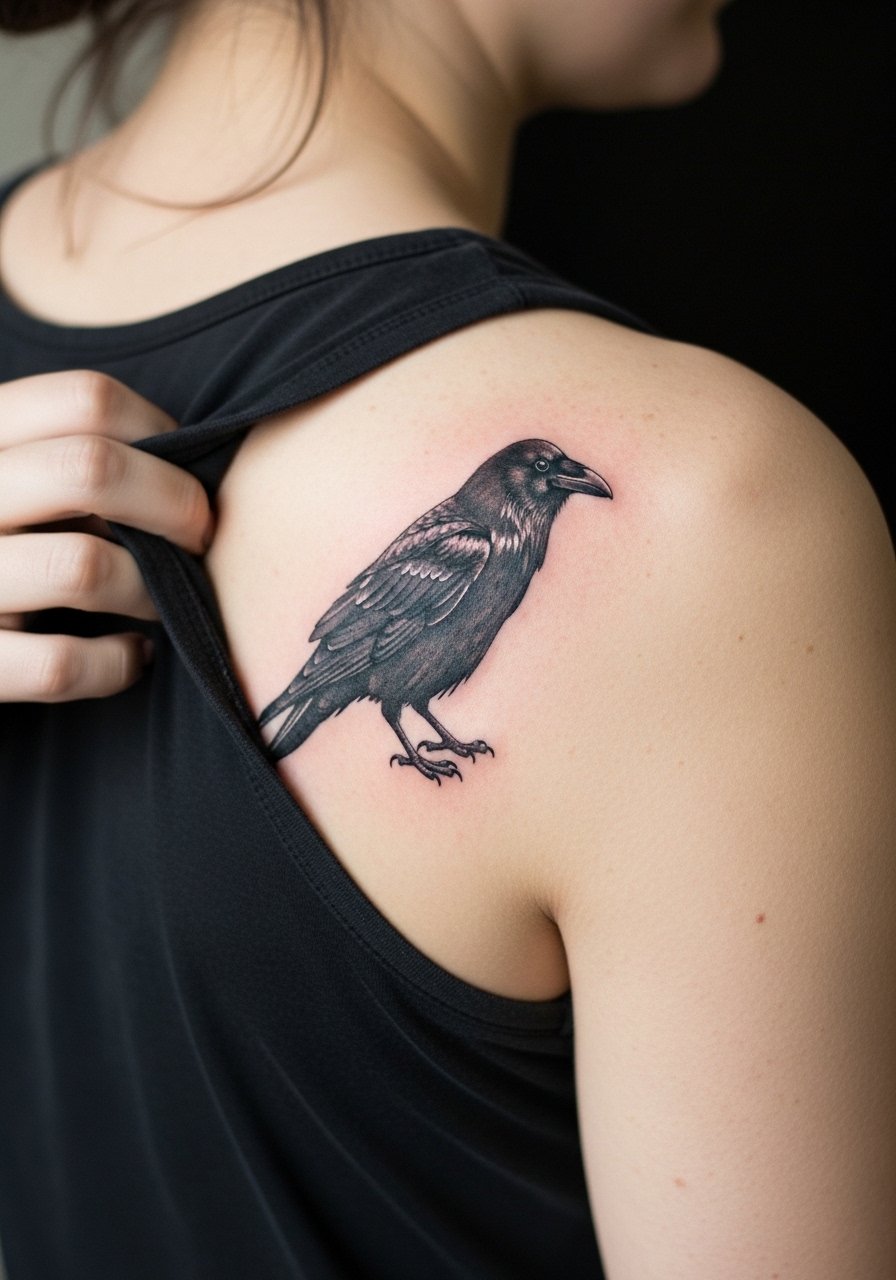
A shoulder blade piece gives you surface area and movement without constant friction. The biggest mistake is placing heavy black too close to the spine where touch-ups are awkward. Request the bird angled slightly toward the shoulder so the composition reads when you wear a tee. The session is moderate in pain and may take two to three hours for feather texture using whip shading and stipple. At two years the feather edges will soften, but the silhouette stays clear. For the session wear a loose button-down shirt so you can pull it aside without dragging fabric across the area.
6. Black Parade Helmet Fragment on Calf
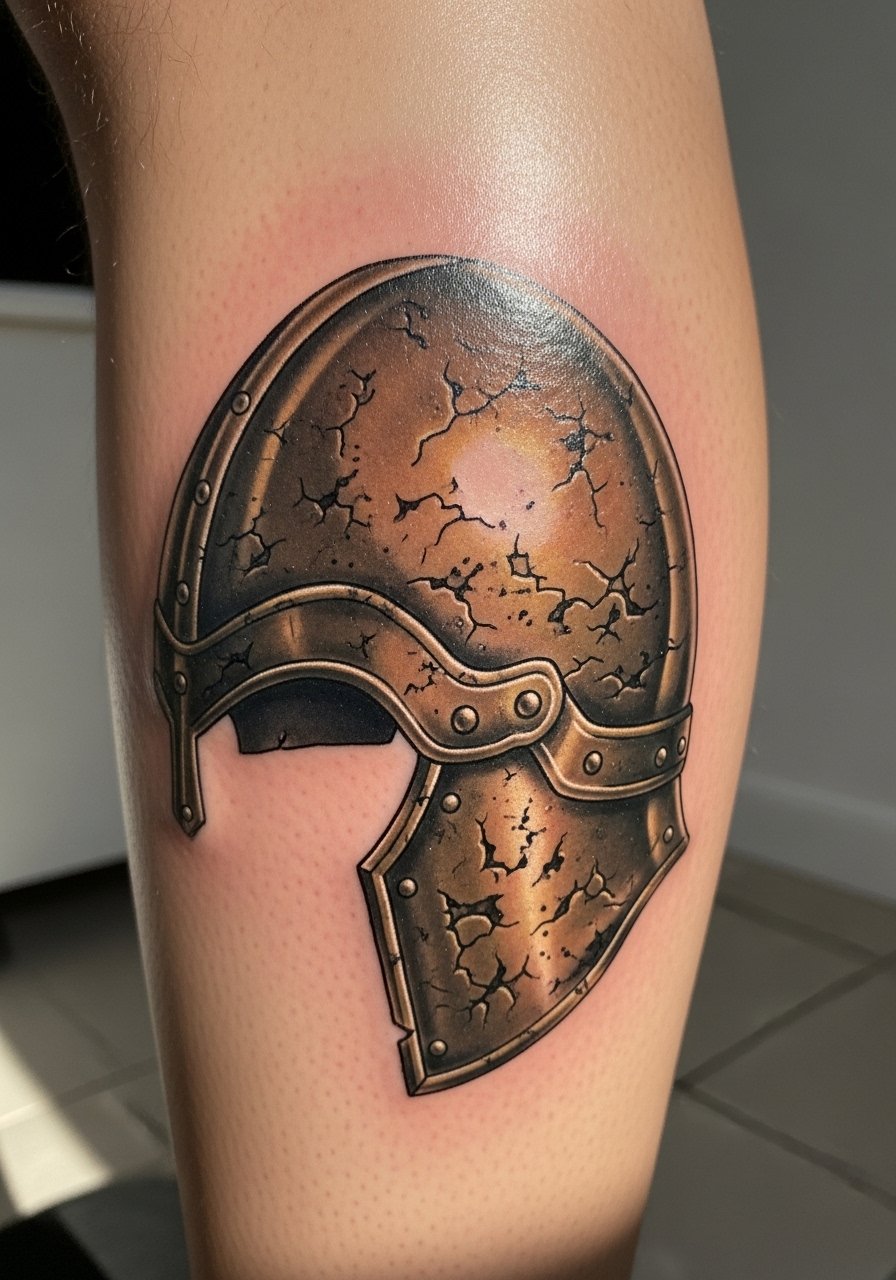
The calf offers a forgiving canvas for metallic textures and hard edges. People often ask for a full helmet in a small space and lose the shine. Ask for a fragment with clear highlights and a defined rim to preserve the metallic illusion over time. Blowout risk is low here, but expect soreness when wearing tight jeans in the first week. Sessions vary from one to three hours based on how much reflective detail you want. After two years the highlights will patina, and a subtle touch-up restores the metallic pop. Pair this showpiece with cropped trousers or a loose drawstring linen pant so the work peeks without rubbing against socks.
Studio Day Picks
The forearm, shoulder blade, and calf pieces above have different prep needs, and a few targeted items make the session smoother and the first week easier.
-
Stencil transfer paper kit. Lets you test how the composition sits on curved areas like the shoulder blade and calf before the needle touches skin.
-
Topical numbing cream. Useful for sternum and ribcage appointments when the sensitivity spikes, applied as directed before the session.
-
Thin protective film roll. Keeps ankle and wrist work clean during that first week of friction from clothing and daily movements.
-
Fragrance-free gentle body wash. Cleans healing tattoos without stripping the fresh saturation, important for areas like the chest and inner arm.
-
Aquaphor healing ointment. Thin layers in the first days lock in moisture and protect fine line work that otherwise flakes away too fast.
7. Mini Gas Mask on the Wrist

Wrist tattoos read instantly but take a beating from washing and movement. A mini gas mask needs a slightly bolder outline than you might expect to survive daily abrasion. Common mistakes are using ultra-thin script and tiny filigree that the skin cannot hold. Ask for thicker contour lines and inner stippling rather than smooth grey blends. The session is short and the pain is noticeable because of thin skin. Plan a one-week adjustment in wardrobe to avoid watches that rub. Show it off with a minimalist gold watch worn on the opposite wrist so the artwork remains unobstructed.
8. Fallen Rose Stem Along the Collarbone

The collarbone area is visible and flat enough for elongated motifs. A long stem reads well here but avoid packing tiny thorns and text under the same curve. The visual impact lead works best with a single long session that focuses on clean linework and subtle shading. Pain varies near the bone and sessions often finish in one to two hours. Over time the stem's thorns may lose crispness, so ask for slightly stronger initial contrast. Pair this with an open-front cardigan or wide-neck tops to frame the line rather than hide it.
9. Micro-Realism Concert Portrait on the Upper Arm

When people ask for concert portraits, the visual detail is the draw. The upper arm handles micro-realism well because it gives the artist room to work without risking immediate blowout. The common mistake is shrinking a full-stage scene into a small patch. Instead, choose a focused fragment such as a microphone and silhouette. In consultation say you want dot work for texture and stronger outlines for edges. The session is longer than a simple line piece, often three hours or split across visits. At year three you may need a targeted touch-up rather than a full redo. For wearing after the session, a short-sleeve tee rolled at the cuff draws the eye to the portrait.
10. Scripted Lyric Wrap on a Finger
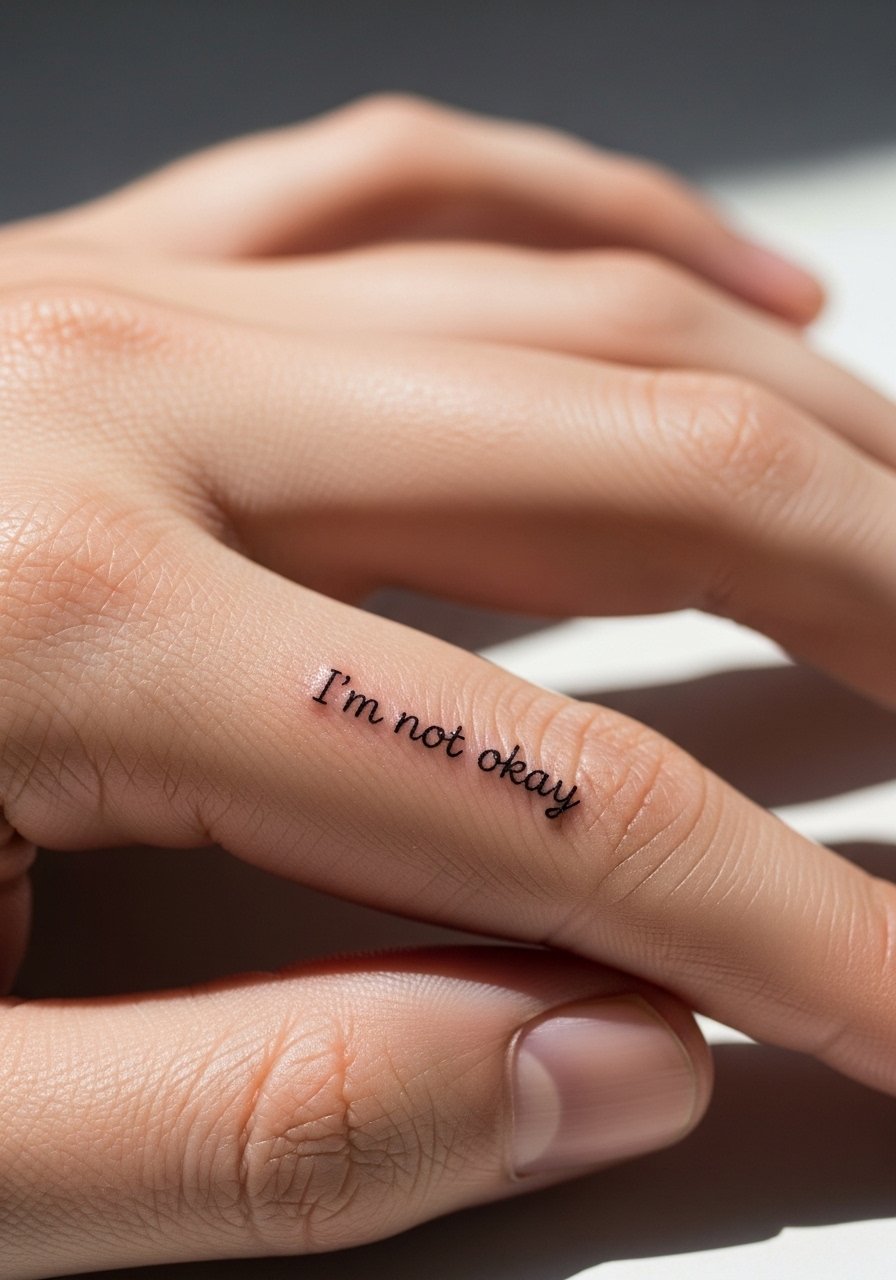
Finger scripts are intimate but high maintenance. The heaviest debate surrounds finger text longevity. One camp says the skin there moves too much and letters blur in one to two years. The opposing camp recommends thicker strokes and careful placement on the outer finger pad. If you want a lyric, keep the letters spaced and accept yearly touch-ups. The session is brief and painful because of bone proximity. Expect the first touch-up within the first eighteen months. For showing it off without friction, rotate rings to the opposite hand or opt for a thin estate-style band that complements the script rather than rubbing against it.
11. Black Heart with Bandage on the Thigh
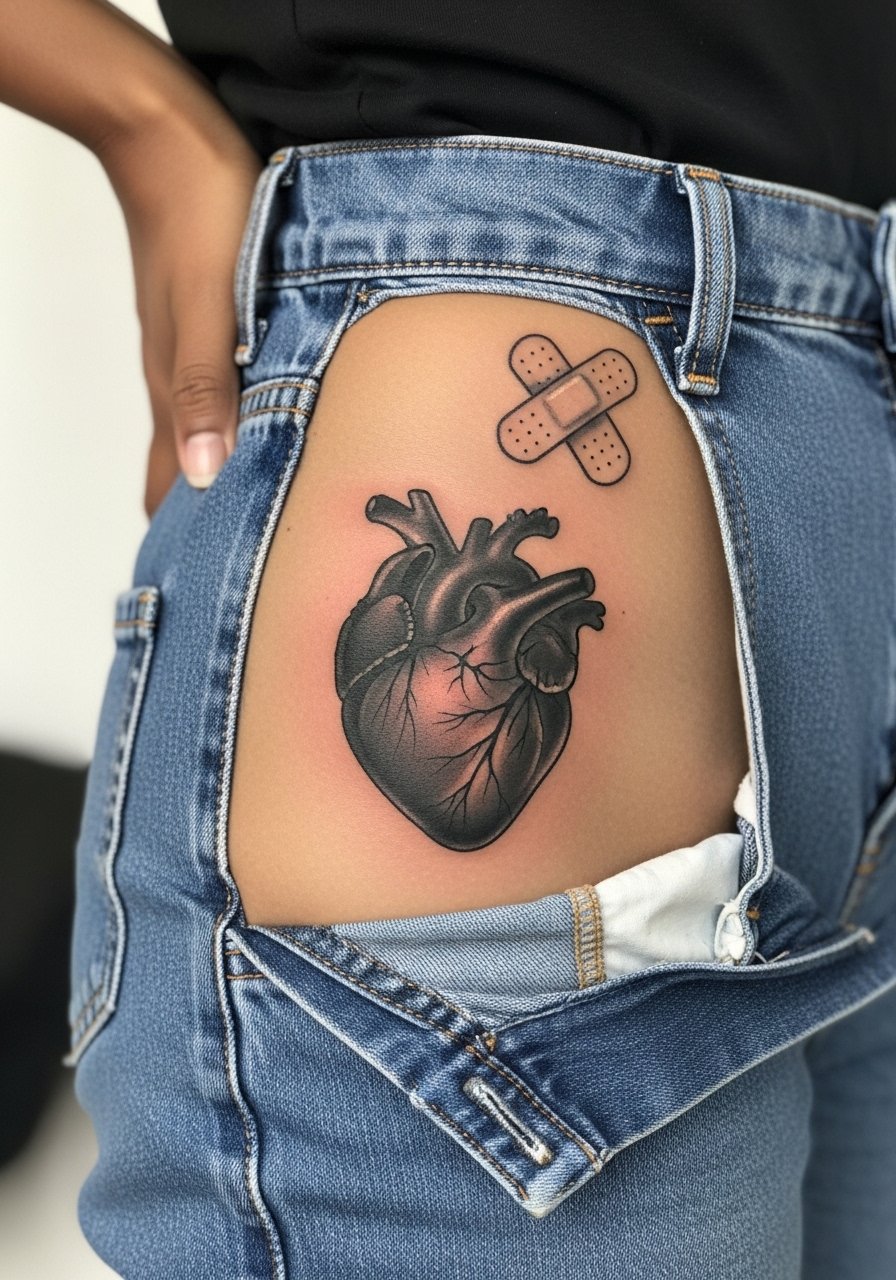
The outer thigh is forgiving for saturation and heavier black. This motif works as a statement piece and ages well because the area is less exposed to UV. The mistake is adding tiny detail that ends up merging when you sit or wear tight fabrics. Ask for bold silhouette, simple bandage texture, and moderate saturation. Sessions are comfortable compared with ribs and often fit into a single two-hour block. At two to three years the black will mellow and a touch-up restores punch. For the session wear high-waisted shorts you can shift slightly so the artist has clear access.
12. Photo-Realistic Eye Above the Wrist
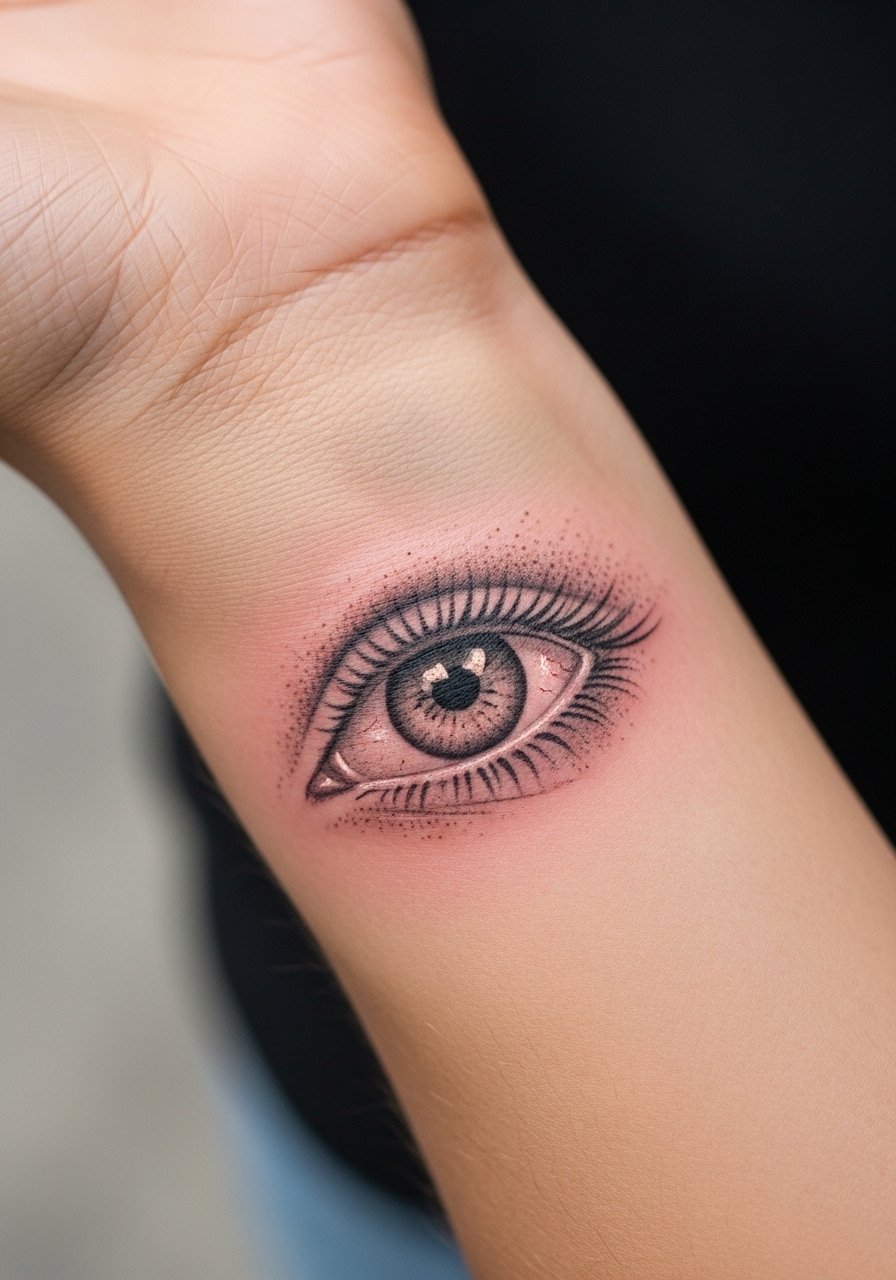
Eyes command attention but test small scales first. A single eye above the wrist gives you emotive detail without the hand’s worst abrasion. The visual impact lead applies here because a crisp pupil and highlight sell realism. The frequent mistake is over-blending shadows that later soften into a smudge. Ask for crisp contrast in the iris and controlled stippling for surrounding shadow. Sessions usually run one to two hours and may require a touch-up for the whites and fine lashes. At year three expect softer contrast but still readable detail if protected from UV. No styling link here so the section counts as a non-styling rotation.
13. Folded Flag Detail on the Calf

A folded flag or draped cloth works well on the calf because the muscle holds ink firmly. The mistake I often see is requesting too many folds in a small area which becomes visual noise over time. Ask your artist for larger, bold folds and careful highlight placement. The session time is moderate and tends to be less painful than ribs. Over years the fabric texture may soften, and a targeted touch-up keeps the folds readable. For showing the piece wear cropped pants or rolled cuff jeans that let the calf peek without constant friction.
14. Small Gaslight Lamp Behind the Ear
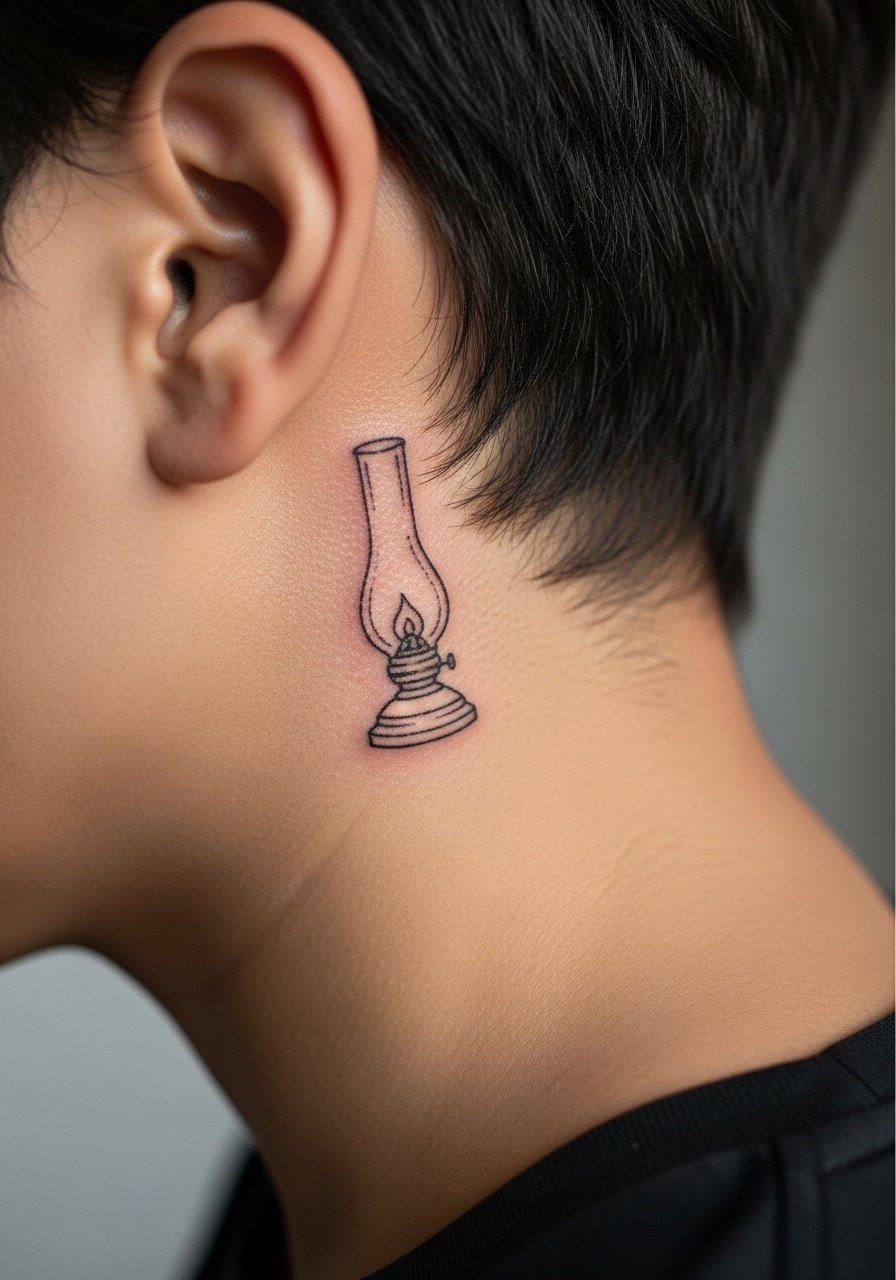
Behind-the-ear placements need careful planning. The skin here is thin and hairline movement affects longevity. A lamp motif works if you place it slightly below the hairline on the neck skin behind the ear. The common error is sizing it too small which makes the detail vanish. Ask the artist for slightly bolder outline and simplified filigree. Sessions are quick but the area is sensitive. Also consider career visibility because neck placements can still influence hiring in some fields. No styling link here because session wear is the main consideration.
15. Broken Microphone Cable Along the Forearm

A winding cable plays well on the forearm because it follows the limb’s natural curve. The visual risk is creating too many tight turns which read as clutter. When you consult, ask for deliberate negative space and a mix of linework and subtle stipple shading for depth. This placement has a moderate pain profile and often finishes in a single session. At two years the thin connector lines may require a touch-up. Pair the forearm piece with rolled-up sleeves or a racerback tank to keep focus on the cable line when you want to show it off.
16. Small Gas Mask Charm on the Ankle

Ankle tattoos sit in a high-friction zone because socks and shoes can rub during healing. The common mistake is expecting tiny detail to last without extra protection. Request a simplified charm with clear silhouette and a little internal dot work rather than smooth gradients. Session time is short and pain is low to moderate. Expect to protect the area more carefully for the first week. For showing it off pair the piece with low-cut sneakers or a simple sandal strap so the artwork is visible and not constantly scraped.
17. Concert Ticket Stub on the Ribcage
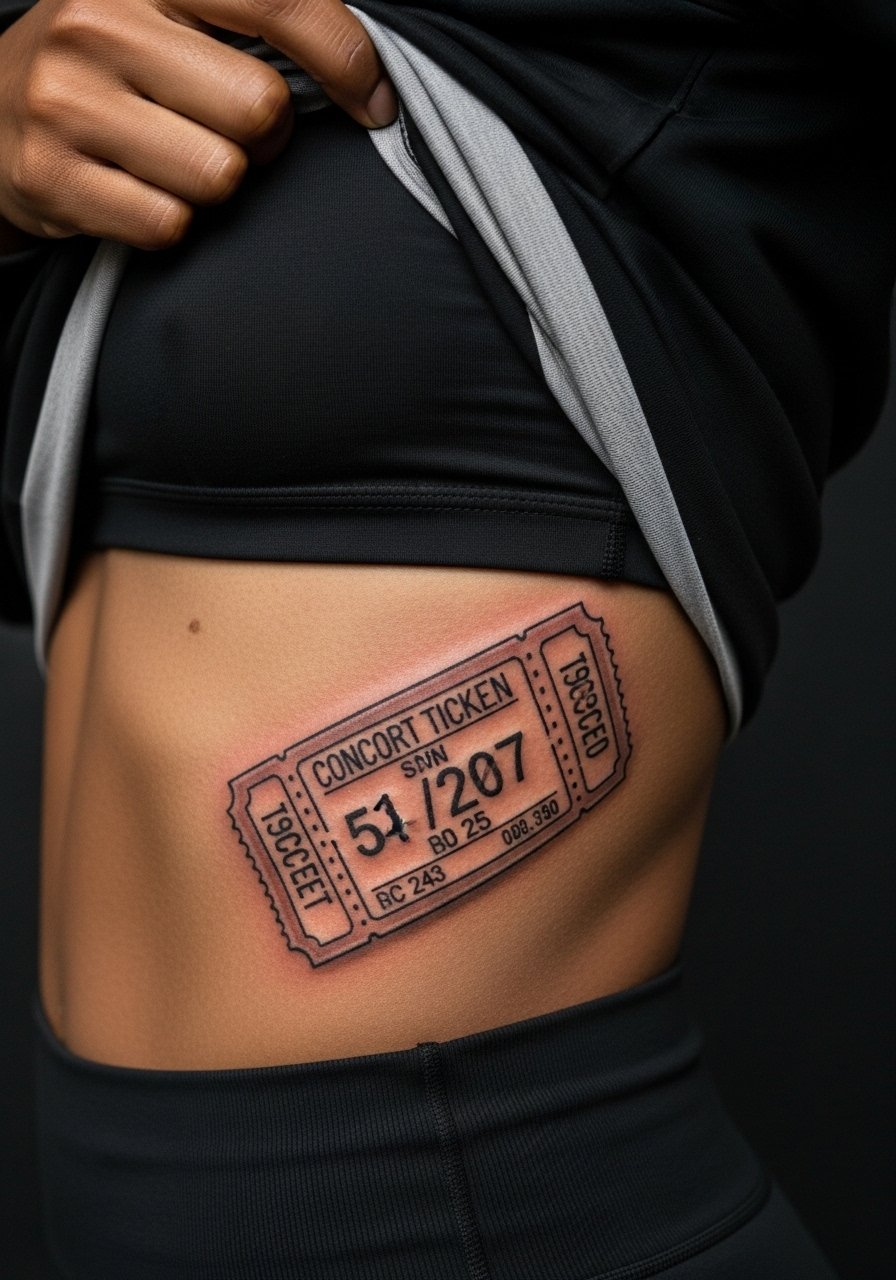
A ticket stub is a fresh take on band memory tattoos and works best as a slightly larger, readable rectangle. The aging lead applies strongly because the ribs move and flex a lot. Keep the typeface bold and the border clear to prevent early blur. The controversy about ribs and fine detail applies here too. If you want ultra-fine lettering expect a trade-off between delicacy and longevity. Sessions are painful and many people split this into two sittings. Ask for a bold headline with lighter inner text so the main detail remains legible at year three.
Frequently Asked Questions
Q: Will a portrait-style My Chemical Romance piece fade faster than a blackwork symbol?
A: From what I've seen, portraits use a lot of micro-detail that softens faster than solid black silhouettes. The fix is scale and contrast. If you want a portrait, increase size slightly and ask for defined outlines or stipple texture that survives better than smooth grey blends.
Q: Are ribcage scripts a bad idea for longevity and pain?
A: Ribs are painful and technically demanding, and artists split into two camps on fine script there. One says the skin moves too much and letters blur. The other says spacing and slightly heavier strokes make it last. If you go ahead, plan for a touch-up in two to three years and wear a zip-up hoodie you can lift easily on session day.
Q: How do I ask an artist to make a band-related tattoo respectful of original imagery?
A: Mention origin respect in the consultation and ask for slight variations rather than verbatim replicas of disallowed artwork. Many artists appreciate a conversation about intent and can suggest minor compositional changes that avoid cultural or copyright concerns.
Q: Which visible placements need special wardrobe planning during the healing week?
A: Wrists, ankles, and collarbones are vulnerable to friction. For wrists switch straps off for a week. For ankles go sockless at home and pick shoes that do not rub. For collarbones choose wide-neck tops. A lightweight open-front cardigan is useful while the area settles.
Q: Can ultra-realistic color work match black and grey realism over time?
A: Color can be stunning but it needs more saturation and UV protection to age well. From what I've seen, bold, well-saturated color holds better than pastel washes. Expect touch-ups earlier than pure black and grey, especially if the work sits where sun exposure is frequent.
