
Fine line rose tattoos behind the ear look effortless when hair is tucked up, but they behave differently on real skin than in photos. Oil from hair, friction from collars, and tiny needle spacing decide whether the design still reads clean at year three. Below are 27 rose ideas placed on the skin behind the ear, each with consultation notes, aging cues, and wardrobe tips to help the tiny pieces last.
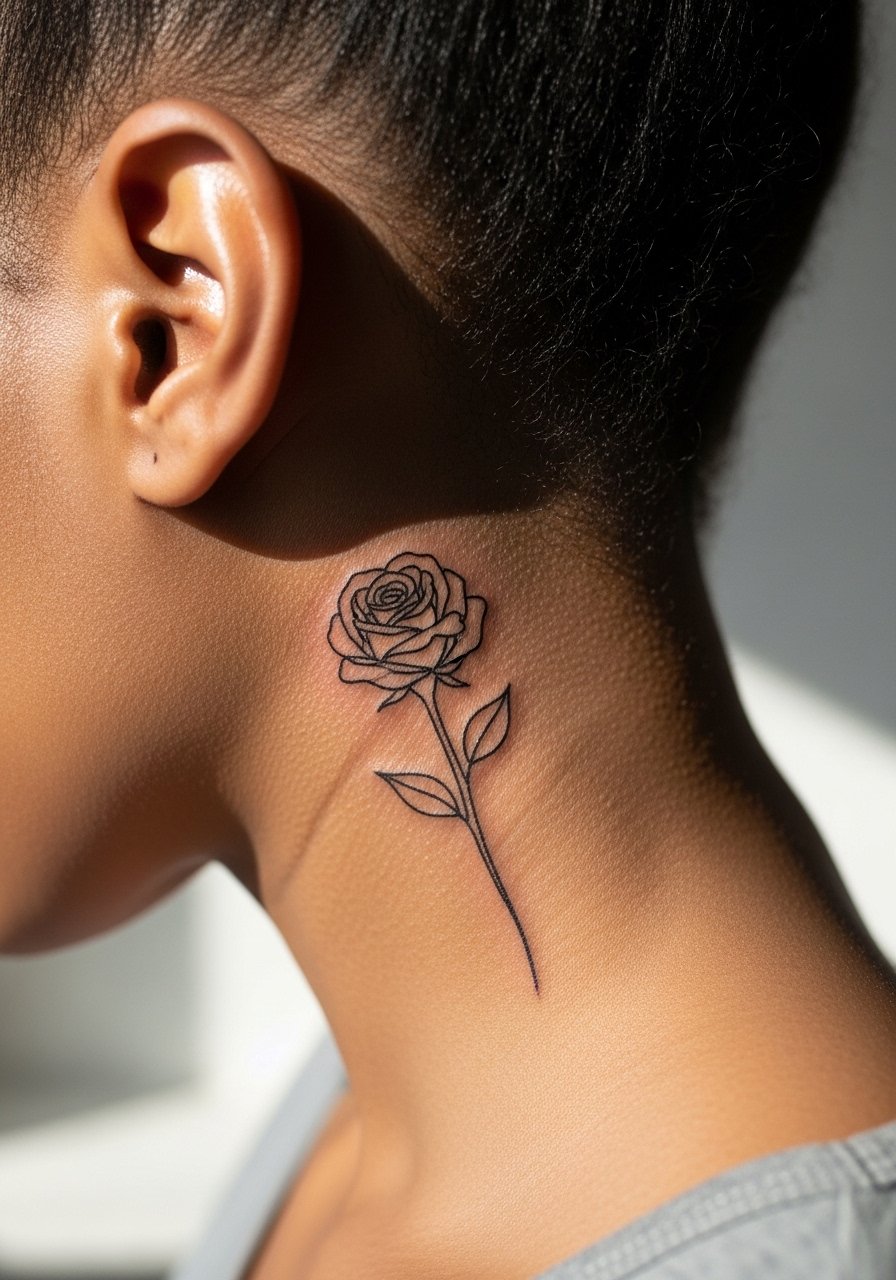
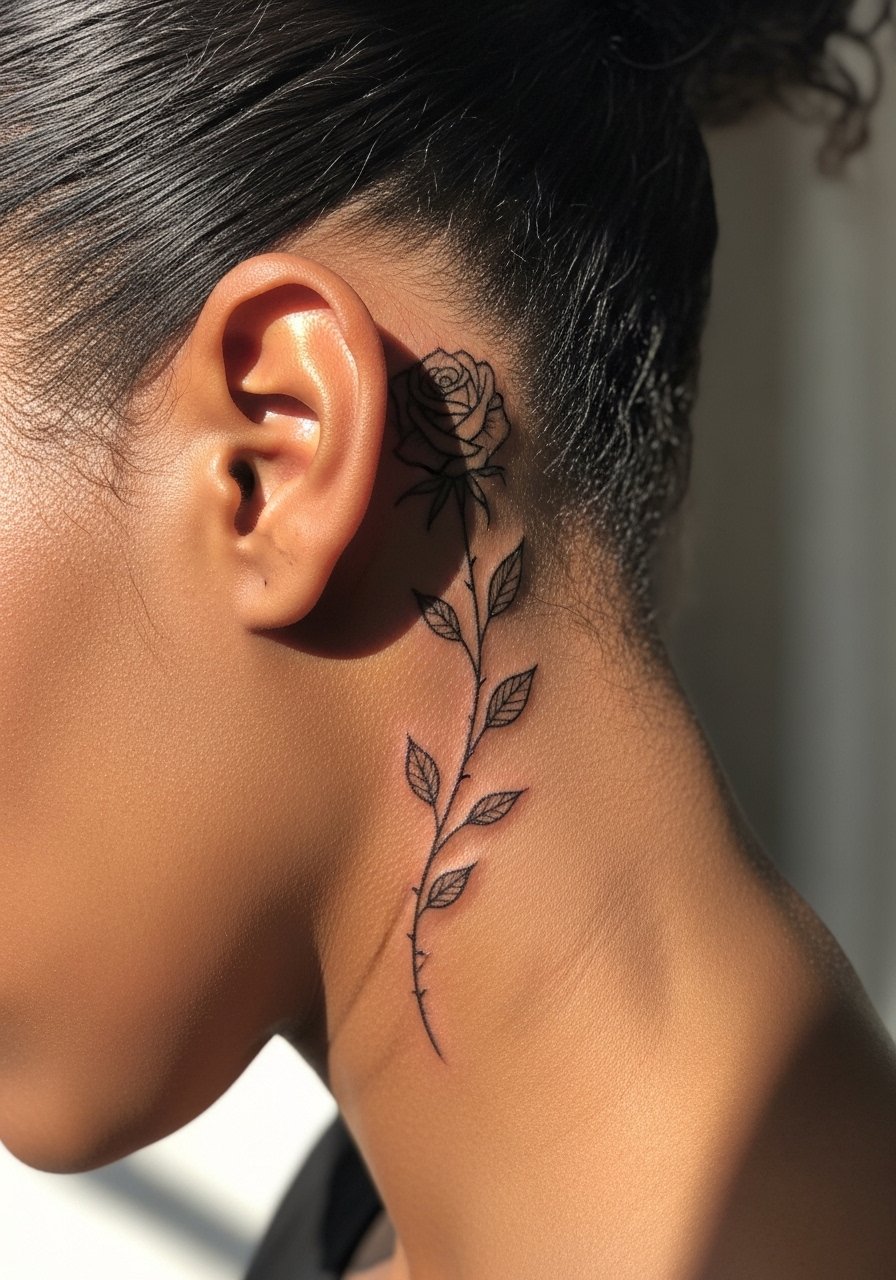
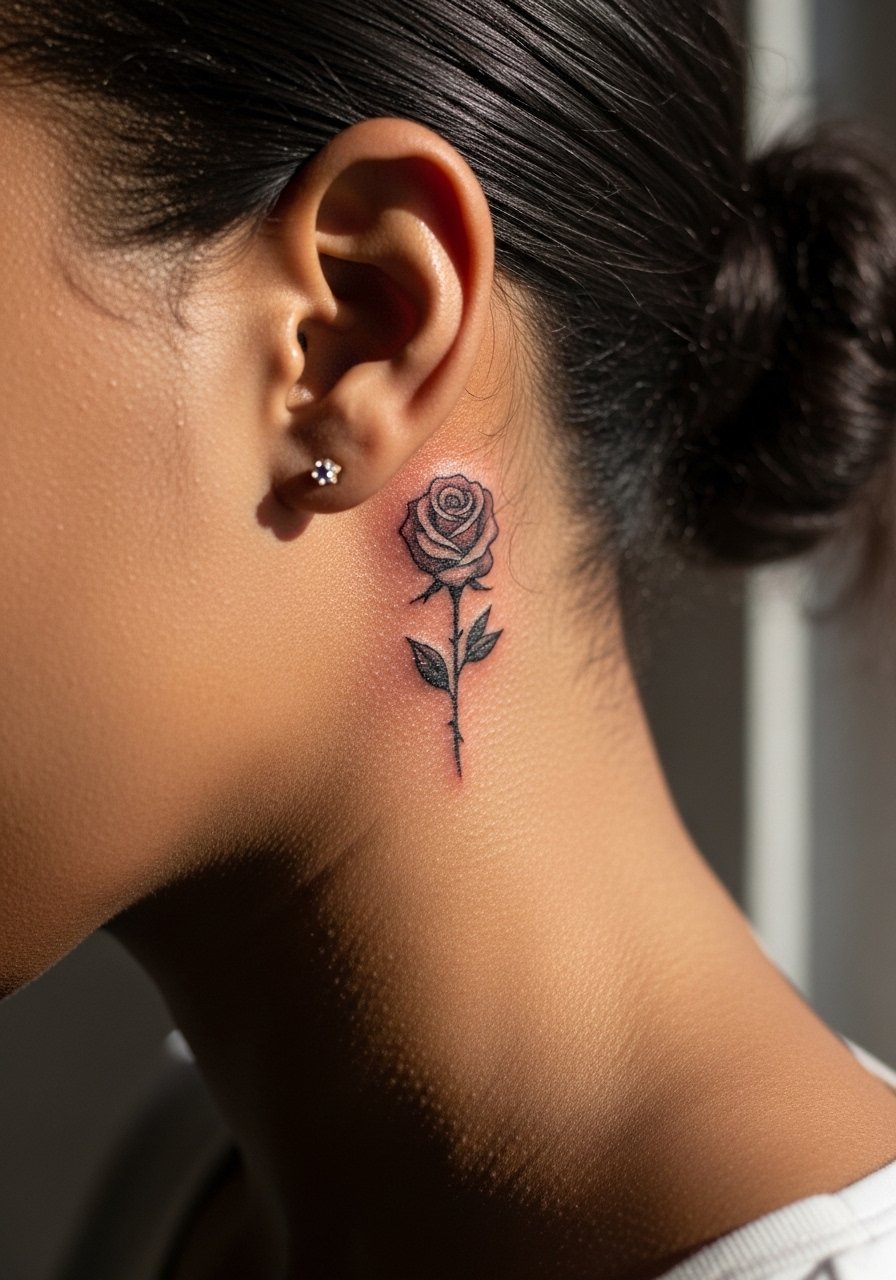
1. Fine Line Single Stem Rose
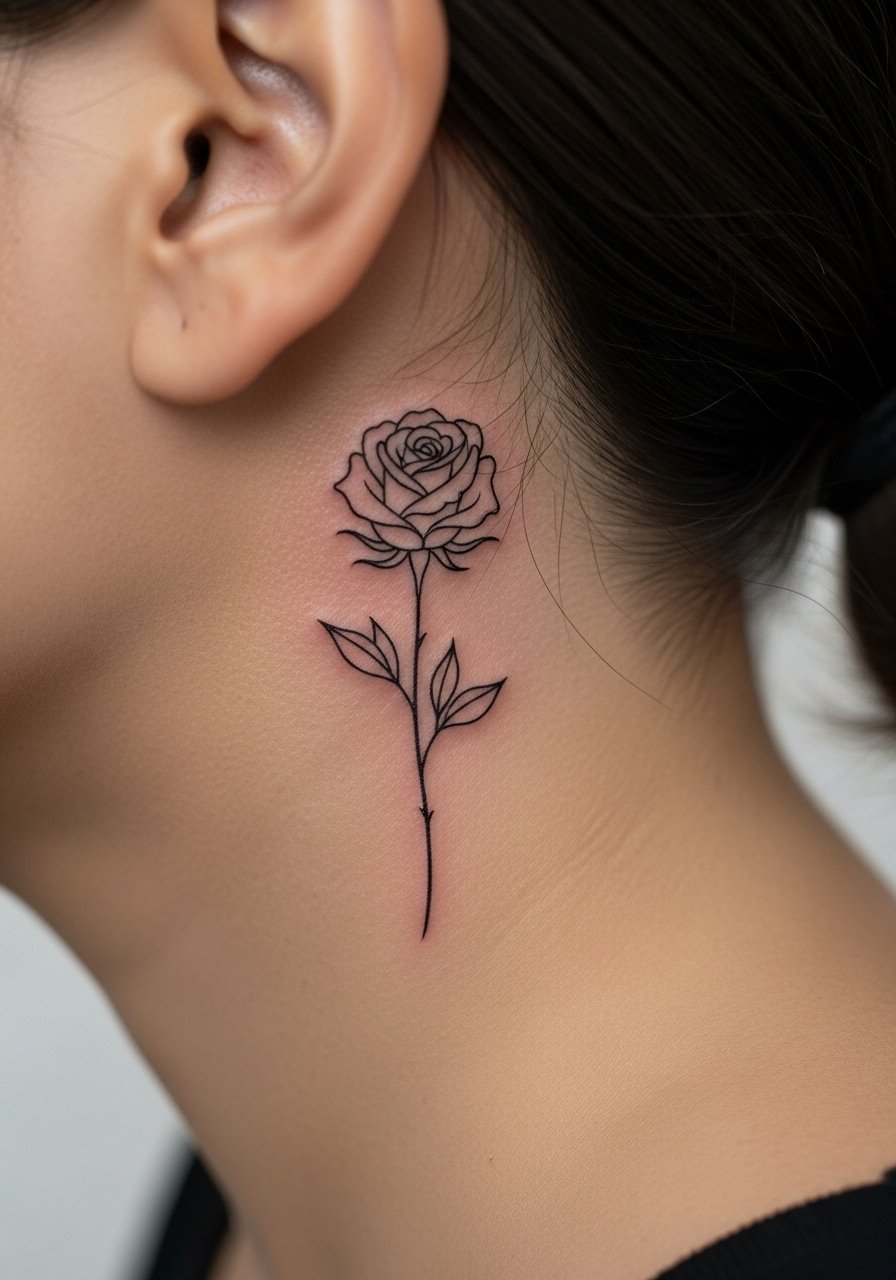
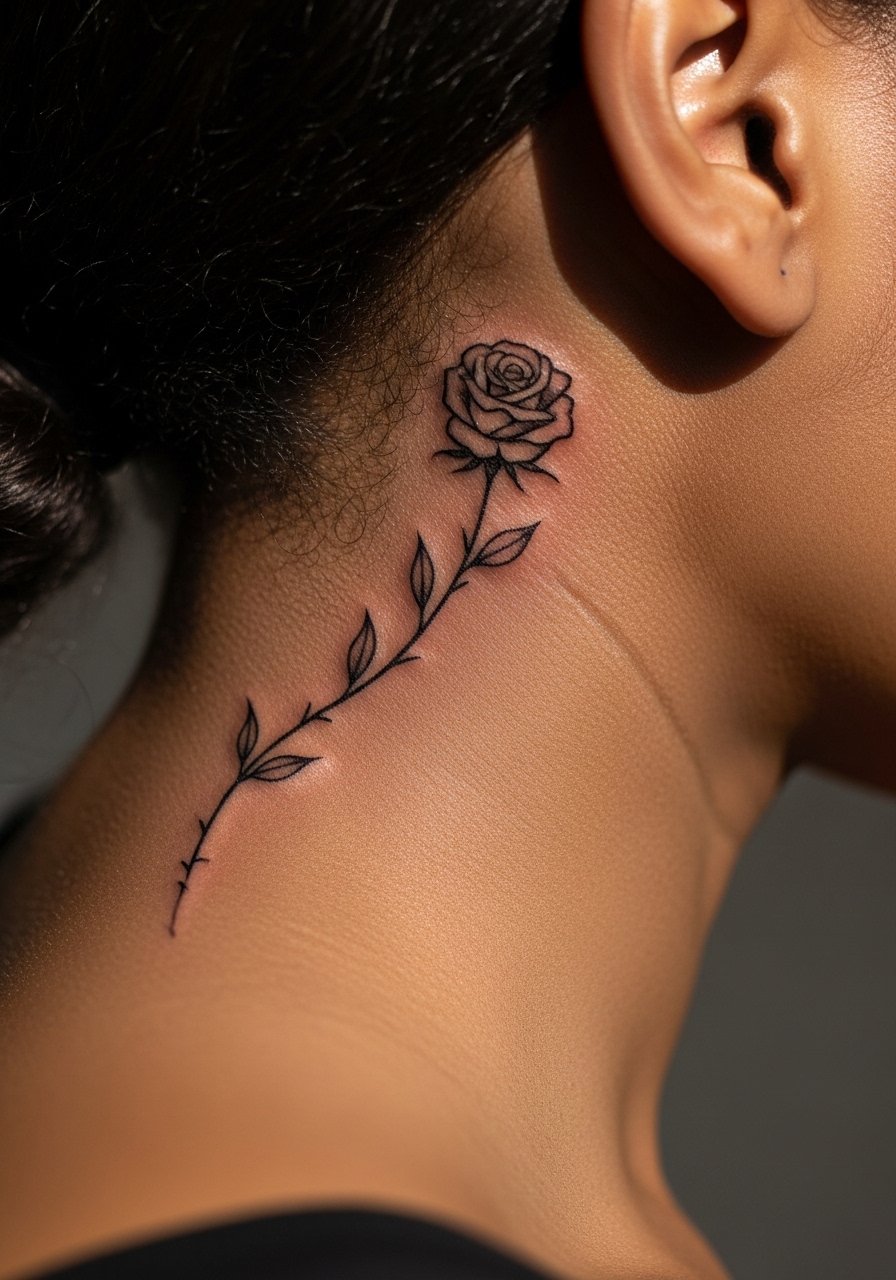
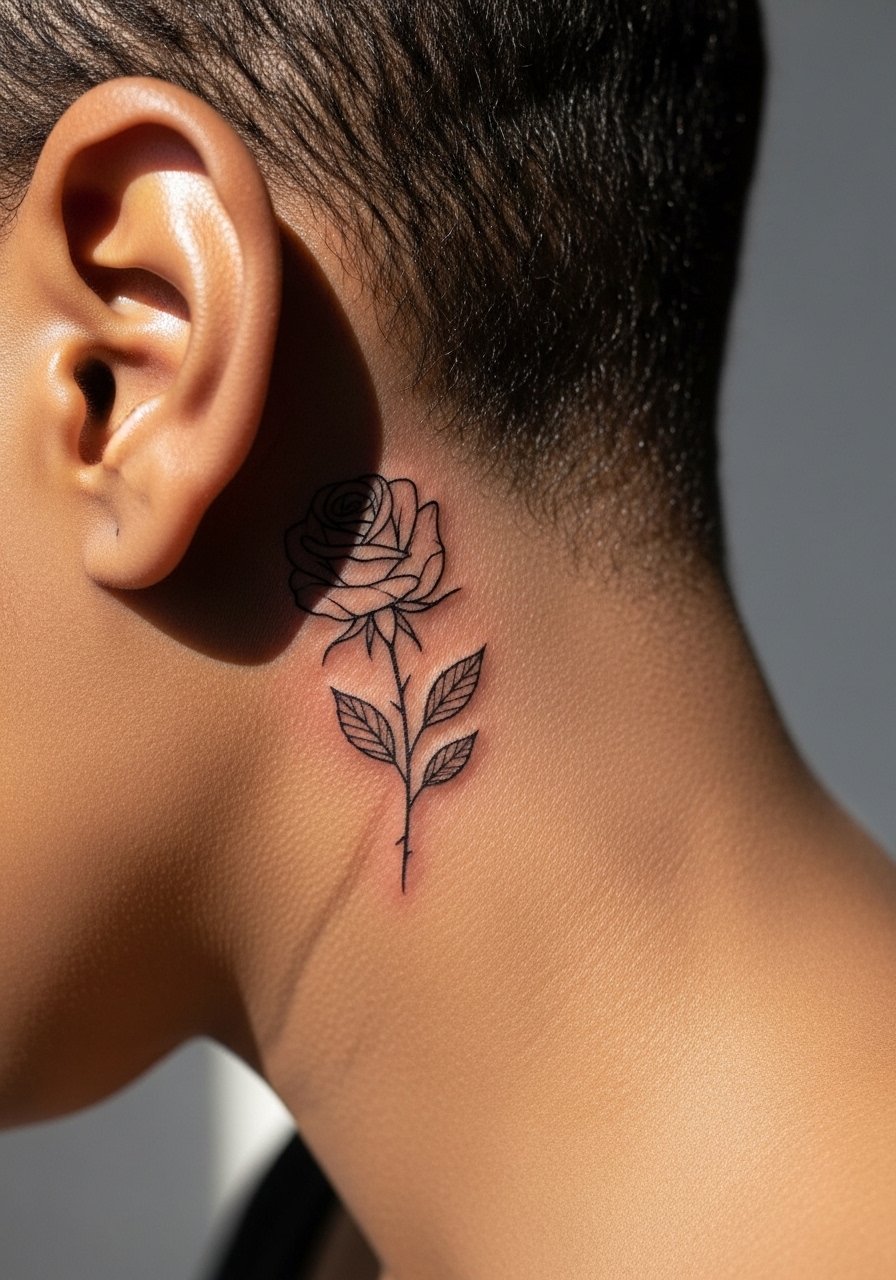
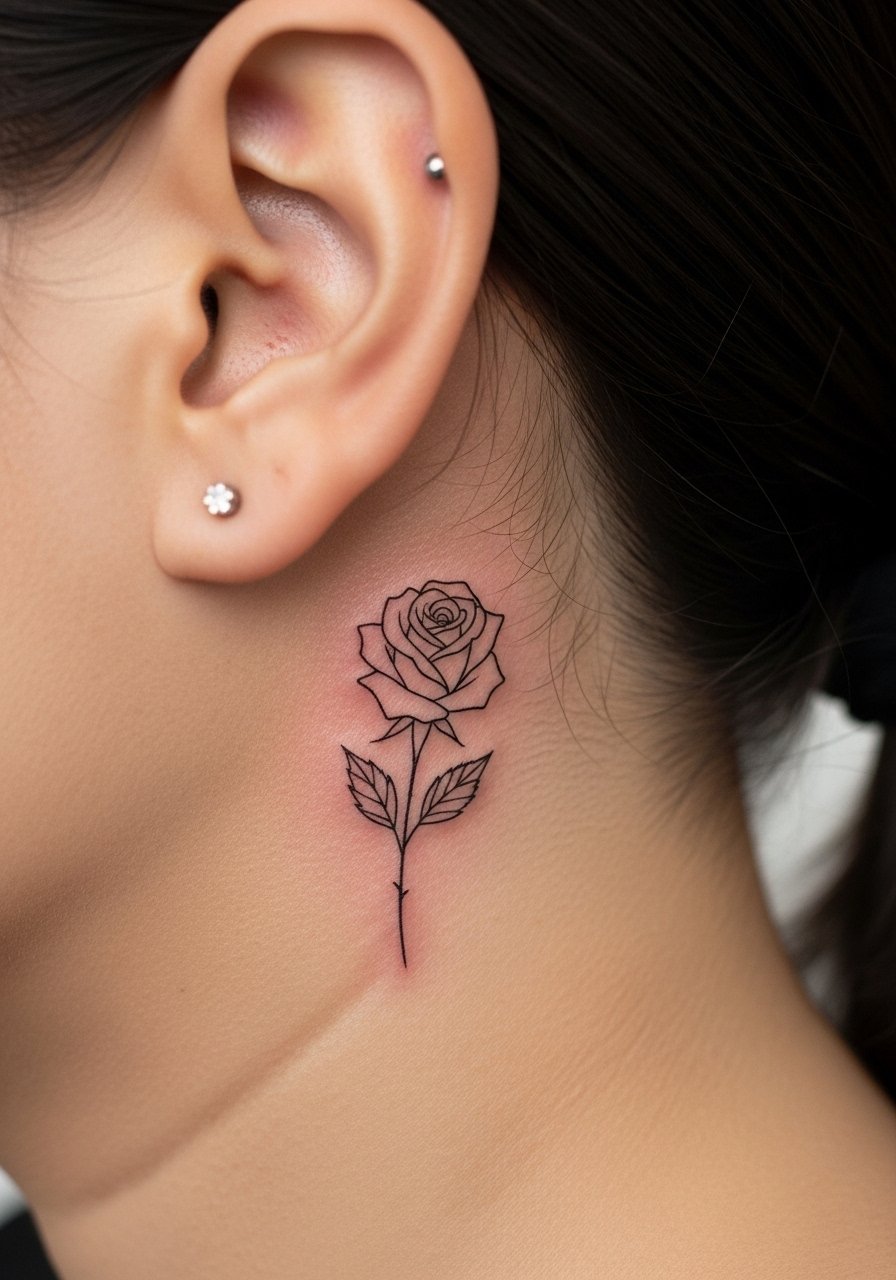
A single-stem fine line rose is the most classic behind-ear move. I recommend it for first-timers who want something discreet but visible when hair is up. Tell your artist you want slightly increased spacing between the inner petal lines so the piece does not blur into a single shape after a few years. Expect a quick 20 to 30 minute session and mild tenderness where the skin is thin. Common mistake is asking for hair-fine lines with zero breathing room. For the appointment wear a loose button-down shirt you can pull aside and a hair clip to keep the area clear.
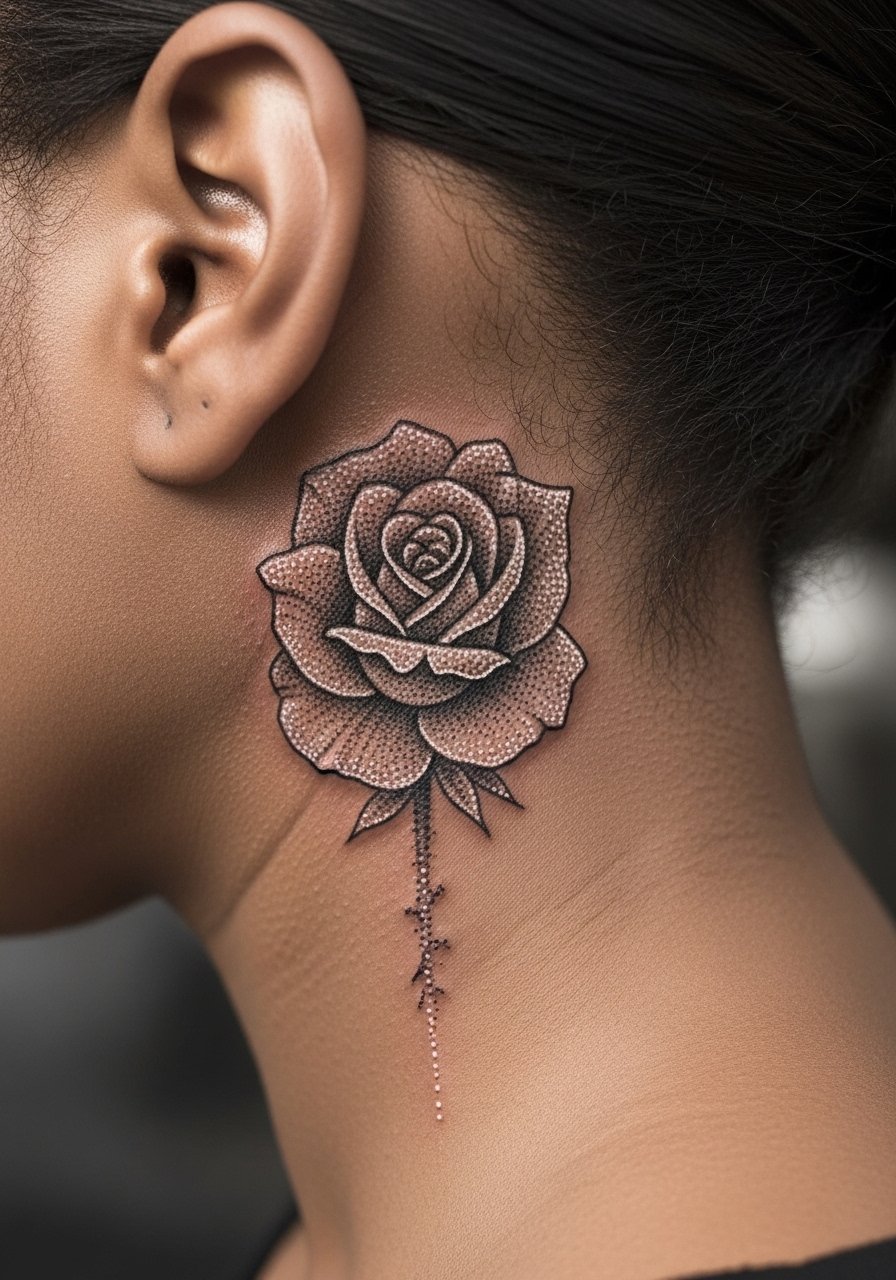
2. Micro-Realism Rosebud
Micro-realism compresses shading into a tiny space for a lifelike bud. Artists split into two camps on this one. One group says micro shading that small can merge into a gray spot with time. The other group says careful needle depth and staggered dots keep texture for years. When you consult mention you want stipple shading rather than heavy packing so the piece ages with subtle texture. Pain is low but expect more machine passes than a simple outline. For showing it off, small hoops or a thin chain necklace that tucks under hair keeps focus on the bud.
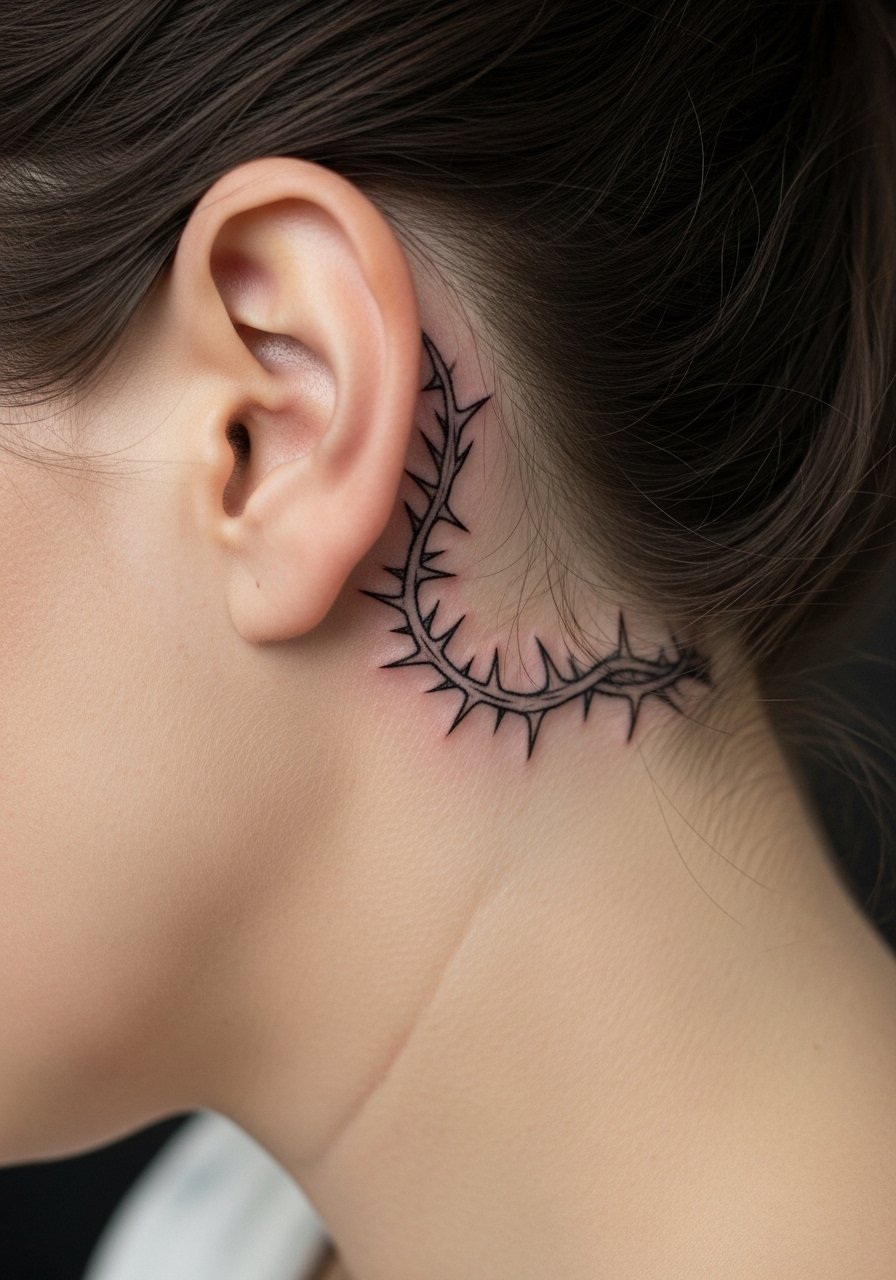
3. Tiny Bud with Thorn Accent
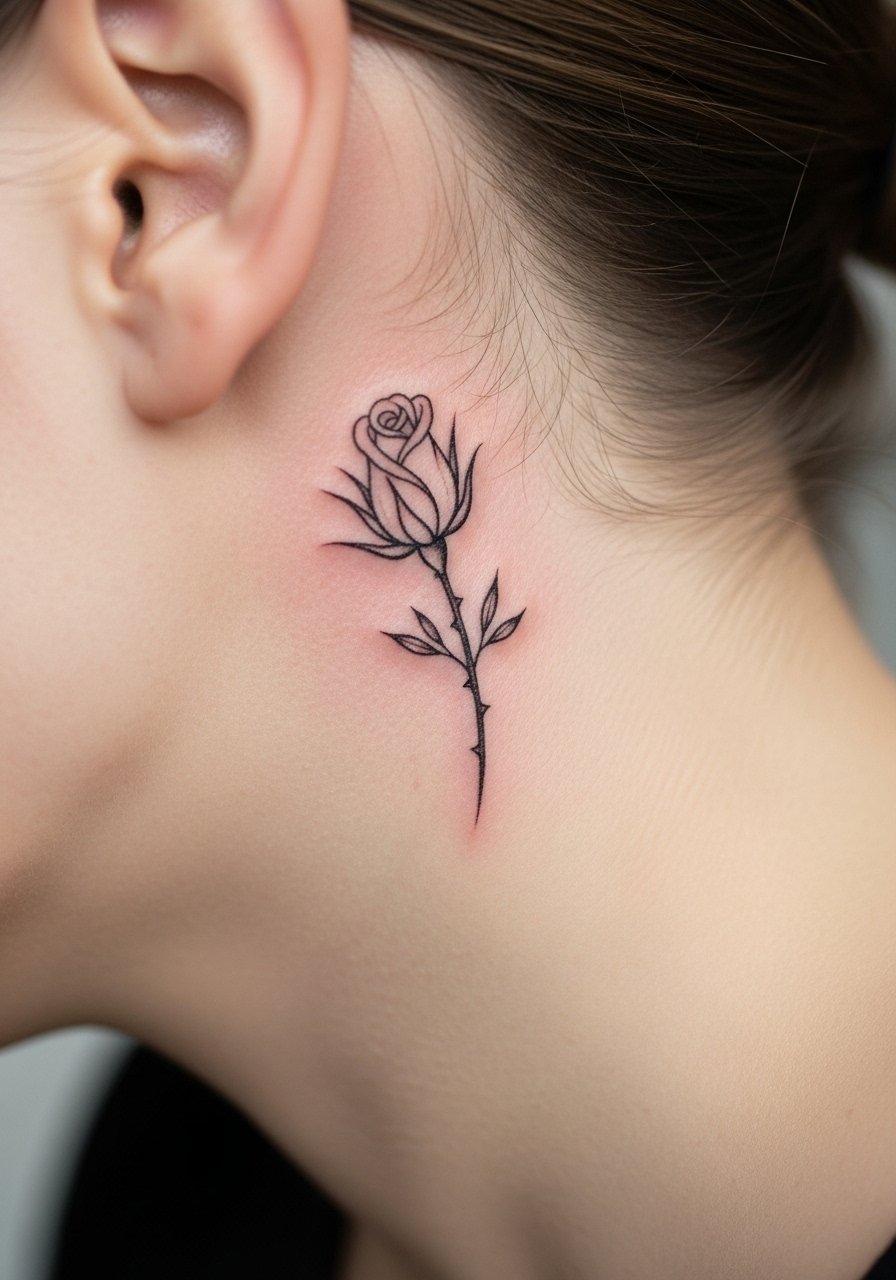
A tiny bud with a single thorn gives the design a little edge without taking up space. This works well for people who want a hint of contrast near the hairline. Tell the artist to keep the thorns small and angled away from areas that will rub against collars. The biggest mistake is crowding the petals with too many internal strokes. Expect 15 to 25 minutes in the chair and a touch-up at year two if you want the thorns to stay crisp. For the session clip your hair up and wear a ponytail hair tie that holds the area clear.
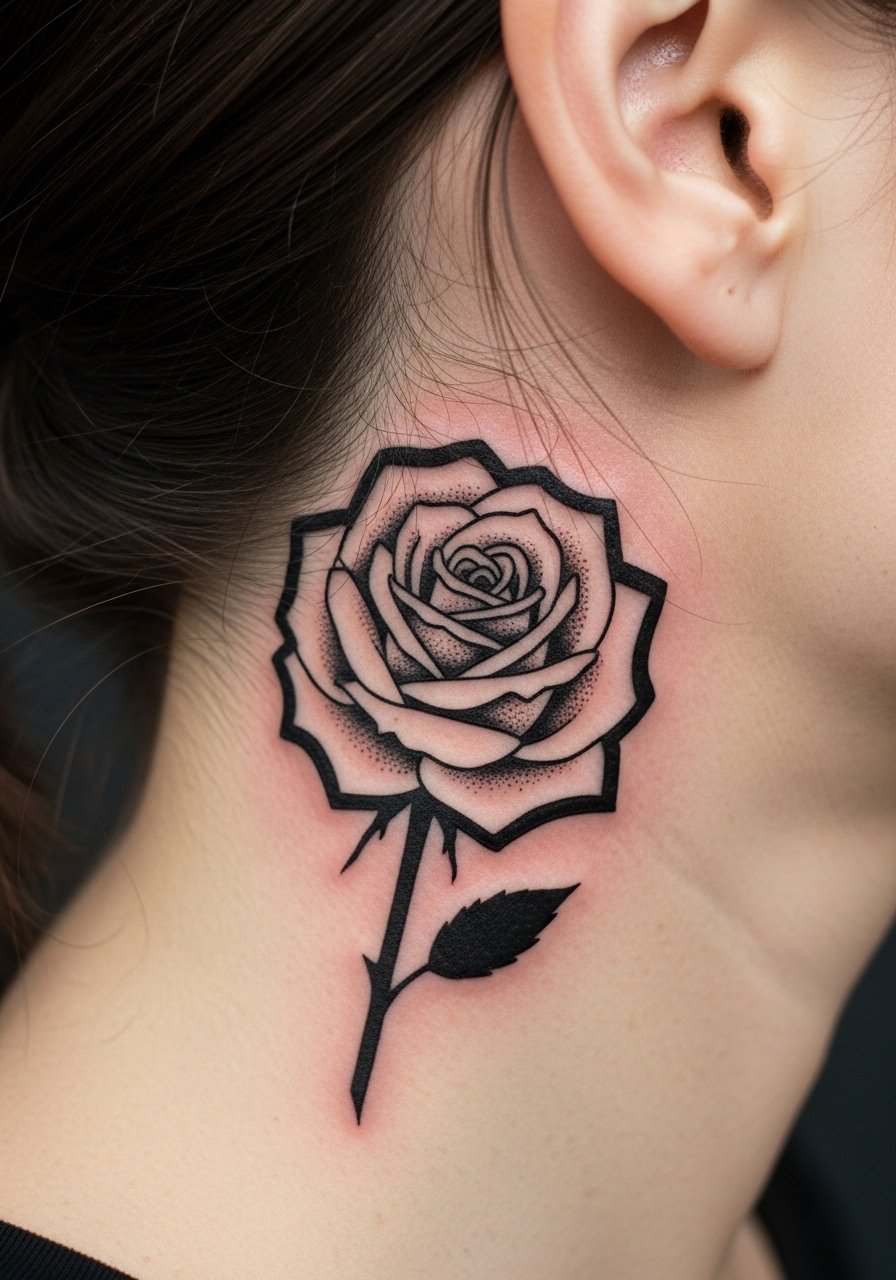
4. Blackwork Silhouette Rose
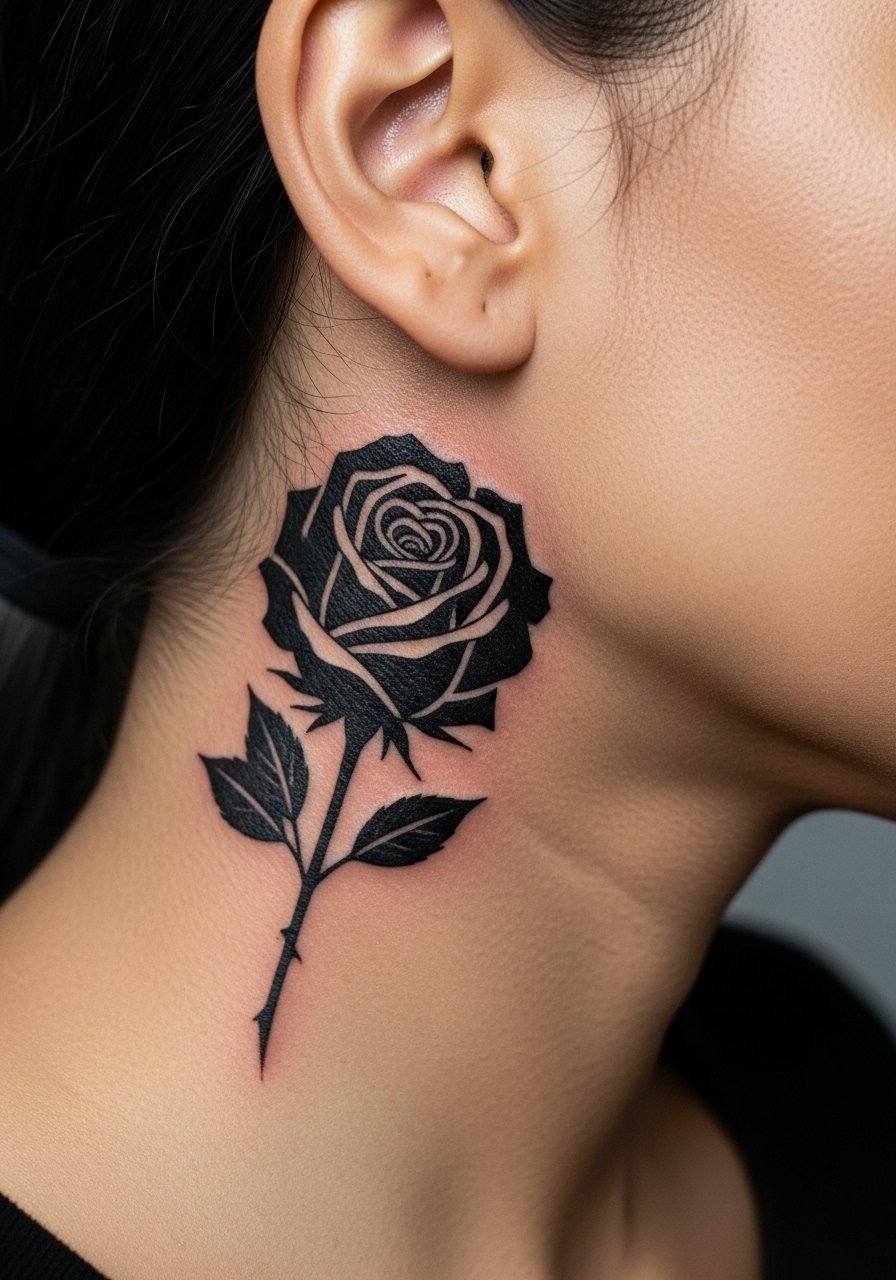
A silhouette rose works if you want a bold tiny mark that reads from a distance. The thicker saturation helps the piece remain readable as it ages. Request the artist avoid packing black under the hairline where constant rubbing can dull surface saturation; place the fill mostly on the exposed side. The session feels quick but expect more pressure when the needle fills solid areas. Common mistake is making the silhouette too small. Pair it with minimalist hoop earrings and a small gold hoop earring when you want the tattoo to pop.
5. Stipple Shaded Rose
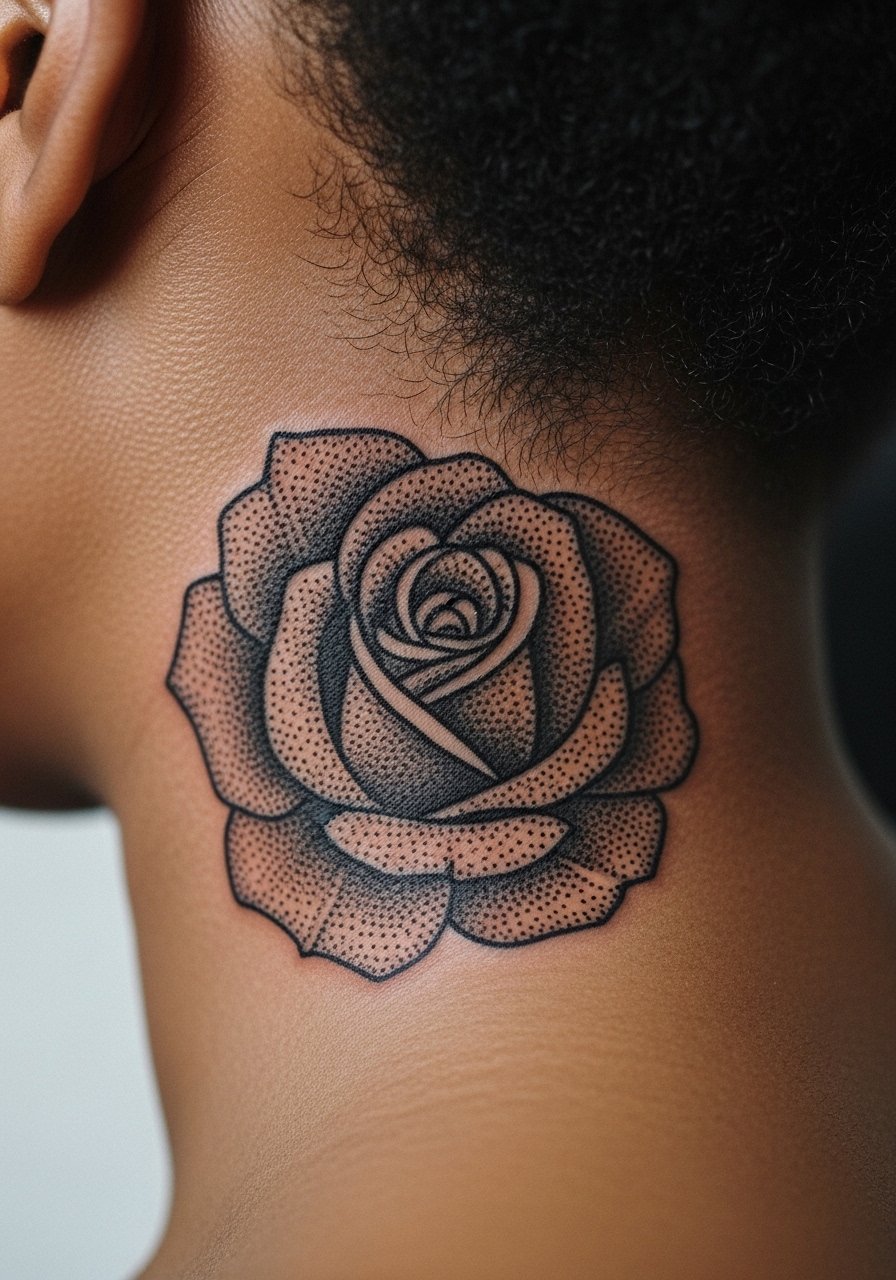
Stipple shading uses dots to build depth without heavy fills. It avoids the dense packing that can cause early patching on thin skin. Ask for spaced stippling around the petals and denser dots where you want shadow. The texture holds differently at six months, two years, and five years. At six months the dots remain crisp. At two years the contrast softens. At five years the pattern reads as gentle gray wash that can be refreshed with a touch-up. For the session wear a scrunchie hair tie so the artist has clear access and your hair stays clean.
6. Watercolor Accent Rose
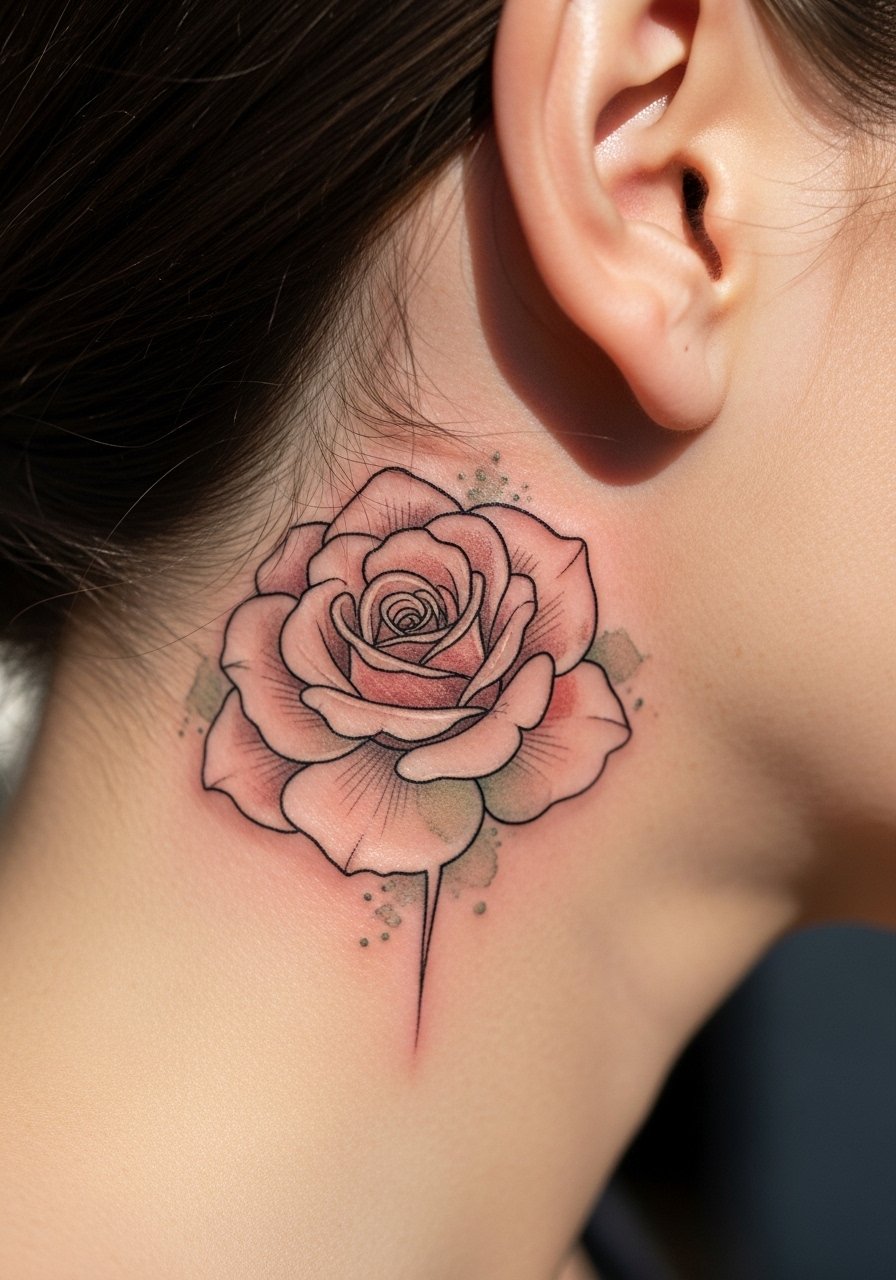
A tiny watercolor wash behind an outlined rose adds color without heavy saturation. Be explicit that you want soft, patchy color and not dense packing. Colors fade faster than black, so pick hues that age into pleasant tones rather than stark erasure. This style splits opinion. One camp loves the painterly freshness. The other warns color on thin skin near hair may need more frequent touch-ups. In the chair the color pass is quick but expect a lighter touch. For showing it off pin hair up and wear small stud earrings to keep attention on the hue.
Studio Day Picks
The pieces above are small and sit close to hair and collars, so a few targeted items smooth the session and the first week of healing.
-
Stencil transfer paper kit. Lets you preview the exact placement on thin skin behind the ear before the needle touches the skin.
-
Topical numbing cream. Use as directed to ease the sting on tender behind-ear skin while keeping the artist's lines visible.
-
Thin protective film roll. A narrow film helps the tattoo avoid hair oils and friction during the first 24 hours.
-
Fragrance-free gentle body wash. Cleans the area without stripping pigment or irritating delicate linework.
-
Aquaphor healing ointment. Thin layers for the first few days keep the tiny channels hydrated and reduce scabbing on this sensitive zone.
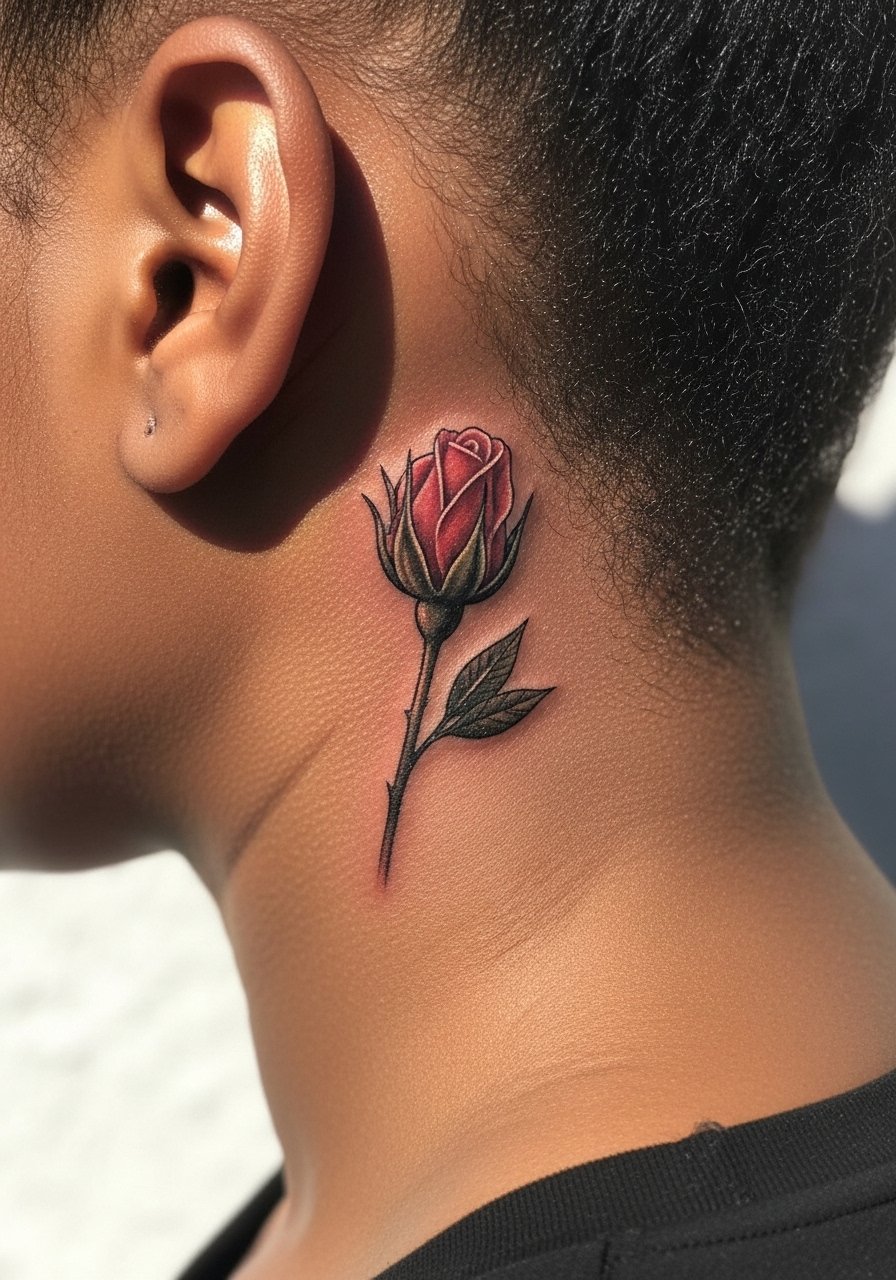
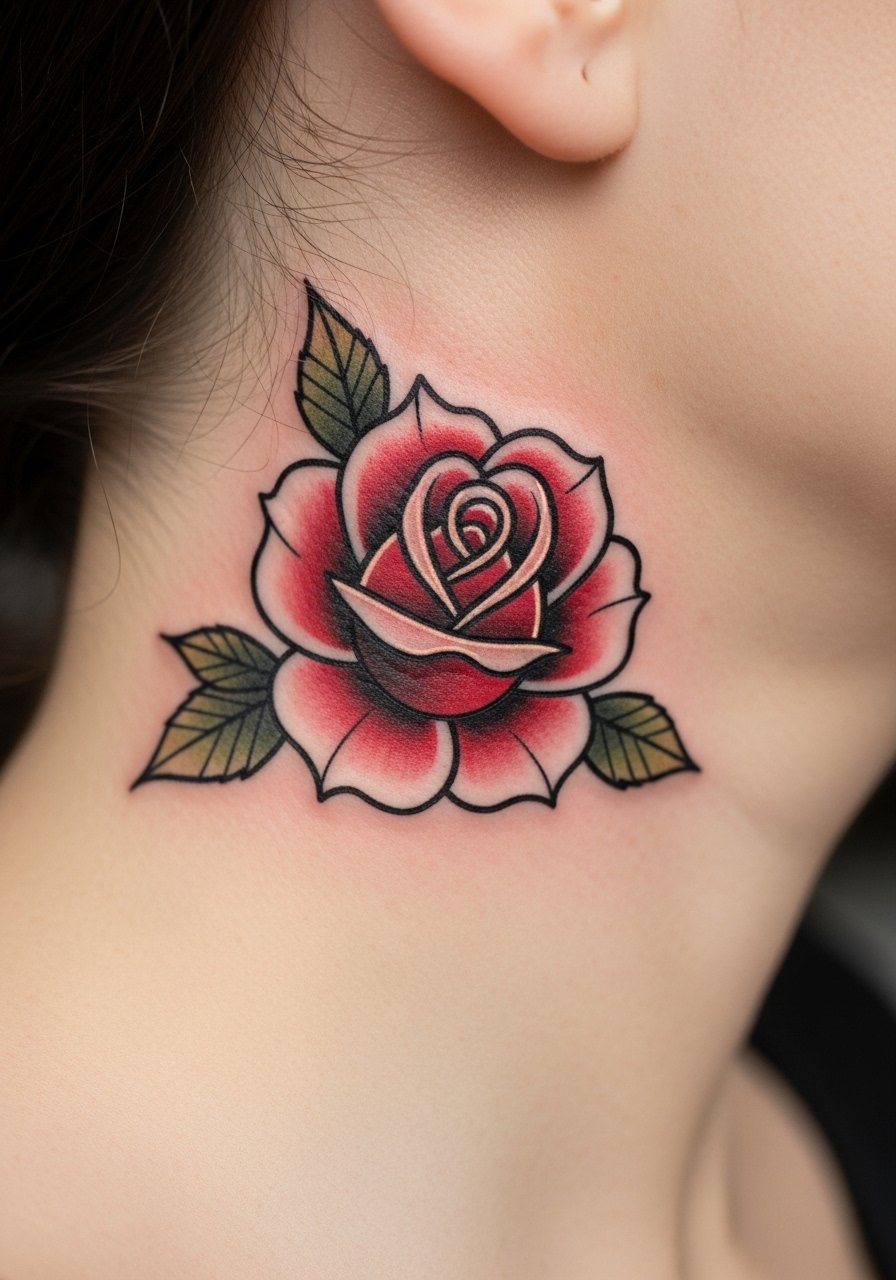
7. Tiny Traditional Rose
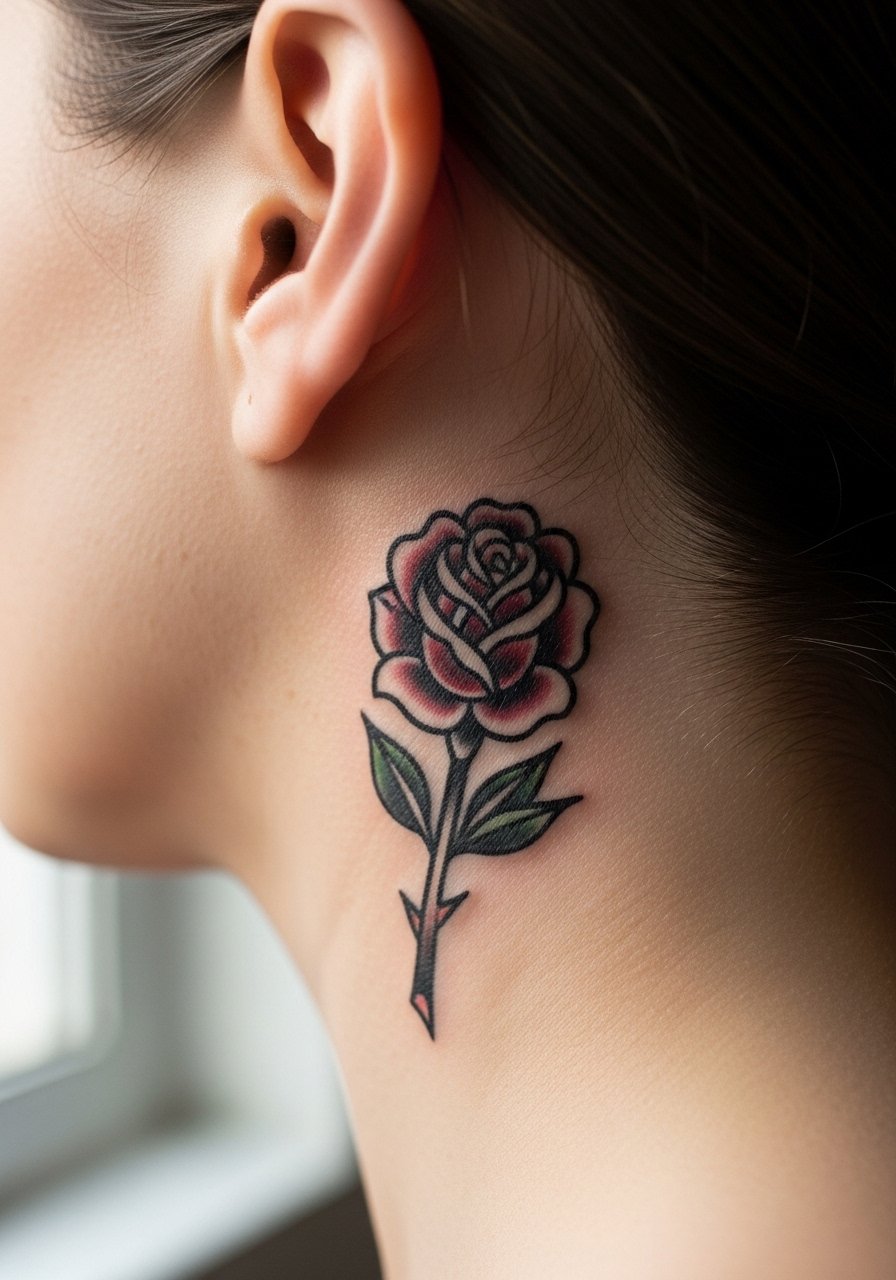
A micro traditional rose simplifies the classic motif into bold outlines and sparse shading. That approach helps longevity because solid outlines age more predictably than micro-detail. Tell the artist you want slightly thicker linework than a fine line piece to maintain legibility. The session feels brisk and the pain is mild. The typical mistake is asking for heavy color packing in a tiny form. For everyday wear this pairs nicely with a thin chain pendant necklace that sits above the hairline and frames the design.
8. Geometric Frame Rose

A geometric frame adds structure to a soft floral shape. Ask your artist to keep the frame slightly offset so the rose does not collide with the edges as lines soften. The combination reads modern and keeps the rose visually anchored as it ages. Common mistake is making the frame too tight around tiny petals. For the session wear a loose button-down shirt you can shift to expose the area without tugging at the hairline.
9. Single-Continuous Line Rose
Single-line tattoos look effortless, but the challenge is keeping consistent line weight. Request the artist aim for slightly bolder continuous strokes than the absolute thinnest ink so the form remains readable after a few years. The piece tends to need touch-ups sooner than heavier work. The session is quick and sensations are light. Avoid asking for the absolute hairline-thinnest single stroke. Pair with a small hoop earring when you want the negative space to show.
10. Rose with Script Ribbon

Tiny script near a rose adds personal text without a large footprint. Text in such a small area needs deliberate spacing and a simple typeface. Tell your artist the exact word and ask them to draw it at the scale you expect. If the lettering is too tight it will blur; if it is too light it will disappear. Expect 25 to 35 minutes and a touch-up timeline of two years for crisp letters. For session comfort wear a racerback tank top so you can move hair and collar away easily.
11. Rose with Crescent Moon

Combining celestial motifs with a rose gives a compact narrative without expanding the footprint. Ask the artist to keep spacing so the moon and petals read separately at small scale. A common mistake is overlapping elements that merge over time. The session is short and the healing follows typical small-piece timelines. Wear hair up and consider a silk scrunchie that reduces friction on the area during the first week.
12. Creeping Rose Vine
A vine that threads slightly behind the ear offers movement and looks great when hair is pulled back. The controversy here is real. One camp worries that linear vine work so close to hair will blur quickly because of constant rubbing. The other camp argues that with proper spacing and lighter needle passes the vine maintains its rhythm. In consultation ask for slightly increased spacing between nodes and for the artist to map the vine around typical hair movement. For the session pull your hair into a high clip and wear a ponytail hair tie.
13. Rose with Tiny Bees
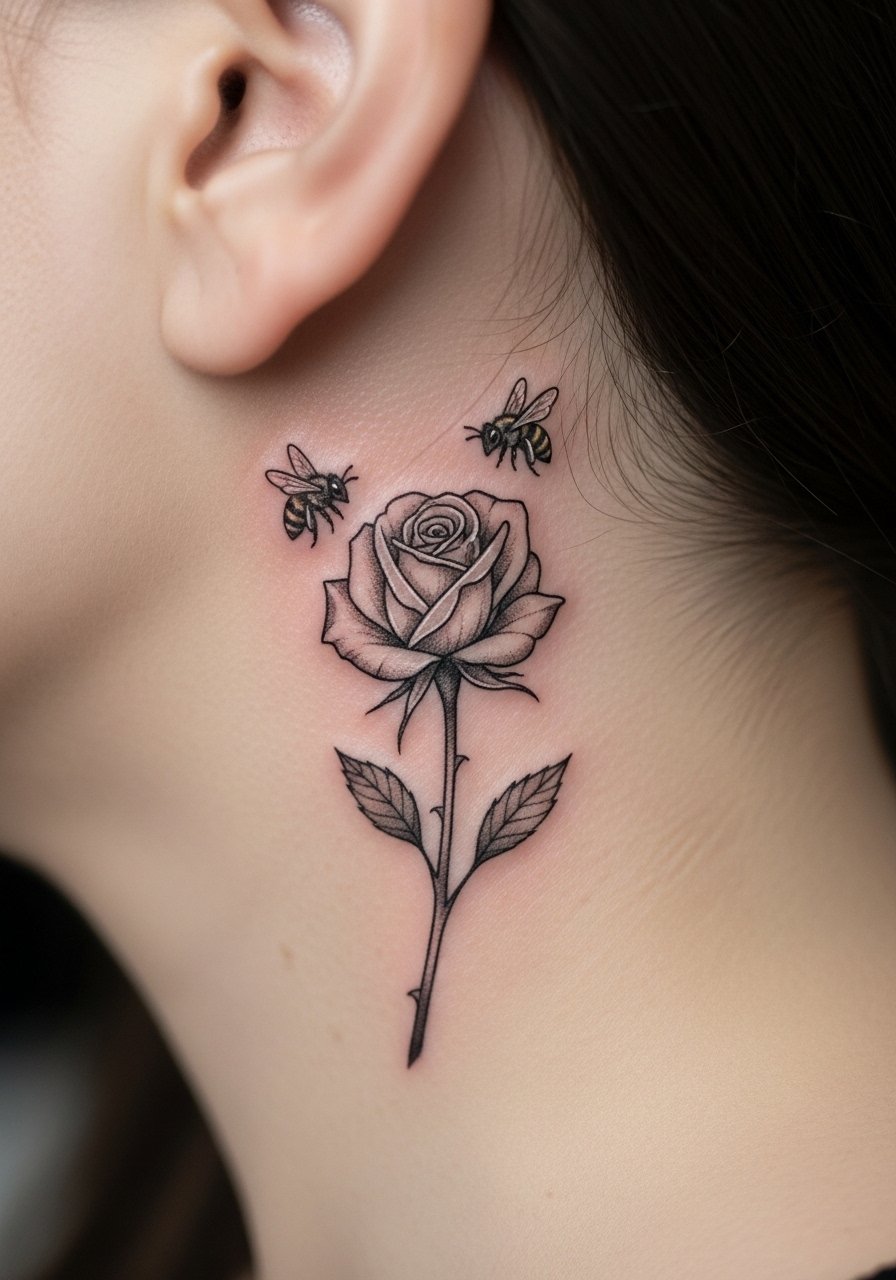
Adding tiny bees gives the rose a storytelling detail and keeps the design playful. Ask for the bees to be simplified so wings read as shapes rather than detailed veins. The most common mistake is insisting on tiny wing detail that becomes muddy. This pairing stays visually interesting when photographed and under hair. The session may take extra minutes for placement balancing. For showing the piece wear your hair tucked behind the ear with a decorative hair clip.
14. Twin Mini Roses
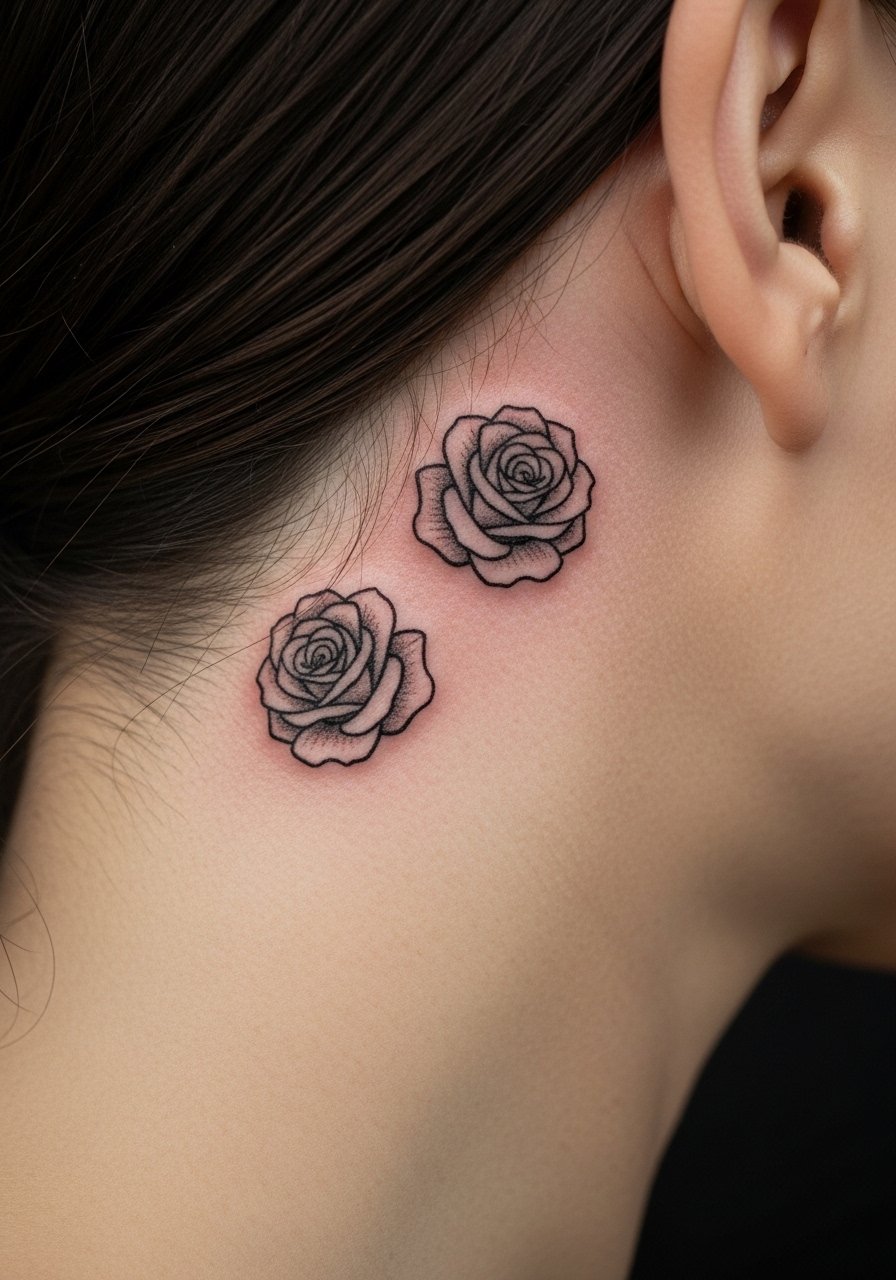
Two mini roses mirror each other for a subtle statement when hair is up. Make sure each rose has its own breathing space so they do not merge as lines soften. A mistake I see is making mirrored motifs too close for the scale. The session can be as little as 15 to 30 minutes. If you like symmetrical accessories, pair this with a thin chain choker that keeps the eye centered.
15. Lace Filigree Rose
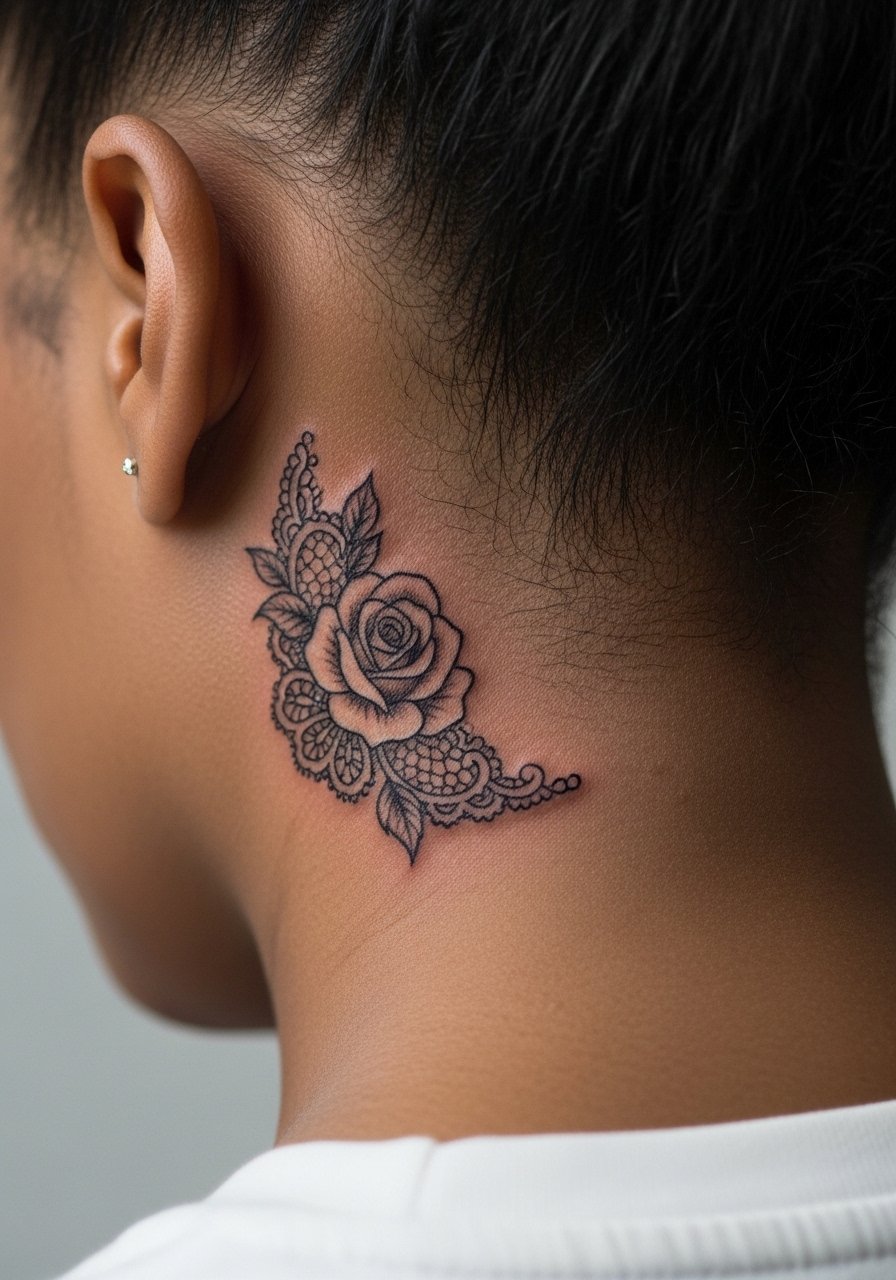
Filigree lets a rose feel ornamental without growing in size. Ask your artist to simplify filigree lines so they age as suggestion rather than becoming a dense patch. The common error is insisting on highly ornate lace at a scale too small. Plan for a longer consult to agree on spacing. For the session pick a loose button-down shirt you can pull aside without disturbing the neckline.
16. Thorn Cuff Wrap
A tiny thorn cuff gives a wrapping effect without moving past the behind-ear zone. Ask for a staggered thorn pattern and not uniform identical spikes so it reads organic as the skin shifts. People sometimes want the cuff too tight, which risks merging lines. Expect a short session but plan for touch-up if you want the thorns crisp over five years. For the appointment wear your hair up with a silk scrunchie to avoid excess oil getting on fresh ink.
17. Rose with Tiny Gem Accents
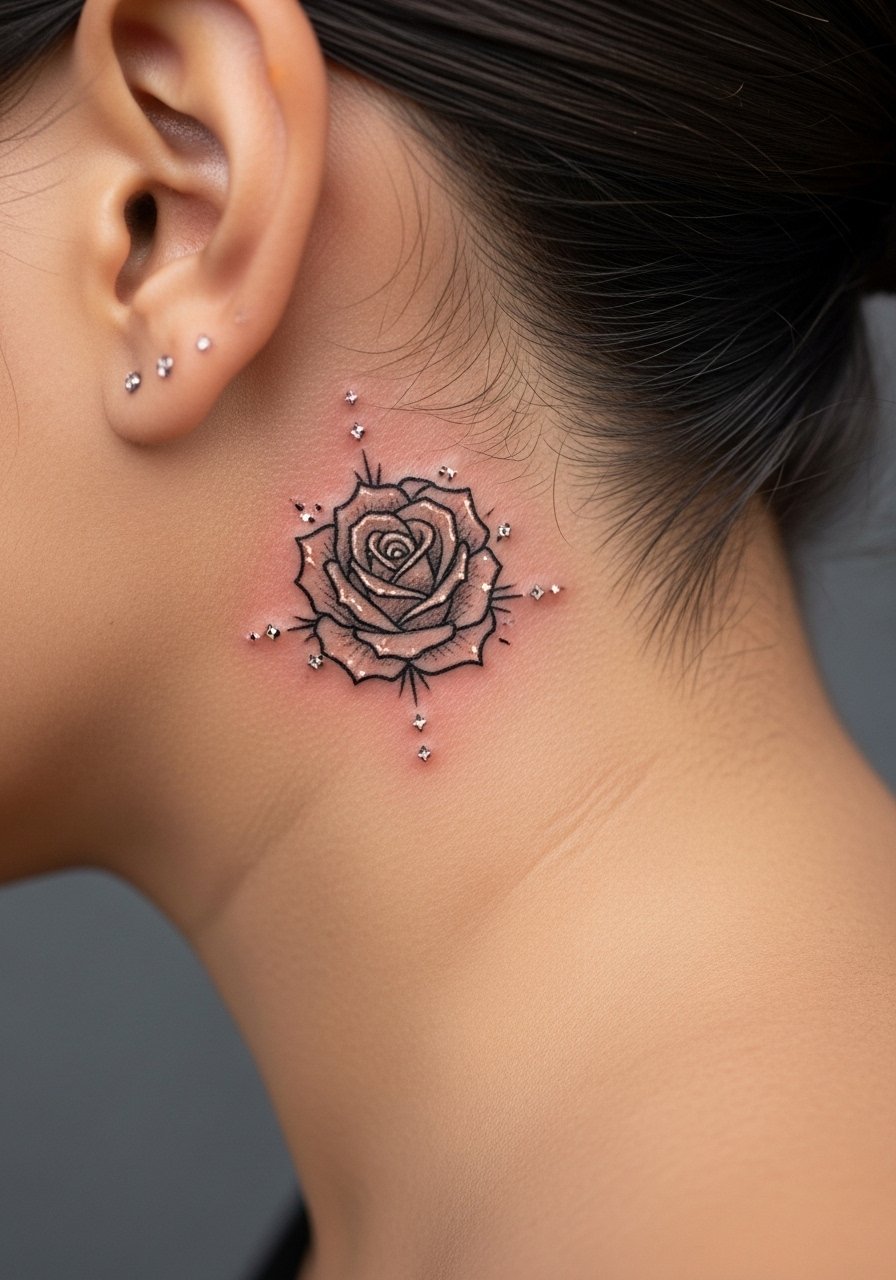
Tiny gem accents use tiny white highlights or tiny dots to mimic sparkle. White highlights fade faster than black, so discuss whether you want subtle white ink or simply a negative-space dot that reads like a glint. The common mistake is expecting white ink to last like black. For showing off combine with a small stud earring so the sparkle feels intentional.
18. Vine Trailing to Nape
A short vine that trails toward the nape creates a sense of movement. Map the vine with your artist to avoid placing the darker sections where shirt collars rub. A frequent error is extending the vine too far for the session or for your wardrobe. The session is slightly longer because placement along the curve of the neck needs careful stenciling. For the appointment wear a racerback tank you can move if needed.
19. Minimal Red Ink Outline Rose
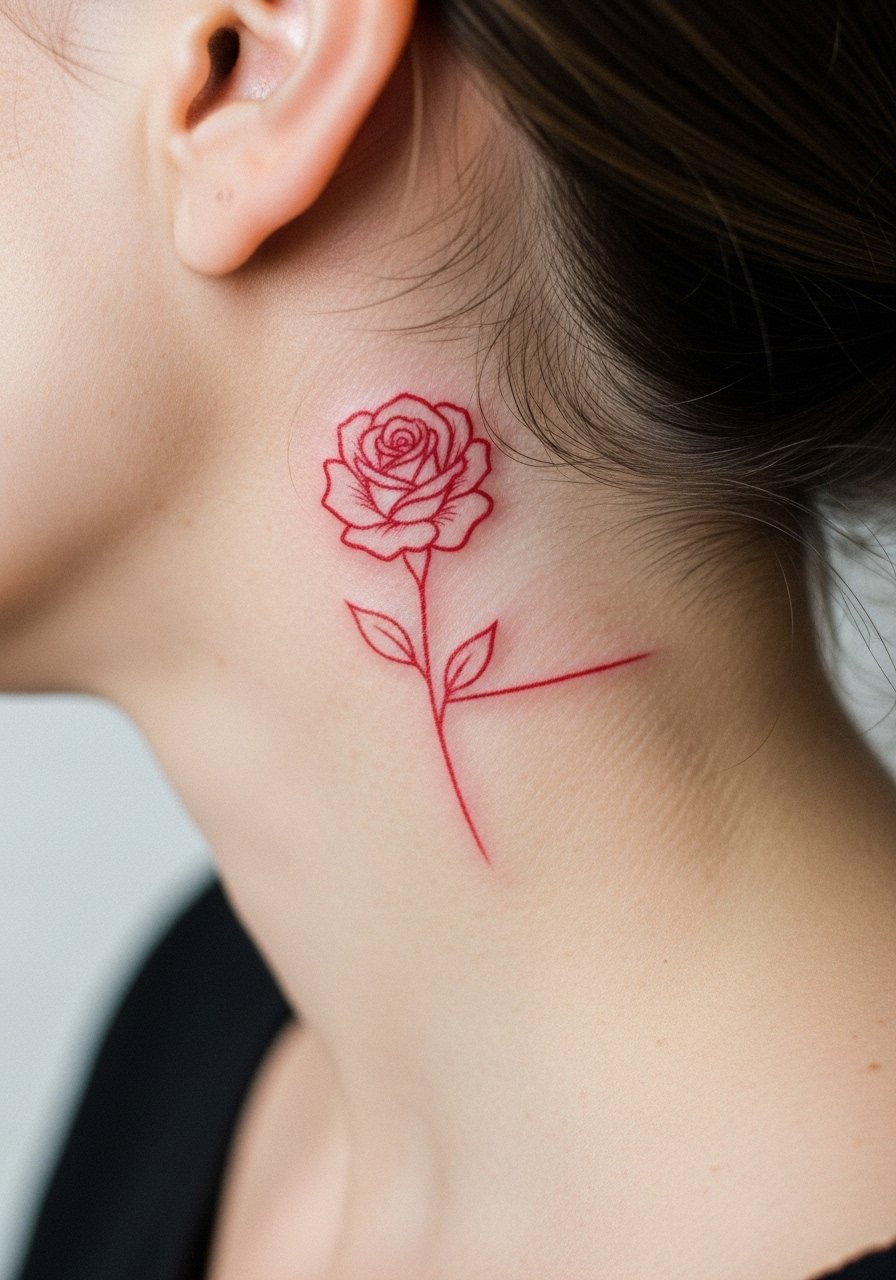
Color choices change longevity. Tiny red outlines age differently than black. If you want red pick a shade that builds into a pleasant faded tone rather than becoming indistinct. Ask the artist about pigment behavior on your skin tone. The mistake is expecting red to behave like black. A small red outline often needs touch-up sooner. For showing it off a small gold hoop frames warm tones well.
20. Negative-Space Rose
Negative-space work uses surrounding ink to define petals. It reads bold and tends to age predictably when the black stays saturated. Tell the artist exactly how much surrounding fill you want and keep the negative petals generous so the skin contrast remains over time. The session requires careful packing of the surround rather than delicate interior lines. Consider pairing with a thin chain necklace that does not sit directly on the area when you want the contrast visible.
21. Leaf Sprig Accent Rose
A single leaf sprig keeps the motif organic and small. The leaf adds balance without increasing the tattoo's footprint. Ask for slightly more negative space between leaf veins so they do not blur. The session is short and healing is straightforward. For the appointment pull hair back and wear a ponytail hair tie that stays out of the way.
22. Vertical Stack of Mini Roses
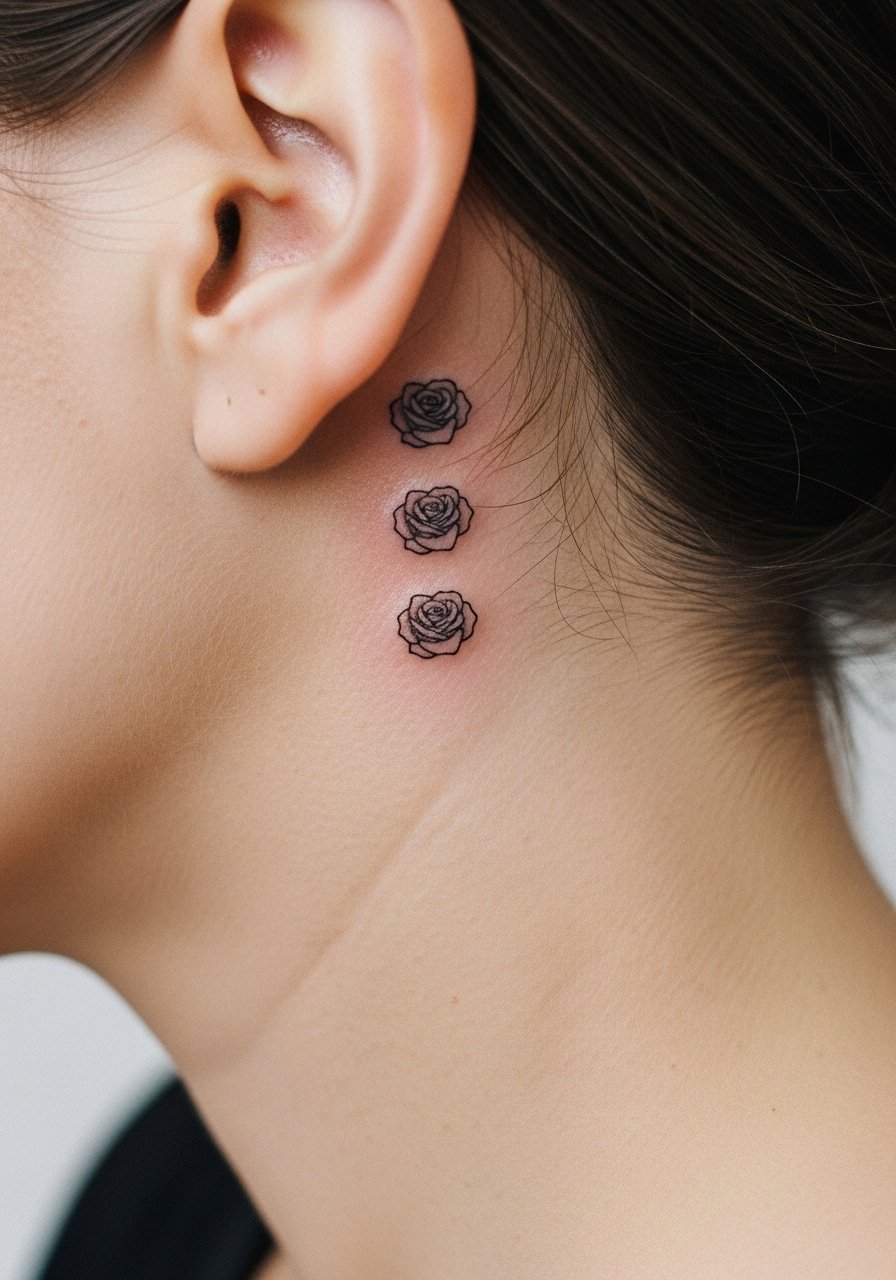
Stacked minis create a vertical accent that reads well when hair is tucked. Space them so each rose has breathing room. A typical error is compressing the stack to fit a narrow area which causes merging over time. The session takes longer than a single motif but still remains under an hour. When you show it off tuck hair behind the ear and pair with a small hoop earring.
23. Rose Coordinated with Piercing
Designing a rose to sit near or around a piercing requires planning. Tell your artist about any future piercing plans and show photos of your ear shape. The biggest mistake is neglecting how jewelry will cast shadow and rub the area during healing. Expect the session to include small positional tweaks. For the appointment leave piercings removable and wear a small stud earring in the other ear if you want balanced styling.
24. Stipple with White Highlights
Using white highlights with stipple can give a suggestion of shine. Note that white fades faster and can shift tone on darker skin. Ask the artist whether they recommend white ink here or negative-space highlights instead. A common error is expecting white details to remain as bright as on day one. For showing off keep hair up and try a decorative hair clip.
25. Neo-Traditional Mini Rose
Neo-traditional adapts classic weight and palette to small scale. It favors slightly thicker lines and restrained color to keep the motif readable. Ask for simplified color fields and strong outlines rather than hyper-detail. The session may run longer because color packing needs care. For the session wear a loose button-down shirt so the artist can access the neck cleanly.
26. Gradient Petal Rose
A tiny gradient requires delicate color work. Ask the artist to map how pigment will fade over time so you do not get unexpected color shifts. The common mistake is choosing multiple close shades that blur into a muddy tone. Expect a slightly longer color pass. For showing it off wear a small gold hoop earring that complements warm gradients.
27. Micro-Realism Petal Cluster

A micro cluster with layered petals reads like a miniature study. This needs confident spacing and subtle contrast so the petals do not pool into a single gray mass. During consultation ask the artist to show how the piece looks at full scale and at half scale on skin mockups. The session takes longer and the piece may ask for a year-one touch-up to reintroduce contrast. For the session pull your hair up and use a scrunchie hair tie so the area stays clean.
Frequently Asked Questions
Q: Will a fine line rose behind the ear blur faster than a small bold rose?
A: In my experience fine line tends to soften sooner because the lines are thinner and closer together. A bold small rose with slightly thicker outlines usually reads cleaner at year three. Ask your artist to balance line weight and spacing for durability.
Q: How should I style my hair during healing to protect a behind-ear rose?
A: Keep hair clipped up or tucked behind the opposite ear to limit oil and friction on the fresh tattoo for the first week. A silk scrunchie reduces tugging and helps keep the area dry.
Q: Are white highlights worth it on darker skin for a tiny rose?
A: White can add a spotlight effect but it often fades faster and can change tone on darker skin. Ask your artist about using negative space or tiny skin gaps instead of white ink.
Q: How visible will a behind-ear rose be with short hair or a pixie cut?
A: Very visible. The tattoo becomes a small statement piece when hair is short. If you plan a haircut consult the artist about placement so the design sits where it feels balanced with your ear shape.
Q: Do behind-ear roses affect piercings or jewelry choices?
A: They can. Jewelry that rubs the area during healing will irritate the skin and the ink. Plan for removable pieces and mention any piercings during your consult so the artist can avoid conflict with hardware.
