
Fine line rose stencils are trending, and the gap between what looks good on a saved board and what holds up on skin is wider than most expect. Some designs live off bold saturation and age into solid shapes, while delicate single-needle work can blur if placed on high-movement spots. Below are 27 stencil references that balance art, placement, and longevity so you can pick a rose that still reads clean after a few years.
1. Single Thorned Rose Outline on Outer Forearm
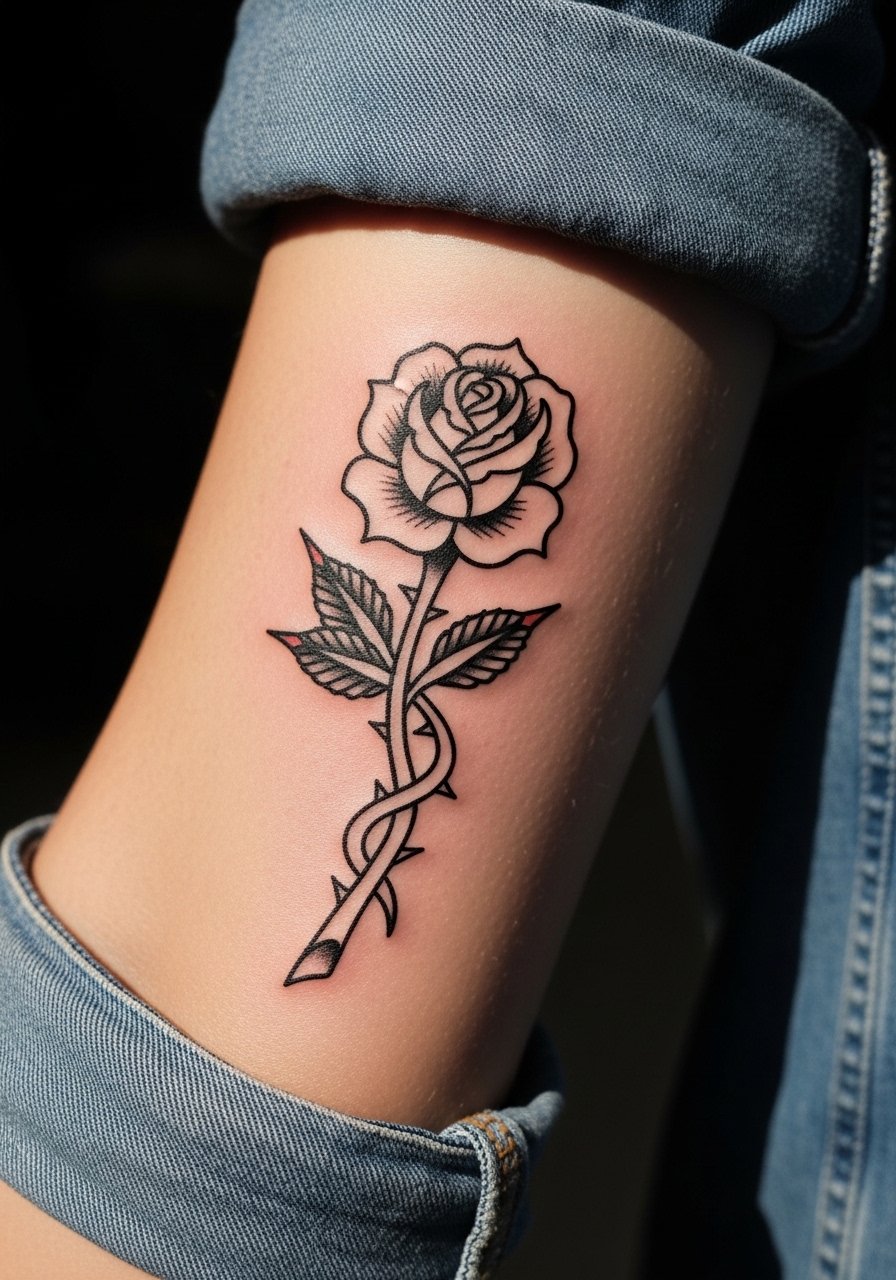
I recommend this stencil when you want a bold focal piece that scales well from three to four inches. Tell your artist to emphasize steady linework with slightly heavier outer contours and lighter interior lines so the silhouette reads at a distance. Common mistakes include asking for ultra-thin lines that will soften into faint hairlines by year three. Forearm placement has low blowout risk compared with the inner wrist, and session time is usually one short appointment. For showing it off, roll a chambray shirt sleeve so the stem sits neatly on exposed skin.
2. Paired Two-Rose Cluster for Shin or Outer Calf
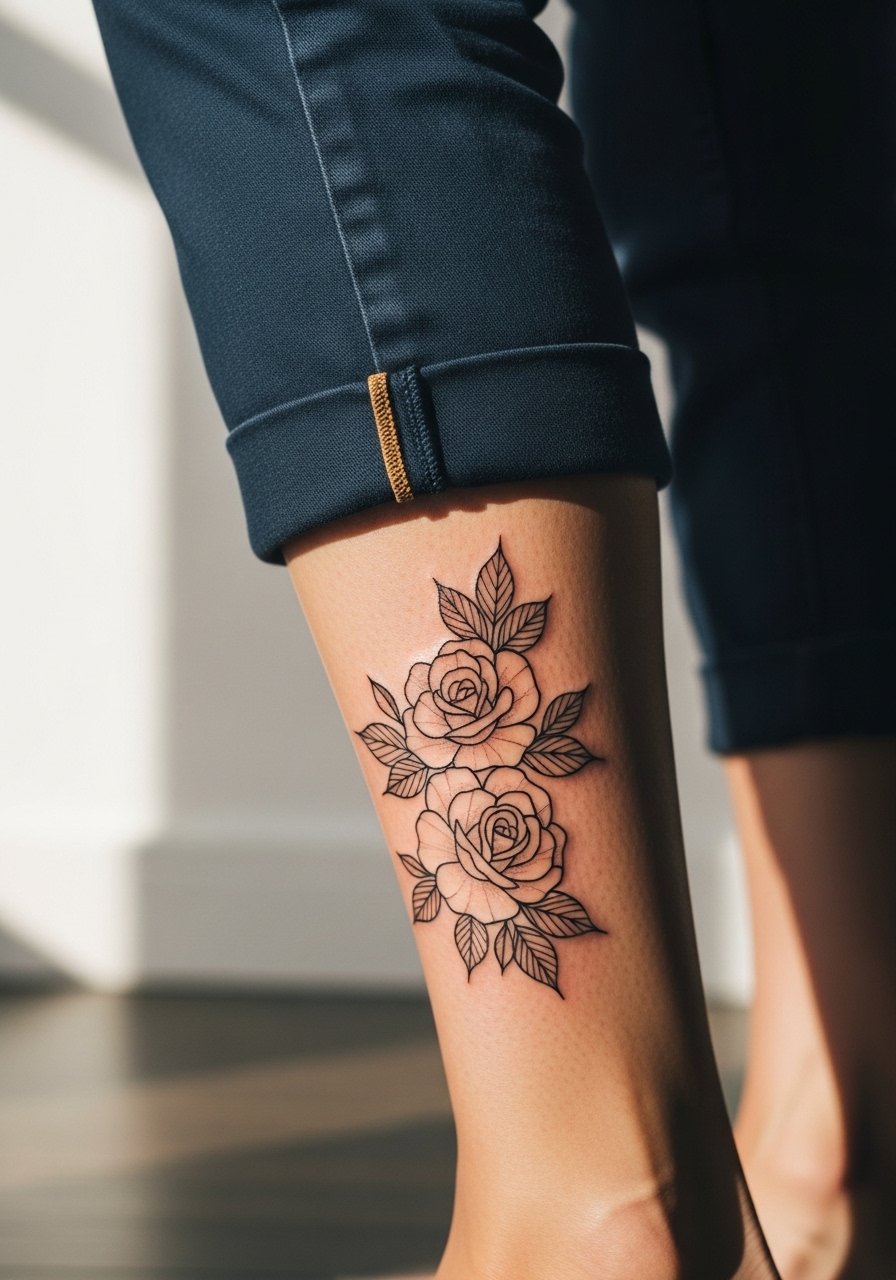
This paired stencil balances asymmetry along a linear leg canvas, perfect when you want flow without a sleeve commitment. Ask for vector-ready outlines so the artist can scale the spacing without losing leaf detail. The biggest mistake is cramming too many small leaves into a narrow column, which turns into a muddied wash over time. Expect a single session if kept 4 to 5 inches wide. For evenings out pair the piece with cuffed khaki chinos and a cropped sock so the roses read clean against bare skin, try cuffed khaki chinos for a neat frame.
3. Three-Rose Triangle That Sits on the Hip or Knee

I often suggest this stencil when a client wants symbolism in a compact shape that follows curves. Tell the artist you want the triangle orientation to mirror your natural hip curve so the petals sit flush when you move. A common aging issue is placing dense petals on a joint like the knee without extra spacing, which causes line merging. For hip placements, wear high waisted denim shorts the day you show it off since the waistband frames the triangle nicely.
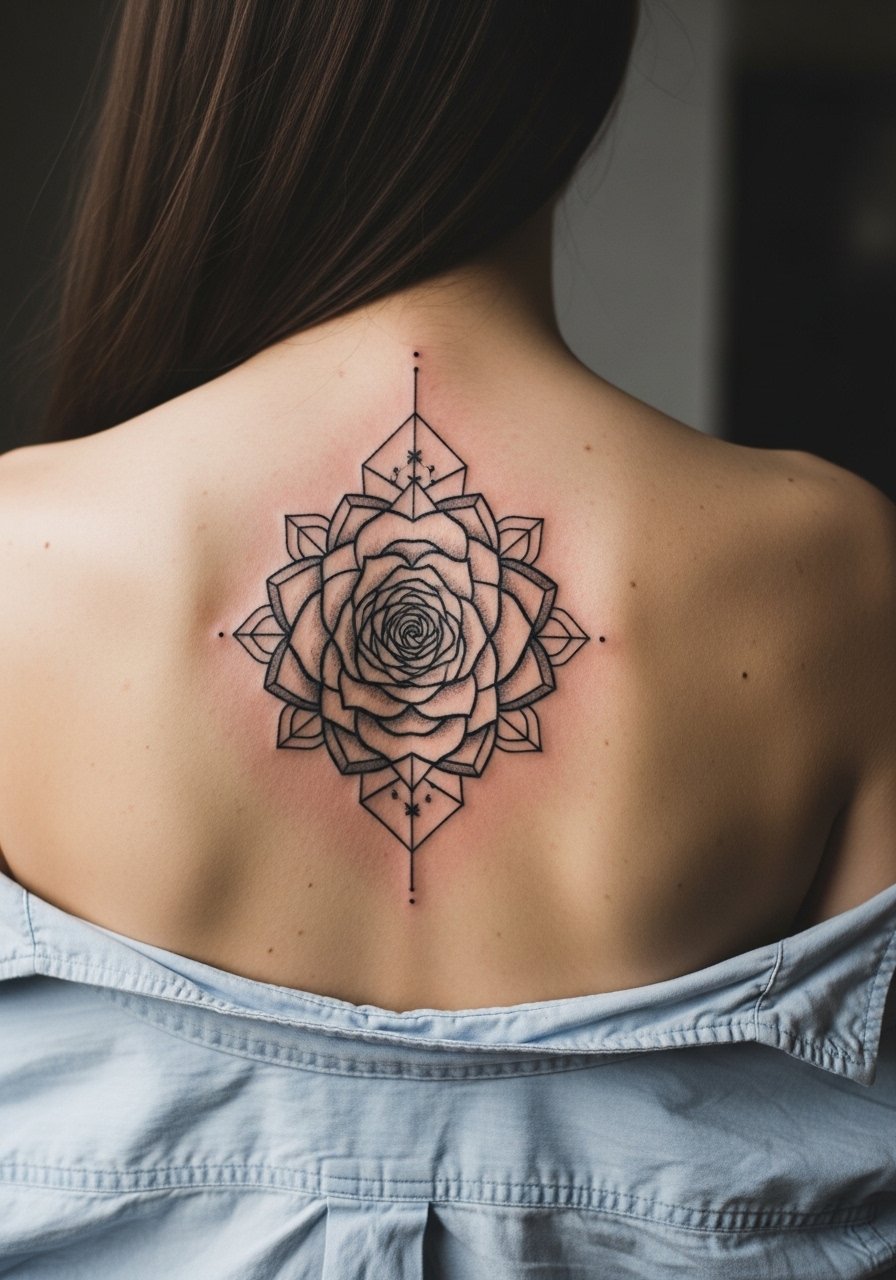
4. Dotwork Rose Mandala for Shoulder or Upper Back

Choose this stencil when symmetry and texture matter more than color. During consultation ask for a dot size chart so the artist spaces stippling to avoid dense clusters that fuse as the piece heals. The shoulder tolerates dotwork well because the skin is stable, so the design keeps its meditative detail longer than on the ribcage. For showing off, an off shoulder blouse keeps the mandala visible without competing patterns. Expect one to two sessions depending on diameter.
5. Vintage Skull Wrapped Rose with Script Banner on Bicep or Chest

This stencil works when you want a narrative flash piece that reads bold from across a room. Tell your artist the banner width and font weight you want so lettering sits comfortably above the curves of the skull. The common mistake is tiny script on a curved bicep, which becomes illegible as the muscle moves. Color accents help petals pop but expect touch-up of saturation at year two to retain vibrancy on sun-exposed chest placements. The session is typically two appointments for linework and color.
6. Minimalist Single Petal Cluster for Wrist or Ankle

This stencil is ideal for a first-timer who wants discreet elegance. Ask for vector line art so the design can be scaled down without jagged edges. A frequent error is requesting extreme micro detail at under two inches, which loses definition once healed. Fine needle work on the wrist will need a touch-up sooner than a forearm piece because of frequent washing and sun exposure. For showing it off, a thin leather cuff on the opposite wrist frames the piece; try a thin leather cuff bracelet to keep attention on the linework. The session is usually short and tolerable.
Studio Day Picks
The small-wrist and bicep pieces above demand different prep from larger thigh and hip stencils, so a few targeted items smooth the session and early healing.
- Tattoo stencil transfer paper kit. Lets you preview and adjust placement on skin for the forearm and wrist pieces above.
- Topical numbing cream. Useful before higher-sensitivity sessions like calf or inner thigh to reduce discomfort during longer fills.
- Thin protective film roll. Helps protect finger and wrist pieces from friction during the first few days of healing.
- Fragrance free gentle body wash. Cleanses healing areas such as the shin and forearm without irritating delicate lines.
- Aquaphor healing ointment. Thin layers for the first days lock in moisture for fine line and dotwork pieces without suffocating the skin.
7. Full-Bloom Rose with Dripping Thorns on Thigh

This stencil suits a bold piece that benefits from a large canvas and long sitting. Tell the artist you want strong black saturation in the deepest shadows so the bloom reads from distance while keeping midtone transitions to avoid a flat look. Mistakes happen when artists try to compress this into a tiny patch, which loses the dramatic negative space designed into the thorns. Thigh skin takes saturation well but may need a second session for dense black fills. For the appointment wear loose fit gym shorts so the artist can access the area comfortably.
8. Ornamental Rose Vine That Wraps the Outer Forearm to Elbow

This stencil is for sleeve builders who want a flowing connector between pieces. Ask the artist to map how the vine will anchor to existing tattoos so negative space reads like storytelling rather than overlap. A common error is tight repetition of identical roses along the vine, which reads repetitive instead of organic. Forearm wrapping has moderate session time across two appointments and touch-ups at year three are common if saturation fades. For showing it off, pull a loose button-down shirt sleeve back so the vine sits framed on the arm.
9. Watercolor Rose Splash Near the Collarbone

Pick this stencil when you want painterly softness rather than sharp edges. During consultation, ask the artist to set a clear boundary of where watercolor should fade into skin to prevent the look from bleeding into blotches later. The controversy here is real. One camp argues that watercolor on collarbones fades quickly and looks like bruising. The other camp says with careful placement and conservative washes it can age gracefully. Decide which side you trust by seeing healed photos from the artist. Session length is usually single appointment for modest sizes.
10. Micro-Realism Wilted Rose Bud on Inner Wrist

I suggest this stencil when subtle emotion and tiny detail are the goal. Tell the artist to use reference photos that match the exact scale you want and to avoid over-layering tiny gradients that will blur. A frequent mistake is cramming micro textures into one inch of skin. Inner wrist work tends to fade faster because of constant movement and washing, so expect a touch-up around year two. For showing it off, a thin leather cuff contrasts the delicate bud nicely and keeps attention on the negative space.
11. Ignorant Style Blocky Rose on Calf

Choose this stencil if you want raw, punk-forward energy rather than polished realism. When booking, ask for drawn fills rather than intricate shading so the design ages into clear silhouettes. The mistake people make is asking for subtle gradients in this idiom; they dilute the intended crude charm. Calf skin holds blackwork well and the bold fills age into readable shapes. For casual wear pair the piece with bootcut jeans rolled to the ankle so the silhouette is easy to show.
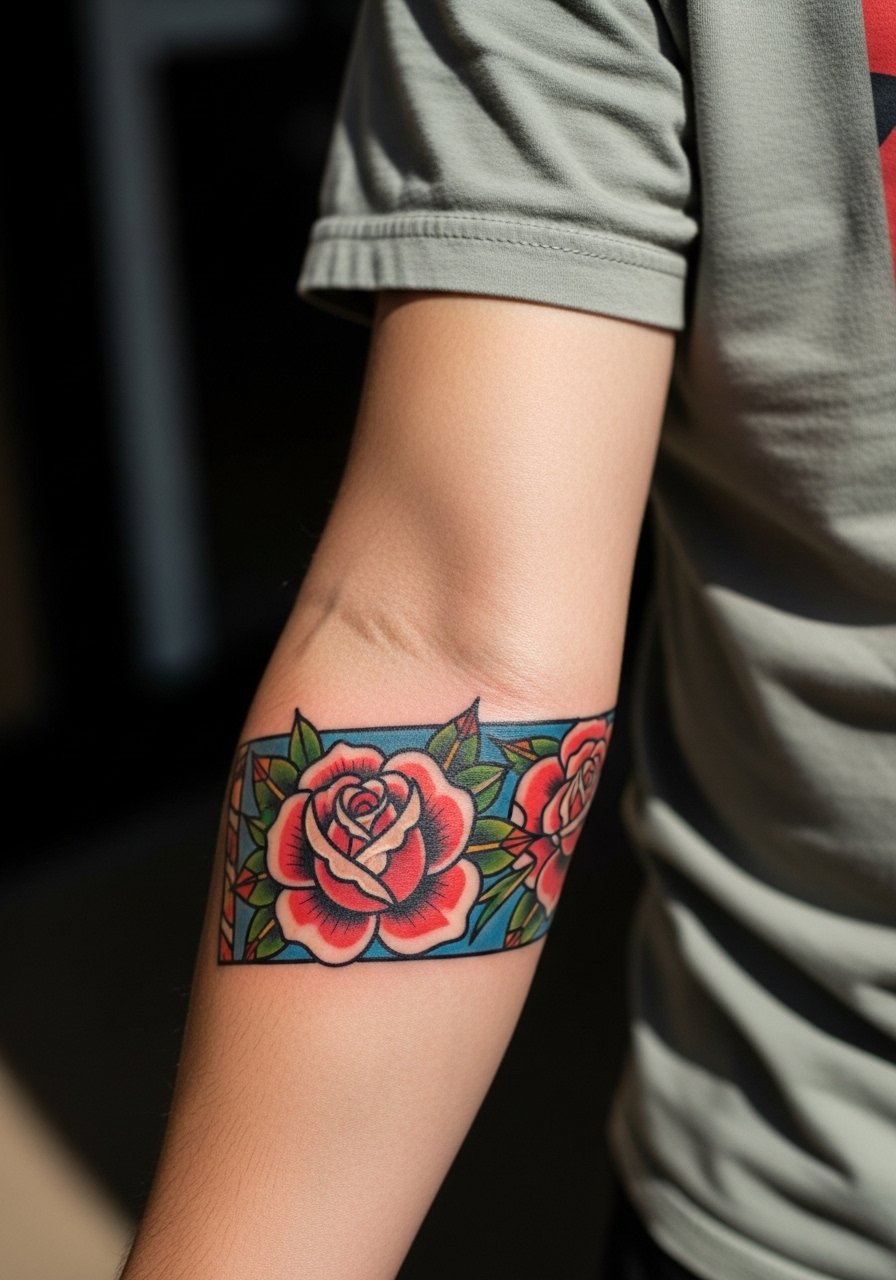
12. Traditional Panther-Rose Combo Flash for Shoulder

This stencil is a flash-style composition with big outlines and saturated red-black contrast. Tell the artist you want the panther scale to match the rose so neither element overpowers the other. A common error is shrinking the panther too small, which weakens the dynamic between the two symbols. Shoulders tolerate bold color well, but sun exposure speeds fade on outer shoulders. Sessions usually split into two for linework and color. For session access wear a short sleeve button up.
13. Geometric Rose Hybrid Centered on the Sternum

This stencil pairs floral forms with geometric frames for a modern minimalist effect. Ask your artist to map the central axis to your sternum bone so symmetry reads even when you breathe. There is debate among artists about dense geometry near the sternum because the area moves with breathing. One camp says leave breathing room between shapes. The other says precise spacing and experienced placement handle it. If you choose this spot, book an artist comfortable with chest anatomy. Session time depends on complexity and sensitivity.
14. Tiny Single-Line Rose Behind the Ear

This stencil is for people who want a whisper of ink that peeks from hair. Ask for a single contour line with little interior detail so it stays legible at a small scale. The mistake is requesting micro shading there, which can look smudged quickly. Behind-the-ear placement is discreet and heals quickly, but it is a sensitive area for touch-ups because of hair growth. Plan a short session and wear hair pinned back on the appointment day.
15. Minimalist Ankle Rose

This stencil is perfect when you want a small anchor that peeks from under pants. Tell your artist to keep negative space around the petals so the shape does not blur with friction from socks and shoes. A common mistake is placing the design too low near the foot joint where rubbing causes scabbing and uneven healing. For showing it off, wear cropped pants or an ankle cuff pant so the rose sits in clean view. Expect a quick session.
16. Small Back-of-Hand Rose

This stencil suits someone wanting a very visible tiny emblem. Be clear in consultation about social and professional implications since hands are highly visible. The most frequent mistake is asking for extreme micro detail on dorsal skin which often spreads and lightens. Hand tattoos have higher touch-up needs and may blur faster because of constant motion and exposure. Sessions are short but may sting more. Consider placement a statement and plan for maintenance.
17. Vertical Spine Column of Small Roses

I recommend this stencil when you want a linear composition that reads well with clothing. Tell your artist to stagger the spacing so the roses step with the spine's natural curve and avoid perfect alignment that fights body contour. The common mistake is stacking identical blooms which looks repetitive as the skin settles. Spine tattoos can be painful but age well because the skin there is relatively stable. For showing the piece off try an open back midi dress that frames the column.
18. Hip and Upper Thigh Cluster That Moves with the Body

This stencil takes advantage of larger curves for dynamic composition. Ask the artist to mock the stencil in different poses so you see how the cluster shifts with movement. A mistake is forcing a rigid symmetric layout onto a mobile canvas which leads to distortion when sitting. Hip tattoos can be forgiving but inner thigh areas require careful touch-up planning. For showing and framing, high waisted denim shorts balance the cluster against the waist.
19. Upper Arm Single Large Bloom with Gray Wash

Pick this stencil for a statement that remains classic without a full sleeve. When you sit in consultation ask for a reference of how the gray wash will age, and request a slightly higher contrast in the darkest areas to preserve depth over time. A common mistake is too much midtone that flattens with repeated sunlight exposure. Upper arm pieces heal well and tolerate touch-ups easily. For the session wear a sleeveless cotton tank so the artist has clear access.
20. Collage-Style Vintage Flash Segment for Outer Forearm
This stencil is helpful when you want a flash-driven vignette that reads like a small panel. Tell your artist which vintage elements you want kept and which you want updated so the piece does not look dated. The mistake is compressing several motifs into a narrow band which hides negative space meant to balance the composition. Outer forearm flash ages predictably and often looks stronger with bold outlines. For session access wear a short-sleeve tee.
21. Watercolor Wrist Wrap in Soft Pinks

I recommend this stencil when you want painterly color in a small, wearable band. Ask the artist to confine color washes and provide a small line anchor so the watercolor has structure. The risk is unbounded color that looks like blotches after a few washes if not carefully contained. Wrist color tends to fade faster, so plan for a color refresh in a couple of years. For low-key accessorizing pair it with a thin leather cuff bracelet so the color sits within a frame.
22. Dotwork Mini Rose on the Shoulder Blade

This stencil fits if you want texture over color. During consultation, ask to see stipple samples so you understand how dot size affects long-term legibility. A mistake is requesting overly dense dots in the center which can merge into a blob as the skin settles. Shoulder blade spacing helps dotwork stay defined compared with torso placements. For showing off pair a loose button-down worn open at the back and let the dotwork peek through.
23. Geometric Rose Mandala Across the Upper Back
Choose this stencil when you want a precise, architectural piece that sits on a broad canvas. Tell the artist during consultation you want clear spacing between radial elements so the geometry does not blur into shading over time. The common mistake is crowding thin lines close together which merges into shading where sharp edges should be. Upper back pieces age well because of stable skin. For showing it off use a button-down worn backward briefly or an open-back shirt.
24. Tiny Finger Rose Accent
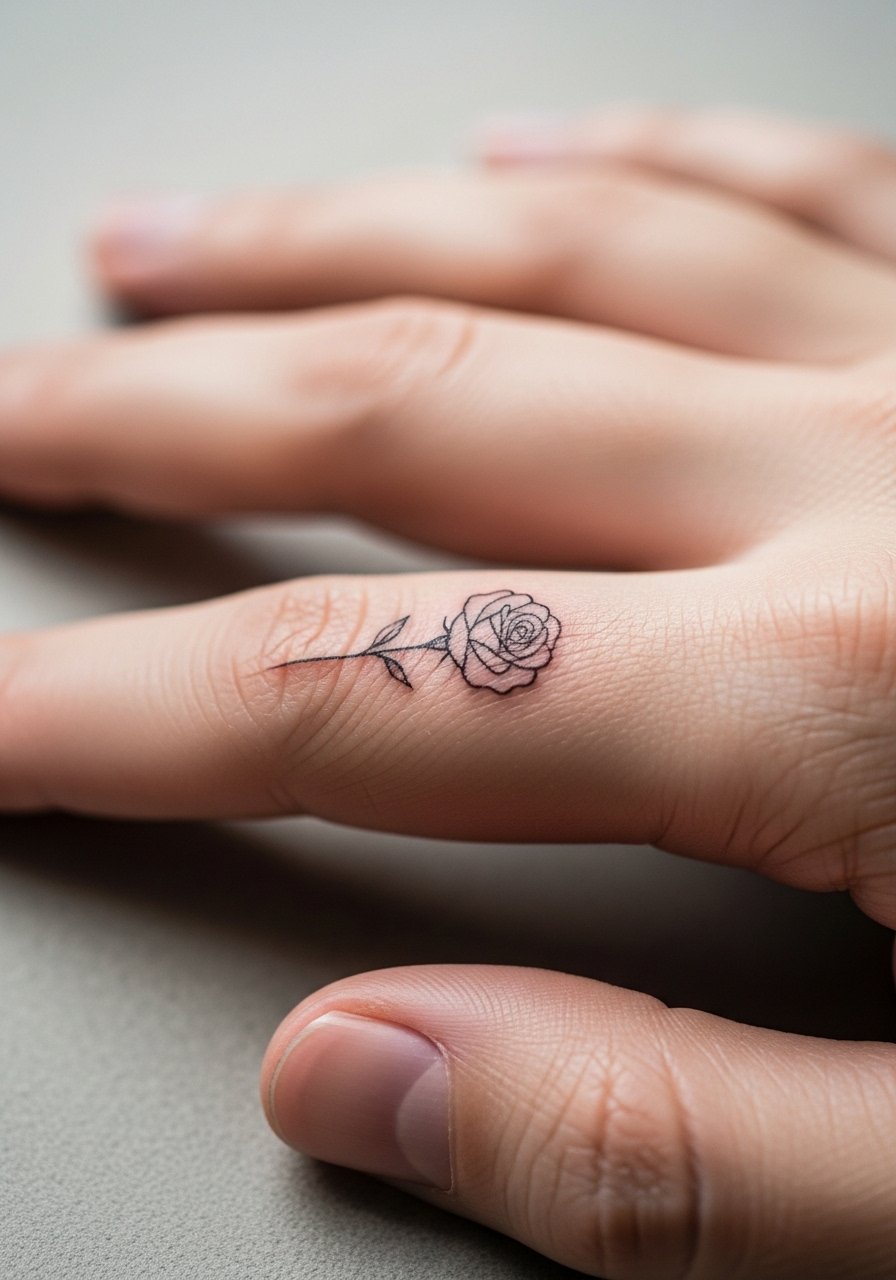
This stencil is for a micro placement that doubles as a ring substitute. Be explicit in the consult about exact size in millimeters and ask for a simple contour so the design will not bleed across the small canvas. Finger tattoos have high touch-up rates because of constant washing and skin turnover, so plan maintenance. The session is very quick but the aftercare window for fingers is more hands-on. Think of this as a commitment to upkeep rather than a one-and-done.
25. Rose and Script Banner That Wraps a Bicep Panel

This stencil is useful when you want personalization without tiny script. When you bring type ideas, show examples of the exact letter spacing so the artist can size the banner properly. Tiny script on a curved bicep often becomes illegible, which is the usual mistake. Bicep flesh takes lettering well if the ribbon is wide enough. For the session wear a loose button-down shirt that you can pull to one side.
26. Blackwork Full-Bloom Across the Outer Thigh

This stencil benefits clients wanting stark contrast and longevity. Discuss with the artist how deep to pack black so saturation remains dense without creating unnecessary scarring. A common error is overworking the area in one session which prolongs healing. Thighs tolerate heavy blackwork but may require a second session for even saturation. For appointment comfort wear loose shorts so the artist can freely access the area.
27. Delicate Inner Bicep Rose with Stippling

This stencil works for a semi-private placement that still peeks in sleeveless looks. Tell your artist to map the stencil while your arm is both relaxed and slightly flexed, as inner bicep skin stretches depending on muscle tension. Many people pick dense interior shading here which can blur due to constant arm motion, so keep stippling light and spaced. Inner bicep sessions are more sensitive, but healing is straightforward if you avoid heavy rubbing.
Frequently Asked Questions
Q: How do I pick the right rose stencil for a first tattoo and what should I ask during consultation?
A: Start with placement and lifestyle. If you work in a conservative setting pick locations that can be covered easily. In consultation ask about line weight, scaling options, and how the artist plans to space petals for long-term legibility. Bring photos of healed examples, not just fresh work, so you see the aging.
Q: Will fine line rose stencils blur faster on ribs and what do the two camps of artists say?
A: Artists are split. One camp says the ribcage moves too much and thin lines blur within a couple of years. The other camp argues that conservative spacing and proper depth let fine line settle well on ribs. The safe approach is to ask for slightly wider spacing or a hybrid design if you want ribs and want it to last.
Q: Do watercolor-style rose stencils need different session planning than traditional blackwork?
A: Yes. Watercolor approaches usually lean on single sessions with careful layering of washes and require conservative boundaries so color does not spread into uncontrolled areas. Blackwork often needs staged sessions for saturation. Ask your artist which scheduling works best for each method.
Q: How should I prepare clothing for sessions for hip, thigh, and shoulder placements?
A: Comfort and access are key. For hip and thigh bring high-waisted shorts so the artist can expose only the necessary strip. For shoulder wear a loose tank or button-down you can pull aside. A simple outfit change makes a long session easier and keeps other areas from getting irritated.
Q: How often will small wrist, finger, or hand rose stencils need touch-ups compared with forearm pieces?
A: Expect more frequent touch-ups on hands, fingers, and wrists because those zones see more washing, friction, and sun. Forearms typically hold linework longer and often only need touch-ups later. Plan for maintenance rather than assuming permanence.
Q: Where can I find more stencil options like dotwork, geometric hybrids, or vintage flash if I want to customize?
A: Search artist marketplaces and vector repositories for scalable outlines and look for "dotwork rose stencil" or "rose vector stencil" as starting points. Also use tutorial videos to learn how stencils transfer to curved areas so you can discuss adjustments confidently with your artist.
