
Fine line behind-ear ink looks effortless in reels, but the reality is messier. Lines can blur from pillow rub, artists now charge more than they used to, and the spot hurts more than a wrist because the bone vibrates. If you want clean, low-key ink that hides under hair but still reads healed, these 17 ideas come with how they age, what to tell your artist, and simple wardrobe tips to show them off.
1. Fine line crescent moon
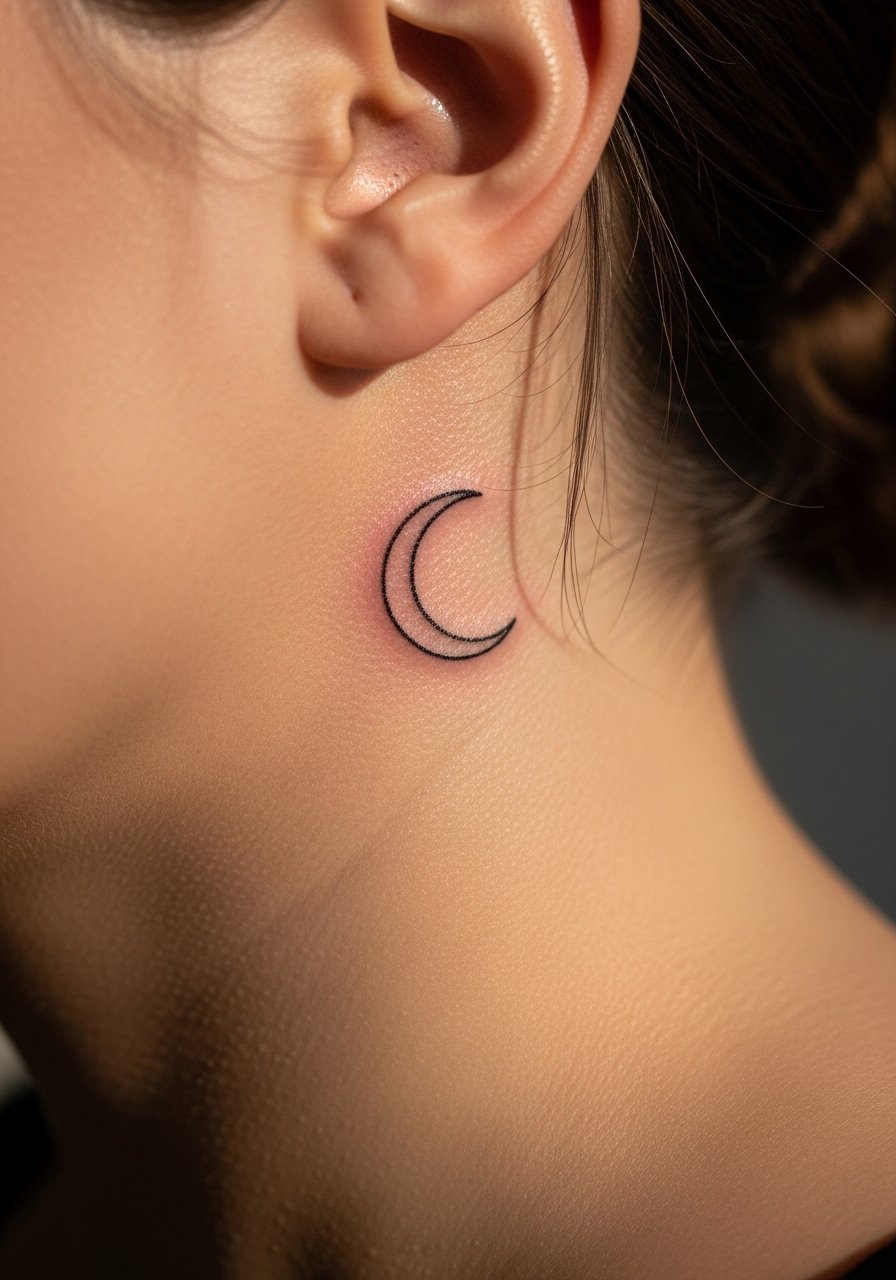
Start with a tiny crescent if you want a celestial accent that peeks when your hair is up. When you consult, ask for 0.25mm-style single-needle linework and request slightly thicker lineweight than what looks fragile on the screen. Artists split on fine line longevity here. One camp says fine line fades faster behind the ear and needs touch-ups at year one. The other camp argues that with correct depth and spaced lines it holds fine. Expect a tingly vibration during the session because the mastoid area sits close to bone. For wear, pair it with small hoop earrings and a high ponytail when you want the moon to show. Plan for a touch-up around the 6-12 month mark for crisp healed linework.
2. Minimalist star cluster

This is a cluster of tiny stars and dots that follows the curve behind the ear for a sprinkle effect. Tell your artist you want negative space between elements so the cluster does not merge as it ages. A common mistake is packing dots too close, which causes blending from natural movement and occasional blowout. The session feels quick but sensitive since the needle passes near thin skin and bone. Healed at six months it reads crisp, at two years it may need a darken touch-up if you sleep on that side. For appointment day, secure hair with a clip and avoid earrings so the artist has clean access.
3. Delicate daisy outline
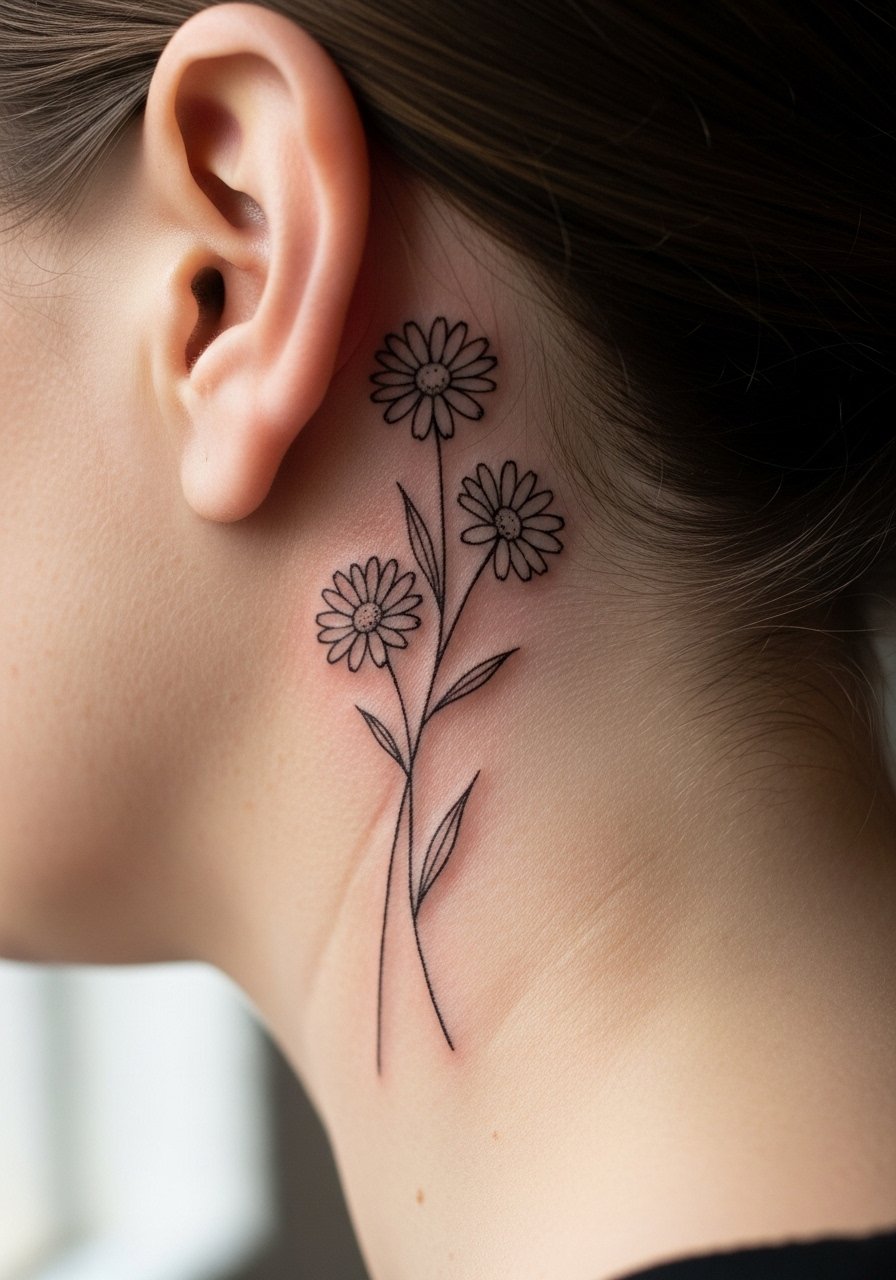
Most people choose this for a fresh, botanical accent that tucks behind hair. In consultation say you want single-line petals and a slightly bolder center so photos keep contrast on medium and darker skin. The mistake I see is requesting hair-fine petals that vanish by year two. Ask for modest lineweight and a touch of stipple shading in the center for longevity. The area rubs on pillows, so sleep opposite side for the first two weeks. For showing it off, go with dainty floral stud earrings and a sage linen scarf when you want a botanical moment. Expect a short session and a tender spot the first 48 hours.
4. Tiny heart silhouette

A classic icon that sits neatly in the lobe curve. Ask for a slightly larger scale than your screenshot if you want the fill to stay solid as it heals. Small solid fills can blur if the artist packs too tightly. The session is fast but sharp pain because the area is thin. One real-world tip is to avoid asking for micro solid fill if you sleep on that side often. If you want a romantic outfit pairing, try a pearl drop earring on the opposite ear and an off-shoulder top in olive for a soft contrast. Plan on a touch-up the first year if the black softens.
5. Butterfly outline

Butterflies reveal movement when you throw hair into an updo and tend to be more visible than abstract marks. When you book, show your artist the exact wing shape and request clean wing tips with slightly thicker silhouette so it reads in photos. Fine line butterflies can itch badly around week two as scabs form in the ear crease, so resist scratching. The controversy about fine line fading applies here too. Some artists will insist bold single-line work is the only reliable route, while others will agree thin line works if spaced and placed correctly. For showing it off, a short layered necklace like a layered gold necklace short and a high bun highlight the reveal. Recovery needs gentle care because hair friction is the main enemy.
6. Small zodiac symbol
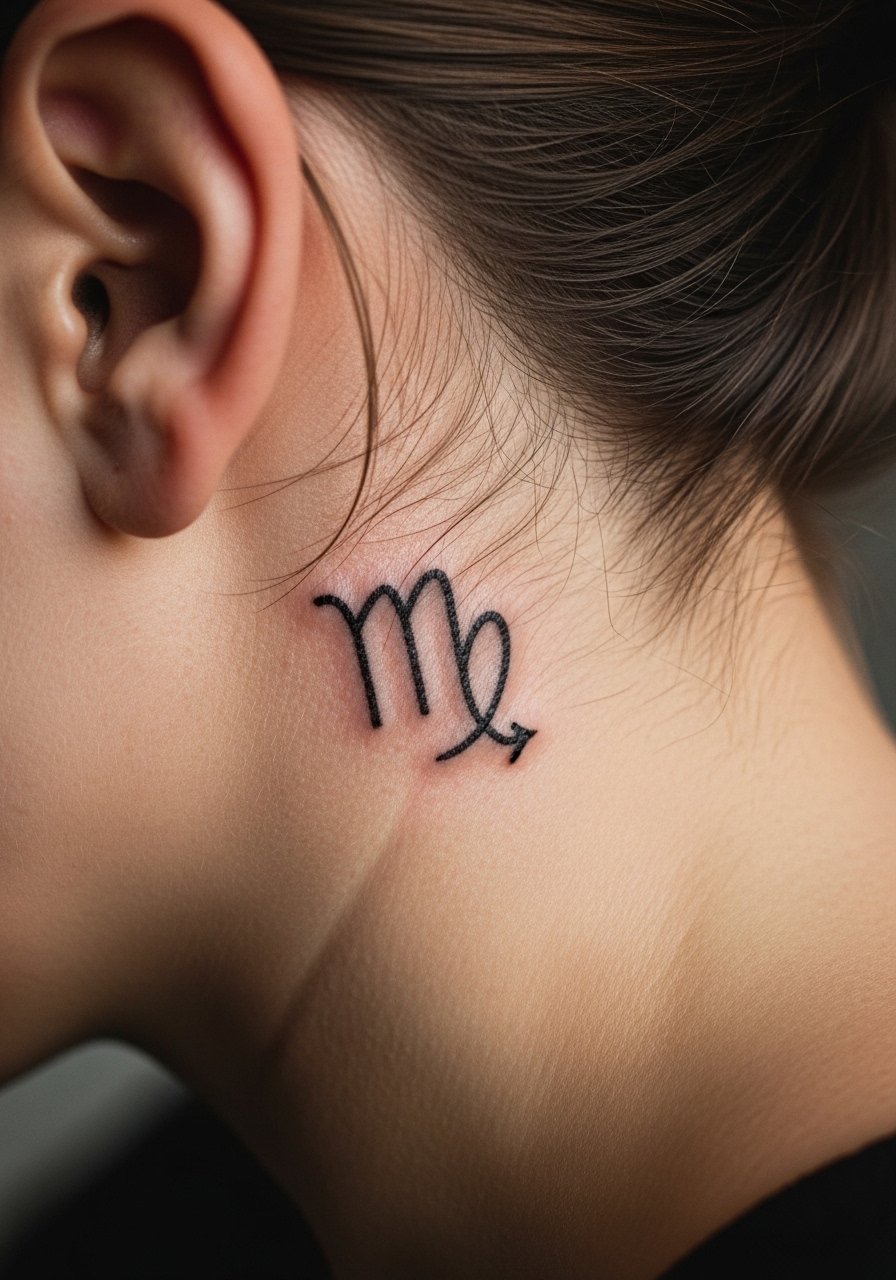
A personalized glyph can sit tucked in the mastoid curve so it reads private but meaningful to you. Ask for the glyph drawn to scale for the ear curve so the lines follow the bone rather than sit awkwardly on the fold. A common mistake is copying a desktop-sized glyph and shrinking it, which compresses strokes and blurs. The session time is brief and the pain level similar to other behind-ear spots. For styling, wear a thin velvet choker black if a low neckline or a crisp white shirt frames the neck. Expect to return for a touch-up if you notice softening after the first year.
Pre-Session Essentials
The first six ideas sit in the mastoid and lobe areas where friction and pillow rub matter most, so a few small items smooth the appointment and the first week.
-
Hustle Butter Deluxe. A non-greasy salve many people prefer for creased areas behind the ear because it keeps skin supple without heavy residue.
-
Indie tattoo salve. A thinner formula works better in ear creases, and this type cuts down on pillow sticking while the piece settles.
-
Australian tea tree balm. For sweat-prone healing behind the ear this balm's lighter texture helps reduce clogged pores and keeps the area feeling fresher.
-
Mad Rabbit healing ointment. Quick absorption helps when you need to sleep without heavy residue transferring to sheets near the ear.
-
Aquaphor healing ointment. A thin layer for the very first days can protect fine line work in friction zones before you switch to lighter salves.
7. Angel wing pair

Wings can be mirrored behind each ear or nestle just behind one ear for a protective vibe. Tell your artist you want feathered linework with slight gray wash only in the deepest feather strokes. The big mistake is over-dense shading which merges when the skin creases by the neck. The session can be slightly longer because each feather needs attention and gentle shading. For showing it off, a thin silver chain necklace and long hair flipped aside create an ethereal effect. Expect a potential touch-up in the first year if the outer feather tips soften.
8. Floral vine sprig
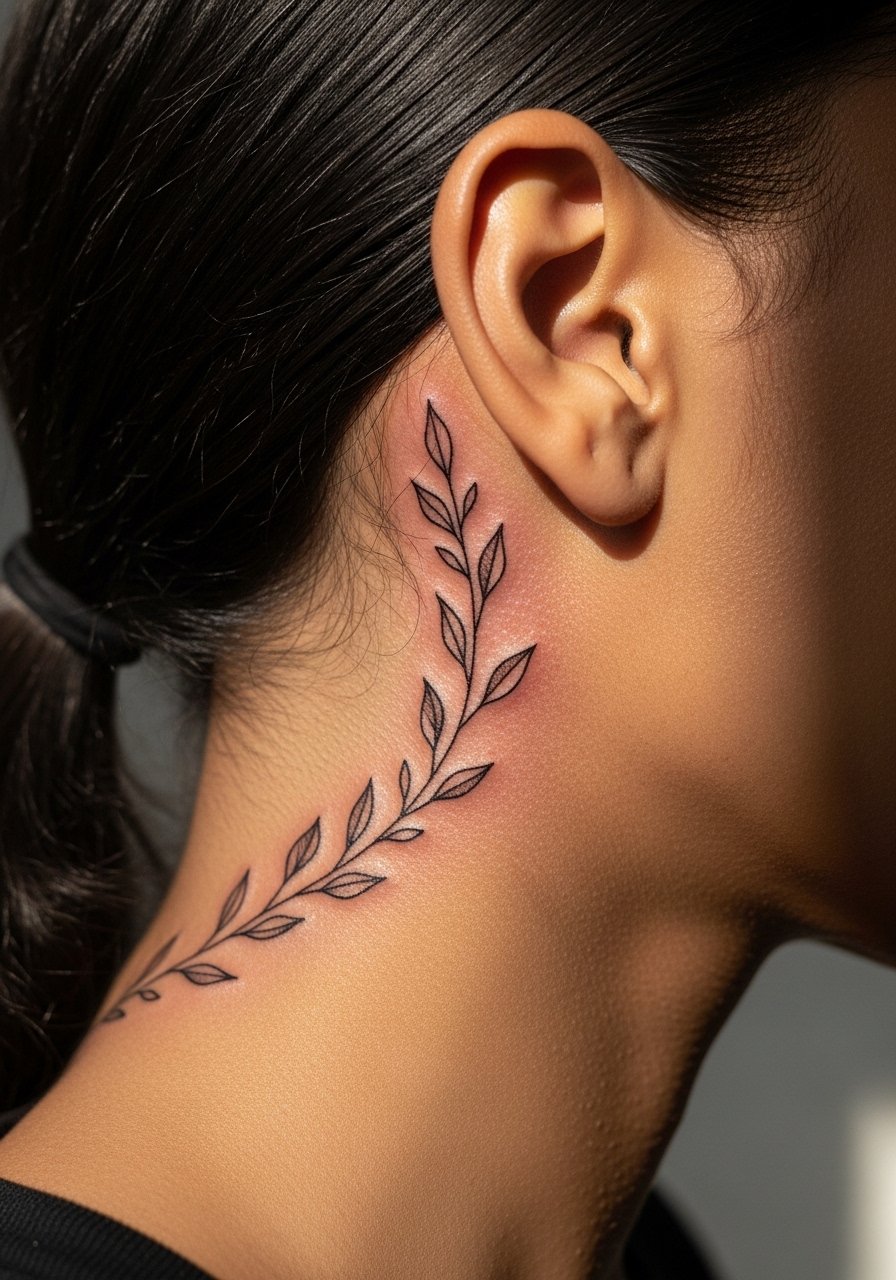
A sprig that follows the ear curve helps elongate the neck line in photos. When you meet your artist, have the vine design drawn to match the arch of your mastoid bone so leaves fall naturally instead of bunching in the crease. People often ask for too many leaves in a tiny area which causes blurring over time. This placement can be tender because the skin pulls when you turn your head, so expect a vibrating sensation. For session wear, pull your hair fully back and wear a loose collar so the artist can see the neckline. Plan a touch-up if you feel the stem lines fade after seasonal sun exposure.
9. Initial monogram

Monograms play well in the soft curve behind the ear if the script follows the contour. During consultation show exact font weight and tell the artist you want letters spaced to avoid ink bleed between strokes. Too many flourishes in a tiny area is the common mistake. The session is short and the pain is a sharp, quick series of pinpricks. This design pairs with a thin velvet choker black or a crisp white button-down when you want it to peek out. Ask about planned touch-ups if your lifestyle includes frequent rubbing against scarves or collars.
10. Seashell contour

A seashell contour evokes ocean memories without taking much space. The right approach is an open outline with modest lineweight so the ridges do not fill in as the piece ages. People sometimes request very thin ridges that disappear in photos on warmer-toned skin. Tell your artist you want a slightly heavier bottom curve and lighter ridges so the shape reads at a glance. Session time is short and the pain is sharp near the bone. For the appointment wear a loose top so you can lift your hair and avoid necklaces during linework. Expect a single touch-up if the outer ridges soften after six months.
11. Bird in flight silhouette

A small flying bird makes the area feel airy and mobile when your hair moves. Ask for a compact silhouette that aligns with the ear base so the wings complement your hairline. The mistake is stretching the wings too wide which can catch on hair and clothes and accelerate fading. Solid black silhouettes often last longer than fine line details in this spot. The session is brisk and a bit sharp at the bony edge. For showing it off, a cream cable knit sweater or a short pendant highlights the neck space without covering the bird. Plan on a touch-up if you notice edge softening after seasonal sun exposure.
12. Flame teardrop

This edgy mark points toward the neck and reads modern when placed in the ear dip. For longevity ask for clean open negative space at the base so the flame does not become a smudge as skin moves. A common request that ages badly is a fully filled micro-flame; it can mushroom into a blob. The session feels sharp because the needle crosses tight curves. If you sleep on that side, expect faster fading from pillow friction. Wear a high bun during the appointment and skip earrings that night so the area has space to settle. Touch-ups at 6-12 months are common for bold single-line micro marks.
13. Turtle outline

Turtles bring quiet symbolism without being floral or celestial. Ask for a compact shell pattern with spaced segmentation so individual panels do not merge as the skin shifts. The typical mistake is over-detailing the shell on a 1-2 centimeter scale, which leads to lost detail within a year. The session is brief and a bit sharp on the mastoid bone. For a casual reveal try pairing it with a pearl drop earring on the opposite side and an off-shoulder top in olive for a beachy feel. Expect one quick touch-up if the outer shell lines soften.
14. Micro star map

A tiny star map outlines a minimal constellation that fits the mastoid curve nicely. Tell your artist you want spacing that mirrors real star distances so the map ages with clarity. Many people scale a whole map down too small, compressing lines and causing loss of shape. The session is detail-focused and sensitive, so expect a steady buzzing sensation. For session prep pull hair fully back and wear a loose top to let the artist see the neck curve. Anticipate a touch-up at the one-year mark if dots soften from rubbing.
15. Open-ended flame base

This under-covered approach uses the ear curve as the lower boundary so the flame appears to grow out of the lobe. Ask for an open-ended base and tapered lines that follow the ear arc. The unique risk is asking for a closed base which can look like a blob when the skin creases. The session feels quick but precise because the artist must match curvature exactly. For a clean reveal, wear a hair claw clip large to lift hair and show how the flame sits. Plan a potential touch-up if the tapered tips soften after months of friction.
16. Minimalist anchor

An anchor is a compact nod to travel or stability that plays well behind the ear. Ask the artist for a simplified silhouette with open negative space at the shank to prevent fill-over time. The common error is too much interior detail on a small scale. Sessions are short with a sharp, focused feeling at the bone. For the appointment wear a loose neckline so the artist can see the ear-to-neck transition clearly. Expect a single touch-up if the outer edges blur from hair friction.
17. Tiny wave line
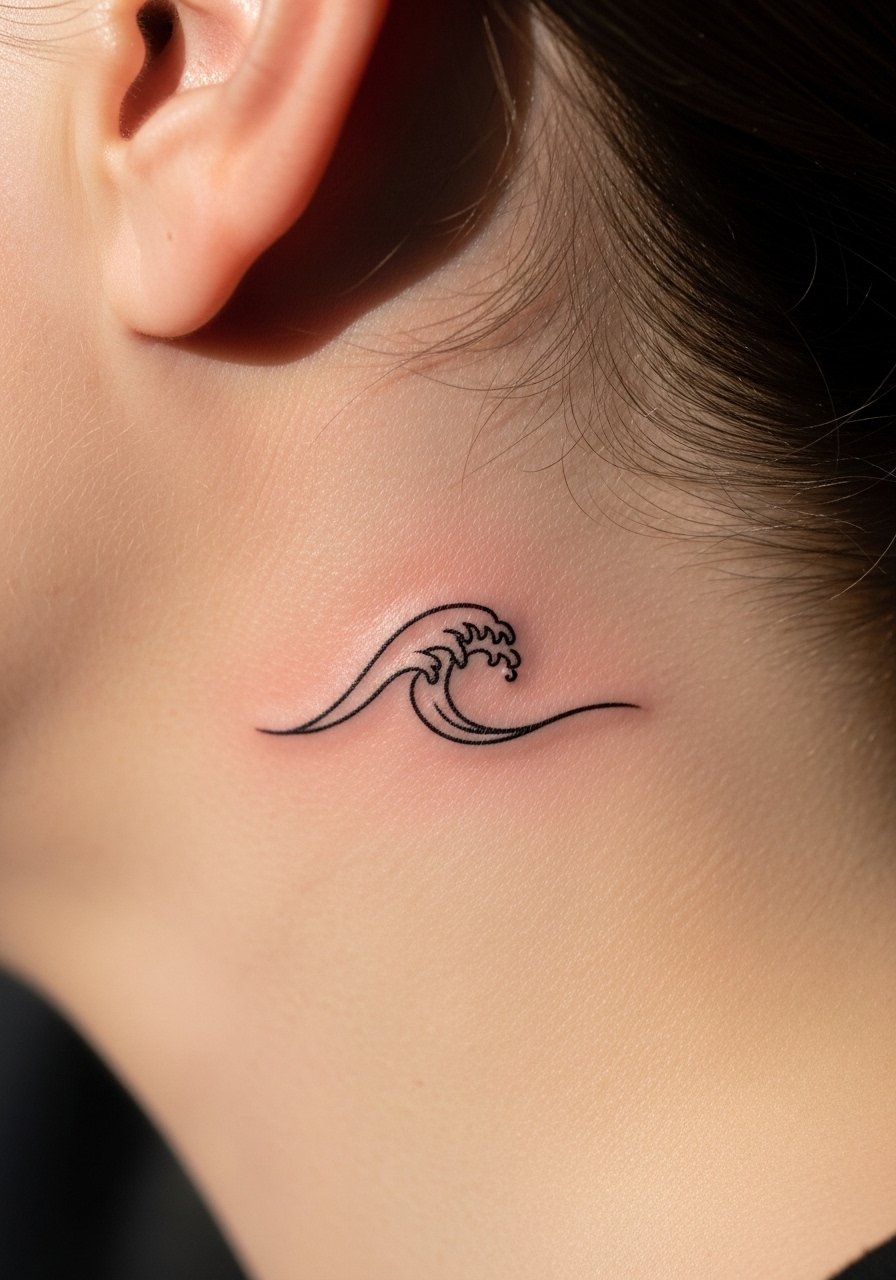
A small wave line is an elegant ocean nod that follows the neck curve. Tell your artist to keep the curve flowing and avoid adding extra curls that create tiny closed shapes. The mistake I see is over-complication at small scale which makes the wave disappear in year two. The session is very quick and the area recovers with typical tenderness. For easy reveals, pair it with a layered gold necklace short or flip your hair into a messy bun. Plan for a touch-up if the crest loses definition after months of rubbing.
Frequently Asked Questions
Q: How much does a behind ear tattoo usually cost?
A: Expect a small behind-ear piece to fall within a range of about 80-350 depending on linework, custom time, and studio rates. Guest spots and apprentices can be on the lower end. Ask for a flat rate during booking so there are no surprises at the chair.
Q: Will a fine line behind-ear tattoo fade faster than a bold black one?
A: In my experience fine line tends to soften sooner because there's less pigment per millimeter. One group of artists says fine line needs touch-ups around year one. Another group believes proper spacing and depth make fine line hold up. Decide in consultation which camp your artist follows and plan a touch-up timeline.
Q: My skin is medium or dark. Will these designs show in photos?
A: Some very thin single-needle work can lose contrast in photos on darker skin tones. Ask for slightly thicker lineweight or small areas of blackwork for better camera visibility. A henna patch test of the shape can help you preview contrast before committing.
Q: How should I sleep after getting a behind-ear tattoo to avoid scabbing and blurring?
A: Sleep on the opposite side for the first two weeks, and keep hair tied up so the ink zone sees less friction. Pillow rub is a major culprit in early fading. Use breathable pillow covers and avoid rough fabrics that snag the area.
Q: Are there healing methods artists disagree about that I should know?
A: Yes. For example, some artists prefer protective film while others advocate dry healing. There is also debate over richer ointments versus lighter balms for creased areas. Ask your artist which camp they recommend and follow their method for the first week to keep healing consistent.
Q: Can I use numbing cream for a behind-ear appointment?
A: Numbing creams can help with the bone vibration, but some artists warn that certain creams swell the skin and blur fine line work. If you want numbing, discuss which product and timing with the artist so they can adjust technique and still deliver clean linework.
