
Fine line collarbone skulls look fragile on a saved board but behave very differently on real skin. Pain on the bone, summer sweat that rubs at fresh ink, and tiny tattoos that vanish on darker tones are the three things I hear most from people after their first collarbone piece. Read on for designs that account for those issues and what to tell your artist in the chair.
1. Fine Line Skull with Roses along the Clavicle
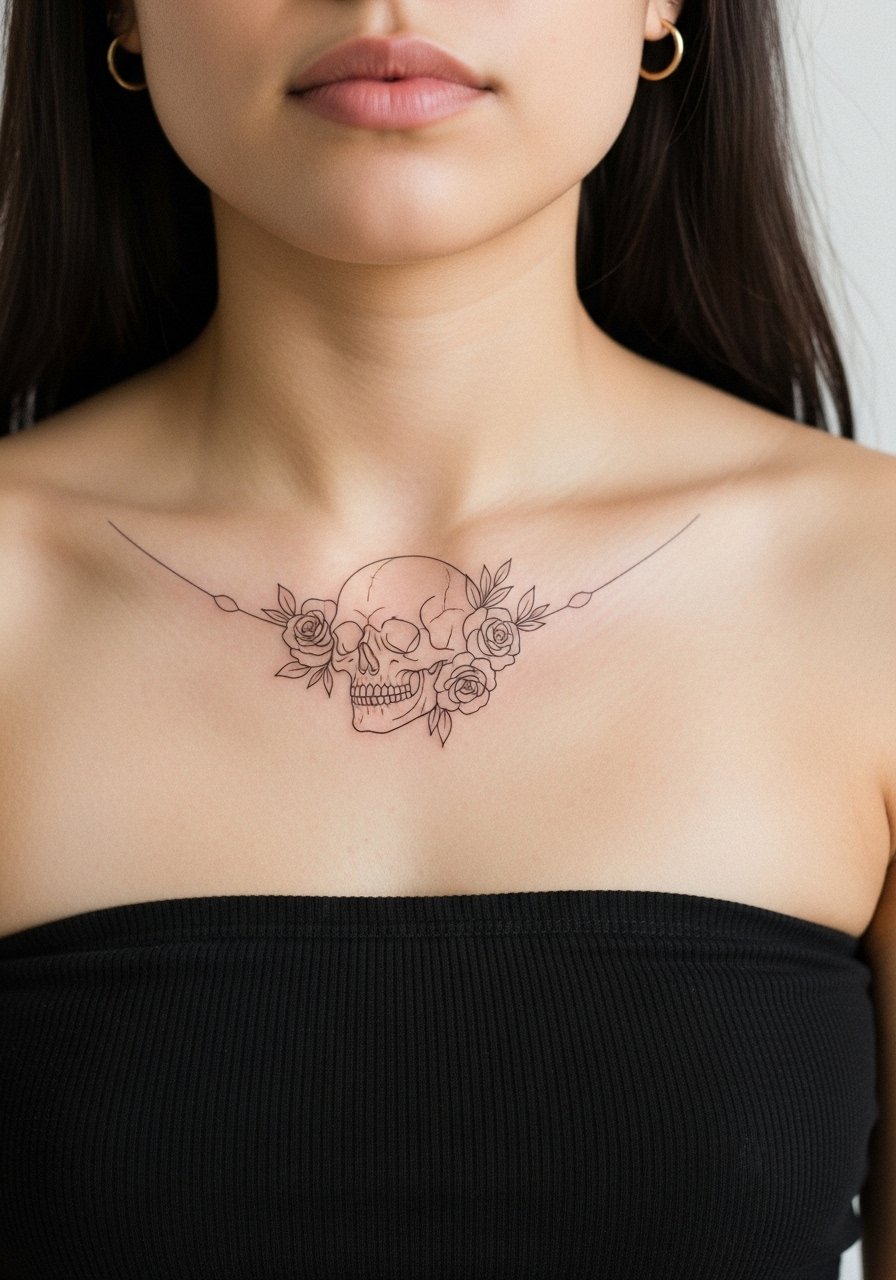
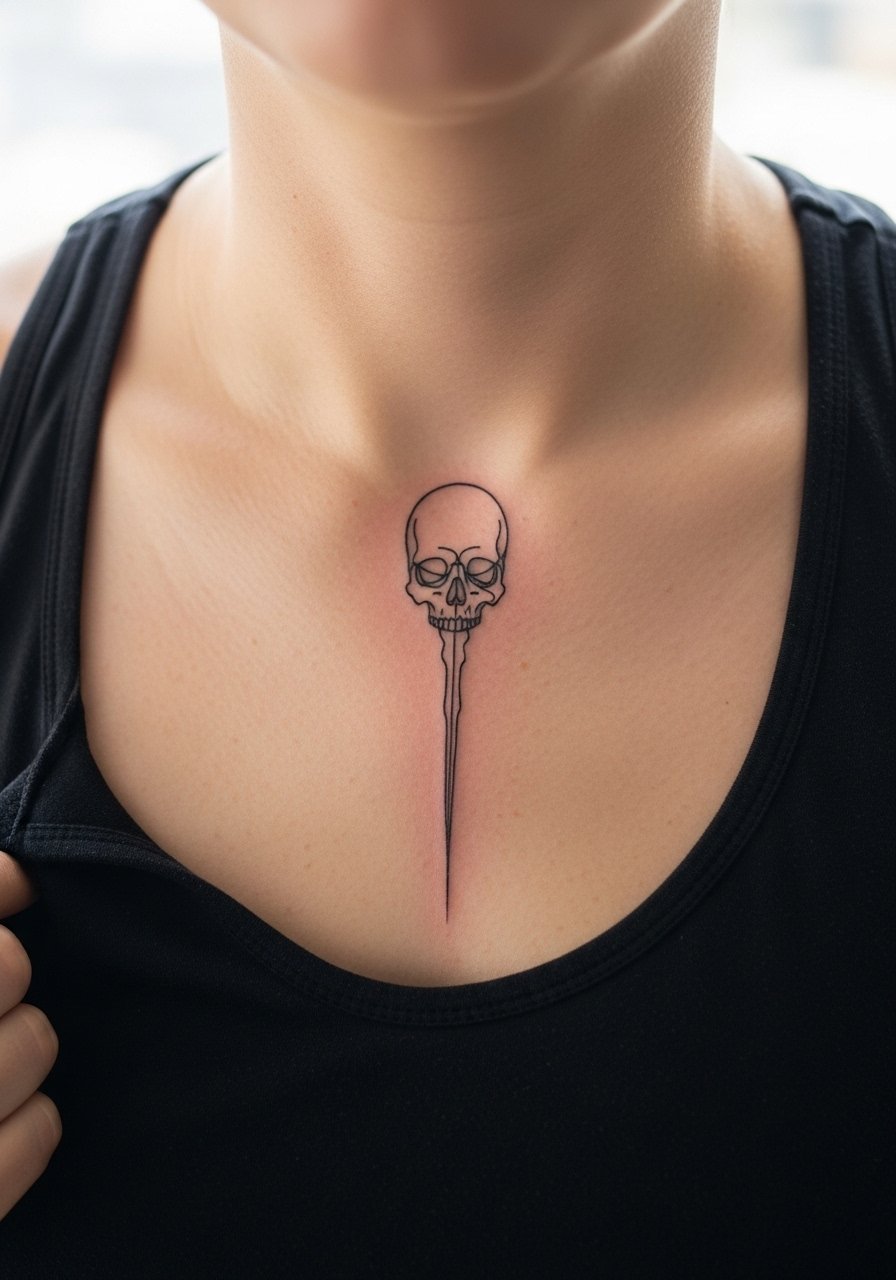
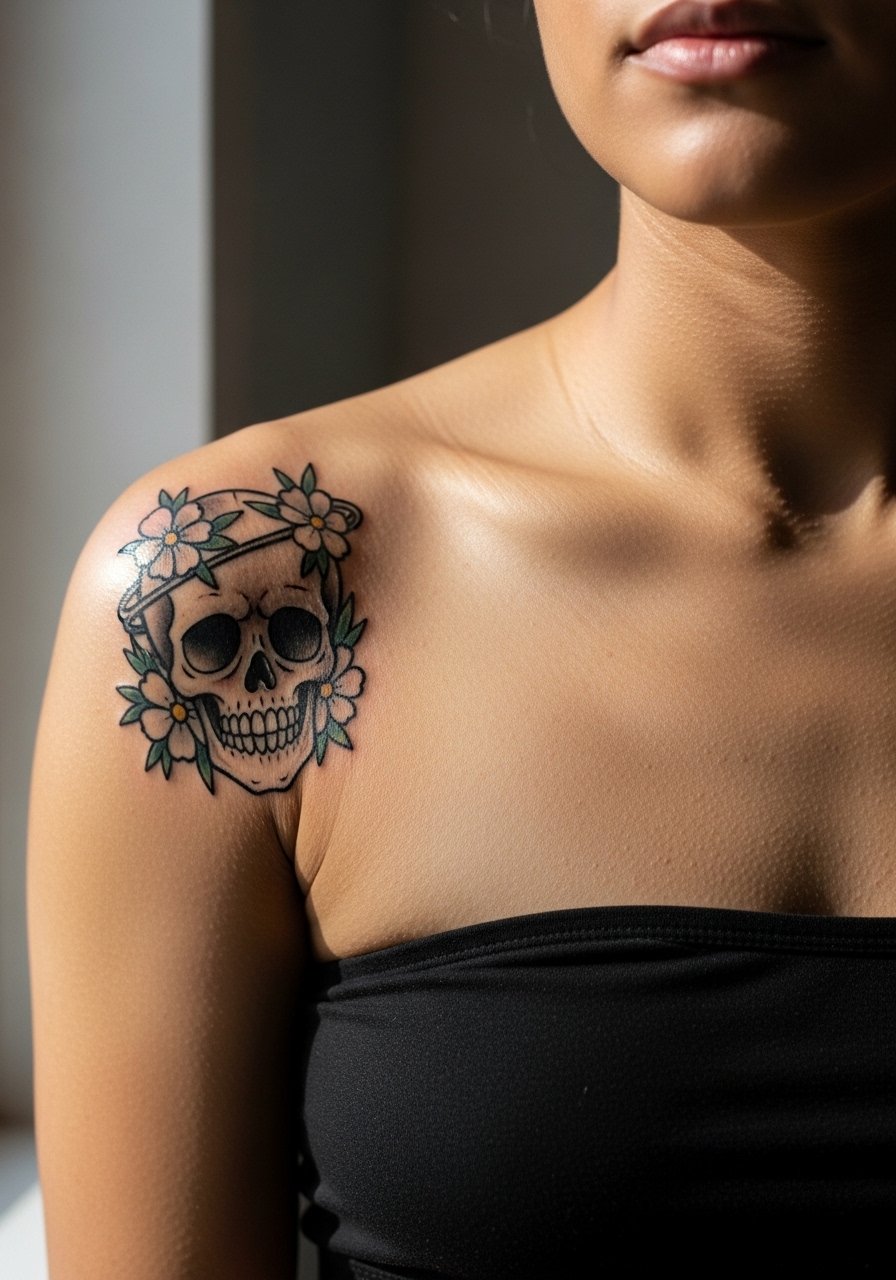
I pick this when someone wants the skull motif but fears heavy saturation. Ask for single-line precision with slightly thicker anchor strokes where the bone curves, so the design keeps shape if you gain or lose weight. Expect a tight 45 to 75 minute session and a sharp sting over the actual bone. A common mistake is asking for micro detail jammed into a two-inch space, which causes early blurring. Plan touch-ups at year two for line refresh. For showing it off, a v neck cotton tee or a thin silver chain necklace frames the placement without covering the roses.
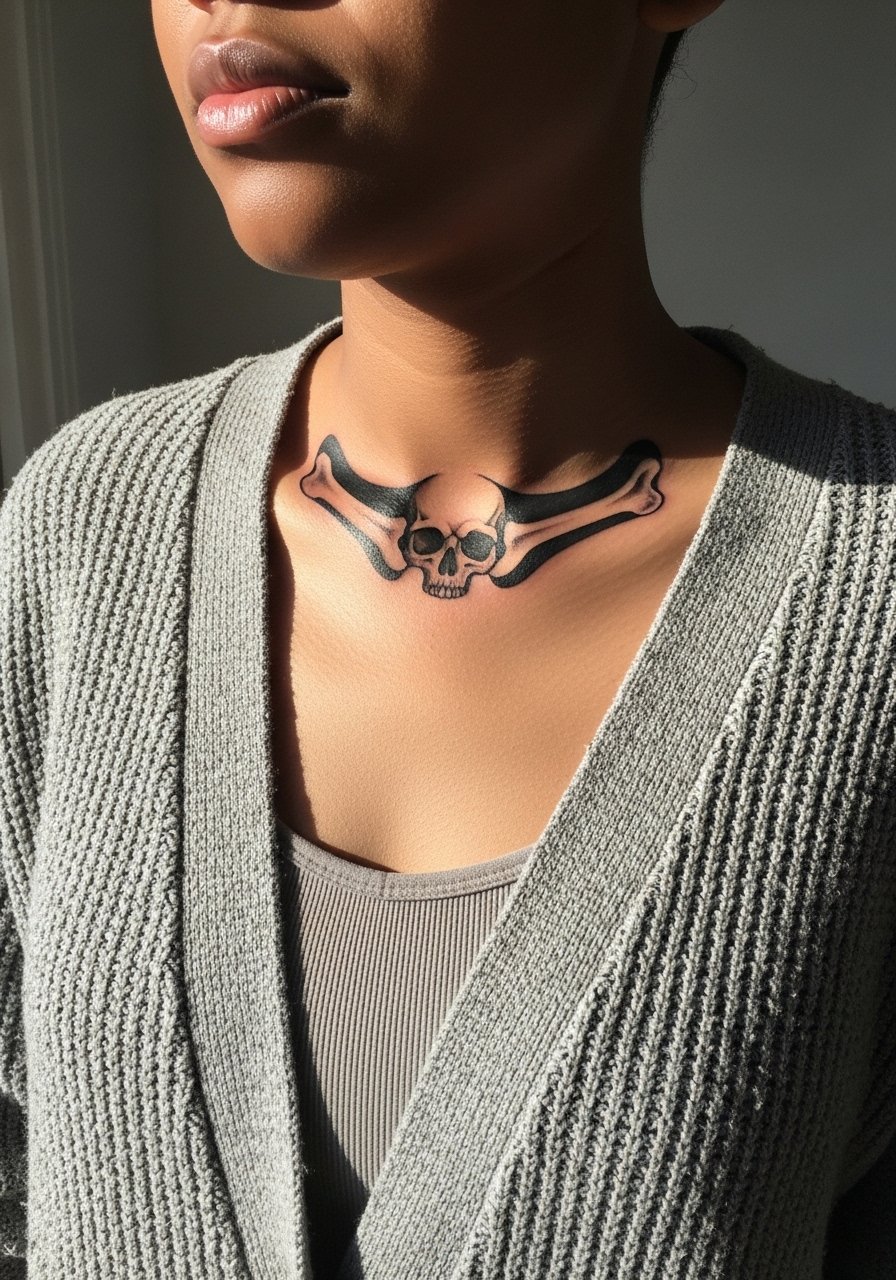
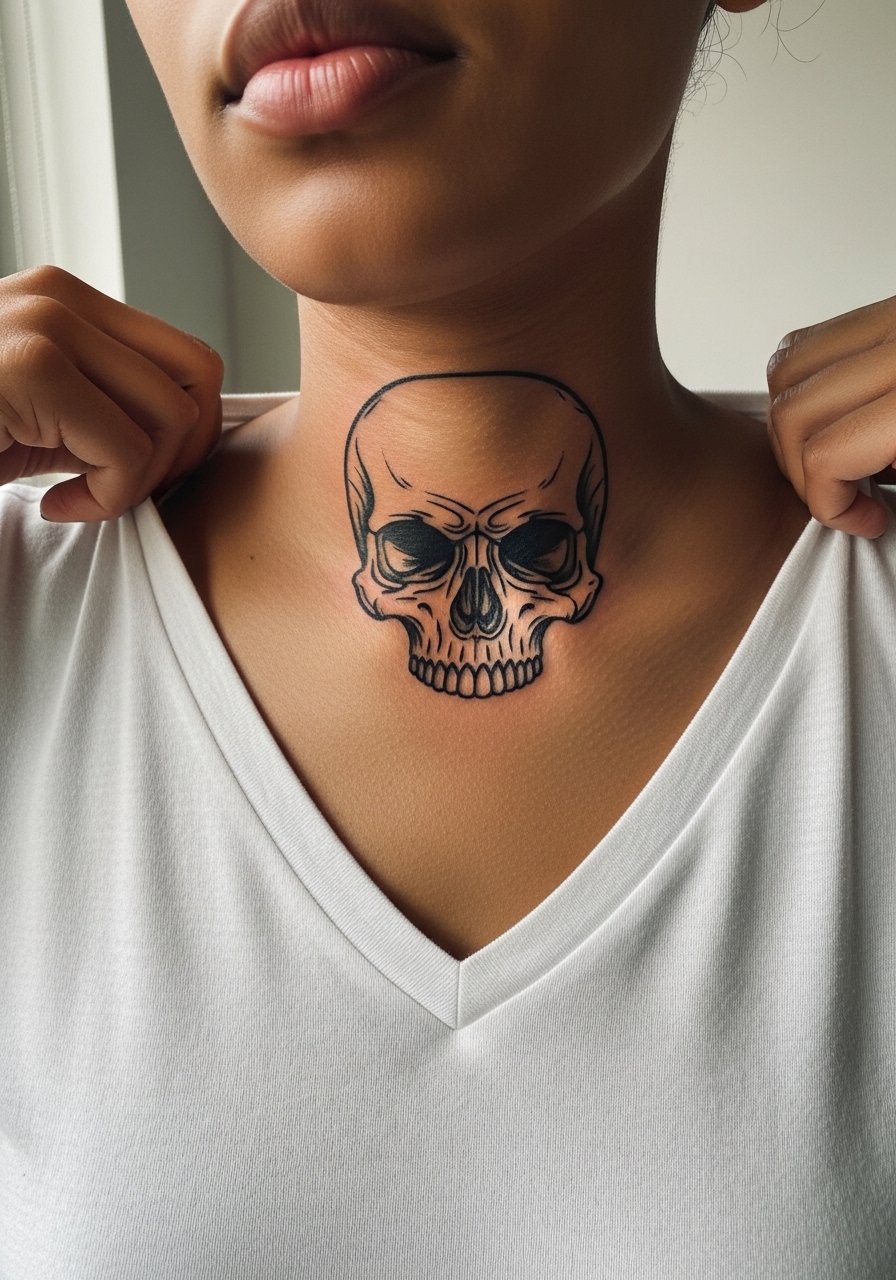
2. Traditional Bold Skull Curving with the Collarbone
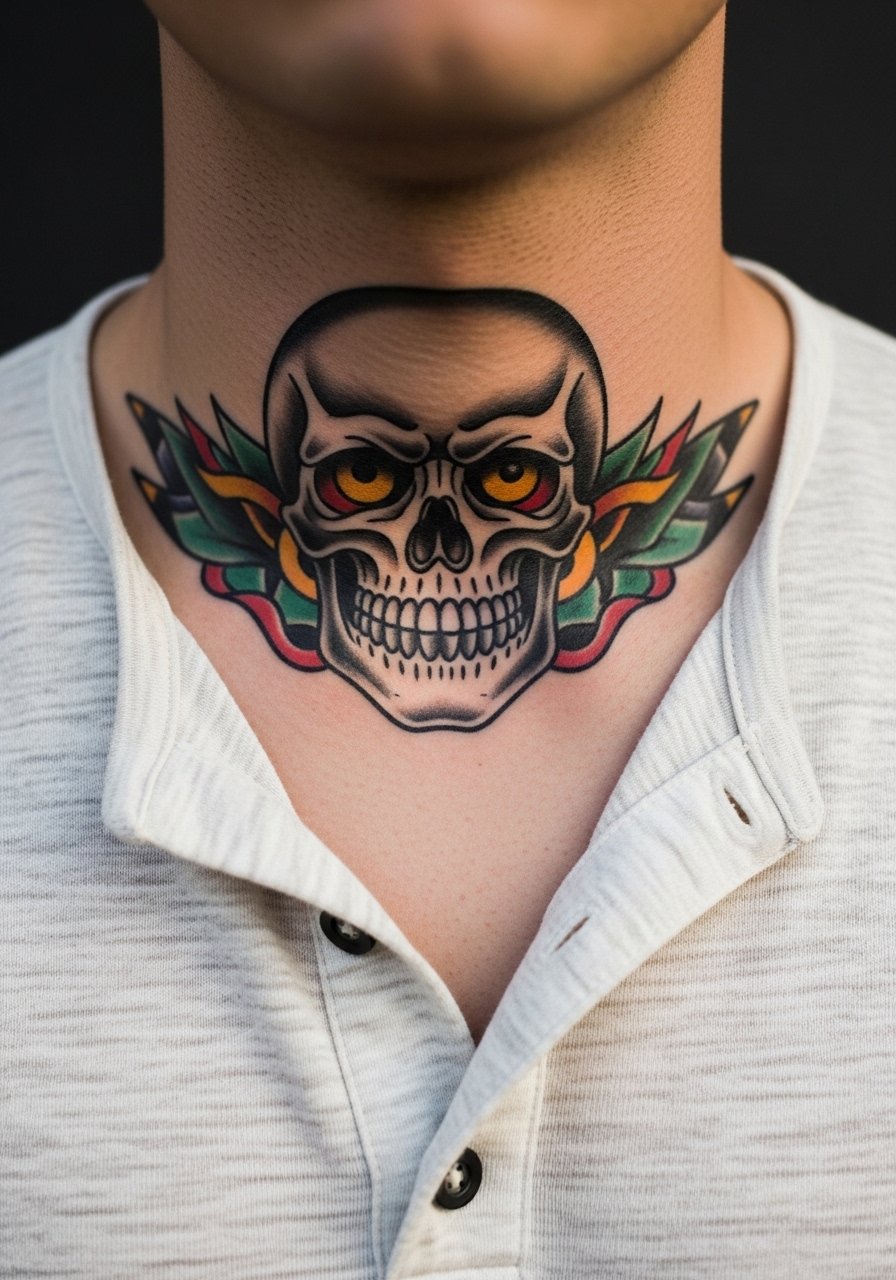
This one ages well because heavy outlines and saturation keep contrast as the skin softens. Fair warning, the bone sting is real and the session typically fits in a single solid hour. Artists split on numbing cream for bone work, with one camp saying it helps client comfort and the other worrying about ink seating. Name both concerns in consultation and ask the artist which approach they use. A common mistake is too-small motifs that lose character when the saturation spreads. For show-off outfits try a cotton henley or a band collar shirt to let the skull peek.
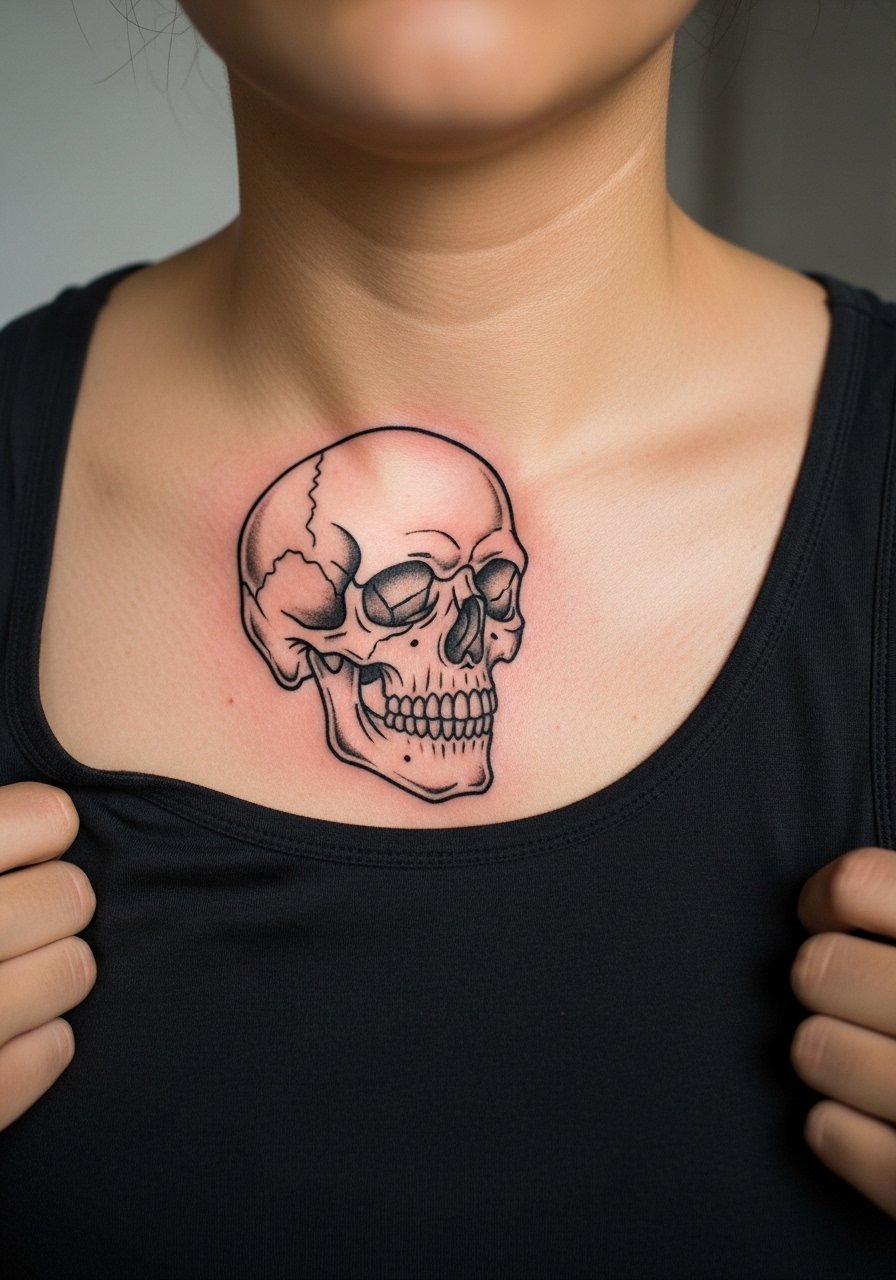
3. Blackwork Geometric Skull Anchoring the Ridge
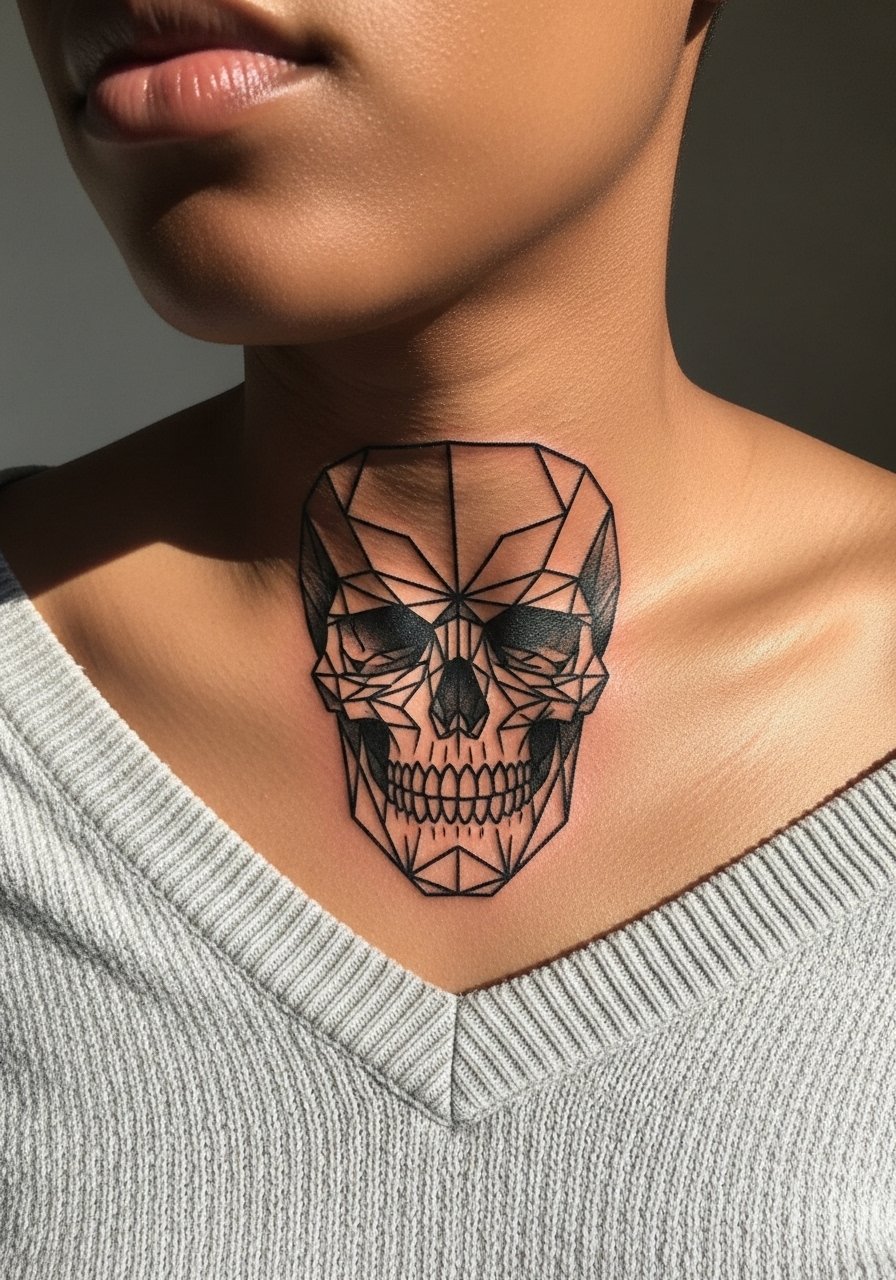
Solid blackwork is a strong choice when you want longevity, especially on darker skin where fine lines can disappear. The session is brisk if the piece is 3 to 4 inches, usually finished in one visit. The mistake is packing tight geometry into narrow space, which risks early merging. Blowout risk exists if the artist goes too deep over thin skin on the ridge. For edges that read in photos, pair this with an off shoulder sweater and let the black shape frame the neckline.
4. Watercolor Skull with Smoke Draped Over the Clavicle
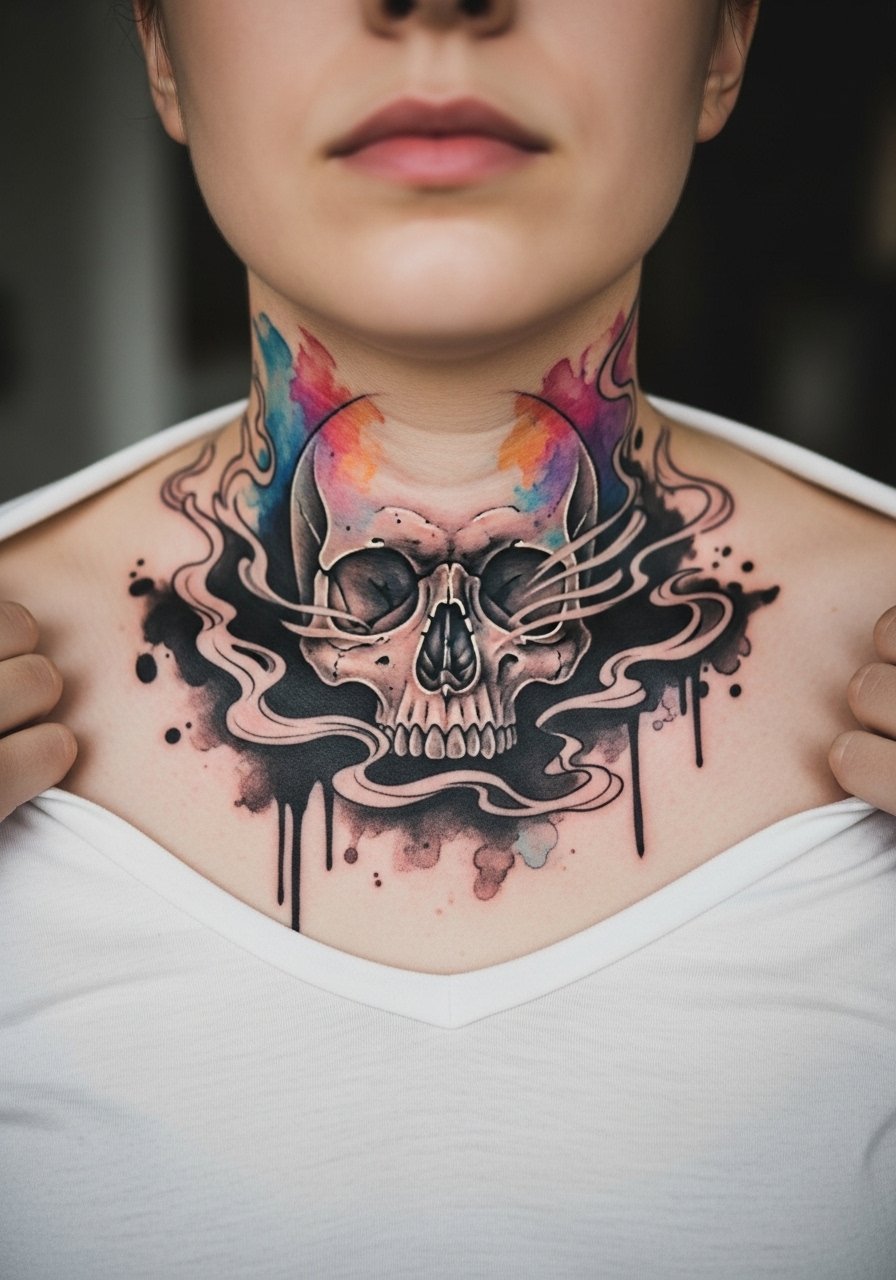
Watercolor looks ethereal fresh but needs careful placement on the collarbone because sun exposure fades pigments faster. I recommend scaling the color zones slightly larger than your reference so the soft fades still read at year two. People often ask for tiny watercolor fills, and those bleed into skin tone on this placement. Plan for a two-session approach and sunscreen once healed. For sessions wear a strapless bralette so the artist can work the drape without straps digging into fresh ink.
5. Neo-Traditional Skull with Dagger Angled Along the Clavicle
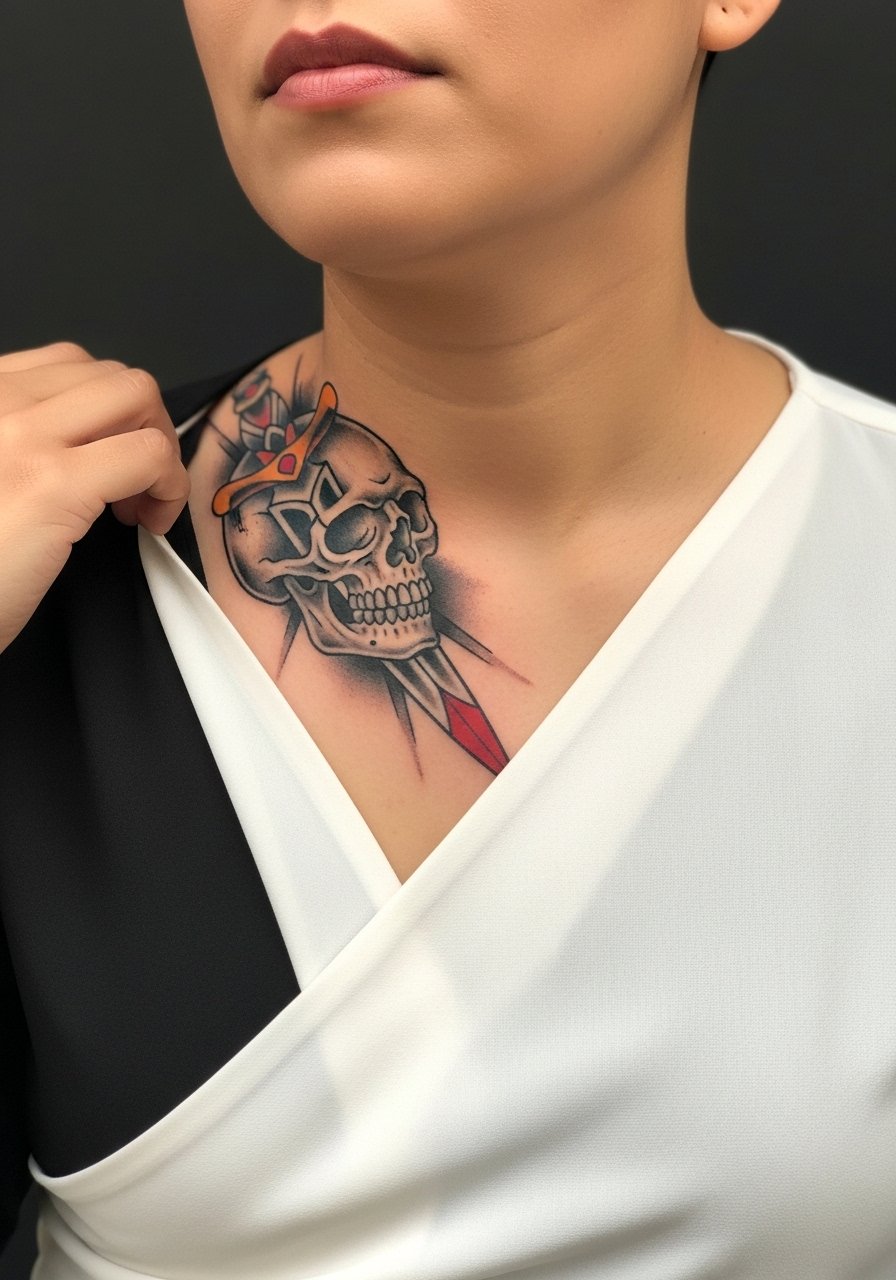
This design is story-driven without getting fussy in a small space. Ask the artist to angle the dagger to follow the clavicle curve so the piece reads like one continuous stroke rather than a sticker glued on. The pain is moderate and session time often runs longer because of color layering. A common error is insisting on tiny complex color blends in a three-inch canvas, which requires extra touch-ups. For nights out, pair it with a wrap front blouse and medium hoop earrings.
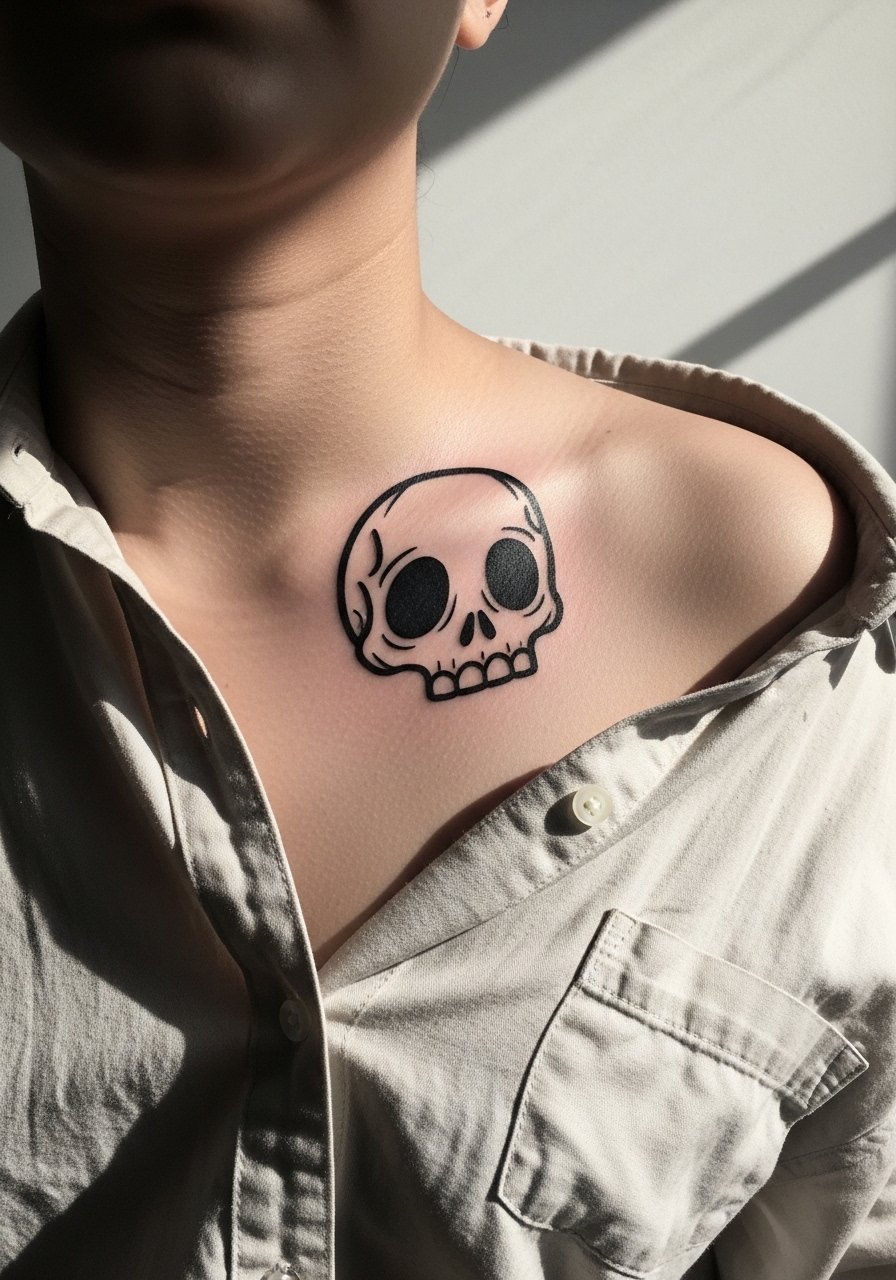
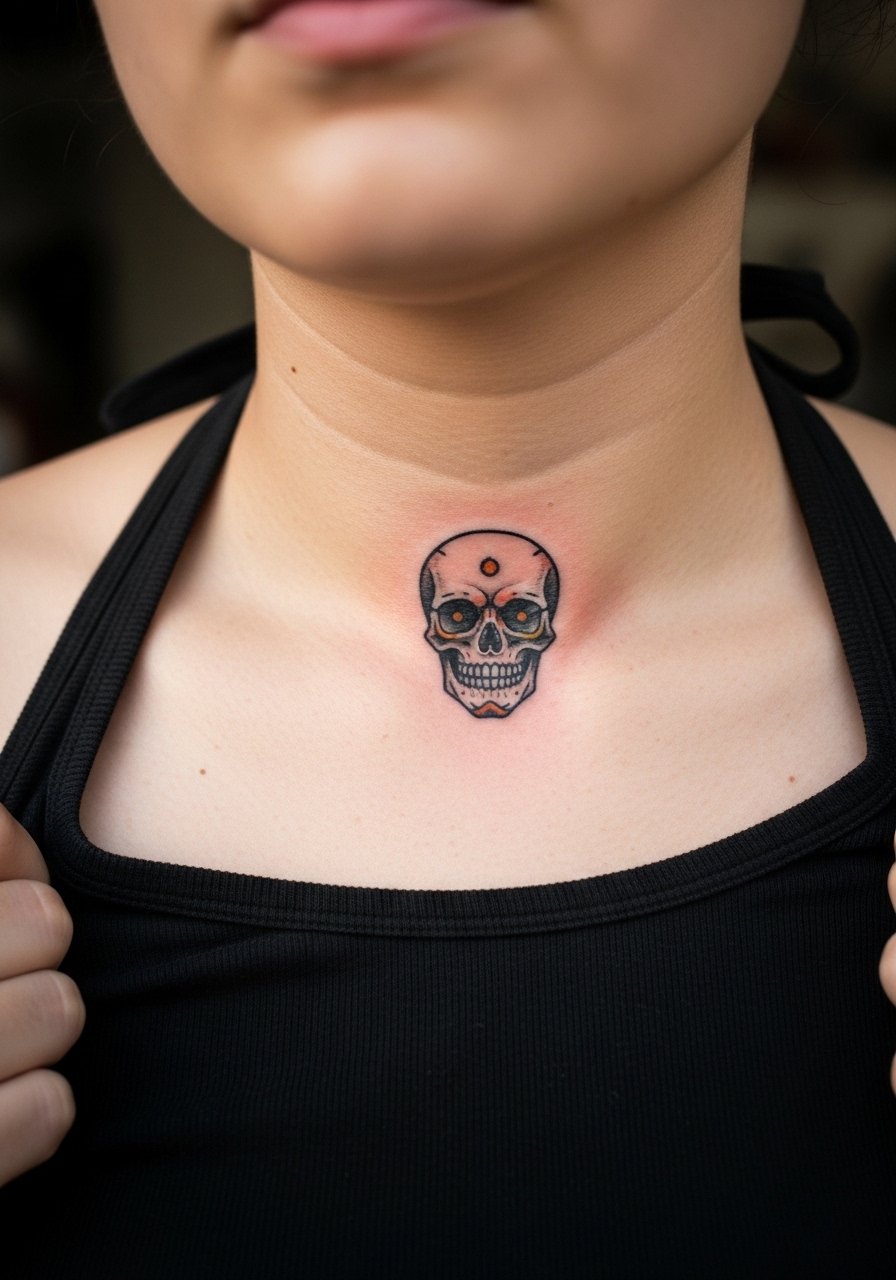
6. Minimalist Outline Skull Nestled in the Collarbone Hollow
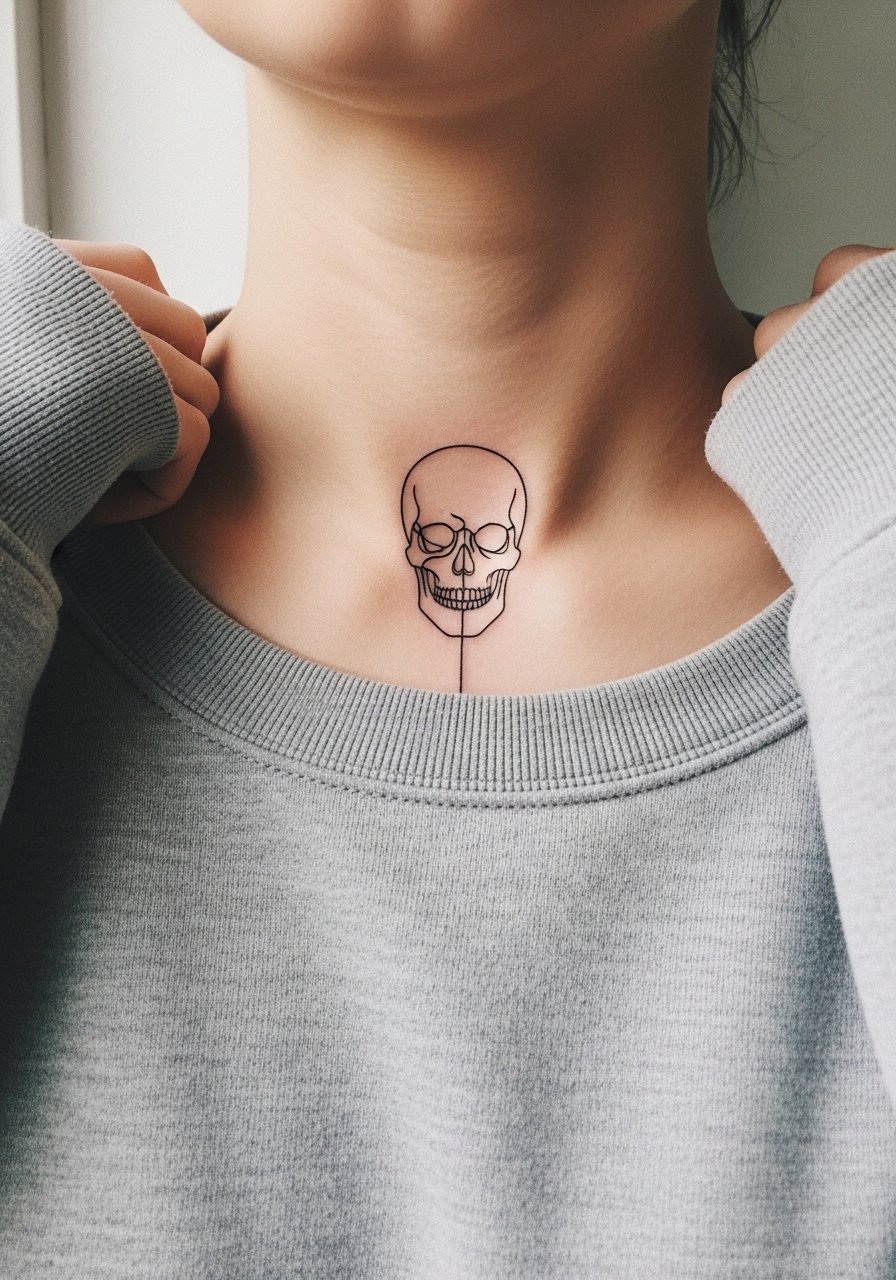
This appeals to first-timers who want a visible micro piece. The session is short, thirty to forty-five minutes, but the hollow sits right above the bone so the sting is sharp. There is a debate in the community about fine line holding on the collarbone, with one camp saying it fades fast and another saying placement and needle depth matter most. Ask for slightly bolder anchor strokes to avoid disappearing lines. For casual wear, a oversized crewneck sweatshirt pulled low frames the hollow without stretching the piece.
Studio Day Picks
These first six collarbone ideas run from micro to saturated color, and the products below help with session comfort and the first week after inking.
- Tattoo Goo balm. A thinner absorbent balm that keeps the collarbone from looking shiny in photos while hydrating tender linework during cooler months.
- Frida's Tattoo Balm. Lightweight and quick-absorbing, it soothes bony spots without leaving a greasy film that traps sweat.
- Ink-Oil lightweight tattoo oil. A matte finish oil that hydrates without reflecting flash in collarbone photos.
- Coda Signature matte healing balm. Fans cite it for less shine on darker tones, which helps with healed contrast.
- Saniderm protective film. Useful on the first few days to cut down friction from shirts on exposed collarbone work.
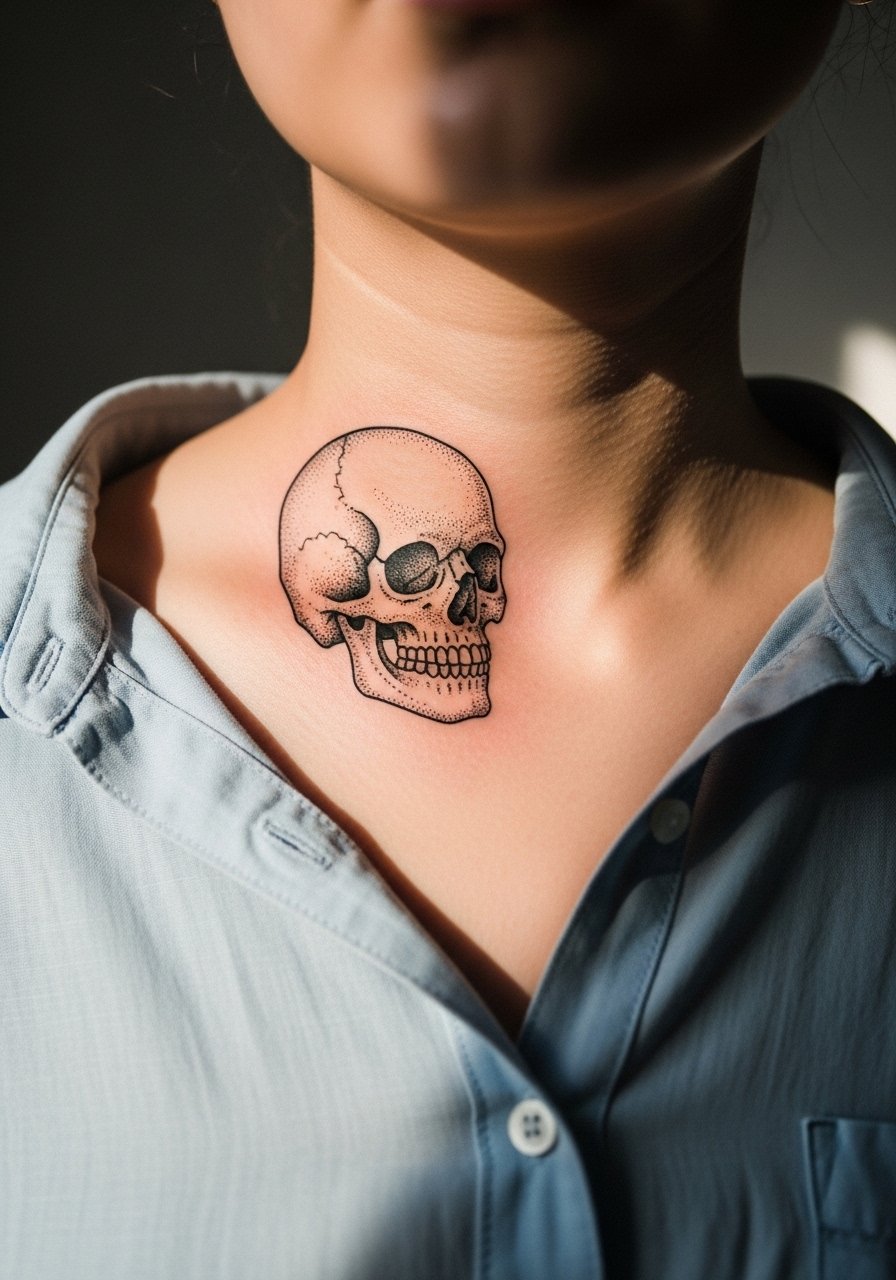
7. Micro-Realism Skull Portrait Fitted to the Clavicle Curve
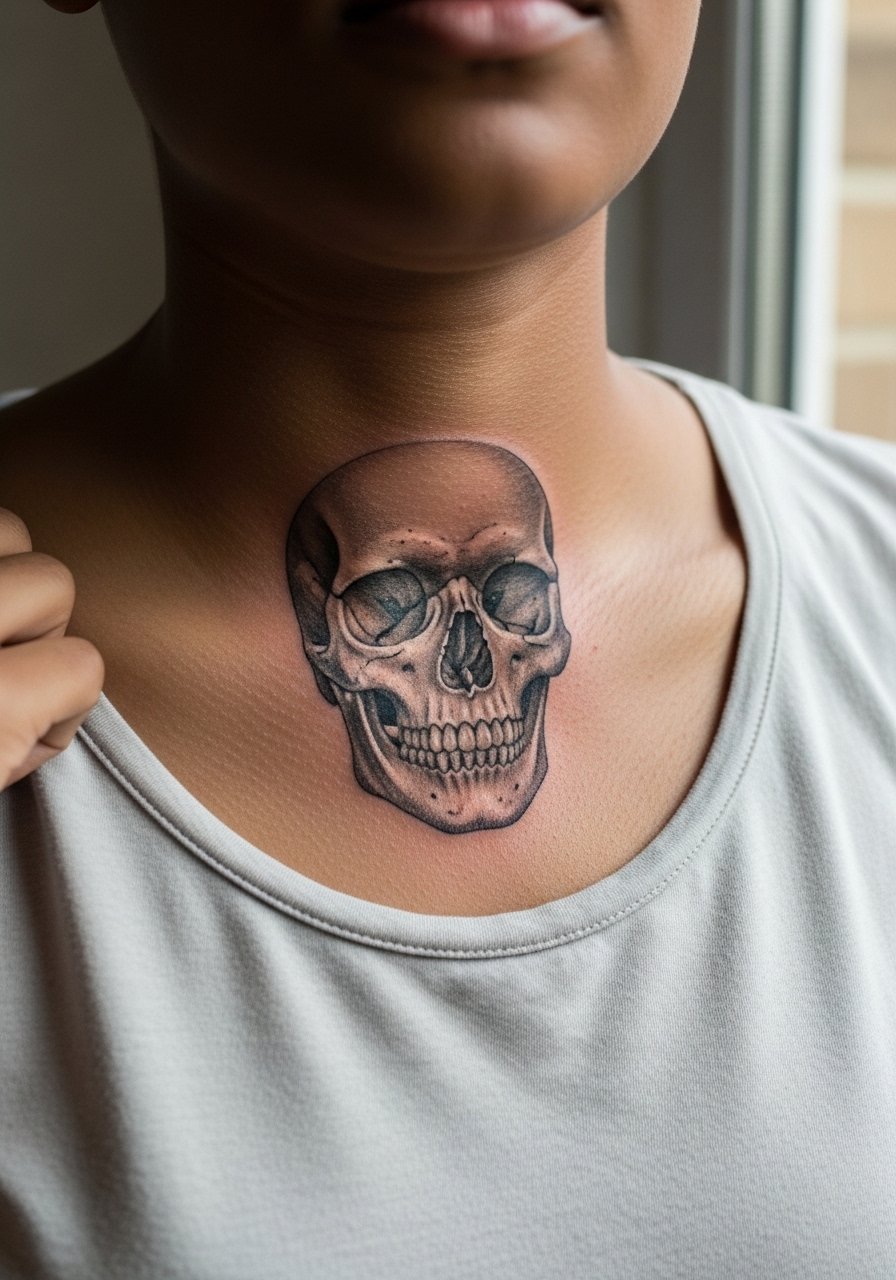
Micro-realism here is for memorial or portrait-like detail in a compact size. Expect multiple sessions and a steady hand for stipple and tiny gradients. The big mistake is squeezing portrait-level detail into a two-inch space without planning touch-ups. On dark skin, ask to increase contrast with bolder midtones so facial features read in photos. Session feeling is a constant, focused vibration rather than quick shading runs. For visibility, a scoop neck tshirt keeps the portrait unobstructed.
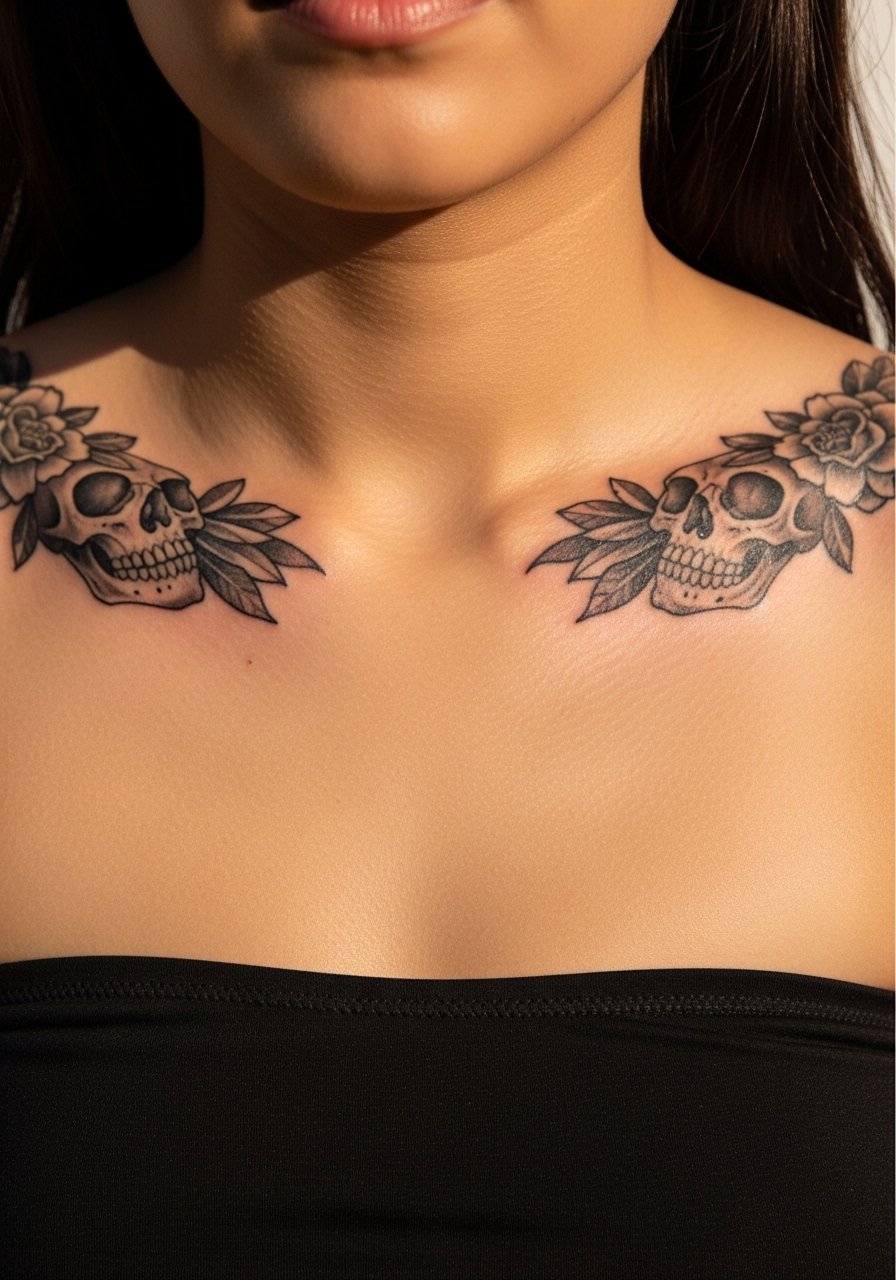
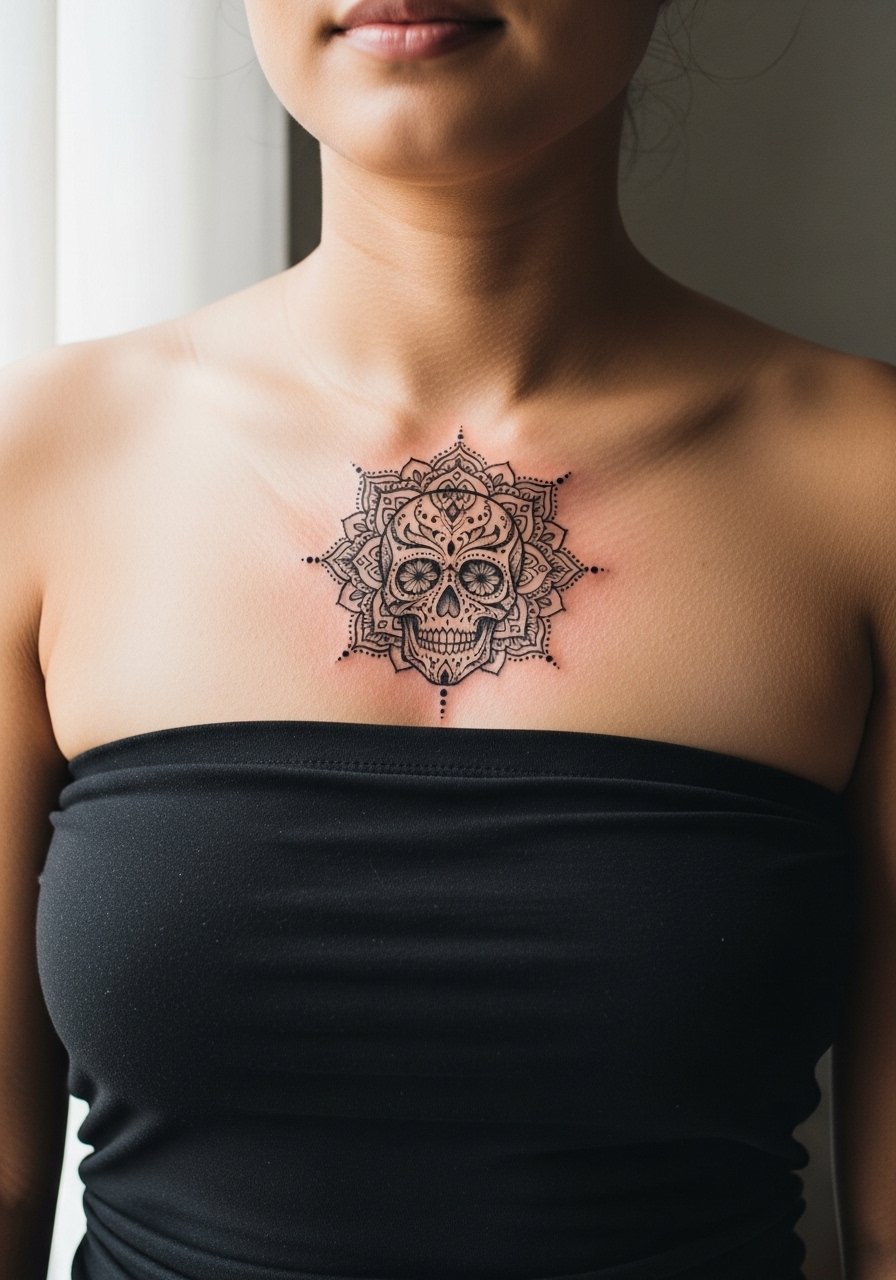
8. Ornamental Skull Framed by a Mandala Across Both Collarbones
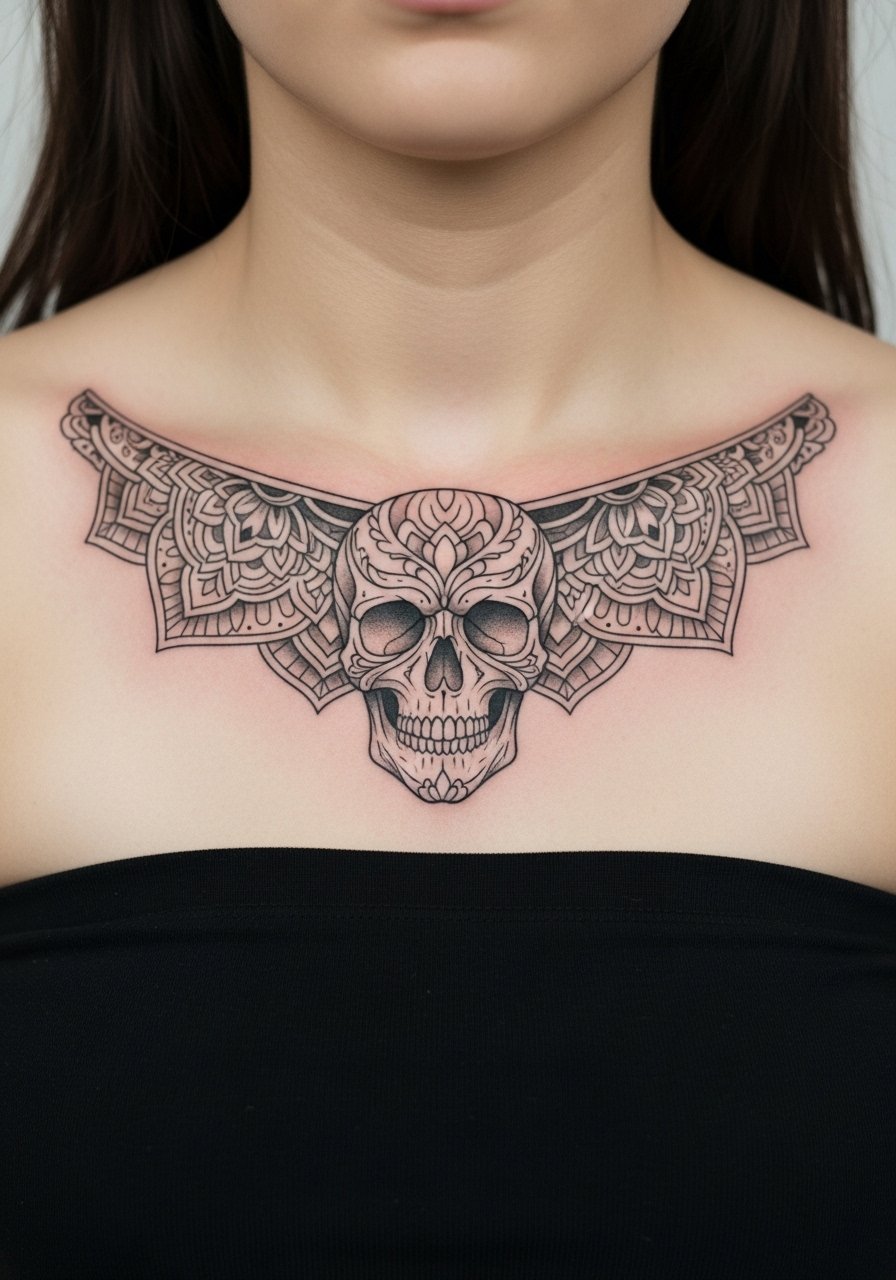
Symmetry sells here, but bilateral work requires matching bone height and posture testing before inking. The session runs longer since both sides need mirrored precision. A frequent misstep is assuming perfect symmetry on people with uneven clavicles. The artist should do a posture and stretch test in the sit-down. This is one of the rarer collarbone pieces that benefits from a planned touch-up schedule to keep mandala points crisp. Pair with a black tube dress for nights when you want matched framing.
9. Ignorant Style Cartoon Skull with Playful Linework
This hand-drawn aesthetic leans playful and reads well when lines are chunky enough to survive oxidation and sun. It is forgiving in touch-up timelines because thick outlines hold. The session is fast and less painful if the skull sits on softened tissue rather than directly over bone. A common mistake is asking for ultra-tiny cartoon details that lose charm when they blur. For session comfort, wear a loose button-down shirt you can pull aside.
10. Dotwork Skull with Hourglass Along the Ridge
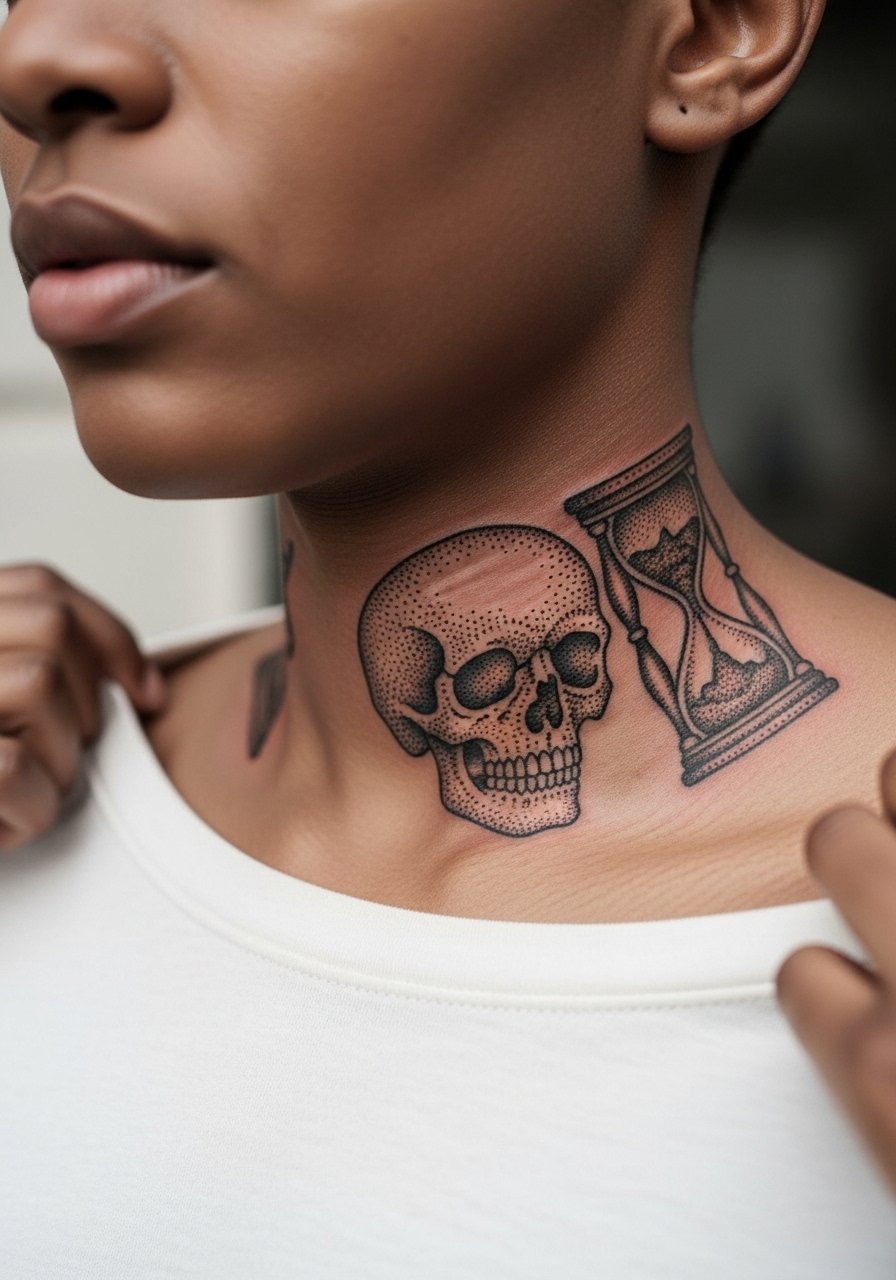
Dotwork rewards patience, and the collarbone lets stipple follow the bone for a meditative rhythm. Expect a longer session if the piece is medium sized, because stippling takes time. The mistake is asking for too-dense stipple in a crowded area, which can merge over time. Plan touch-ups around year two for dot redefinition if you sunbathe often. No jewelry is needed to show this, but a thin silver chain necklace sitting above the hourglass can balance the look.
11. Realism Sugar Skull with Day-of-the-Dead Color Peek
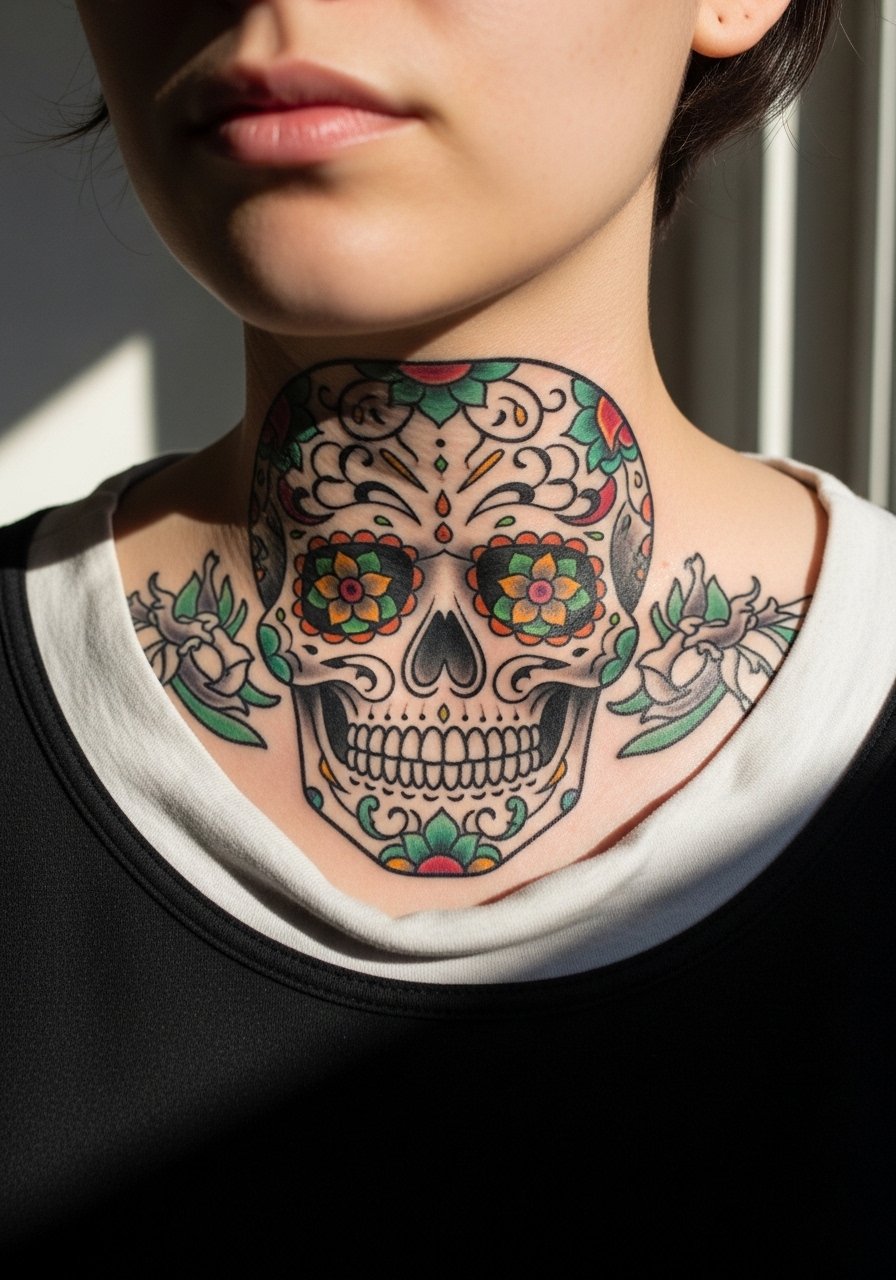
If you want color and fine detail, accept the longer time and higher touch-up likelihood because collarbone color fades faster under sun. This will likely take multiple sessions for layering and saturation. People with darker tones should request bolder color keys to keep motifs readable in photos. Common missteps include expecting tiny ornate details to stay crisp without periodic refresh. For wardrobe, a wrap front blouse keeps color visible without exposing too much chest.
12. Black and Gray Floral Skull Wrapping the Collarbone Ends
This hybrid balances realism with ornamental flow that flatters the bone shape. The session often runs 90 to 150 minutes depending on how much wrapping you want. Pain is spotty where the bone peaks. A big mistake is asking for heavy gray fill right against the bone without spacing, which risks the piece softening into a flat gray area. For showing it off, choose a strapless bralette or scoop neck top so the floral curves complement the neckline.
13. Elongated Skull That Follows the Clavicle Dip
This is one of the under-covered ideas I recommend when you want optical depth. Stretching the skull to follow the clavicle dip gives a dynamic look and helps the design avoid distortion from small weight shifts. Ask the artist to trace the bone and map the elongation in the stencil phase. Expect a 60 to 90 minute session. The error people make is insisting on a symmetric skull when their bones are asymmetrical. For session day, a racerback tank gives the artist access without straps in the way.
14. Negative Space Skull Mimicking the Bone Contour
Negative space designs use the skin as part of the image, which can be a smart longevity strategy because there is less pigment to fade. The session time depends on how much filled black surrounds the negative zone. A common mistake is thinning the negative gaps too much, which makes the illusion vanish with minor fading. On darker skin you can use larger negative windows to keep the skull readable. For showing it off, a relaxed open front cardigan works well.
15. Asymmetrical Single-Side Skull for One Collarbone Focus
Asymmetry can look deliberate and flattering on one-sided clavicle pieces. The trick is to scale the skull so it reads against the exposed shoulder and does not feel lopsided. Sessions are usually compact but require careful stencil placement. A frequent error is copying bilateral references and expecting one side to match the other. For outfits, an off shoulder sweater gives a moody reveal on the active side.
16. Micro Skull with Neo-Traditional Accents for Patchwork
This approach plays well if you plan a later patchwork collection. Keep the micro skull simple and add a single accent color so future adjoining pieces can echo the palette. The session is short, often under an hour. The mistake is over-detailing the micro base, which limits future integration. For sessions, wear a halter tank top so the artist can reach the upper chest without costume alterations.
17. Bold Line Skull That Peeks from Off-Shoulder Tops

If visibility matters, thick lines and high saturation win. The trade-off is longer healing and more visible scabbing if the area rubs against clothing. Expect a one-session piece for 3 to 4 inches. The common regret is choosing thin line weight for a guaranteed-peek placement. For showing it off, an off shoulder sweater or a strapless top frames the peeking skull.
18. Sugar Skull with Personalized Date in Roman Numerals
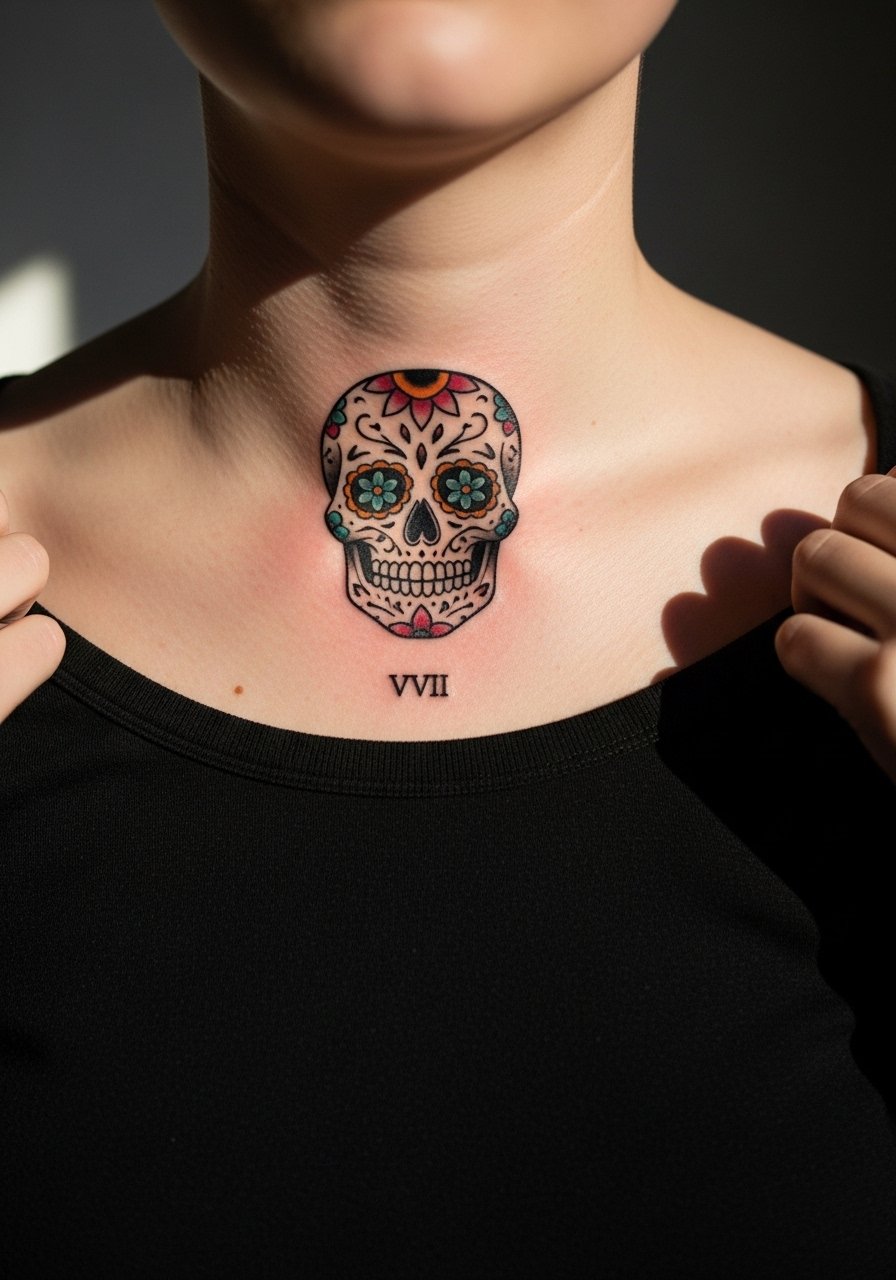
Including a subtle date personalizes without generic phrasing. If you include Roman numerals, specify the exact characters in the consultation so spacing and font are nailed. The session runs longer for color layering and fine numeral legibility. On darker skin choose stronger color keys so the numerals remain readable in photos. Avoid squeezing the date into a tiny band below ornate skull work. For outfits try a wrap front blouse to reveal the detail while keeping the chest modest.
19. Stipple Shaded Skull Sitting on the Clavicle Ridge
Stipple shading gives texture without heavy gray blocks, which helps collarbone contours breathe. Expect a longer session when the stippling area is medium sized. The mistake is packing stipple too densely in tight spots, which can flatten into gray next to bony peaks. Ask for test dots in the stencil phase so you can see how the density will read. For the session wear a loose button-down shirt that you can slide for artist access.
20. Minimal Micro Skull Centered Over the Bone Dip
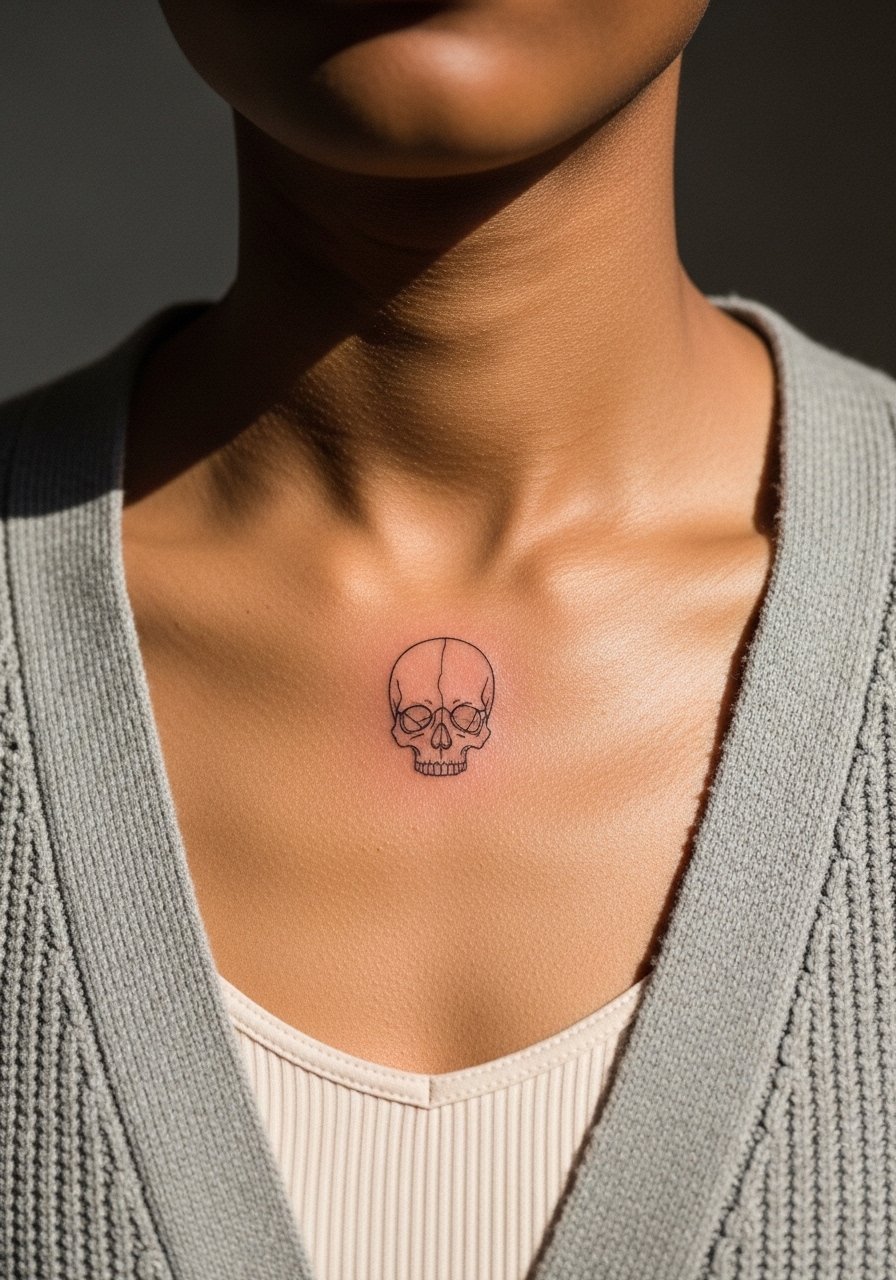
Micro center placements are deceptively visible because the dip draws the eye. Keep line weight a little stronger than your saved reference so the ink does not disappear into healed skin tone variance. The session is very short but intense over the bone. A common error is wanting the absolute thinnest line possible for a micro; that often results in near-vanishing lines. For casual looks, a open front cardigan worn over a bralette highlights the micro without competing jewelry.
21. Ornamental Frame Skull with Mandala Points on the Ridge
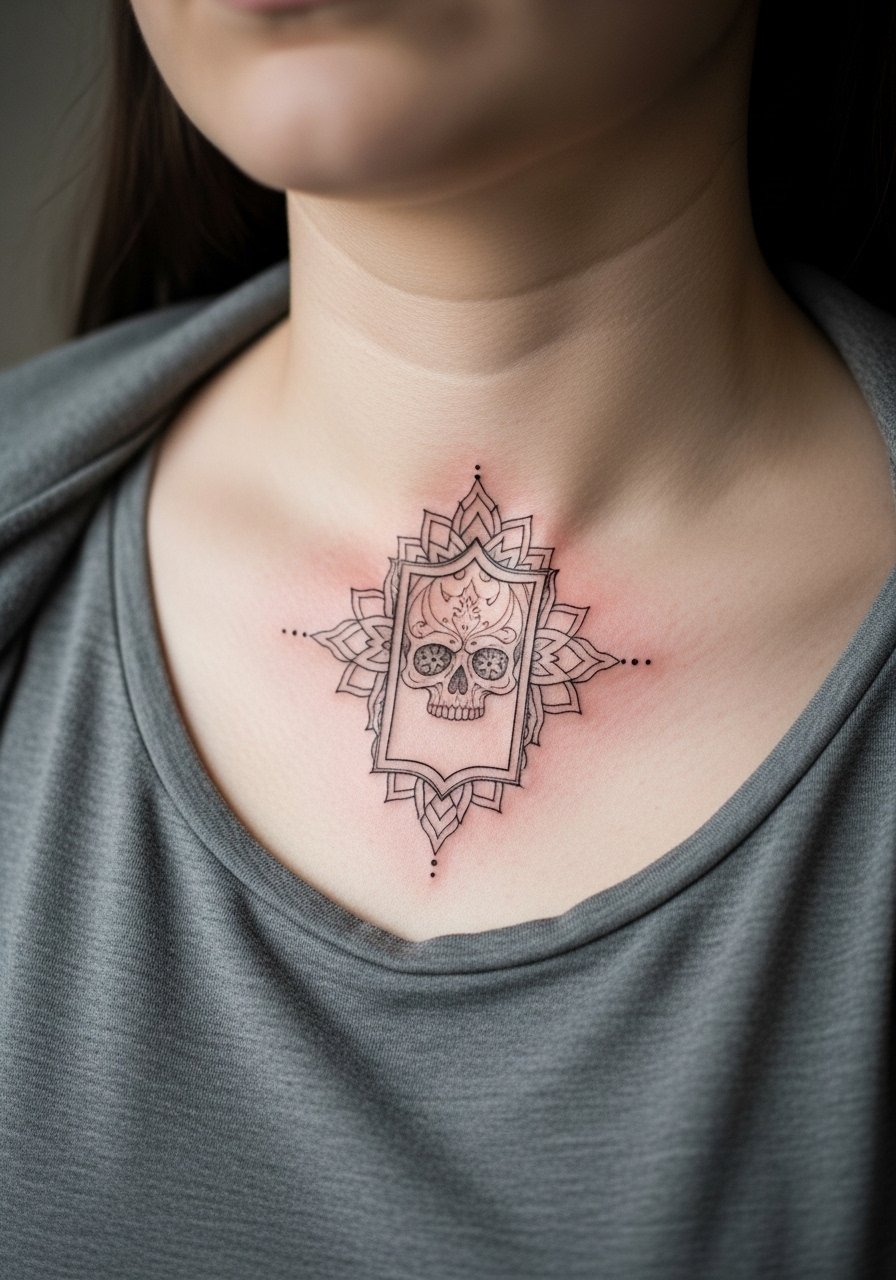
Framing the skull with mandala points increases visual stability because the pattern disperses attention away from tiny line shifts. Sessions will be longer due to symmetry and fine detail. Artists often caution that small mandala points need spacing to avoid merging once healed. A posture test in the consult catches potential asymmetries. For simplicity in photos, a scoop neck tshirt keeps the frame clear.
22. Cartoon Skull with Floral Halo on One Side
This hybrid keeps charm and readability by pairing heavy outlines with softer floral fills that sit away from the bone peaks. The session is friendly for first-timers but expect a short sting near the bone. The mistake is requesting minute floral details next to the skull where the skin is thin. For showing off, a strapless bralette or a scoop neck supports a balanced reveal.
23. Geometric Skull with Negative Space Highlights
Geometry reads clean when given breathing room, and negative highlights help the shape persist as lines soften. Sessions are methodical because angles must align with bone contours. The common error is shrinking geometry too close to the bone peaks, which increases blowout risk. For wardrobe, a wide-neck shirt that can be shifted works best for both session access and display.
24. Neo-Traditional Skull with Rose and Subtle Red Accents
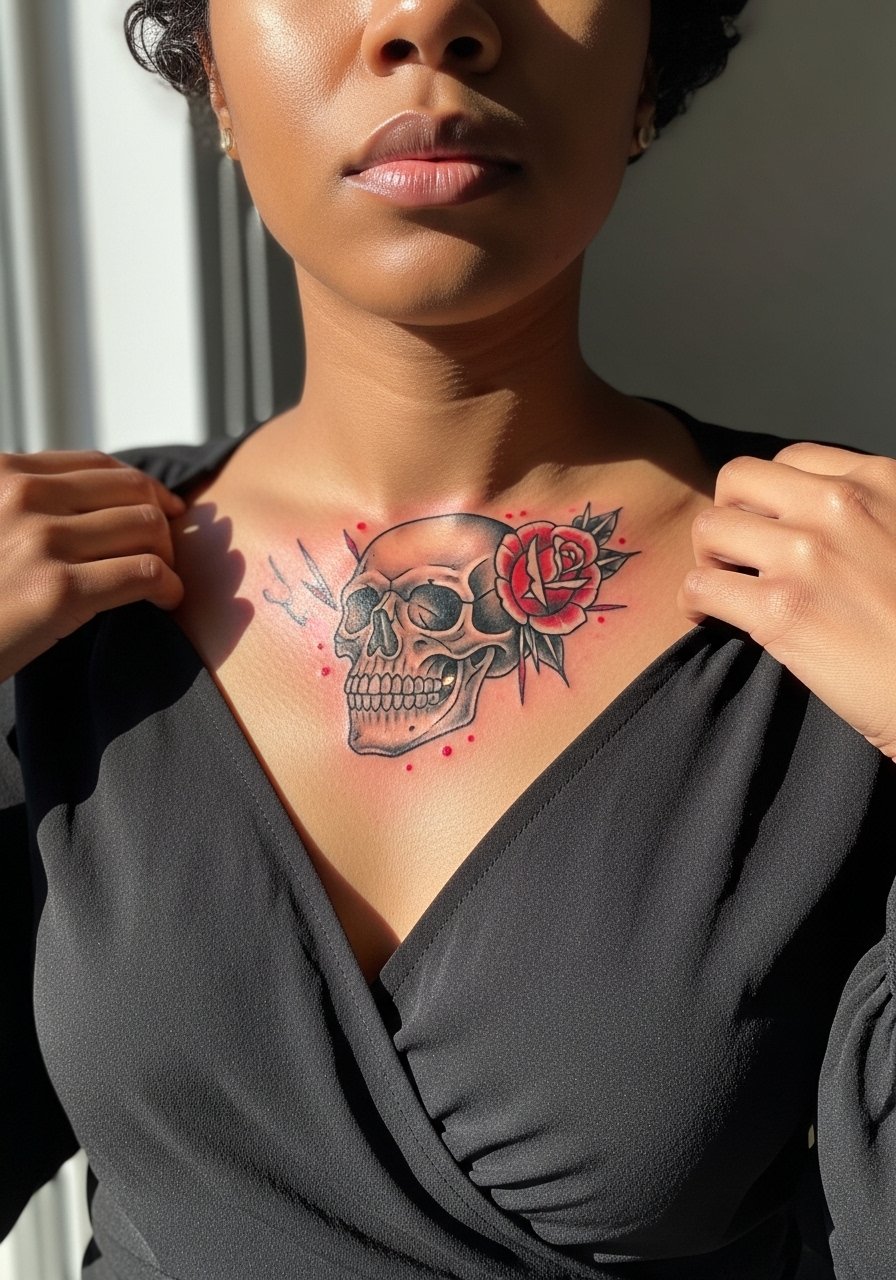
Neo-traditional color accents need saturation planning so reds do not fade into undertones on darker skin. Ask the artist to increase color keys and place reds in broader swaths rather than tiny petals. Sessions take longer with color layering and may need a follow-up for saturation. For evening looks, a wrap front blouse and hoop earrings echo the design curves.
25. Micro-Realism Skull with Subtle Shadowing

This is about tiny tonal shifts, so insist on portfolio examples of micro-realism on collarbones and on similar skin tones. Expect several short sessions and a tight touch-up window. The main mistake is underestimating how much contrast micro realism needs to survive everyday sun. For low-key outfits, a scoop neck tshirt keeps attention on the tonal work.
26. Ornamental Skull with Mandala Halo for Symmetry
This halo effect helps pull attention upward from the bone and creates a necklace-like visual without metal. Sessions demand clean fine-line work and a steady stencil check. A frequent error is compressing mandala petals, which leads to blurring between points. Symmetry checks in the consult are non-negotiable. For nights out, a black tube dress showcases the halo like jewelry.
27. Bold Collarbone Skull That Peeks from V-Neck Tees
If you want an attention-grabber that still holds, build it with heavy outlines and selective negative space. The session is straight forward and usually single-visit for a mid-sized skull. A mistake I see is requesting a thin-lined peek that will disappear in a year. For everyday wear pair it with a v neck cotton tee so the skull peeks the way you intend.
Frequently Asked Questions
Q: Which skull styles hold up best on darker skin tones around the collarbone?
A: From what I've seen, blackwork and bold traditional outlines retain contrast best on darker tones. Micro-detail and watercolor need bigger scale and stronger color keys to stay legible. Ask to see healed examples on similar skin in an artist portfolio and plan for touch-ups at year two if you want color longevity.
Q: How painful is a collarbone skull session and does numbing cream affect the result?
A: The collarbone can deliver a sharp, localized pain compared with softer tissue nearby. Numbing creams help many clients tolerate the session, but some tattooers prefer clients without them because they feel it can change how the ink sits. Name the concern in advance and follow the studio's guidance on numbing.
Q: With fine line skulls, how soon should I expect touch-ups on the collarbone?
A: It depends on line weight and sun exposure. Lighter fine line work often needs a refresh by year two to three, while slightly bolder single-line anchors can go longer. If you plan to sunbathe frequently, budget for an earlier touch-up.
Q: Should I use Saniderm or dry heal for collarbone tattoos given friction from clothing?
A: Artists and collectors split into two camps. One group favors protective film for the first few days to reduce friction, the other prefers dry healing to avoid trapped moisture. Both approaches can work if you follow sensible timing and keep clothing soft and loose. Ask the studio which method they use and why before you book.
Q: What should I wear to my collarbone session to make it easier for the artist and safer for my tattoo?
A: Wear something that gives clear access to the clavicle without tight straps across the area. A loose tank, a button-down you can slide, or a strapless bralette usually does the trick. For example, a strapless bralette makes positioning easy while keeping you comfortable.
