
Fine line finger tats look incredible in saved boards, but they do not always behave the same way on real hands. What keeps a tiny snake or moon looking crisp a year from now is line weight, placement, and how you live with your hands every day. Below are 21 baddie-ready finger ideas, practical consultation notes, and styling tips that help you pick a design that still reads clean after the honeymoon phase.
1. Fine line snake wrapping the side finger

I recommend this when you want a slinky baddie motif that still reads delicate. Tell your artist you want a slightly thicker "bold fine line" so the coils age clean instead of merging. A common mistake is asking for single-needle micro scales and expecting them to hold on a rubbing surface like the ring finger. Expect the session to be quick if the artist keeps the snake narrow. Pain sits around a four out of ten on the side of the finger. For showing it off, stack thin silver rings that sit below the design, and try a thin silver ring stack to frame the linework without crowding it.
2. Micro heart pierced by a dagger on the ring finger top

This blends cute and hard with room to scale up later if you change your mind. In consultation ask for slightly heavier contour lines around the heart so the dagger tip does not blur into a point of ink loss. The ring finger sees friction from rings and daily wear, so expect a touch-up window sooner than other placements. Sessions are short, usually under 45 minutes, but plan for a follow-up at twelve months. For night looks consider pairing the piece with a statement gem ring below it and a cropped leather jacket vibe. Try a statement gem ring when photographing the healed work.
3. Minimalist lightning bolt on the index finger side

This is for people who want an instant photographable detail that still reads on camera. Ask your artist for a slightly tapered start and a clean termination point so the bolt does not feather into a gray line as it heals. A mistake is making the bolt too skinny along the whole design. Pain is mild but the index can feel sharper near the knuckle. For session day, keep nails trimmed and show it off later with matte black polish that draws the eye to the symbol. Pair with a matte black nail polish for a pulled-together photo.
4. Geometric upward arrow wrapped on the middle finger

When you want a design with direction, an arrow that wraps a full joint gives a modern silhouette and a baddie edge. Tell your artist you want room between parallel lines so the geometry has breathing space as it settles. The biggest error is packing too many parallel elements onto a small circumference. Sessions can be longer for wraps because of repositioning. Expect more discomfort over the joint. Style it with a wide cuff or a silver cuff bracelet women higher on the wrist to balance the visual weight.
5. Tiny rose thorn outline on the pinky side

This is popular for layering with actual rings and charm bracelets. Ask for a slightly boldened outer contour so the thorn line sits clearly next to ring metal. The standard misstep is asking for filigree details that do not survive frequent hand washing. The session is quick and the pain is low, but the pinky rubs against surfaces constantly so plan on touch-ups around the one-year mark. For showing it off, layer a dainty charm bracelet on the opposite wrist so the hands balance in photos.
6. Intricate script "bad" at the thumb base

Script at the thumb base reads bold despite being small because of the location. When you consult, show examples of exact lettering and request a test transfer so the word sits naturally with the thumb flex. The debate about fine line on fingers matters here. One camp says single-needle script ages like a ghost over knuckles, and the other camp argues thicker line weight makes script last. Name both positions to your artist and ask how they approach durability. Thumb base sessions feel punchier next to the pad, so short bursts work best. Oversized hoop earrings and fishnet gloves pair well for a streetwear shot. Consider an oversize hoop earrings look when styling.
Before You Book
The first six ideas above are finger-forward and face constant friction from rings and washing, so a few studio-day items make the appointment and early healing smoother.
- Tattoo Goo Lite. A thinner balm that does not clog pores on fingers, useful when you need light hydration without a heavy crust during the first week.
- Indie Ink Balm. A vegan, low-residue option for humid climates where heavy ointments trap moisture against tight needle channels.
- Frida Wrap. Breathable protective film that peels without tugging, handy for finger pieces that get bumped during daily chores.
- Curel Tattoo Lotion. Lightweight unscented lotion to use after peeling when the skin needs moisture without grease.
- Plain unscented Vaseline. A budget option some artists prefer for very short-term occlusion on tiny areas during the first night.
7. Blackwork crescent moon on the pointer knuckle

Solid black fill holds up better on knuckles than delicate shading, so this design is a longevity winner. Tell your artist you prefer saturated black with one clean edge rather than stipple fill that softens quickly. A common aging issue is patchy saturation from thin passes. Knuckle work feels intense because the needle rides close to bone, so shorter sessions reduce swelling. For a night-out vibe pair it with a paperclip chain necklace and a dark lip liner. A paperclip chain necklace helps complete the goth-baddie aesthetic.
8. Watercolor splash lips on the ring finger face

Watercolor on fingers is eye-catching but risky for longevity. Ask your artist about concentrated pigment zones and stronger outlines that maintain shape as color fades. The failure mode is diffuse color that turns muddy within months. Sessions require careful layering and sometimes a second pass to lock in color. This style pairs well with cropped leather jackets and a statement gem ring to keep the lips as an accessory rather than the whole look. Slip on a matte black leather jacket in photos to balance the saturation.
9. Ornamental chain link band around the finger joint

Band wraps that emulate jewelry age well when the links have breathing room. In consultation request slightly thicker outer lines and minimal inner detail so the pattern does not blur into a single dark band. A mistake is over-detailing each link on too-small a circumference. Joint wraps can be fiddly in the chair due to finger movement, so expect the artist to stabilize your hand and take short breaks. Style with a wide cuff above the wrist or a wide cuff bracelet to echo the band motif.
10. Ignorant style butterfly on the side finger
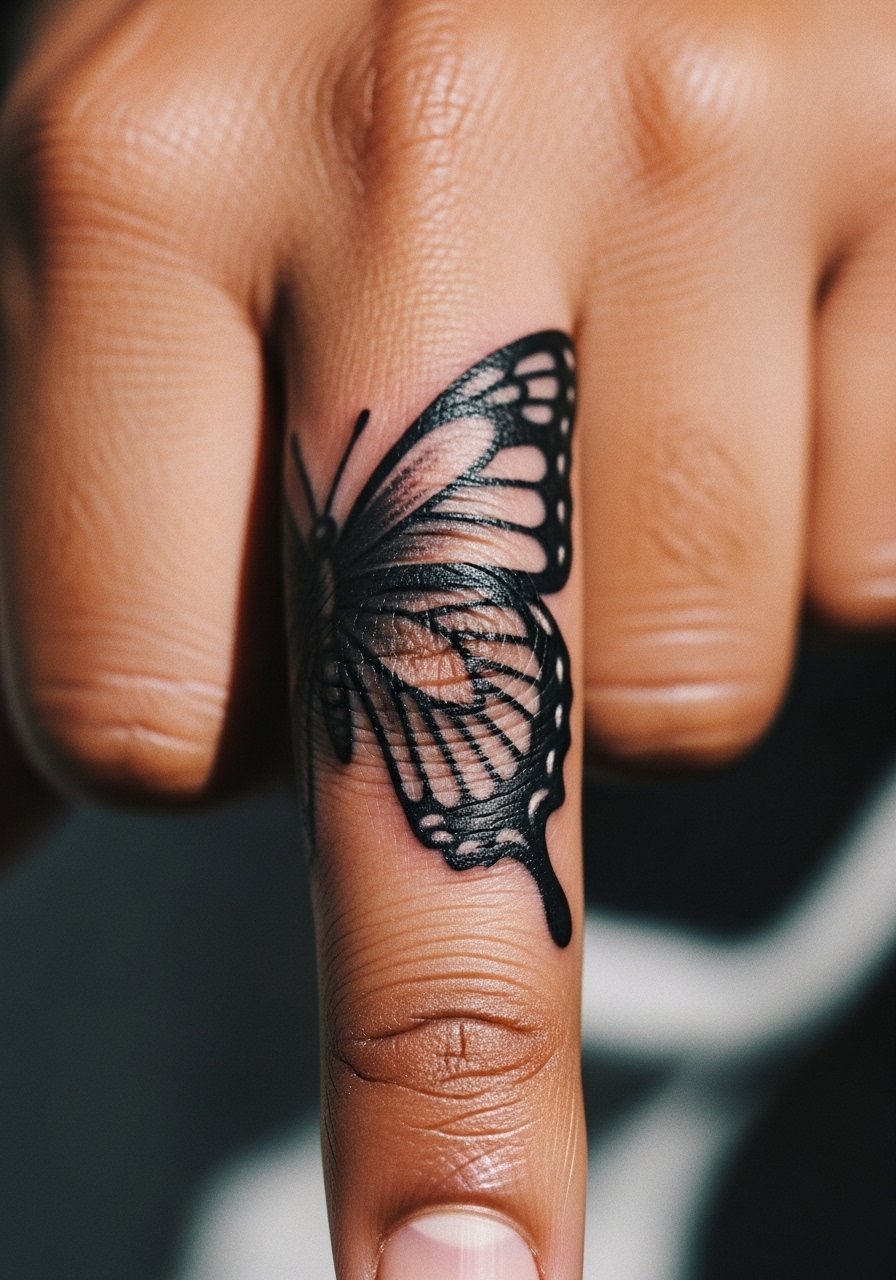
This raw, imperfect butterfly reads rebellious and rejects polished micro-realism. Tell your artist you want confident, slightly clumsy linework rather than tiny refined details. The pitfall is asking for messy lines that become unrecognizable blob after healing. Expect a short session with pronounced discomfort near the finger bone. Pair it with stacked thin rings or a dainty arrow ring so the butterfly sits within a layered hand look. Try a dainty arrow ring to finish the styling.
11. Neo-traditional venom drop on the thumb pad

Thumb pad pieces read large because the pad is wider than the phalange, so neo-traditional styling suits the surface. Ask your artist for contrast between bold outlines and soft gray fills to preserve silhouette. A common mistake is packing too much tiny detail into a small pad; that detail disappears quickly. The session may sting near the pad, but short bursts keep it manageable. For photo styling, oversized hoops and fingerless fishnet gloves create a high-contrast streetwear look. An fishnet gloves fingerless piece makes an edgy prop without covering the tattoo.
12. Dotwork star cluster across knuckles
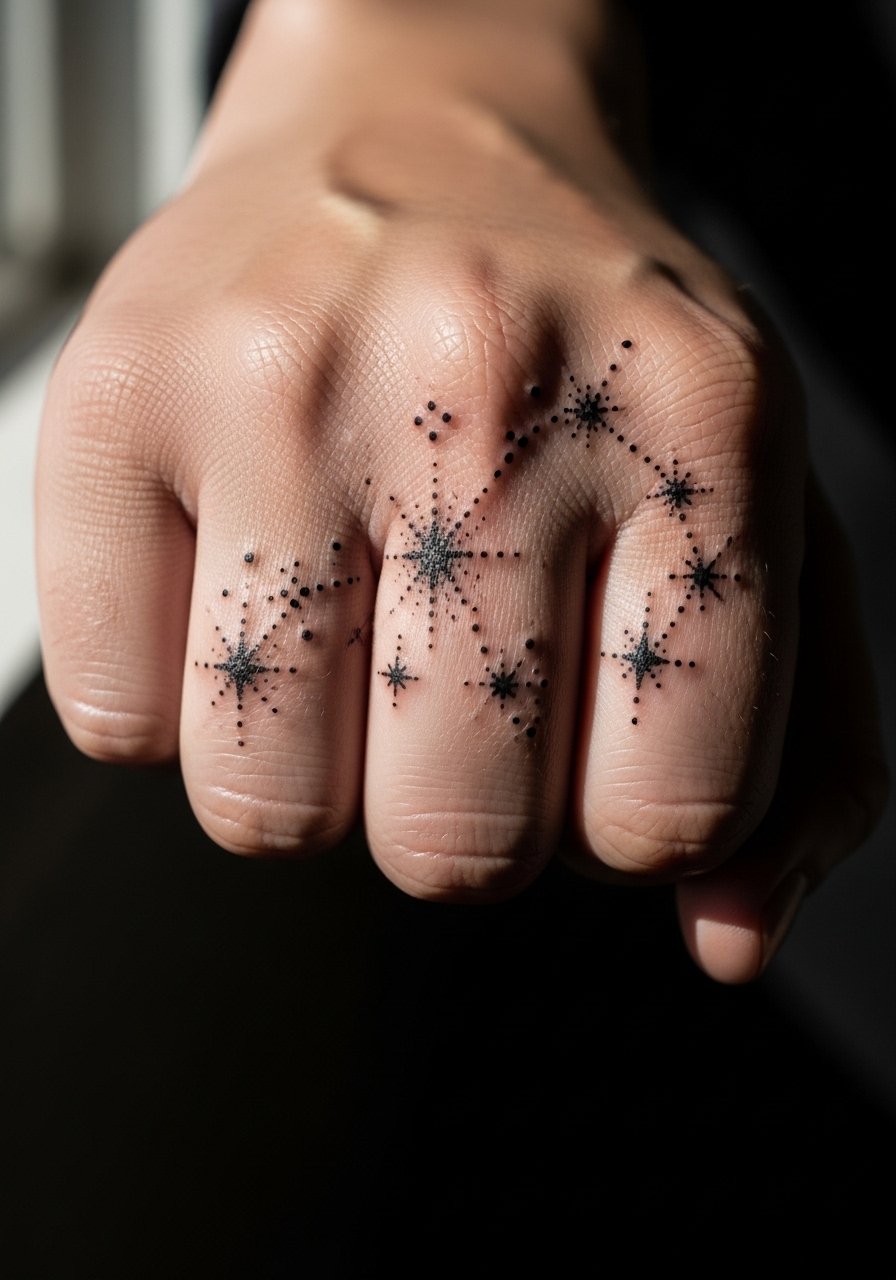
Dotwork plays well across knuckles when each star has spacing to prevent merging. Ask for distinct dot sizes and a few anchor stars rather than dense stippling that will fill in with time. The common failure is a crowded pattern that looks like a gray wash after a year. Knuckle placements hurt more than flat finger sides and they will need touch-up scheduling per finger. For layered styling let these knuckles peek out under short-sleeve shirts and match with a paperclip chain necklace to pull the look together.
13. Micro gem "jewel tat" cluster on the finger face

Jewel tats give a Y2K micro-glam vibe that films well in nightlife settings. Request crisp white highlights and slightly heavier outline dots so the gems do not soften into blotches. The mistake is relying on tiny white ink alone for pop, which fades faster than black anchors. Sessions are precise and can take extra time to layer tiny highlights. This pairs with a single statement gem ring or a cropped leather jacket for photos. A statement gem ring keeps the theme consistent.
14. Morse code dots and dashes along the finger side
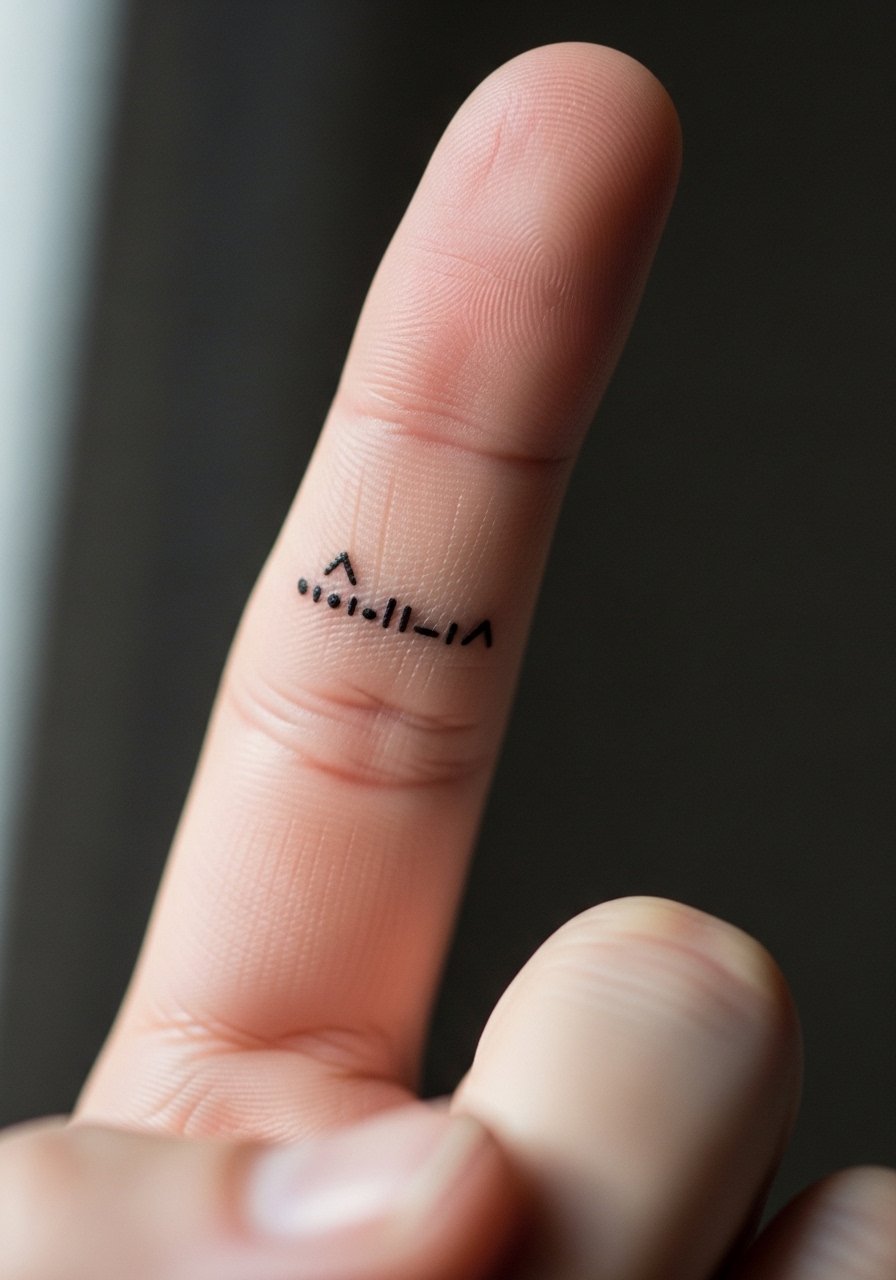
Morse code is a discrete way to carry a phrase without obvious script. Tell the artist to space dots and dashes generously so the pattern reads even as small lines thicken over time. A mistake is compressing the code to fit a visual idea rather than readable spacing. The session feels quick and tolerable. For session day wear, keep sleeves loose and nails short. On-show styling, minimal rings or a dainty arrow ring prevent visual clutter.
15. Multi-finger "spell" set where each finger completes a sigil

This set plays well if you want a narrative that reads only when fingers are aligned. Discuss the negative space between symbols in your consult so lines do not run together with touch. A common error is making each component too ornate for the small canvas. Sessions are staged one finger at a time to allow healing control. This series works with fingerless mesh gloves for photos and summer tank tops. Try a fingerless mesh gloves prop when showing the set.
16. Hidden symbol on the finger webbing

Webbing placements are intimate reveals and they age differently than visible finger faces. Ask your artist about how the skin stretches when you make a fist so the symbol does not warp. The mistake is treating webbing like flat skin. Expect extra healing attention as friction from adjacent fingers can rub the area. For photos, fingerless gloves and spread-hand selfies highlight the reveal. A cropped tank top keeps the vibe casual when you want to show the hidden detail.
17. Dark-skin optimized dot cluster that mimics henna

On darker tones, dot clusters and slightly bolder dots read clearer than ultra-fine lines. Tell your artist you prefer contrast over whisper-thin strokes so the pattern holds. The common problem is copying a fine-line template that vanishes into a faint blur. Sessions are relatively short. For showcasing, pair the work with layered charm bracelets or heeled boots for hand-on-hip photos. A dainty charm bracelet complements the henna-like effect.
18. Negative space band that leaves the skin as the pattern

Negative space bands age differently because the black fill can spread inward if lines are too thin. In consult ask for a comfortable black margin width that keeps the cutout crisp over time. The error is tiny negative slivers that collapse visually when the black spreads. Sessions can be longer because of shading passes. Style with a single wide cuff or keep hands in ripped denim pockets for casual photos. A ripped skinny jeans look frames the wrist and band without stealing focus.
19. Mini dagger along the finger bone

Dagger motifs read tough and pair easily with rings. Ask for a reinforced outline and minimal internal detail so the blade silhouette remains clear as lines soften. The classic mistake is too much micro shading on such a narrow surface. Expect short, sharp sensations as the needle runs near bone. For session comfort wear a loose tank top and bring a steady grip. After it's healed, pair the dagger with an oversize hoop earrings look when styling streetwear photos.
20. Constellation wrap from knuckle to cuticle

A wrap with negative space constellations reads delicate but needs breathing room between points. Tell the artist to place larger anchor stars with smaller filler dots so the pattern survives friction. Crowding the dots is the main reason these blur into a gray line. Sessions can be split if you want alternate density. Pair the piece with rolled-up sleeves or a thin chain pendant for balance. A thin chain pendant necklace keeps the neck area simple while the hands do the talking.
21. UV-reactive micro accent for nightlife glow

UV ink allows an invisible-by-day accent that pops under club lights. Discuss safety and longevity with your artist because not all studios work with UV inks and opinions vary. One camp loves the novelty and nighttime payoff, and the other camp warns about unpredictable fading and limited artist experience. If you choose this, combine a black anchor outline with the UV element to help the motif keep its form. Sessions are precise and can require a follow-up to adjust glow placement. For show-off shots, use chain necklaces and dark lip liner to carry the nightlife theme.
Frequently Asked Questions
Q: How long should I expect a finger tattoo to last before needing a touch-up?
A: Expect finger pieces to need touch-ups sooner than other placements. From what I have seen, fine-line work often needs attention within a year or two, while thicker blackwork stretches the window closer to two to three years. Plan an annual check-in so small fixes do not become big reworks.
Q: Are finger tattoos more painful than other spots and can numbing help?
A: Fingers are higher on the pain scale because the skin sits close to bone. Short sessions and topical numbing can take the edge off, especially for pad or knuckle work. Ask your artist about their numbing protocol during the consult so you both manage comfort without compromising linework.
Q: How do I find an artist who actually nails tiny finger work?
A: Look at portfolios filtered for hand and finger work on platforms like Booksy and Tattoodo and browse hashtags such as #FingerTattoo and #FineLineFingers on social channels. Guest-spot calendars and convention lineups are also where artists with tight micro work sometimes take bookings. Spend time checking healed photos and client comments on recent posts.
Q: Can fine line finger tattoos work on darker skin tones?
A: They can, but the approach changes. On darker tones thicker lines and higher contrast dot work often hold better than whisper-thin single-needle details. Bring references showing healed tattoos on similar skin tones and ask the artist how they adapt line weight and saturation.
Q: Is Saniderm or dry healing better for fingers?
A: The community is split. One group favors Saniderm for fingers because it keeps the area clean and reduces surface friction. The other group prefers dry healing, saying occlusion traps moisture and promotes irritation on such small, mobile zones. Discuss both methods with your artist and pick the one they have the best track record with for finger work.
Q: What should I wear to the studio for a finger tattoo appointment?
A: Keep the hand free and the rest of your outfit comfortable so you can stay still. A loose button-down shirt that you can slide up or a tank top is ideal when you have multiple placements in a session. Try a loose button-down shirt so the artist has clear access and you stay comfortable during breaks.
