
Bold traditional ink reads differently on skin over time. The saturated blacks and thick outlines that define classic mom and dad pieces tend to hold shape where fine detail does not, and knowing that distinction before you book keeps the design readable for years. These 27 takes mix old-school banners and family motifs with unexpected placements and wardrobe tips so you can picture how each will age and how to show it off.
1. Classic Heart with Mom and Dad Banner on Outer Forearm
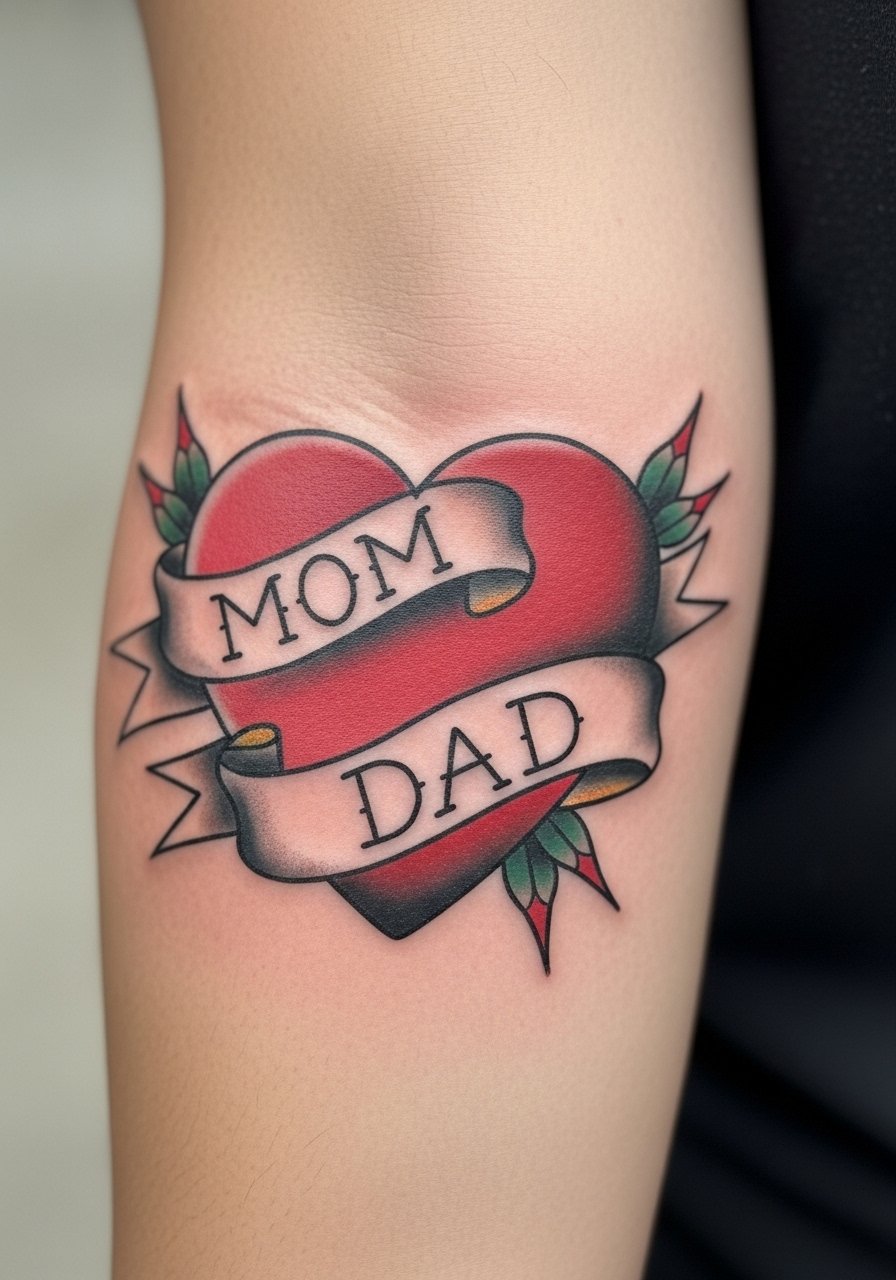
I've seen this version on forearms for a decade and it still reads legible because the artist kept the letters slightly larger and the banner bold. Tell your artist you want stronger linework around the lettering and slightly wider spacing between letters so the names do not merge as the piece ages. Pain on the outer forearm is moderate and sessions for a small heart run about an hour. Common mistakes include shrinking the script to fit a busy heart, which invites touch-ups by year three. For showing it off, roll sleeves and wear a loose button-down shirt that you can push up for casual display.
2. Anchored Banner on Upper Arm with Bold Color
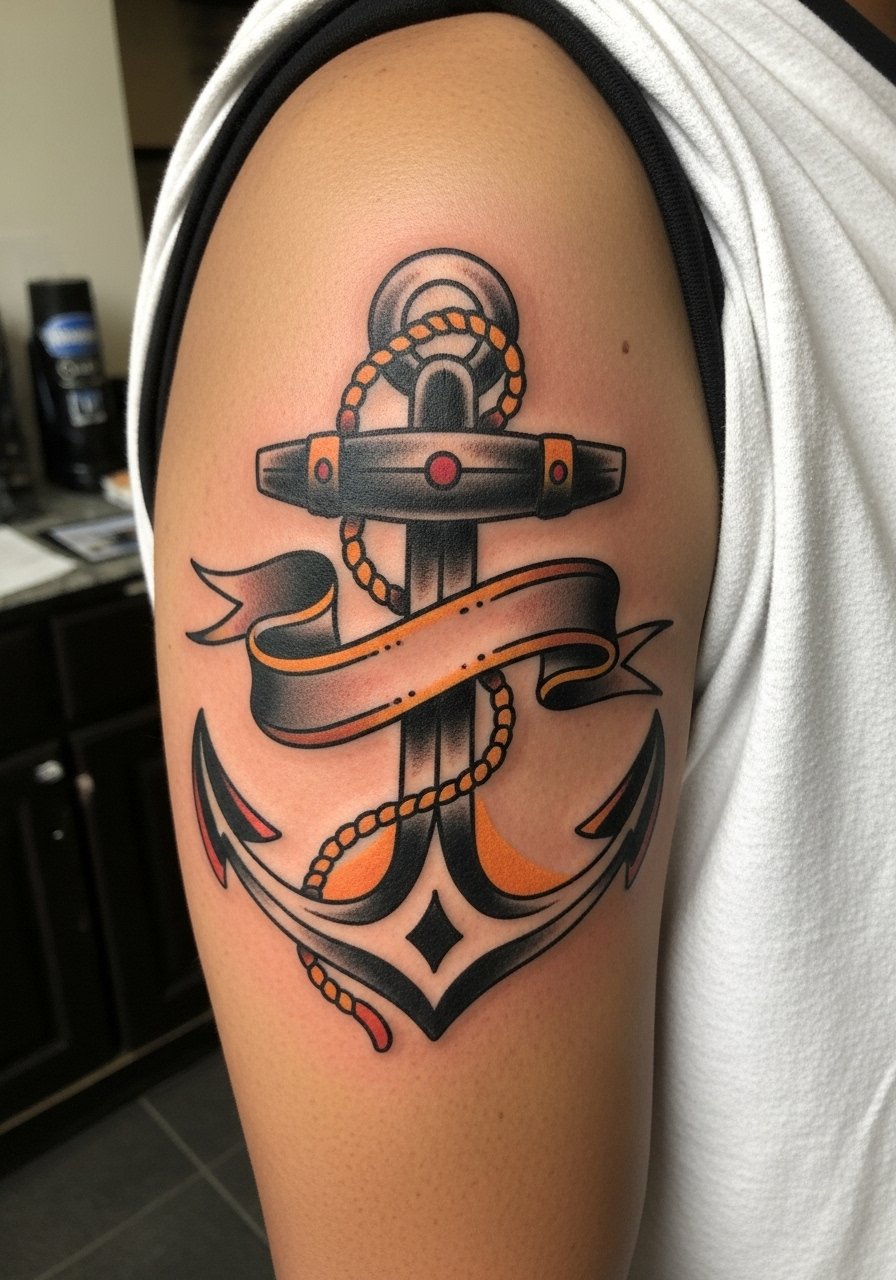
Personal observation: upper-arm anchors age well because the skin is stable and the muscle underneath cushions the needle. Ask the artist for saturated fills and a solid black outline around the anchor to protect against softening. Expect a mid-level pain and a one- to two-hour session for a medium-sized piece. A frequent error is going too many tiny details inside the banner, which blur faster than clean shapes. Pair this with a rolled linen shirt with sleeves you can cuff for warm-weather show-off looks.
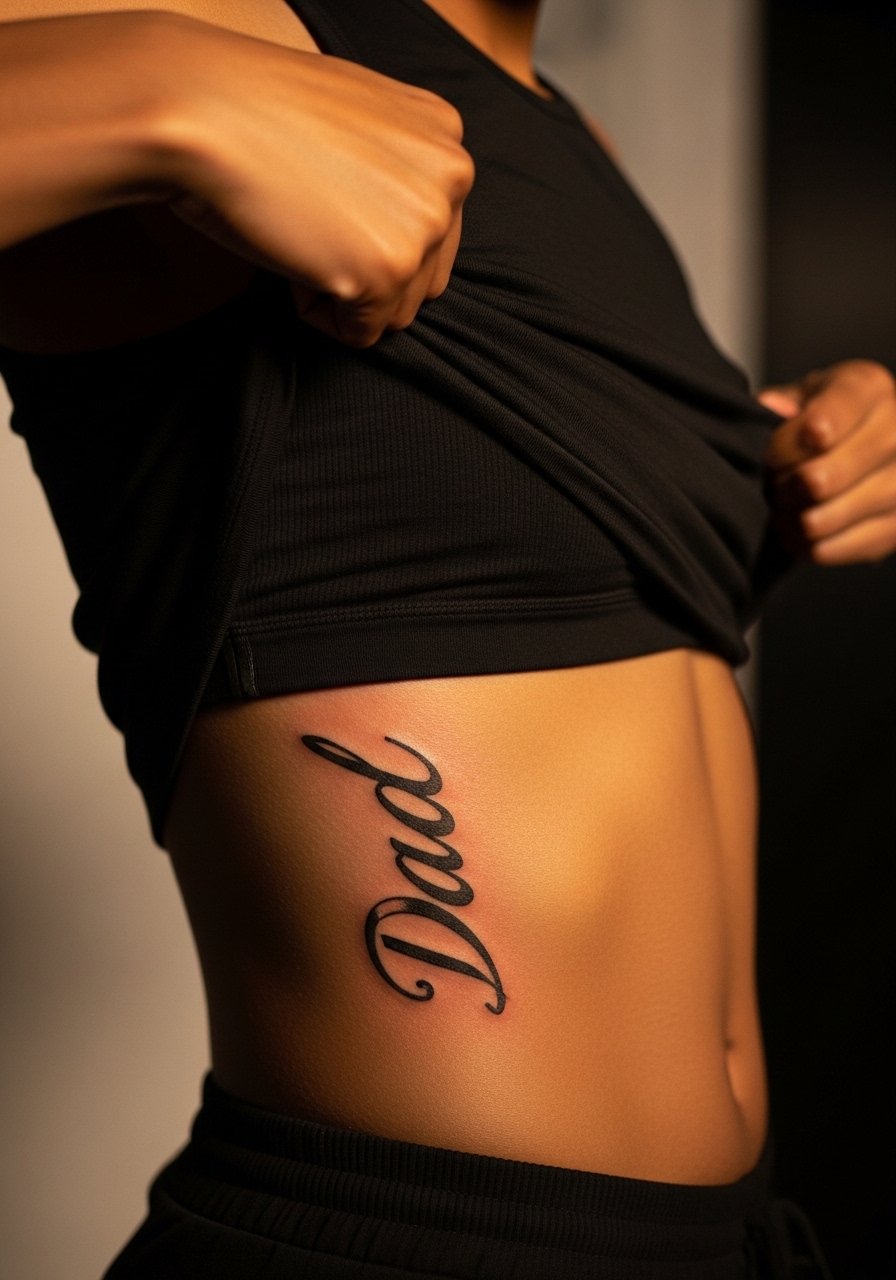
3. Traditional Rose with Small Dad Script on the Sternum
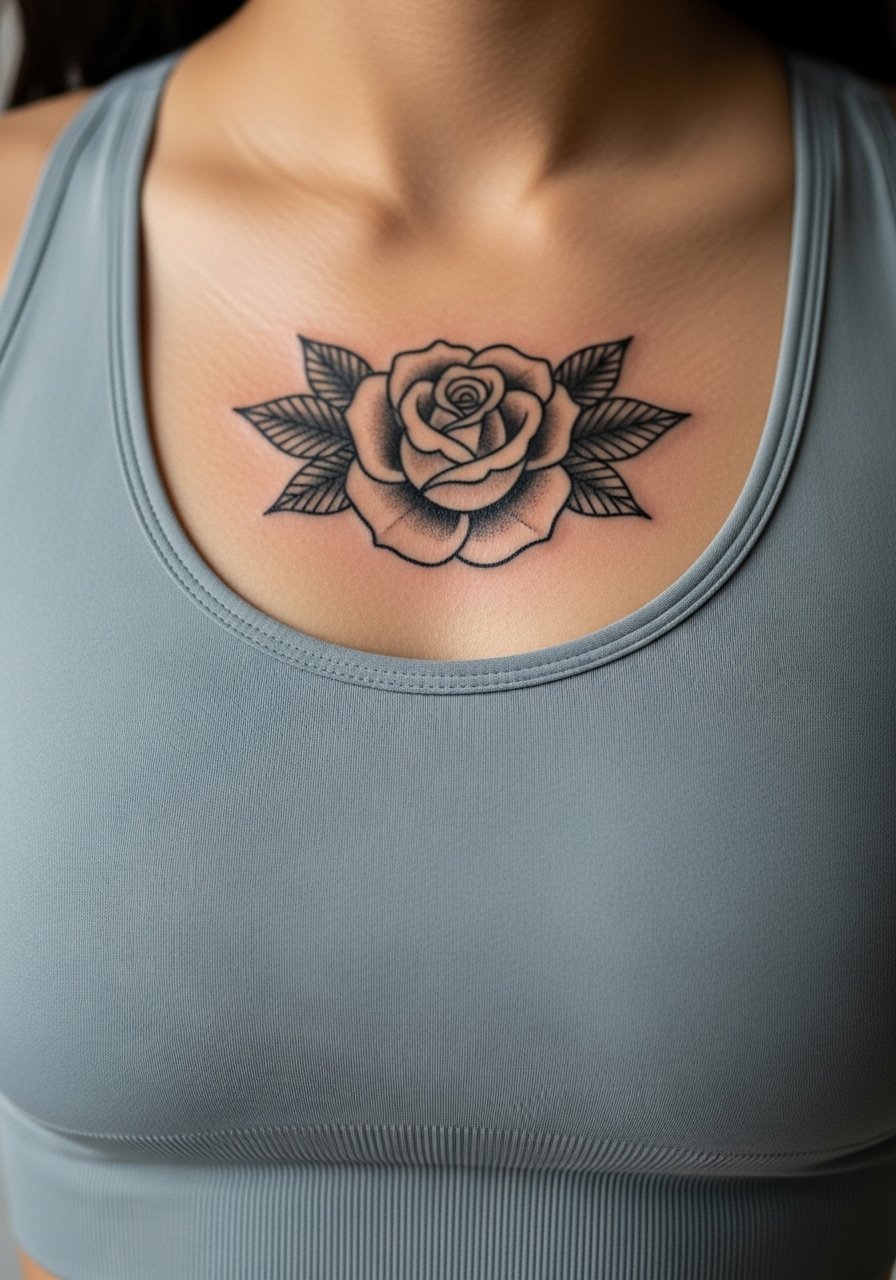
Fair warning: sternum work is higher on the pain scale, and the tissue there can be sensitive. This rose works best when scaled to sit above the fabric line of a sports bra so it breathes visually. During the consult, ask your artist to keep petals open and avoid tiny veins in the design, because dense detail in sternum pieces tends to merge as skin stretches. Session time usually falls in the two- to three-hour range for a chest-centered rose. For wardrobe, a fitted sports bra or wide-neck top during the session keeps access easy and photos flattering.
4. Swallow Pair Flanking Collarbone
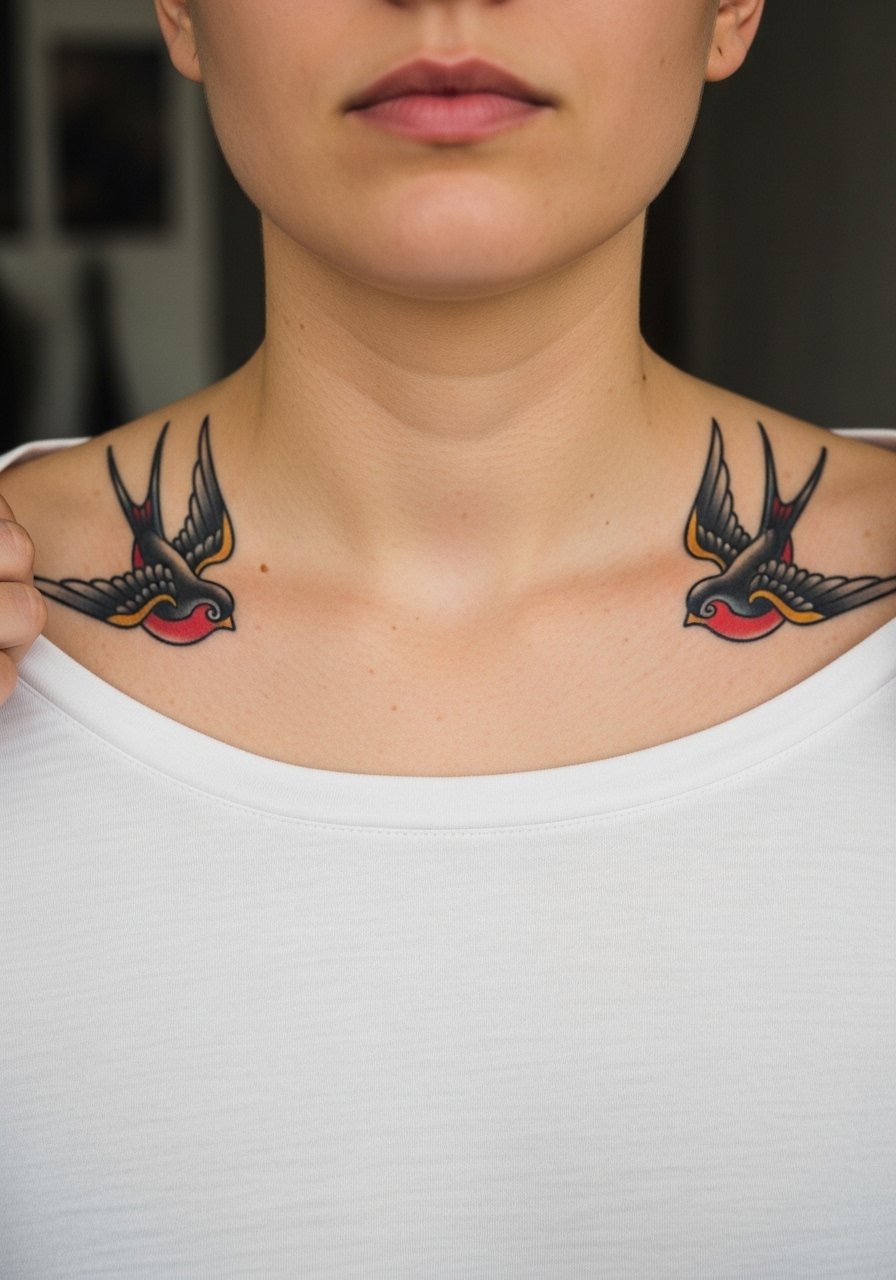
Visual impact lead: swallows read as movement across the collarbone when placed symmetrically. Tell your artist you want the wings to angle with the bone, not straight across, so the flow looks natural when you move. Collarbone pieces can be tetchy for pain because the bone is close to the needle, so expect short but sharp sessions. A common mistake is putting too much dot shading into the wing tips, which fades into blotch. For nights out, an open-back midi dress frames collarbone work without competing.
5. Traditional Script Names on Ribcage
Consultation lead: when you meet your artist for a ribcage name, show references of the script scale you want. Smaller script here blurs faster because the ribcage skin moves a lot when breathing. Many artists divide into two camps on fine line ribs. One camp says fine script loses clarity within two years because of stretch. The other camp says with correct depth and spacing it holds up fine. Ask where the artist stands before booking. Pain is high and sessions often broken into two short passes. For the session, wear a cropped athletic top you can lift so the artist has clear access.
6. Anchor and Compass Combo on Calf
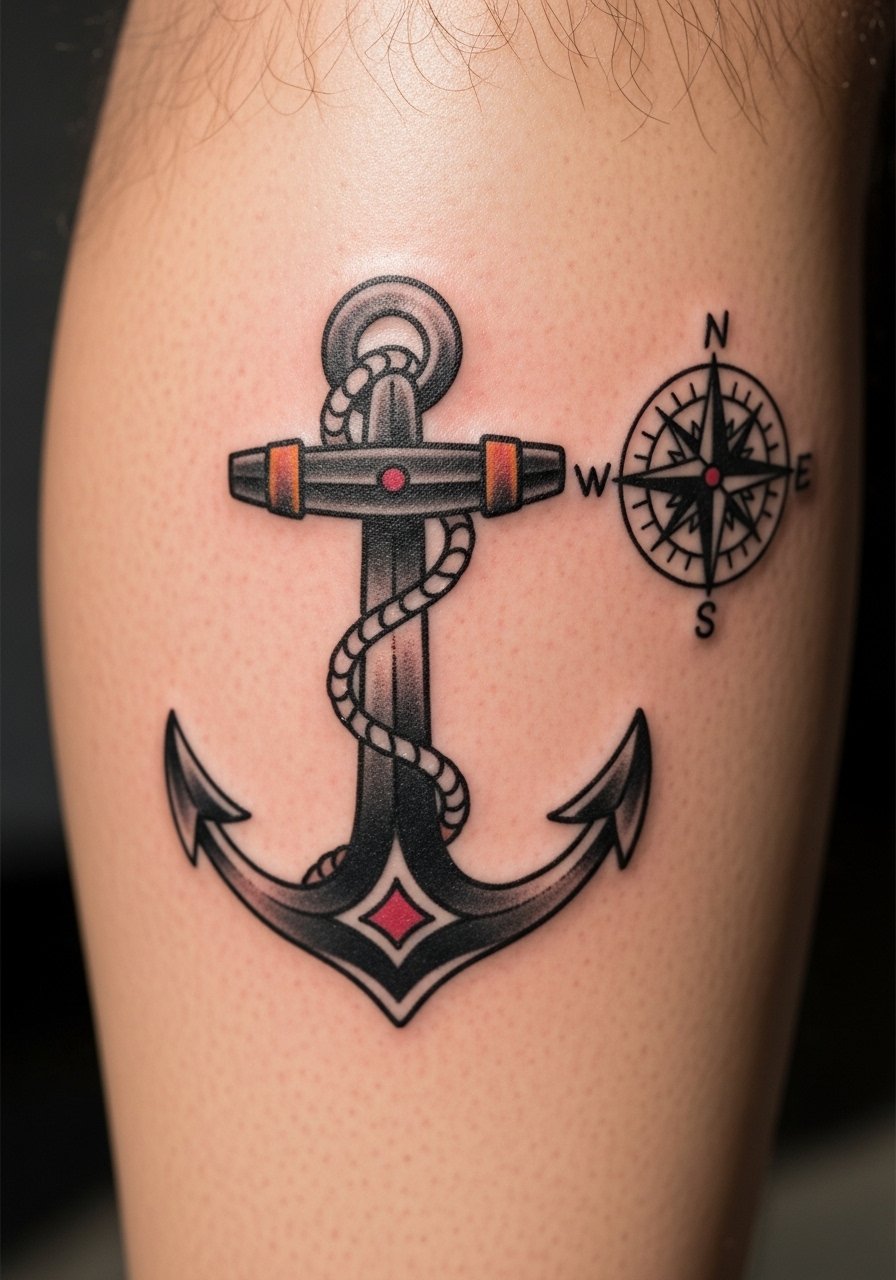
Visual impact: calf placement shows the full motif and stands up to saturated color because of thicker skin and less friction. Tell your artist you want the compass face simplified so the lines inside are bolder and easier to touch up if needed. The session feels like a steady vibration with moderate pain and usually wraps in one two-hour slot. People often forget friction from socks and shoes when planning calf pieces, which can rub the design during healing. For footwear, a pair of low-cut sandals keeps the area visible and reduces rubbing while healed.
Pre-Session Essentials
The forearm and ribcage pieces above have different prep needs, and these five things smooth the session and the first week of healing.
-
Stencil transfer paper kit. Lets you preview how the banner and script will sit on curved areas like the sternum and ribcage before the needle touches skin.
-
Topical numbing cream. Apply per instructions about 45 minutes before especially for calf and rib sessions that run longer.
-
Thin protective film roll. Useful for small wrist and finger pieces to shield against friction in the first few days.
-
Fragrance-free gentle body wash. Cleanses healing areas without stripping the ink or irritating delicate linework.
-
Aquaphor healing ointment. A thin layer during the initial healing window keeps surfaces moist without clogging the channels that need to settle.
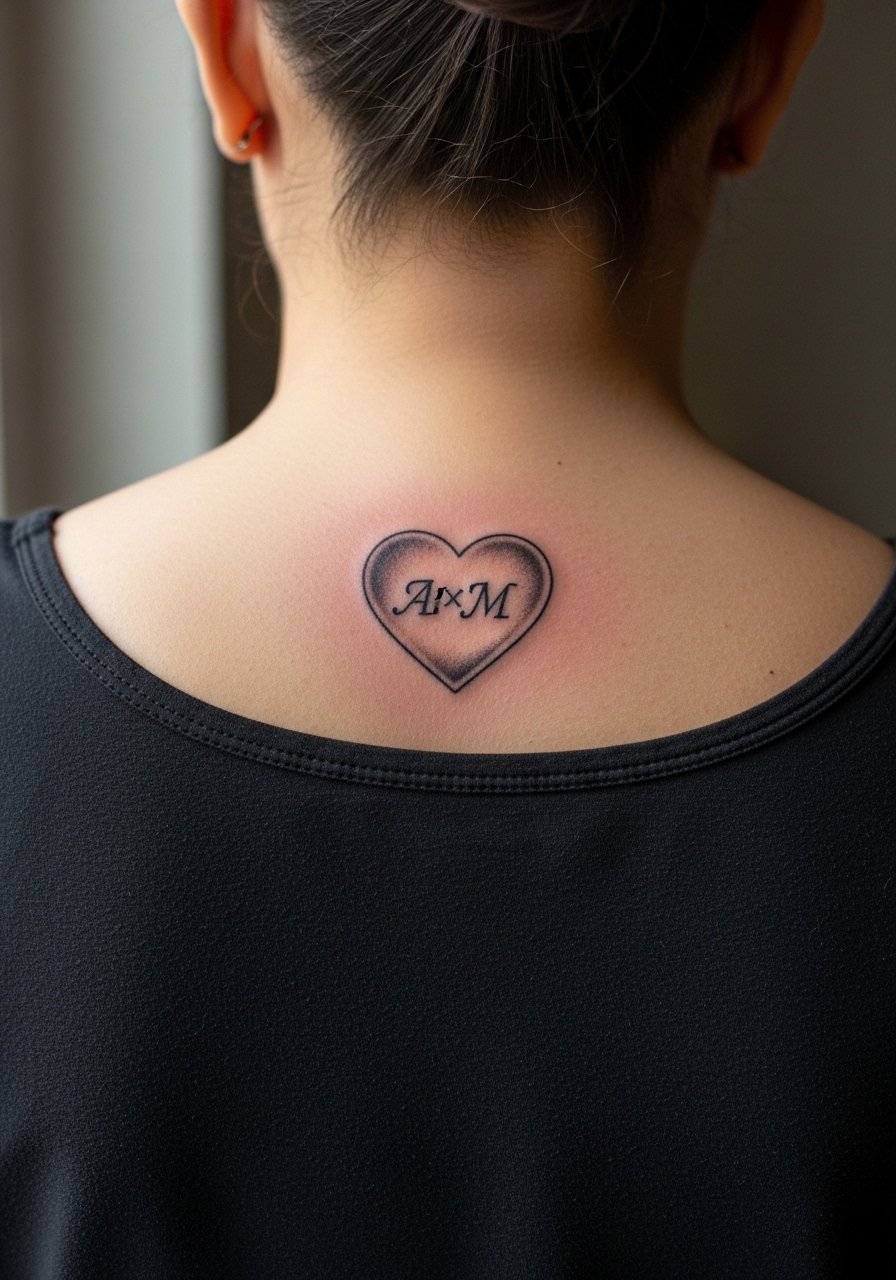
7. Tiny "Mom" Script Behind the Ear
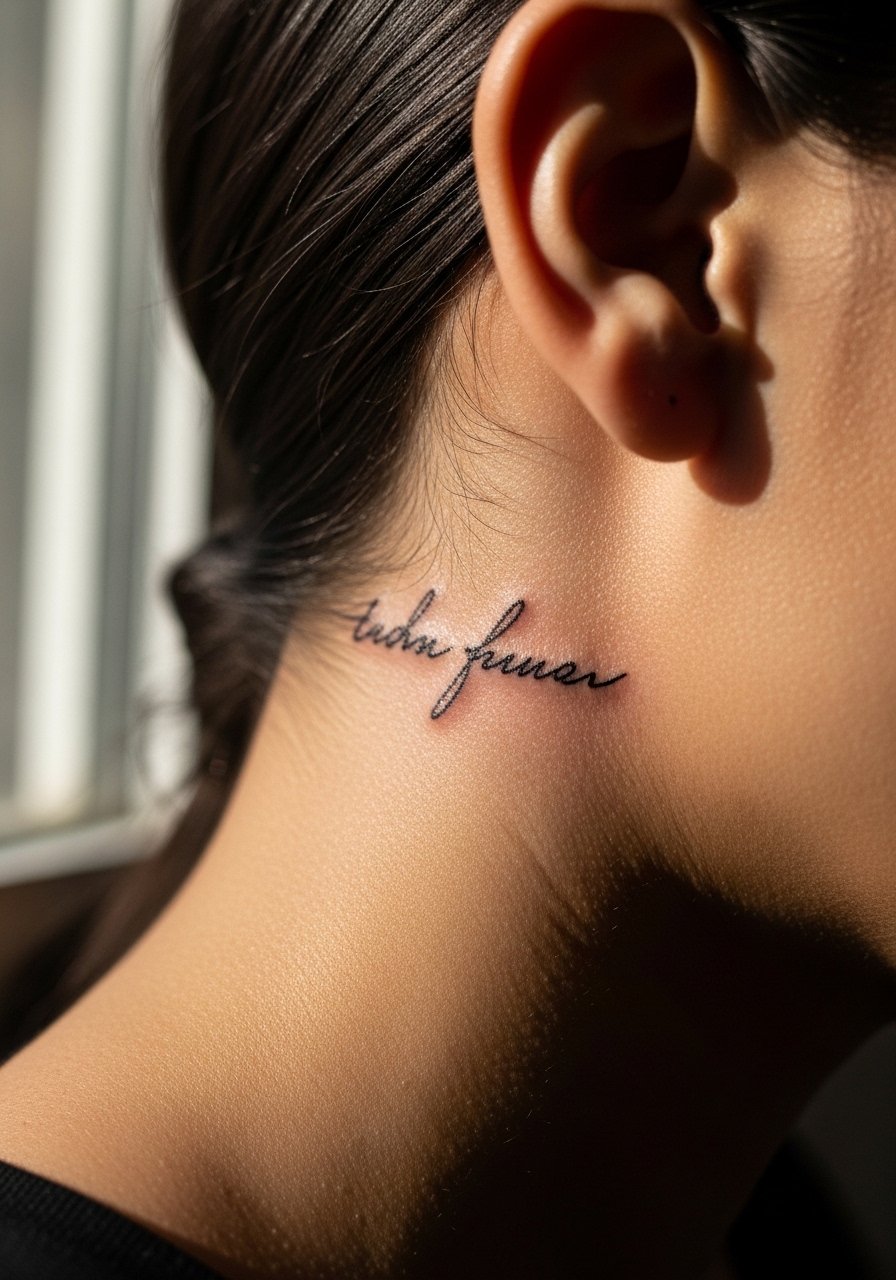
Personal observation: behind-the-ear script reads intimate and subtle because it mostly shows when hair is pulled back. Always specify exact text and size because the area is small and letters that are too thin vanish as they heal. Pain is low to moderate but tricky because of the curvature. A common mistake is choosing ornate lettering for a tiny canvas. For session wear, tie your hair up and bring a wide-neck shirt so the artist can access the spot cleanly. This placement can affect job considerations in some industries, so think through visibility.
8. Traditional Swallow Over Heart
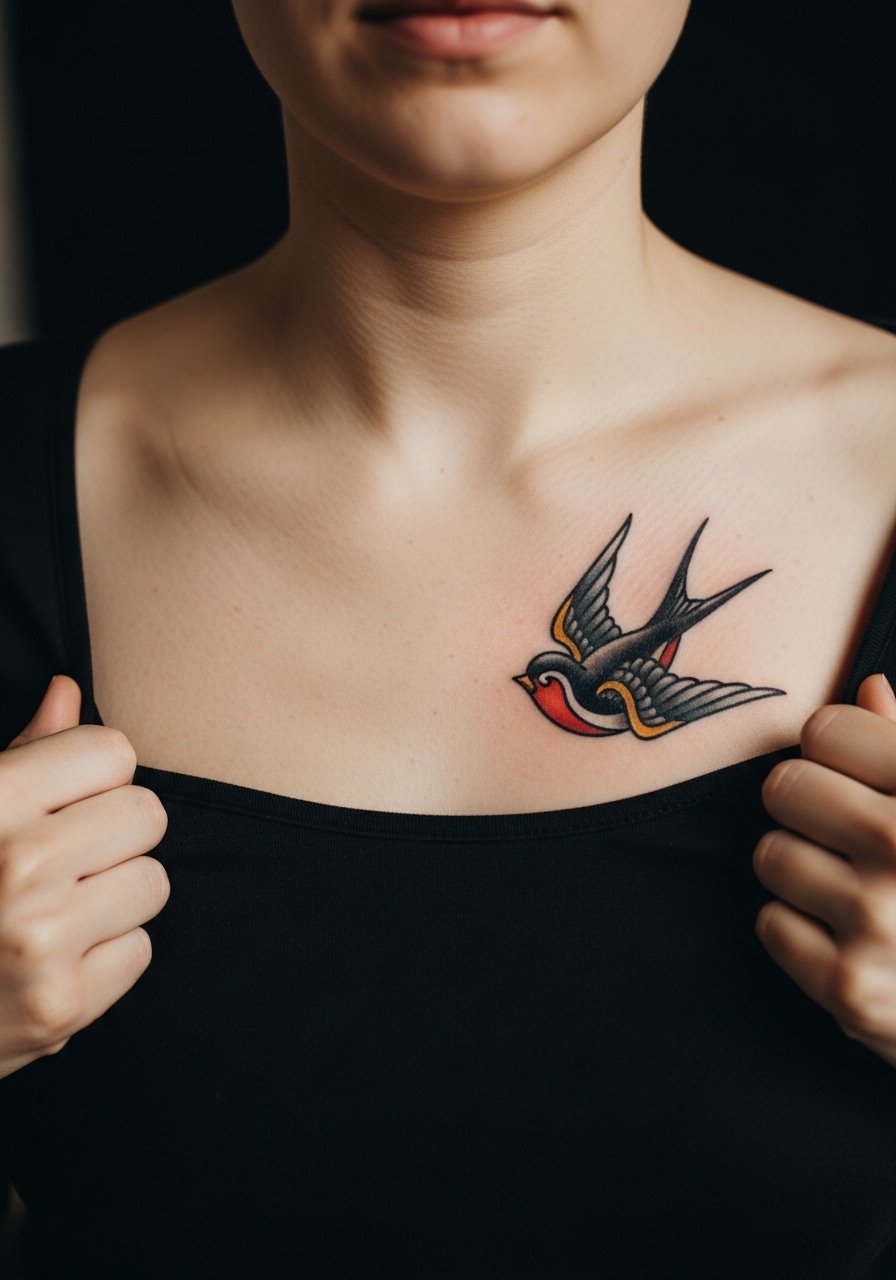
Aging lead: chest placements with bold outlines age predictably when the artist uses solid black and avoids tiny cross-hatching. Tell your artist to favor saturated fills for the swallow wings and to keep small internal details minimal. Pain can spike near the sternum and over the heart, so short breaks make sessions easier. The biggest mistake is over-detailing the wing interiors, which softens into muddiness. For evenings out, a thin chain pendant necklace sits above the swallow without crowding the image.
9. Classic Anchor on the Wrist
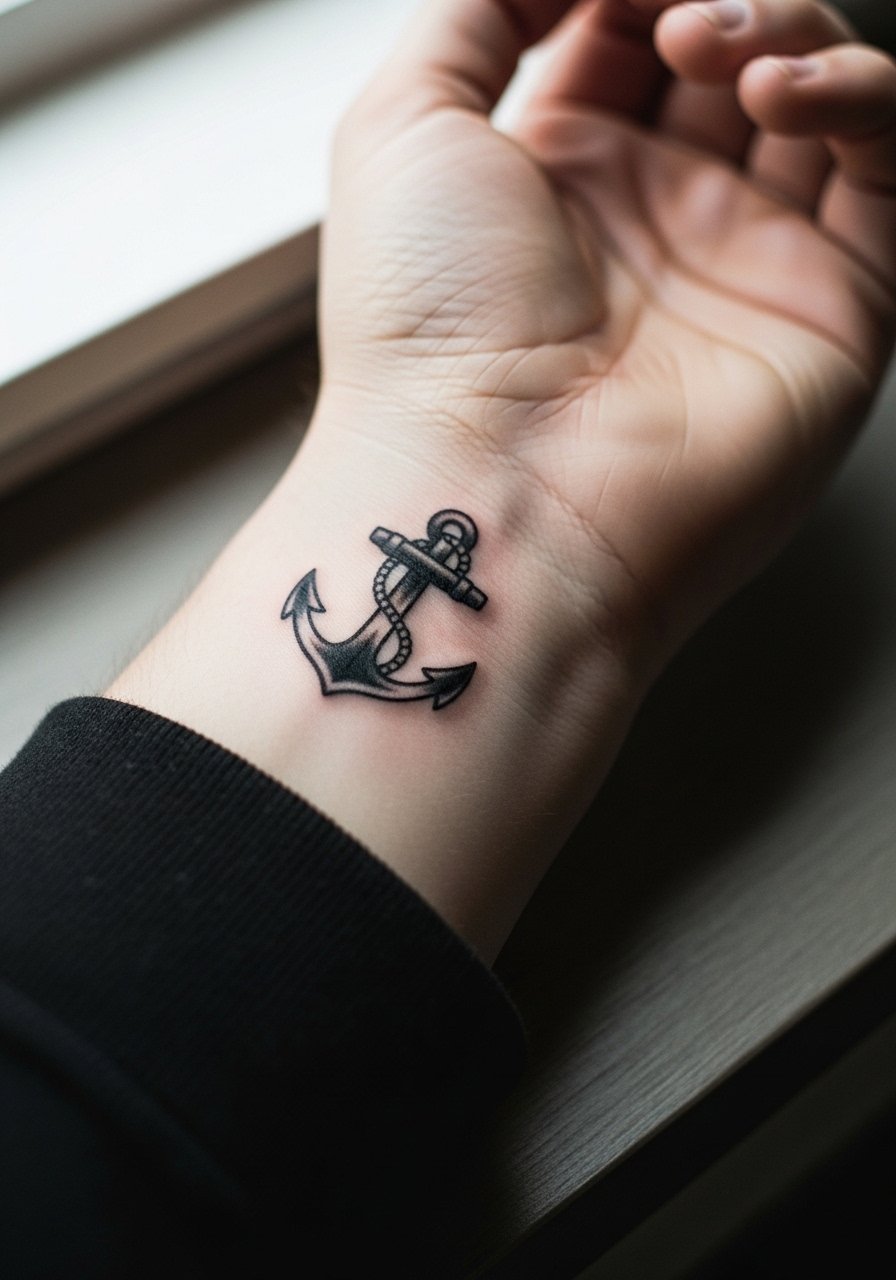
Mistake lead: the inner wrist is unforgiving for tiny anchors because skin movement blurs fine detail. Ask your artist to thicken the anchor's main lines and to avoid microtext inside the design. Pain is localized and sharp but usually brief for small wrists. Expect a touch-up around year two for tighter pieces. Pairing works well with simple accessories, so consider a minimalist watch that leaves the anchor visible without constant rubbing.
10. Old-School Portrait Heart for Parents on Upper Back
Consultation lead: upper back gives space for a slightly larger portrait heart that will age better than a similarly detailed chest piece. During the consult, show full-size references and specify letter spacing and contrast levels so features stay readable. Pain is low because of thicker skin, and sessions might be longer but manageable. A common error is packing too much micro detail into the heart face, which gets lost. For session ease, a loose tank top keeps your shoulder blades accessible.
11. Sailor Dog with Dad Script on Thigh
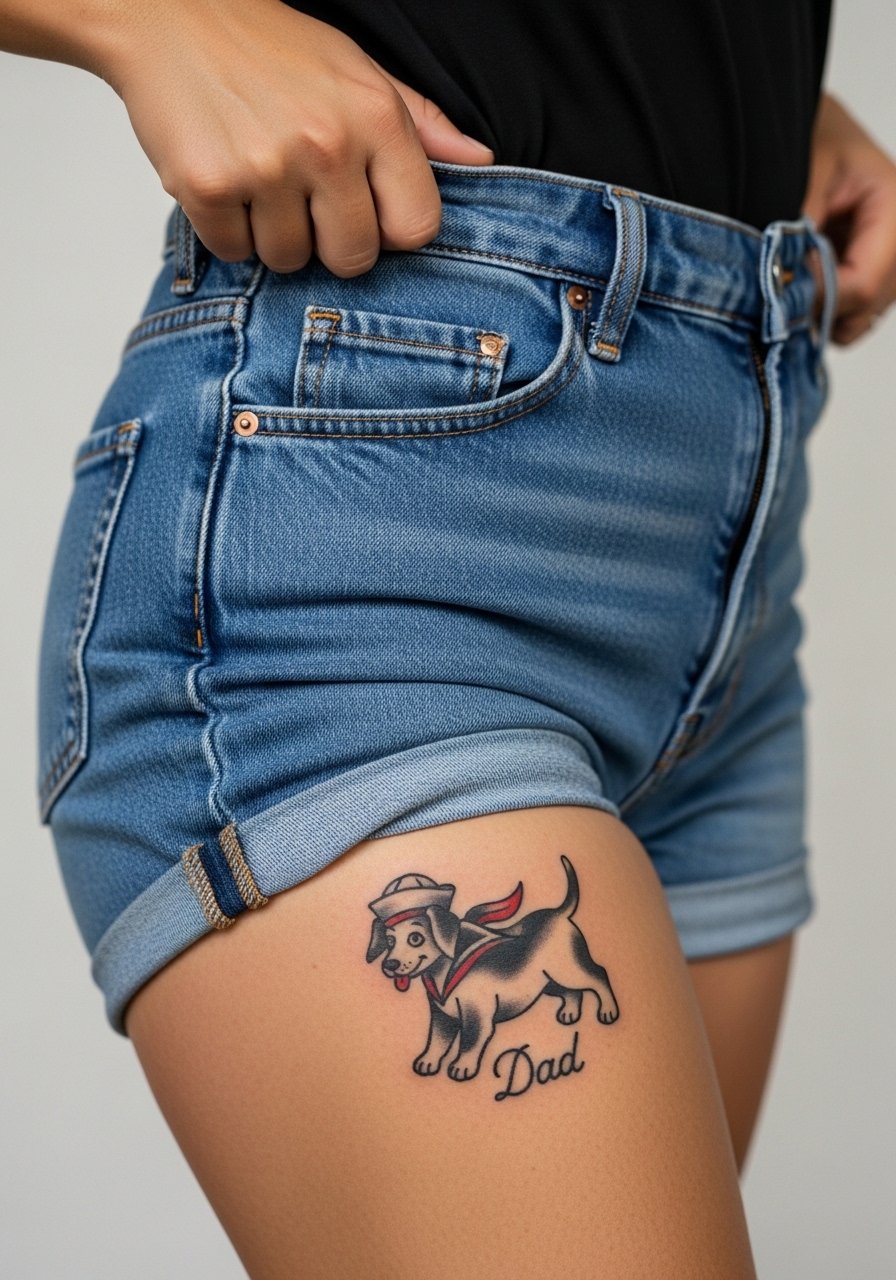
Visual impact lead: thigh placement lets you keep bold silhouette and large color blocks so the dog reads from distance. Tell the artist you want heavier outlines and open color fields inside the body for longevity. The thigh is lower pain than ribs and heals behind clothing, so choose healing garments carefully. People sometimes underestimate chafing from tight denim collars during the first week. For show-off outfits after healing, a high-waisted denim skirt highlights the piece without excess friction.
12. Tiny Matching Mom and Dad Anchors on Fingers

Mistake lead: fingers are notorious for fading and blowout because the skin is thin and frequently washed. Be prepared for more regular touch-ups and discuss placement with your artist to avoid joints and creases. Sessions are short but often need repeat passes. One practical tip is to keep the anchors slightly larger than you think you need. For styling, thin stacked rings sit well next to small anchors, so consider selecting a stackable ring set that complements without covering the ink.
13. Old-School Rose on the Hand
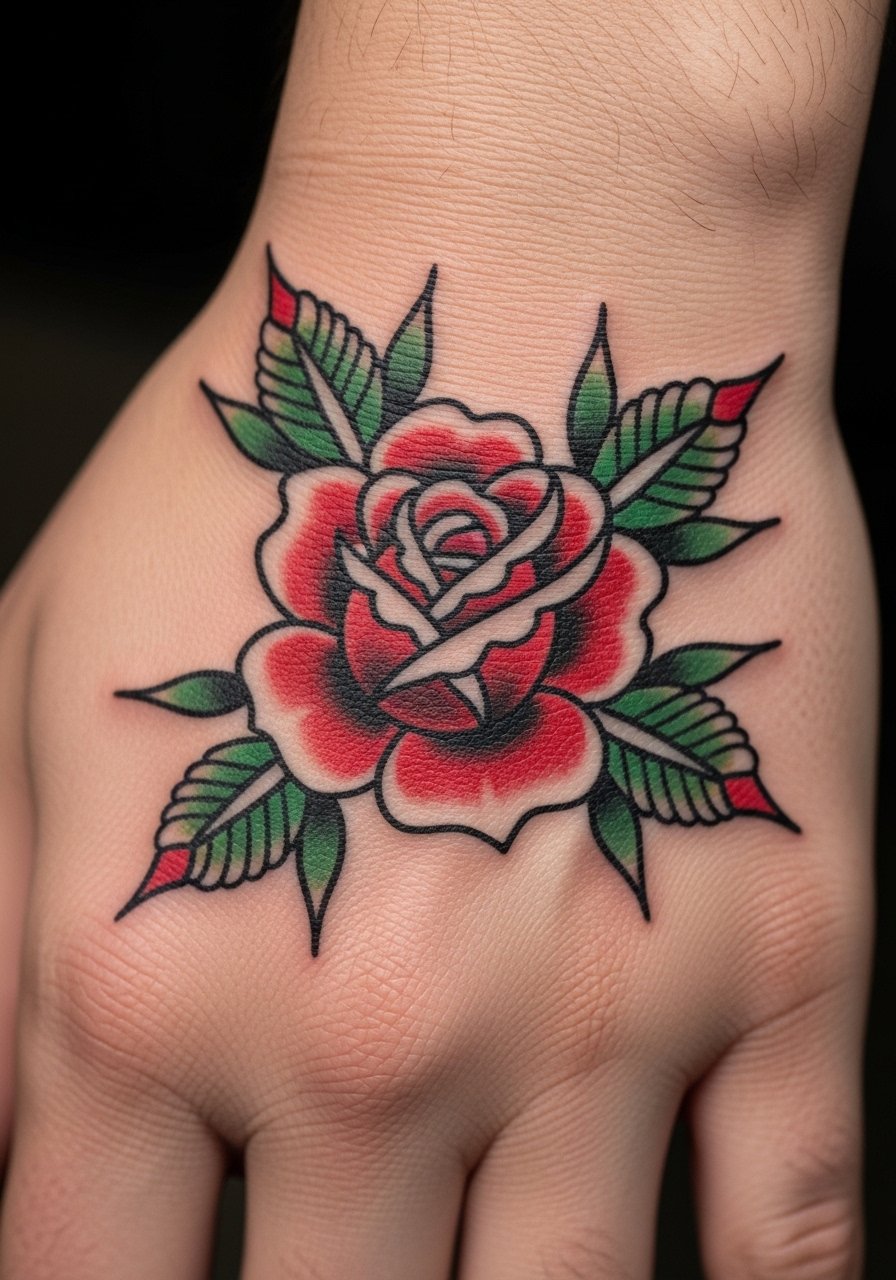
Controversy lead: hand tattoos split opinions. One camp says hands will never hold fine detail because of constant friction and sun exposure. The other camp says bold traditional pieces with big outlines can last if you accept periodic refreshes. This rose follows the latter approach with broad petals and solid blacks. Expect regular touch-ups, and be realistic about work policies in some industries. Wearable styling like a lightweight glove for cold weather keeps the area covered without hiding it permanently.
14. Dad's Anchor with Rope Wrapped Around Forearm
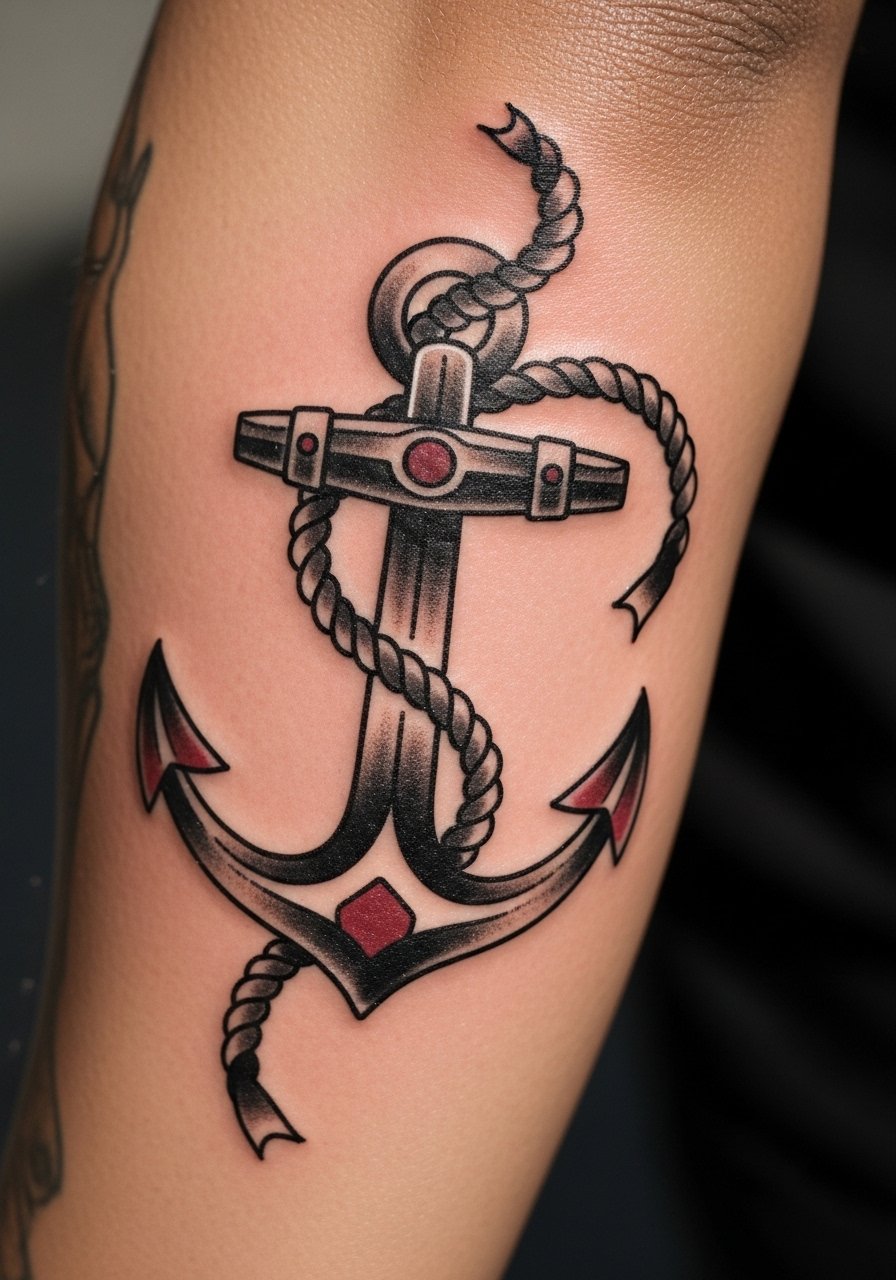
Personal observation: rope wrapping that follows the muscle curves reads better than a flat spiral because it moves with the arm. Tell your artist to map the rope path with a stencil while you flex so the flow feels natural. Forearm pain is moderate and sessions take one to two hours depending on scale. A typical error is tight rope shading that fills in and softens over time. Show it off with rolled sleeves and a short-sleeve linen shirt you can cuff without hiding the wrap.
15. Scripted Dates in a Banner on the Rib Side
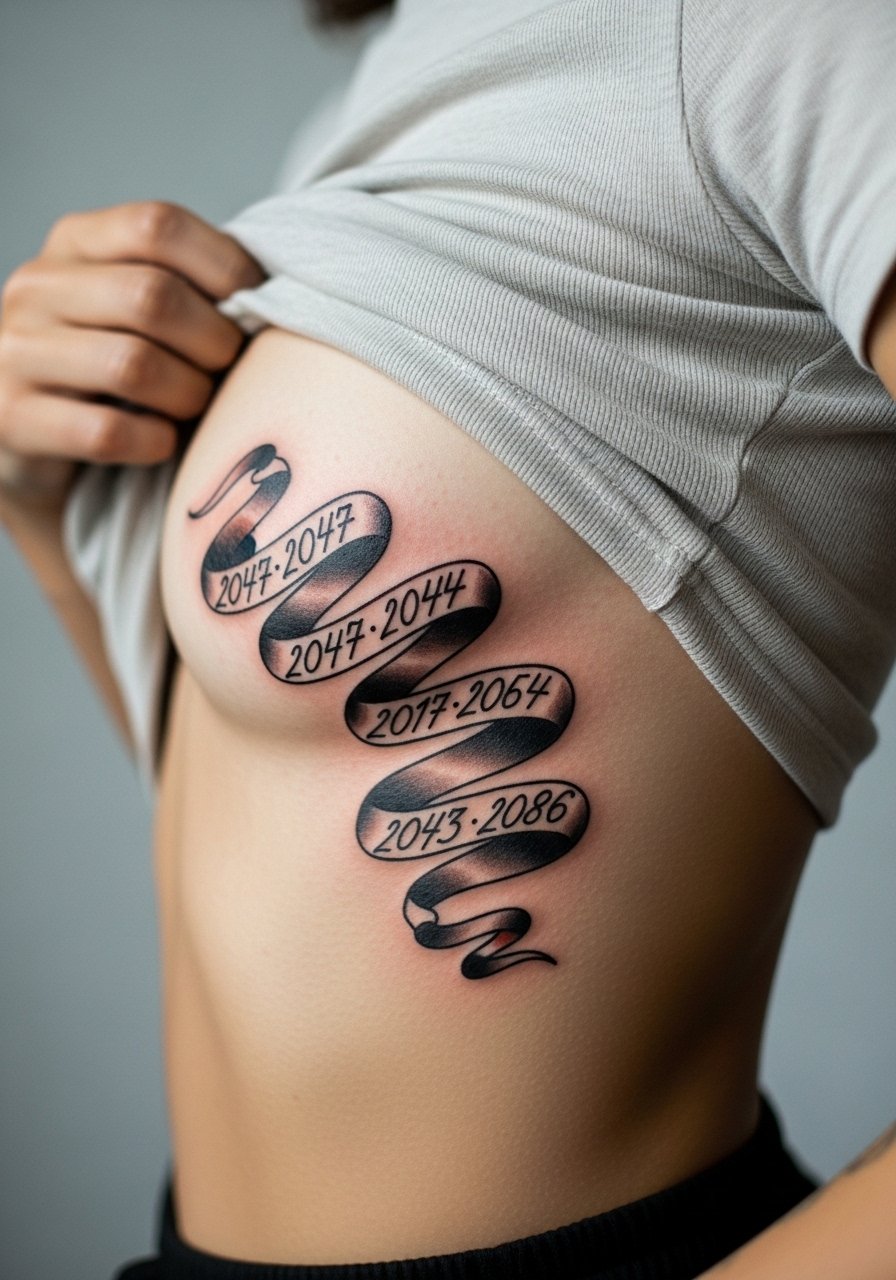
Mistake lead: dates and tiny numerals on the ribs need breathing room. Ask your artist to use slightly bolder numerals and to space digits a bit wider so they remain legible as the piece settles. Rib sessions are high on the pain scale and often done in short intervals. Expect a touch-up window at year two if you keep them fine. For the session, a zip-up hoodie is practical because you can lift or remove it without tossing a shirt in the sterile area.
16. Traditional Lighthouse with "Mom" Script on Calf Wrap
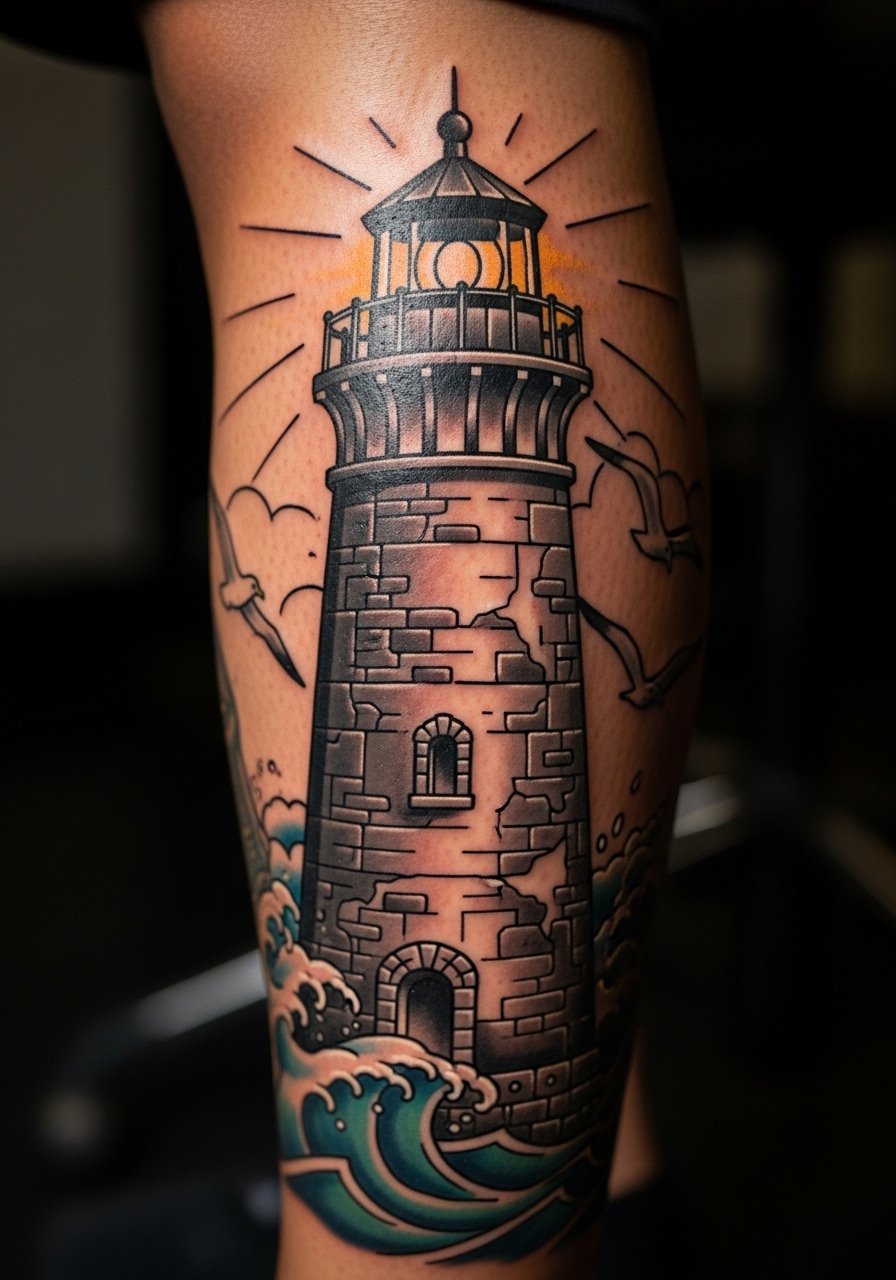
Visual impact lead: wrap placements use negative space to keep designs legible from multiple angles. Ask for simplified interior details and for the light rays to be broad strokes rather than fine lines. The calf tolerates saturation well and sessions are moderate in discomfort. A common mistake is packing too many tiny windows and bricks into the tower, which muddies on healing. For casual show-off, a pair of canvas sneakers keeps the calf visible without friction from boots.
17. Traditional Swallow and Banner on the Neck Side
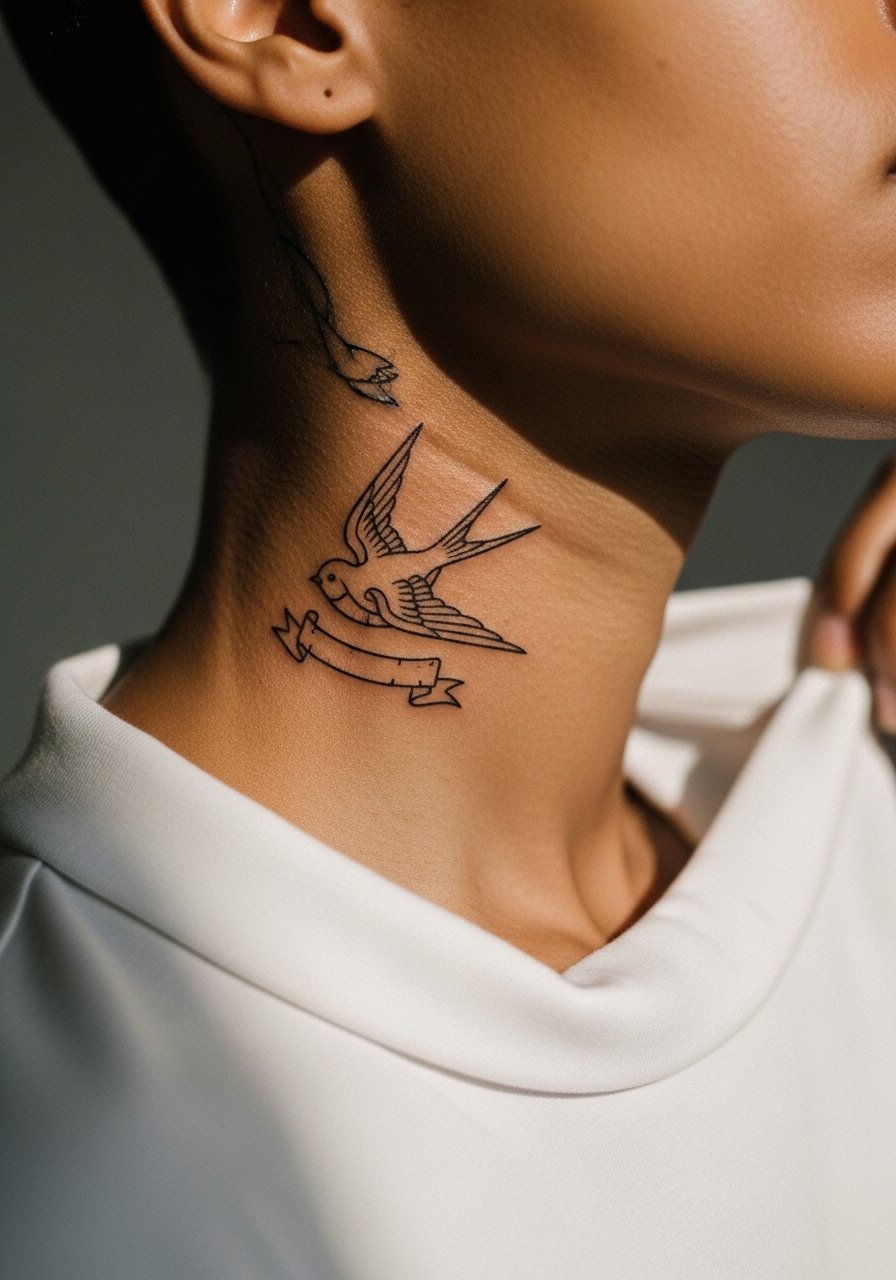
Pain warning lead: neck placements are visible and can be sensitive because of the thin skin. When you discuss this, ask about line weight and how the artist approaches shading near the jawline. One mistake is using overly intricate shading near the hairline that clumps as hair rubs the area. Sessions are short but require careful aftercare. Consider wardrobe that frames the neck without constant abrasion, like a wide-neck sweater.
18. Traditional Ship Wheel on the Palm Side Wrist
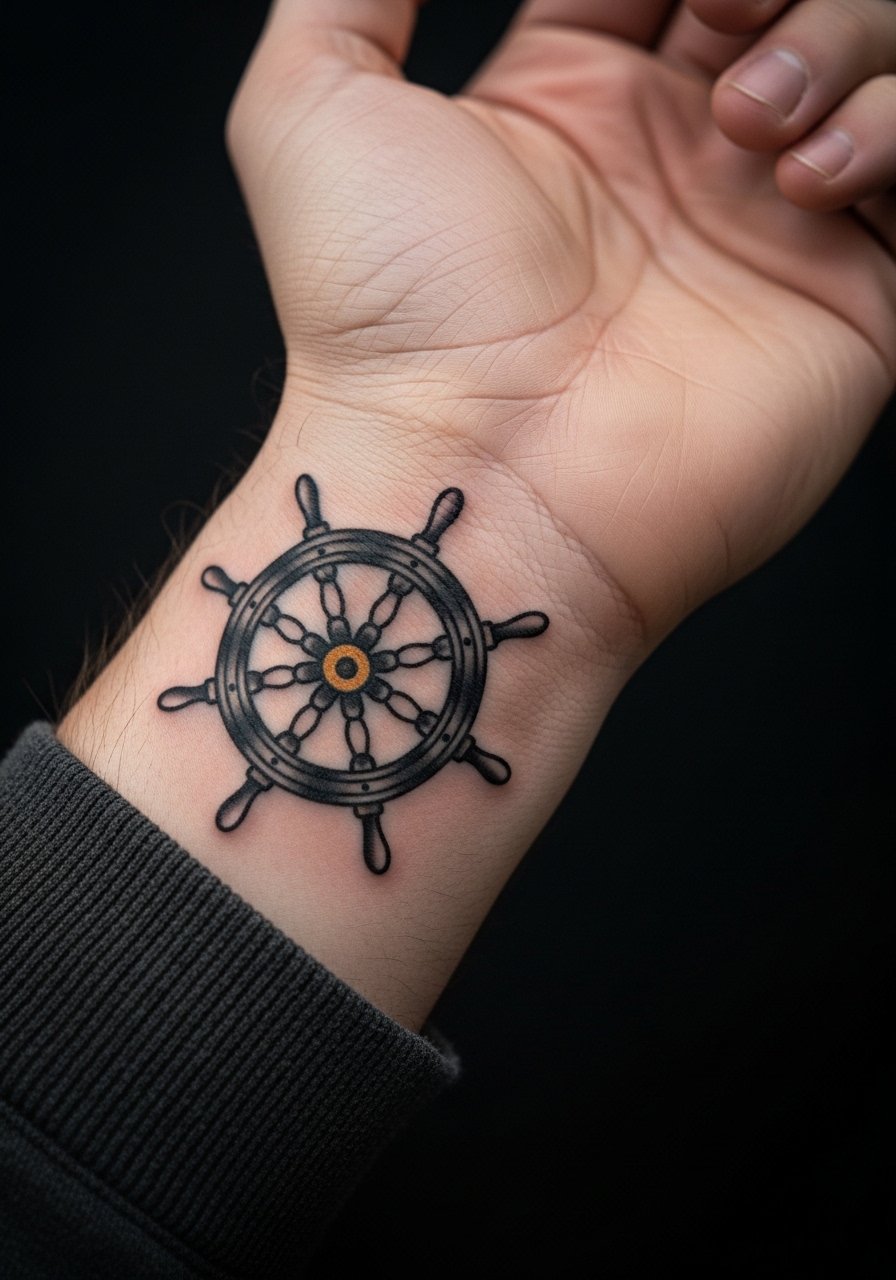
Aging lead: inner wrist designs that extend to the palm edge endure more wash cycles and friction, so keeping the wheel bold and avoiding tiny spokes helps longevity. Pain is sharp but short. The common error is micro-detail in the wheel's center which disappears after heavy use. For showing it off, a minimal leather bracelet can frame the piece without covering the central motif.
19. Traditional Sunburst with Dad Initials on the Back of the Neck
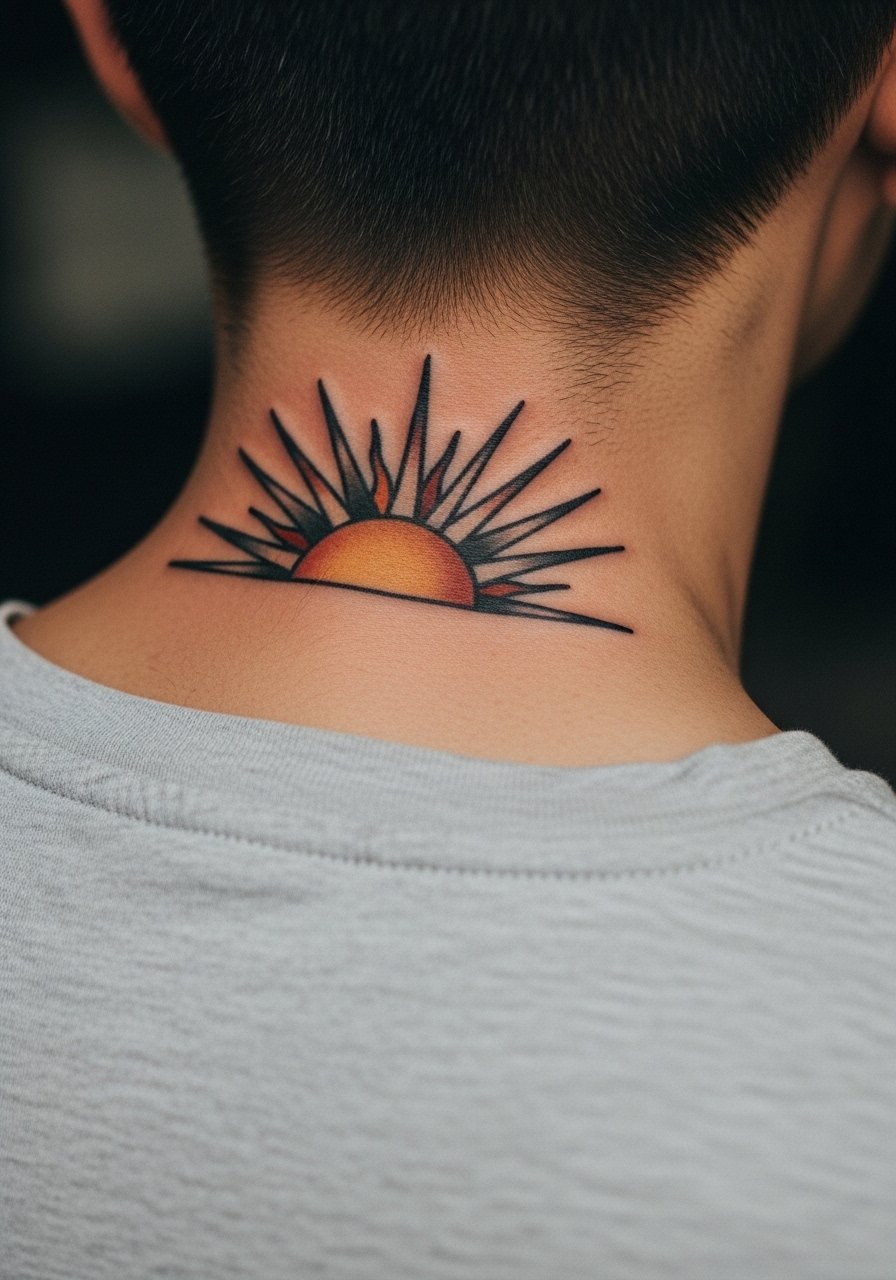
Consultation lead: the back-of-neck canvas is tight, so discuss how big the sunburst needs to be so the initials remain clear. Pain is moderate and sessions are quick. A common mistake is compressing the rays too densely, which blends over time. For visibility when desired, a button-down shirt worn backward or a wide-neck tee shows the area without full exposure.
20. Traditional Compass Rose on the Thigh with Mom and Dad Banners
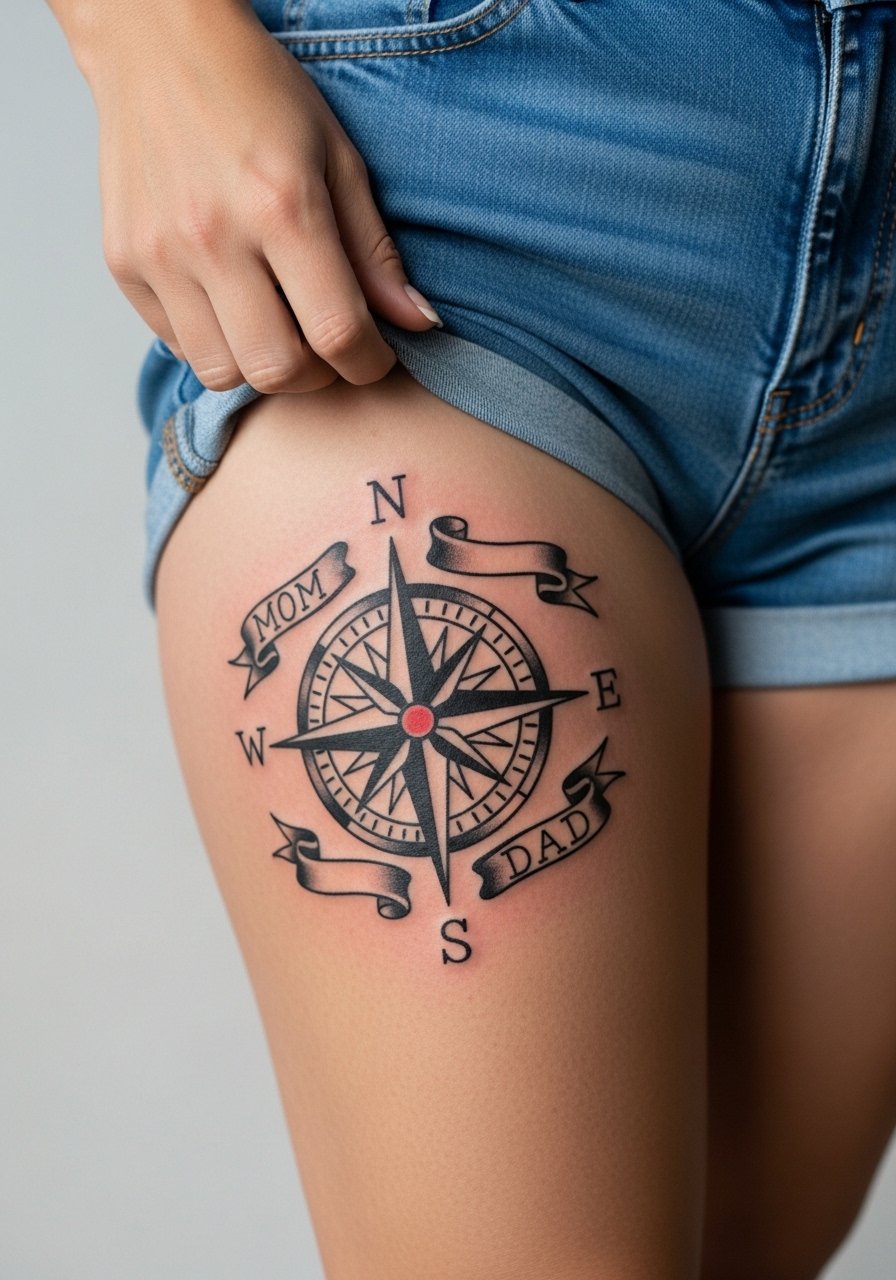
Visual impact lead: compass rosettes need strong negative space between points so the design stays crisp. Ask for simplified point tips and larger gaps. The thigh handles saturation well and sessions are comfortable for most people. A typical mistake is adding tiny markings that are unreadable after six months. For post-heal outfits, a flowy midi skirt highlights the thigh art without compressing it.
21. Traditional Bulldog Portrait with Bold Lines on the Upper Arm
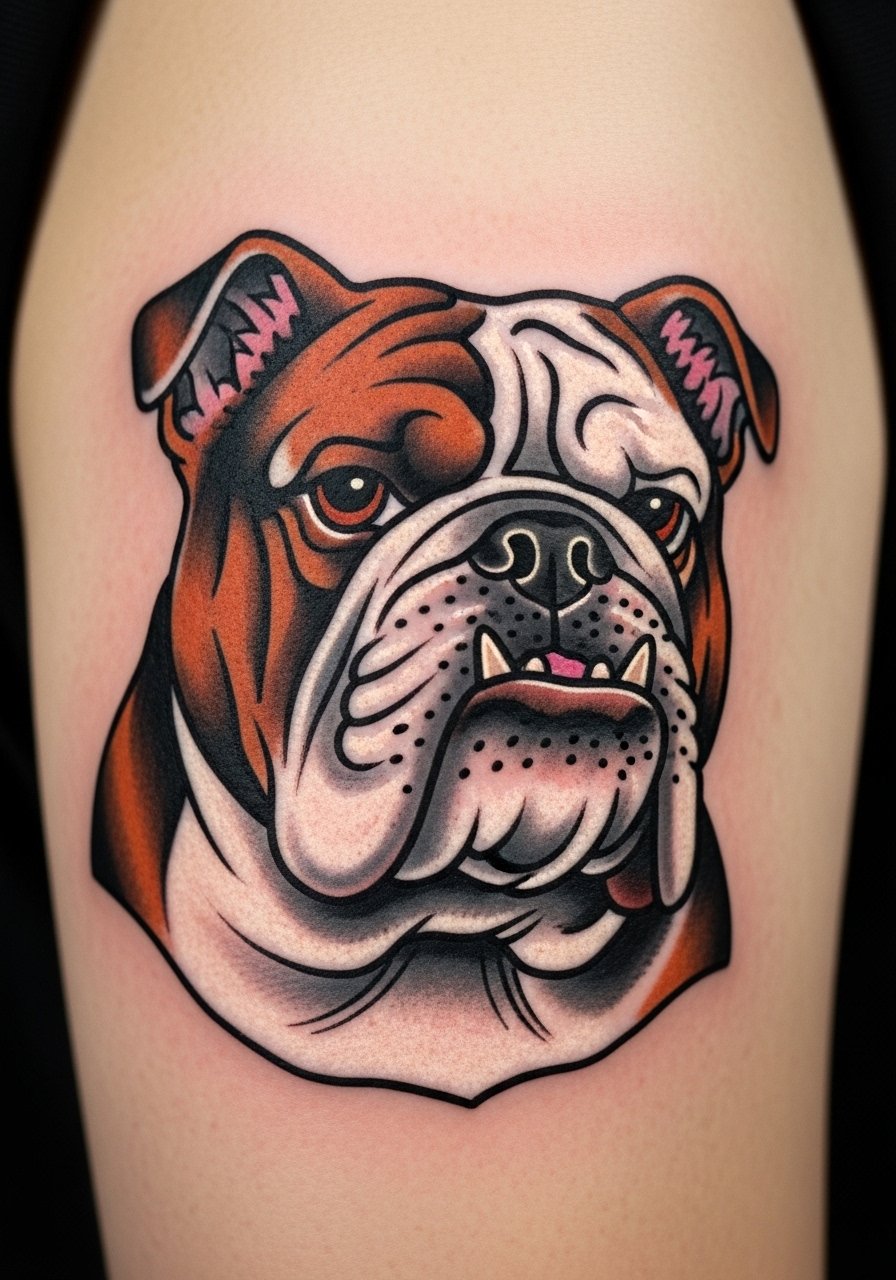
Personal observation: upper-arm portraits that favor bold planes and solid blacks age predictably. Tell the artist to avoid tiny facial hair details and to rely on shadow blocks for expression. Pain is moderate and sessions may take a couple of hours based on size. A frequent mistake is attempting micro-realism in a traditional portrait, which clashes with the style. Style this with a short-sleeve tee you can roll to keep the portrait visible.
22. Heart Lock and Key Script on the Inner Bicep
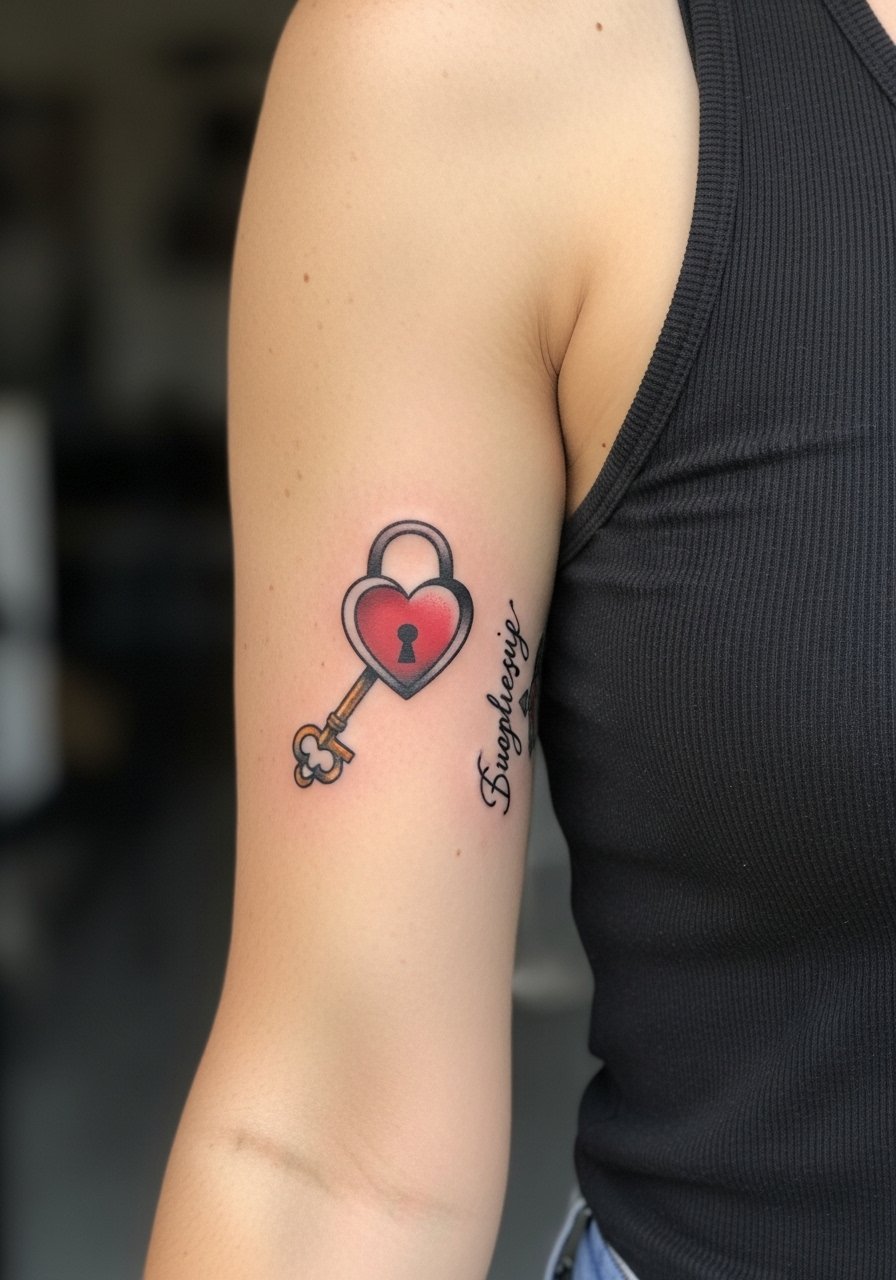
Pain warning lead: the inner bicep can be tender because the skin is softer. When booking, allow the artist to place the lock slightly off-center so natural muscle shifts do not distort symmetry. People often pick overly tiny keys with filigree that disappear after healing. Sessions run moderate time and may include brief rests. For session comfort, wear a tank top so the artist can reach the inner arm without exposing other areas.
23. Traditional Rose and Dagger on the Lower Leg
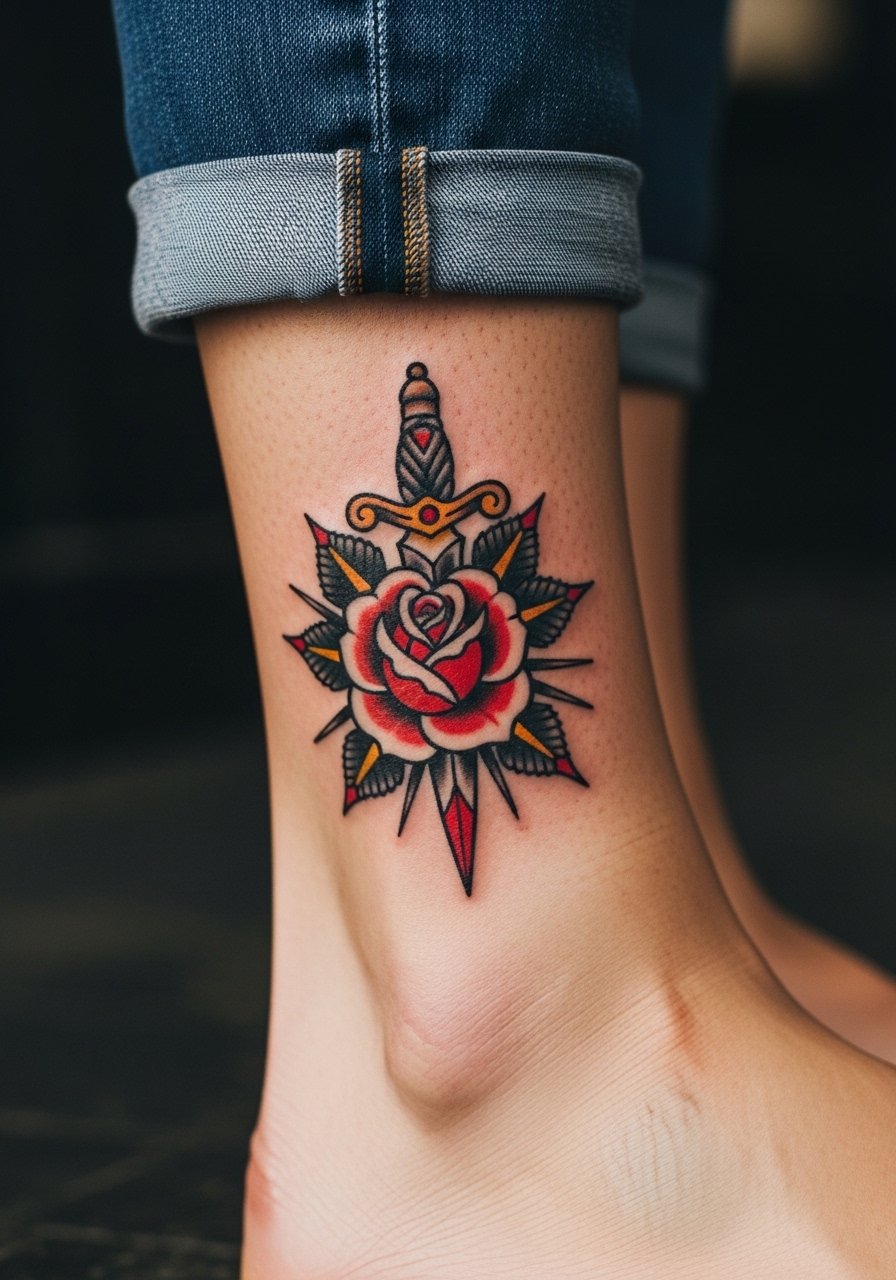
Mistake lead: ankle-adjacent designs need room from the bone. If the dagger tip sits too close to bone peaks it can blow out or look uneven. Tell your artist to anchor the dagger slightly higher and to keep linework bolder near the tip. Expect brief sharp pain with quick sessions for small pieces. For show-off options after healing, consider rolled jeans with a pair of ankle boots.
24. Traditional Banner with Coordinate Script on the Upper Chest

Consultation lead: numbers and coordinates need spacing so digits do not blur together over time. Ask for heavier numeral strokes and allow the banner to sit above the clavicle curve. Chest pieces can be painful near the bone and sessions might be split. The common mistake is choosing a script that is too narrow for the chosen size. For evening wear, a racerback dress frames the chest without hiding the banner.
25. Traditional Nautical Star Cluster on the Shoulder Cap
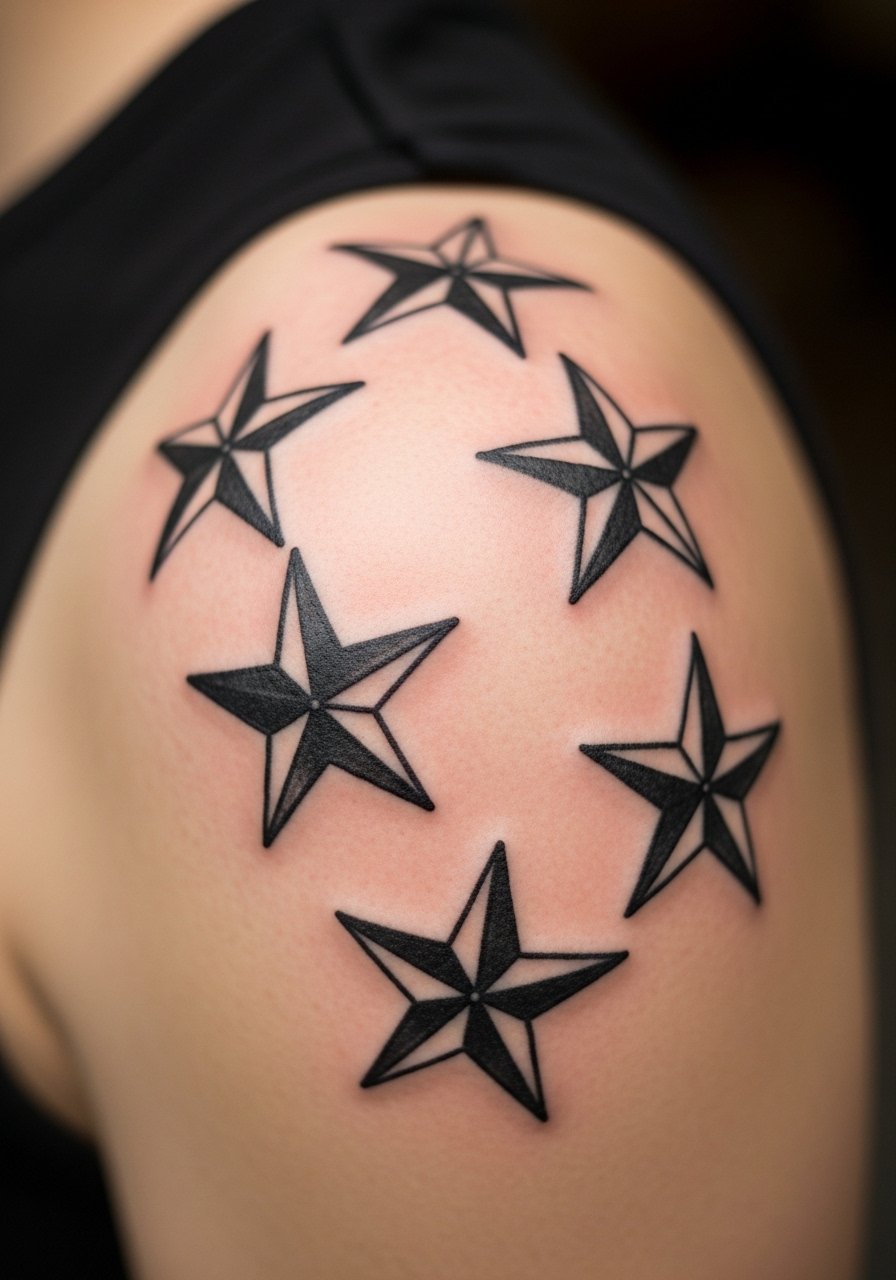
Visual impact lead: stars placed across the shoulder cap benefit from varied sizes and clear spacing so each holds up. Ask the artist to vary star sizes and to use solid black centers for contrast. Shoulder pain is low to moderate and sessions are straightforward. People sometimes request tiny ornamentation between stars that disappears as the piece settles. Style the shoulder with a loose off-the-shoulder top for warm weather.
26. Traditional Script "Dad" with Laurel Wreath on the Chest
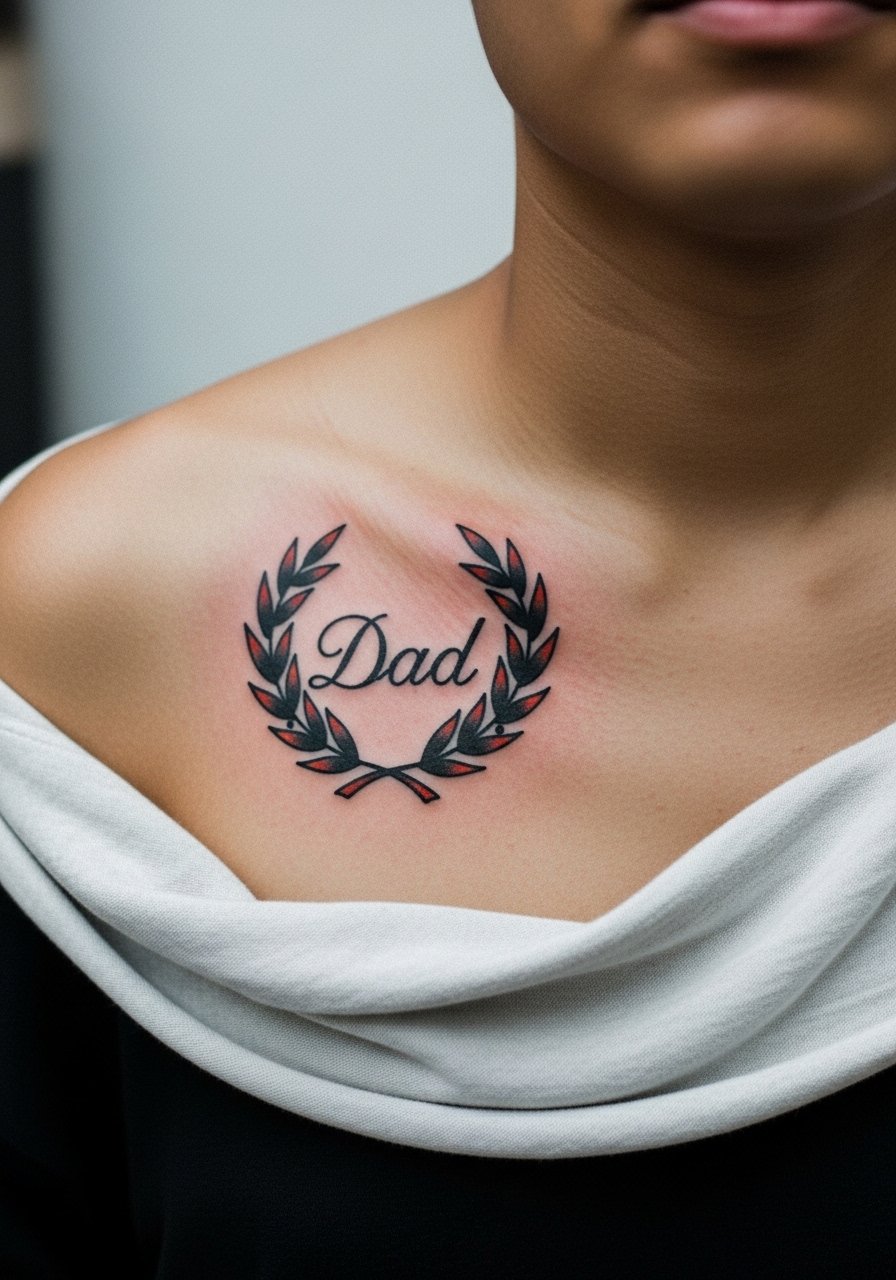
Aging lead: laurel leaves look best when simplified into bold leaf shapes rather than micro-veins which cloud over time. Tell the artist to prioritize silhouette and contrast and to scale the script so it remains legible. Chest work near the collarbone can sting, so brief sessions and breaks help. For a night out, a button-down shirt worn open reveals the laurel without exposing the whole torso.
27. Classic Bannered Ship on the Back of the Shoulder
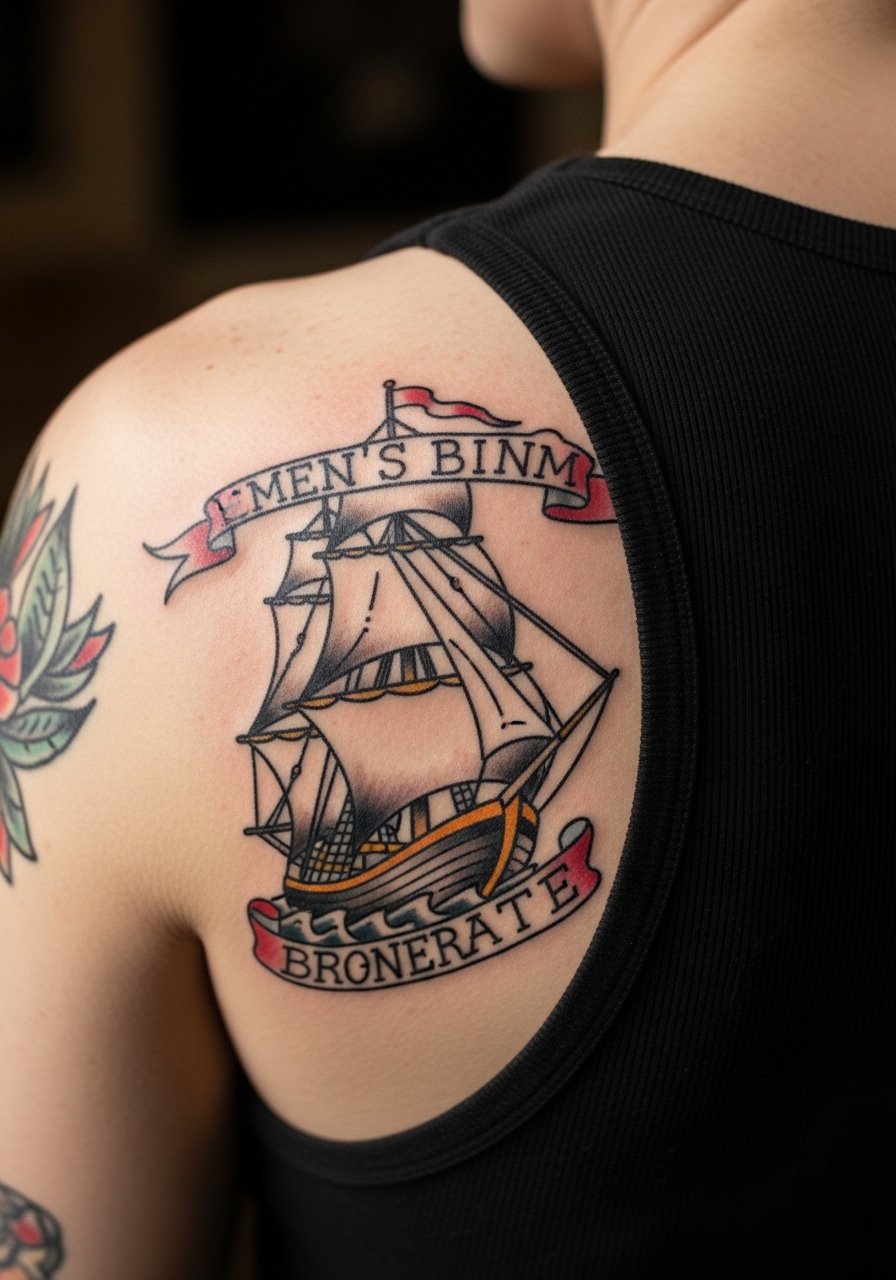
Consultation lead: back-of-shoulder ships age well when sails are simplified and the hull lines are bold. During the consult, show the artist shoulder movement so the mast and banner flow with your posture. Pain is moderate and sessions often fit into an afternoon slot. A repeated mistake is overworking tiny ropes and rigging that darken into indistinct marks. For casual display, try a tank top with high straps that frames the shoulder piece cleanly.
Frequently Asked Questions
Q: Will traditional bold outlines really last longer than fine line on the forearm?
A: From what I've seen, bold outlines and saturated fills tend to hold up better on forearms because they allow for some softening without losing the overall shape. Fine line work can look crisp right away but often needs a touch-up earlier. Ask your artist about line weight and expected touch-up timelines during the consult.
Q: How often should I expect touch-ups for ribs and sternum script?
A: It varies by skin and daily movement, but ribs and sternum are on the higher end for touch-ups because the skin stretches with breathing. Plan for a realistic touch-up window around two to three years if you want the lettering to stay sharp. Discuss spacing and depth with your artist so the initial work maximizes longevity.
Q: Are hand and finger mom/dad pieces worth it if I live in a professional office?
A: Hand and finger pieces are visible and may affect perceptions in some workplaces. If you work in a conservative office, consider placements like the upper forearm or ankle that are easier to cover. If you choose hands, accept that regular touch-ups will be part of maintenance and that some employers may ask to cover them.
Q: What should I wear to a thigh or calf session to make the appointment easier?
A: Wear loose shorts or a skirt that can be shifted without pressure on the area. For thighs, high-waisted bottoms that you can lower slightly are practical. Try a loose drawstring short so the artist can access the canvas without tugging at tight clothing.
Q: Are there cultural considerations with traditional motifs like banners and stars?
A: Classic banners and nautical stars are broadly shared in Western tattoo history, but when a design references a specific cultural symbol you do not come from, consider small stylistic adjustments or asking your artist about respectful adaptation. A short conversation about origin goes a long way.
Q: Do collarbone and chest placements need different healing than forearm work?
A: Yes. Collarbone and chest areas are closer to bone and may scab differently. They also face more rubbing from straps and necklaces, so plan wardrobe that does not irritate the area while it heals. Avoid tight collars for the first two weeks and follow your artist's aftercare directions.
