
Fine line trends and bold blackwork both get attention on feed, but geometric stitch tattoos live between those extremes. They use repeated marks and careful spacing to read like embroidery on skin, and the pieces that still look crisp at year five start with proper scale and spacing. Below are 17 geometric stitch ideas, each with what to ask your artist, how it heals, and how to show it off once it has settled.
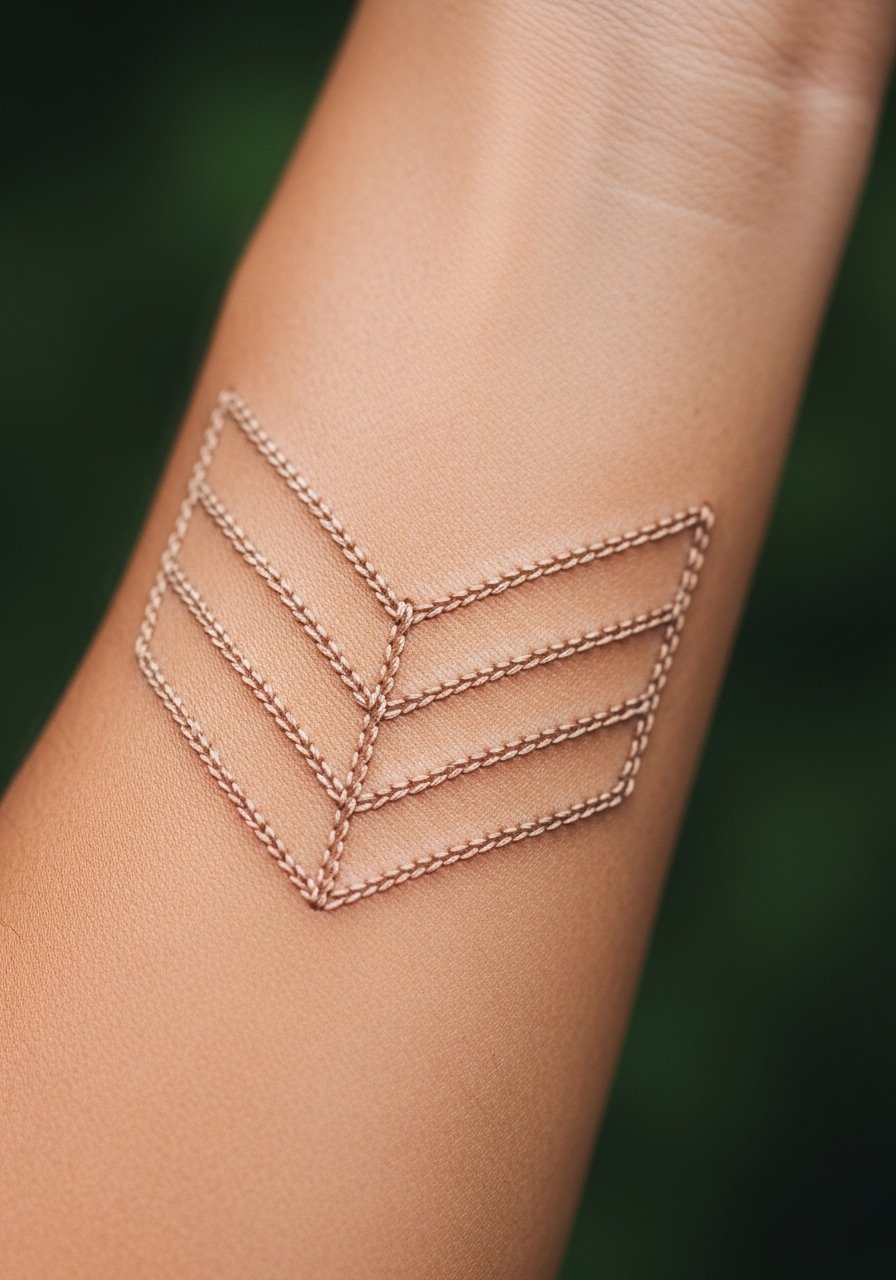
1. Linear Arrow Cluster on Inner Forearm
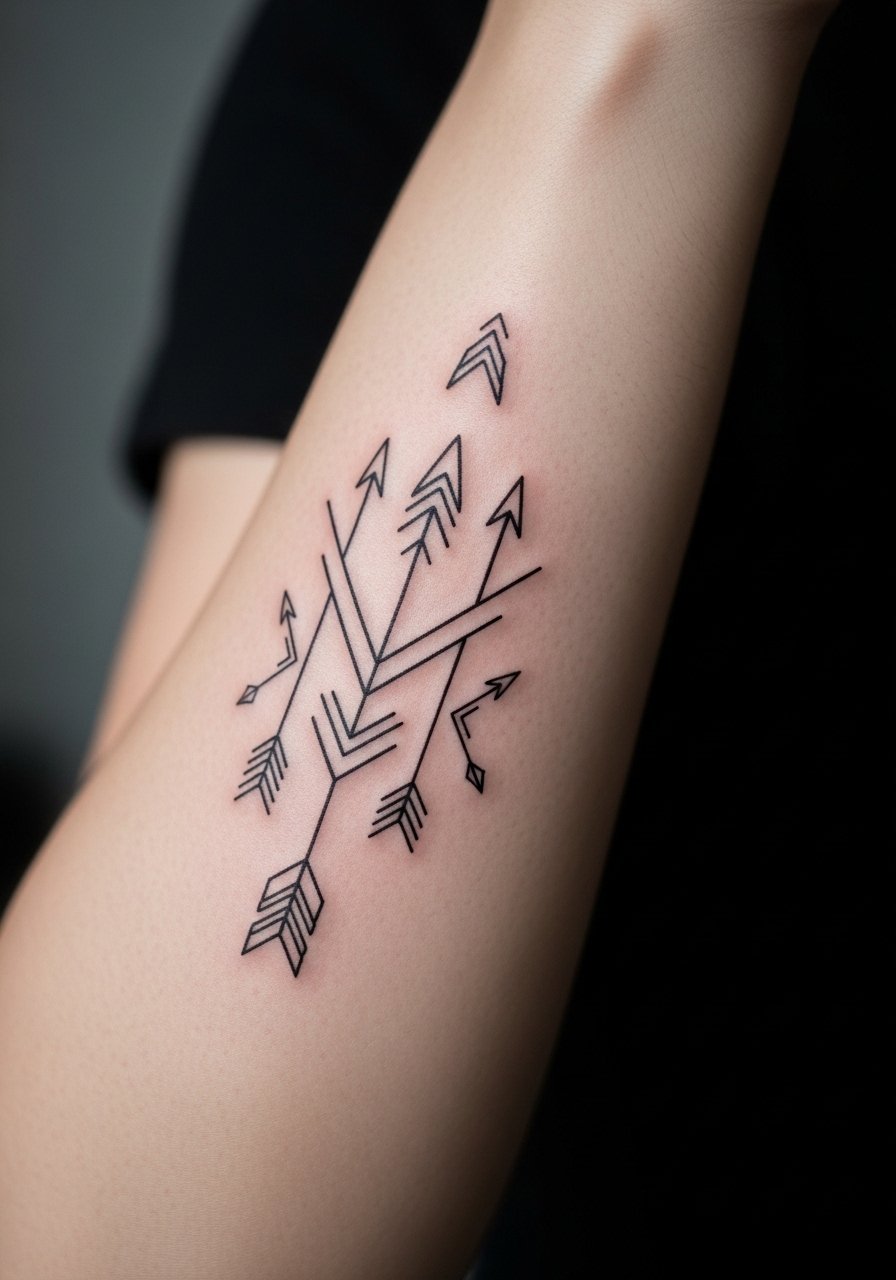
I recommend this when you want a readable linear motif that still reads from a short distance. Tell your artist you want spacing between arrows equal to the needle grouping so the stitch effect breathes. Fair warning, the inner forearm is visible and gets more sun, so expect gentle softening at year two without sunscreen and touch-ups around year three if you want the crisp look to persist. Session-wise, the forearm is a mid-level pain area and often takes a single short session. A common mistake is requesting too many tiny arrows close together. That packing makes the lines merge as the skin stretches. For showing it off, roll up a sleeve and pair the design with a loose button-down shirt so the forearm sits flat and visible when you want it to.
2. Tiny Geometric Knot on the Side of the Finger
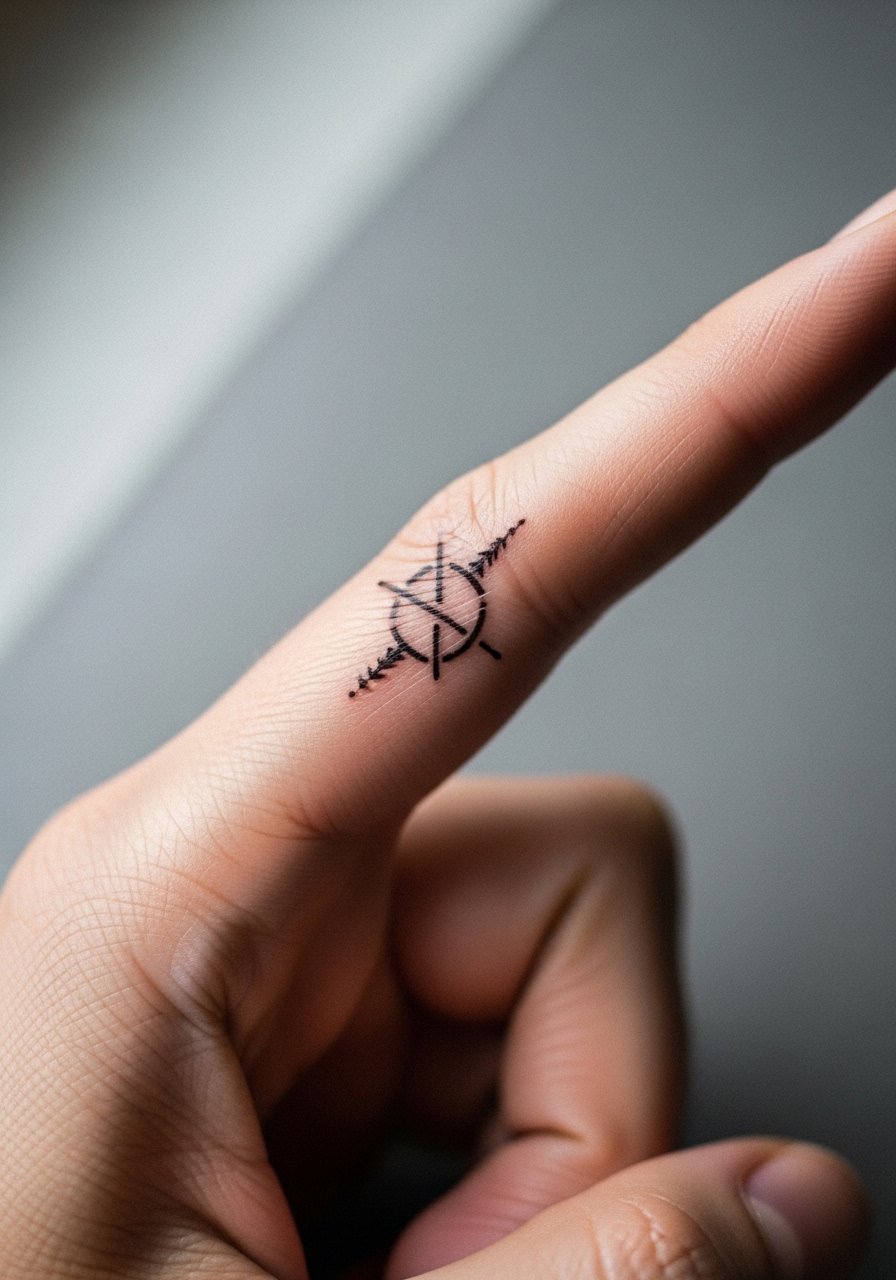
Finger work shows instantly but ages fast because of constant washing and friction. Expect touch-ups sooner than other placements, often around year one or two for fine work. Tell your artist you prefer slightly heavier linework than the reference photos, and ask about needle depth for longevity. The session is short but sharp, and the biggest mistake is asking for the knot smaller than the needle can reliably hold. For visibility, simple stacked rings frame the finger without adding visual noise, and during the appointment wear an easy button or slip-on to keep your hand unobstructed.
3. Constellation Grid on the Wrist
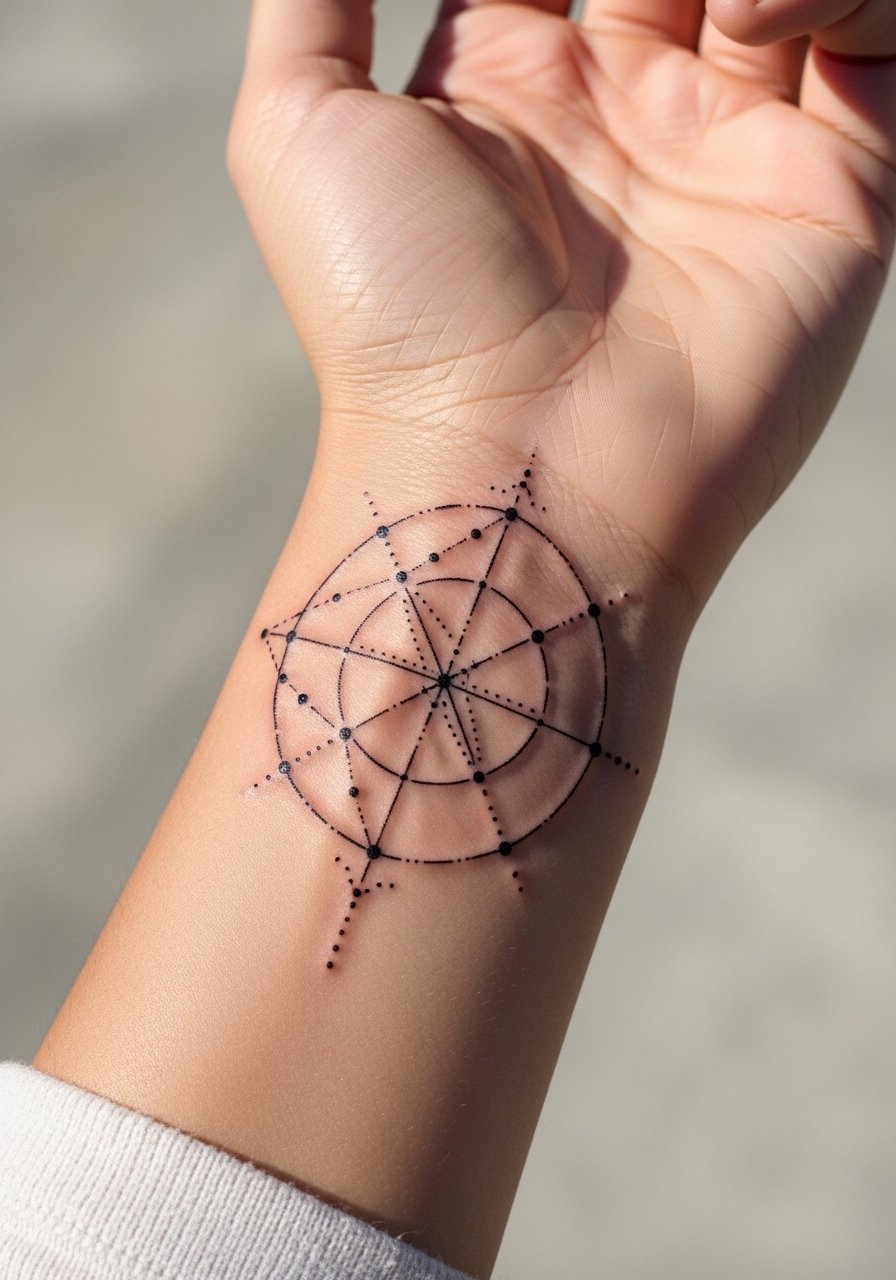
Wrist tattoos heal under frequent movement, which can blur ultra-fine dots if they are packed too close. I usually suggest spacing the dots slightly wider than the visual reference so the grid doesn't congeal after a year. For the consultation, request a test stencil and stand the arm in your normal position while the artist checks flow. The wrist tends to need a touch-up sooner than the forearm because of soap and watch friction. Pair this design with a thin chain bracelet when you want to draw attention subtly.
4. Repeat Triangle Band Around the Ankle
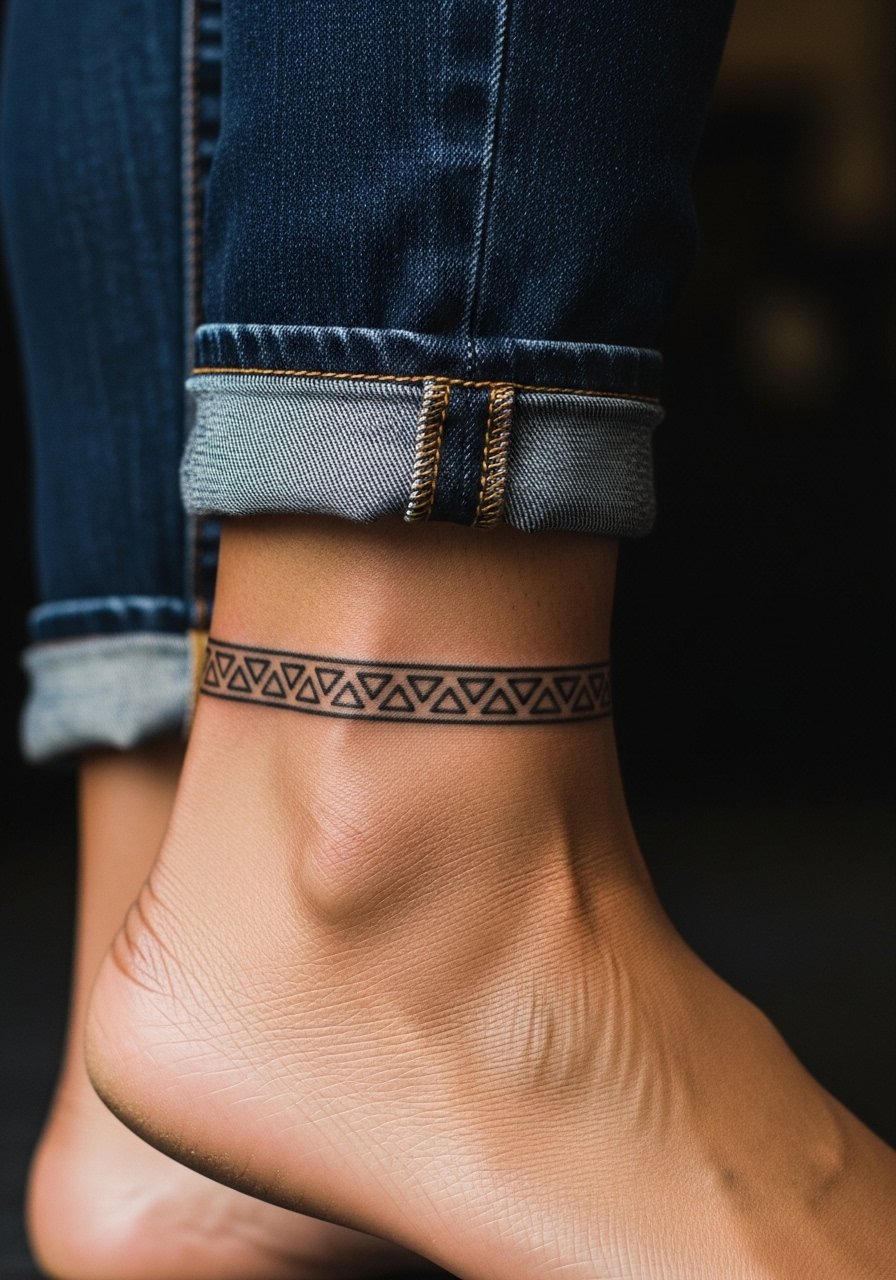
Ankle bands are forgiving visually because distance softens small irregularities, but they face constant rubbing from socks and shoes. Ask your artist for slightly bolder linework than your reference to account for early fading. Pain is moderate and sessions are quick. A common mistake is making the band too thin to survive friction. For show-off styling, cuff your jeans and wear sandals or low-top sneakers so the band sits cleanly with minimal overlap from fabric.
5. Stacked Diamond Motif on the Outer Bicep
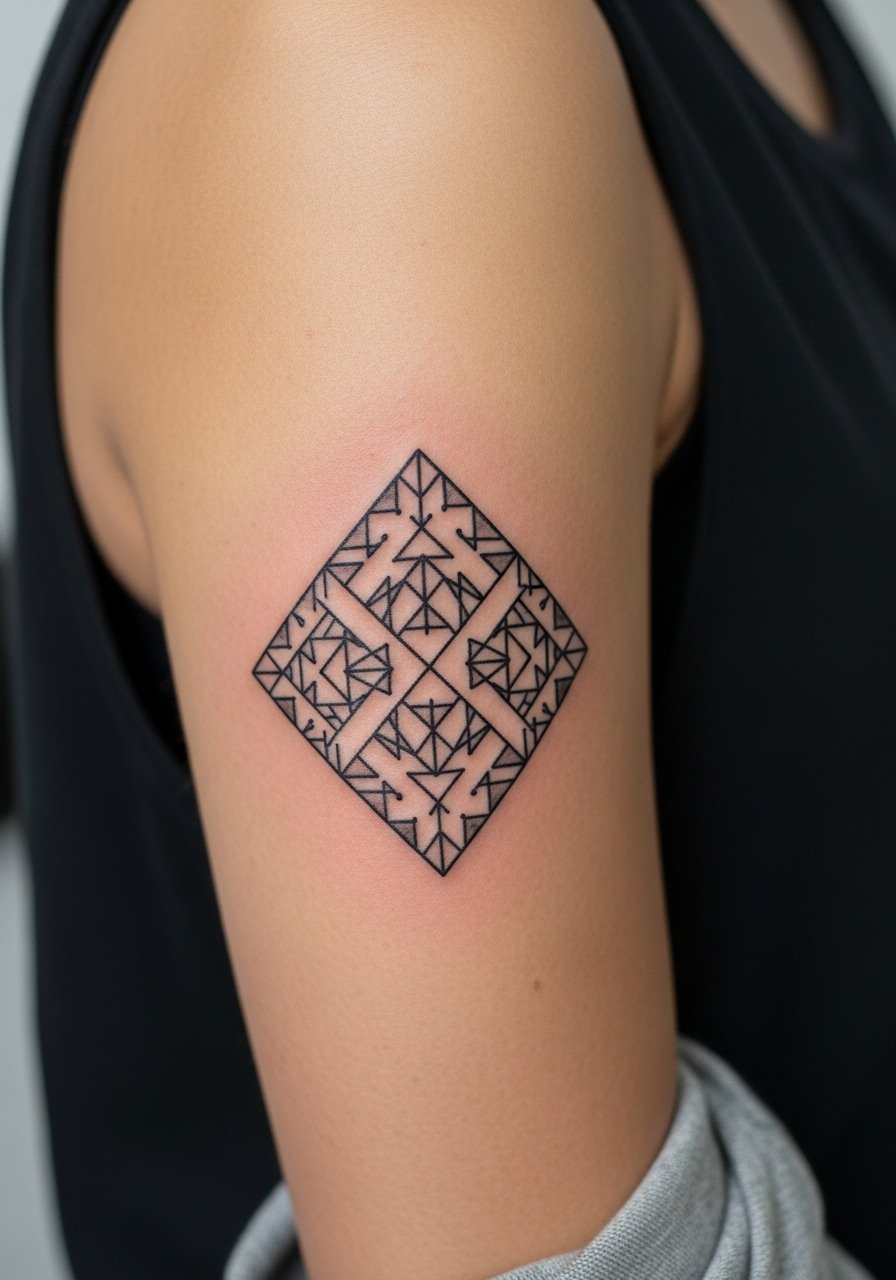
This placement handles a mix of fine detail and bolder weight well. Outer bicep skin is thick and holds needle channels, so the diamonds age with slower blur than wrists or hands. If you want long-term clarity, tell your artist you prefer slightly increased spacing between the stitch marks and a medium line weight. Sessions are comfortable in short bursts. The typical mistake here is overloading the motif into a tiny area. For session day, wear a loose tank top so the artist has clear access without you getting chilled.
6. Collarbone Grid with Dot Stitch Accents
Collarbone pieces read well with negative space and the stitch dots create rhythm across the area. The pain is variable because the clavicle is thin under the skin. Artists disagree on how fine is too fine here. One camp argues that ultra-fine dots over bone blur within two years. The other camp says careful depth and spacing make them hold. Ask your artist where they land on this before you book. A common session mistake is choosing a dense grid that sits too close to the bone. For showing it off, pair the piece with an open-back midi dress or a wide-neck top that frames the collarbone.
Studio Day Picks
Those forearm, wrist, ankle, bicep, and collarbone pieces above all ask for slightly different prep. A few targeted items smooth the session and the first week of healing.
-
Stencil transfer paper kit. Lets you preview exact placement on skin during consults for pieces like the collarbone grid and arrow cluster.
-
Topical numbing cream. Applied per directions it can reduce edge pain on sensitive collarbone and wrist sessions without altering saturation if your artist approves.
-
Thin protective film roll. Useful for finger and wrist pieces that face constant washing and rubbing in the first week.
-
Fragrance-free gentle body wash. Cleanses without irritating delicate linework, which is important for the fine dots in the constellation and collarbone pieces.
-
Aquaphor healing ointment. A thin layer in the first few days keeps fine stitch work from drying into tight flakes, making touch-ups less likely.
7. Geometric Mandala on the Upper Back
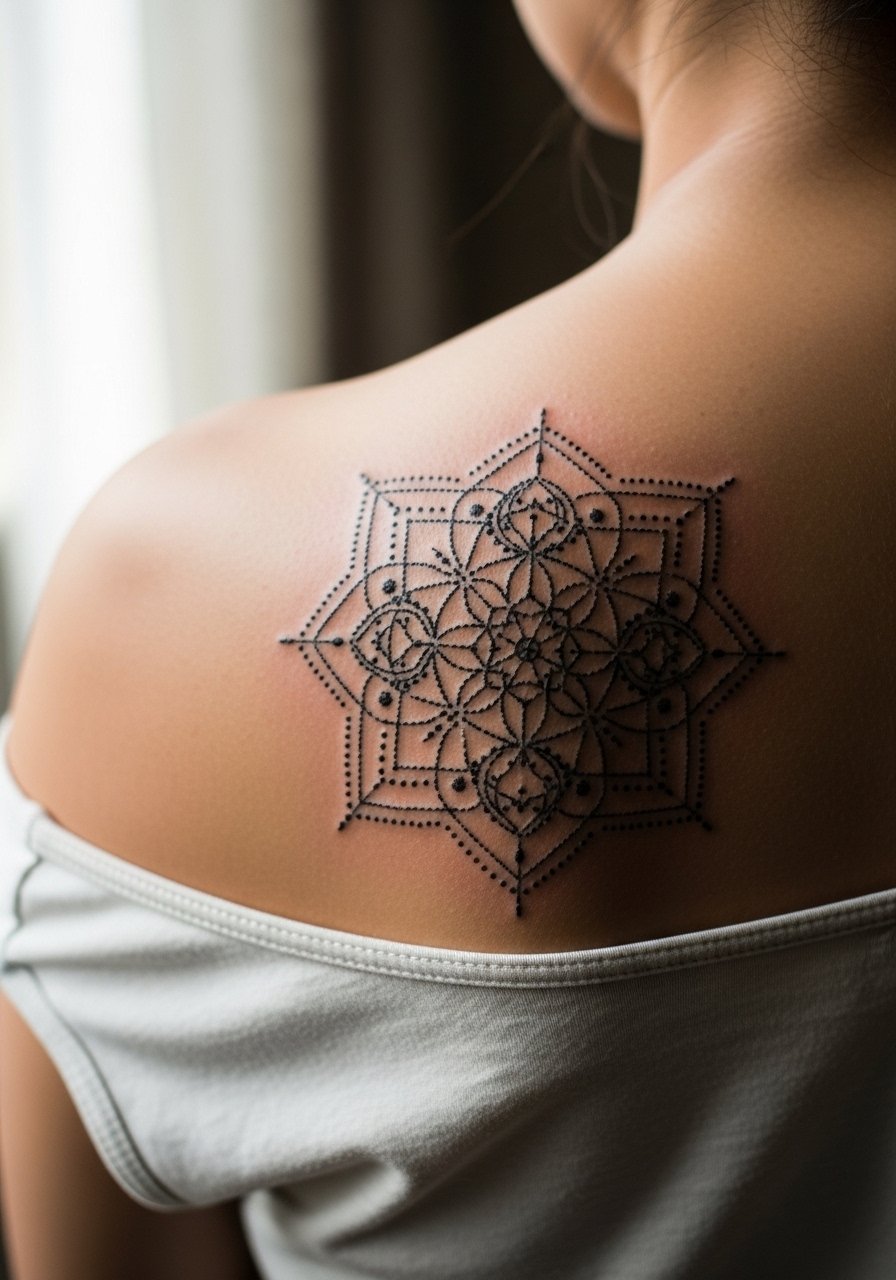
Upper back mandalas let you play with dense stitch textures because the skin there is stable. For a mandala that lasts, ask your artist for variation in stitch density and to preserve negative space in the center so the design keeps its shape over years. Sessions may be longer if the piece is wide, but pain is moderate. Common mistakes include compressing too many tiny stitches in the core, which blurs. For wardrobe, open-back tops or halter styles let the mandala breathe when you want to display it, and for the appointment a loose button-down you can pull aside is the easiest option.
8. Minimal Stitch Triangle Between the Shoulder Blades
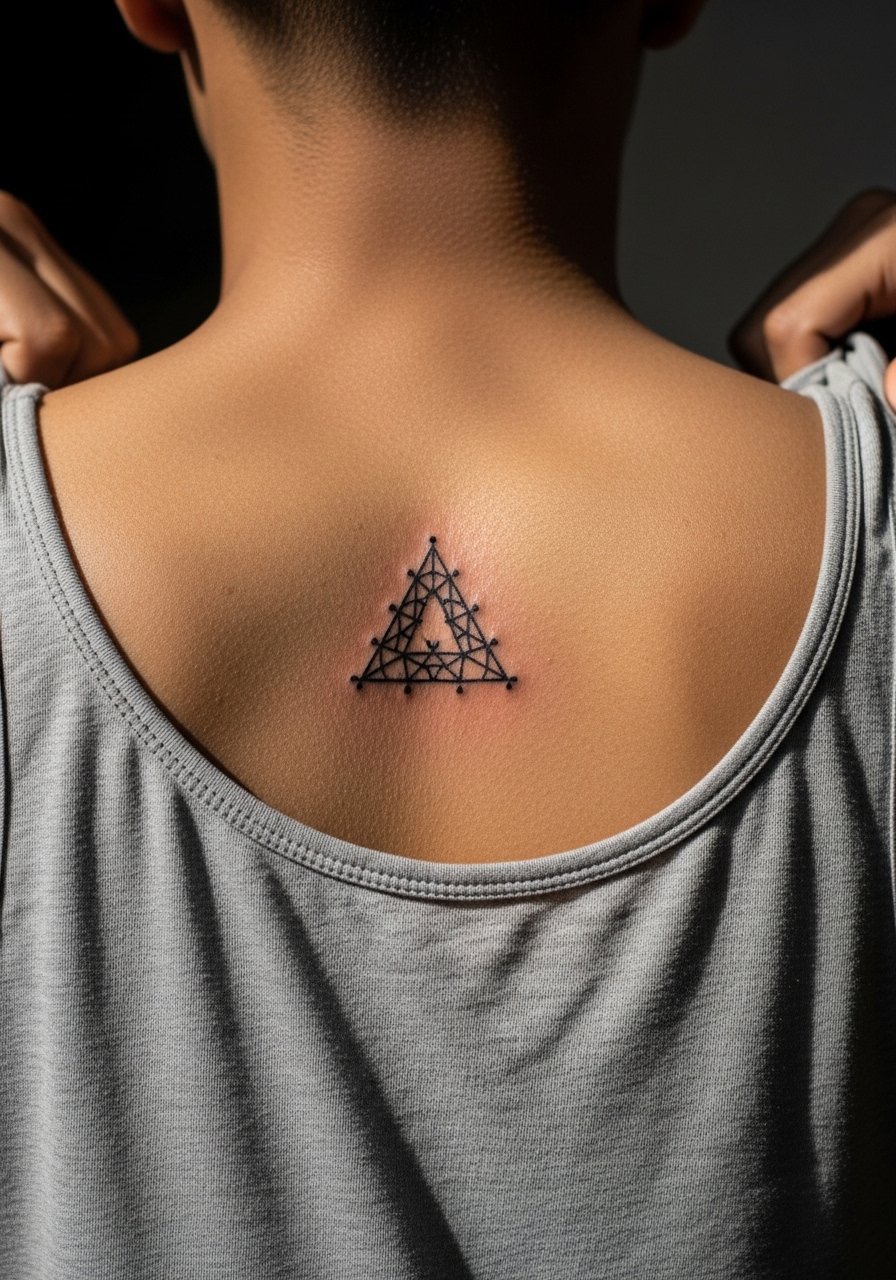
A small center-back piece looks discreet and symmetrical with minimal lines. Tell your artist you want the stitch marks spaced so the negative space reads as part of the design and not empty gaps. Healing is straightforward but reaching for aftercare can be awkward alone, so plan to have easy access or a friend help the first day. The shoulder-blade area rarely needs early touch-ups. A mistake is making the triangle too small, which makes the spacing compress and the motif lose its geometric clarity.
9. Interlocking Hexes on the Thigh
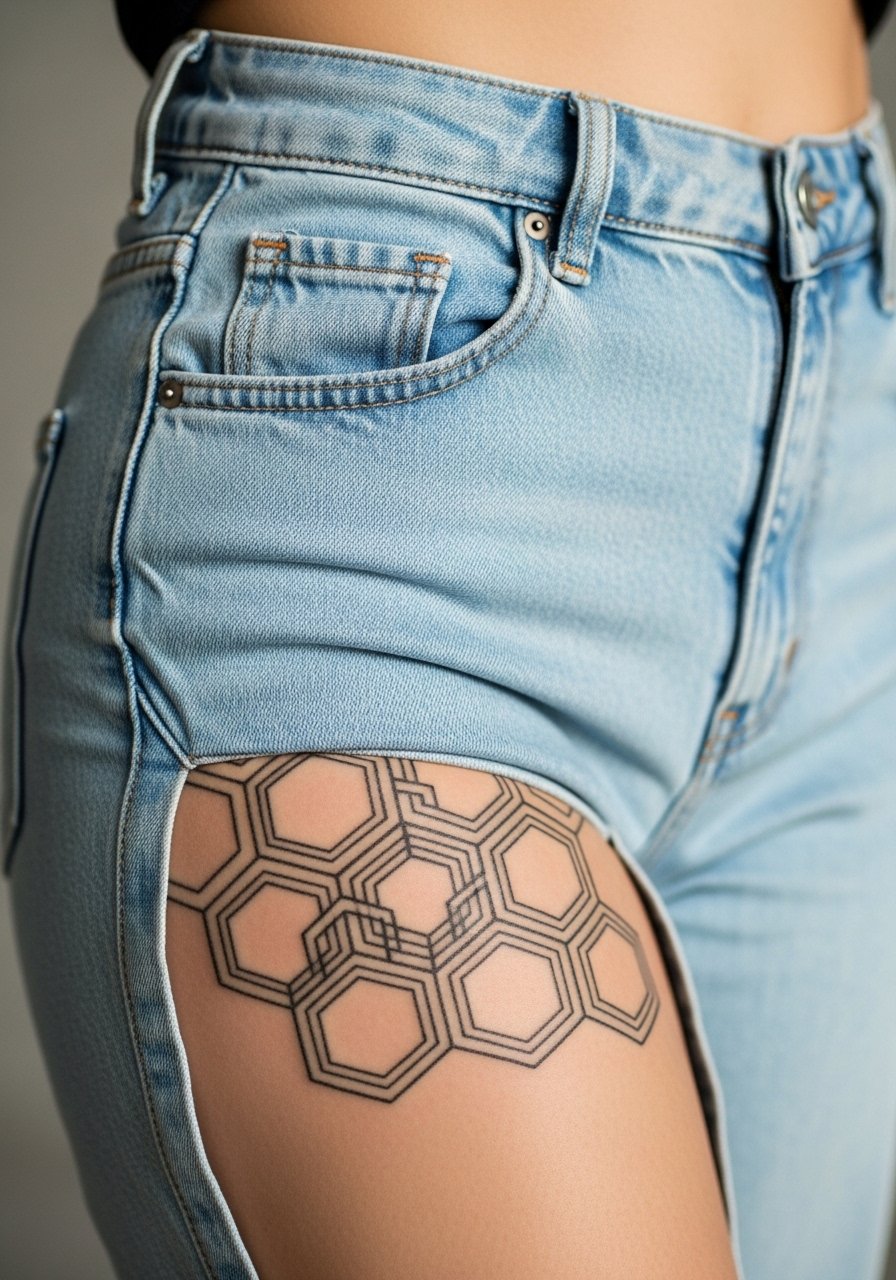
Thigh placement handles larger scale and detail because skin is thicker and sees less sun. If you like the stitch look but want durability, go slightly larger and ask for subtle whip shading between stitches to hold shape. Sessions can be longer and the area is moderately painful for some people. A common mistake is picking a dense grid too small for thigh curvature. For the session, wear high-waisted shorts or a skirt so the artist can work without the fabric tugging on the area.
10. Micro Stitch Script Along the Ribcage
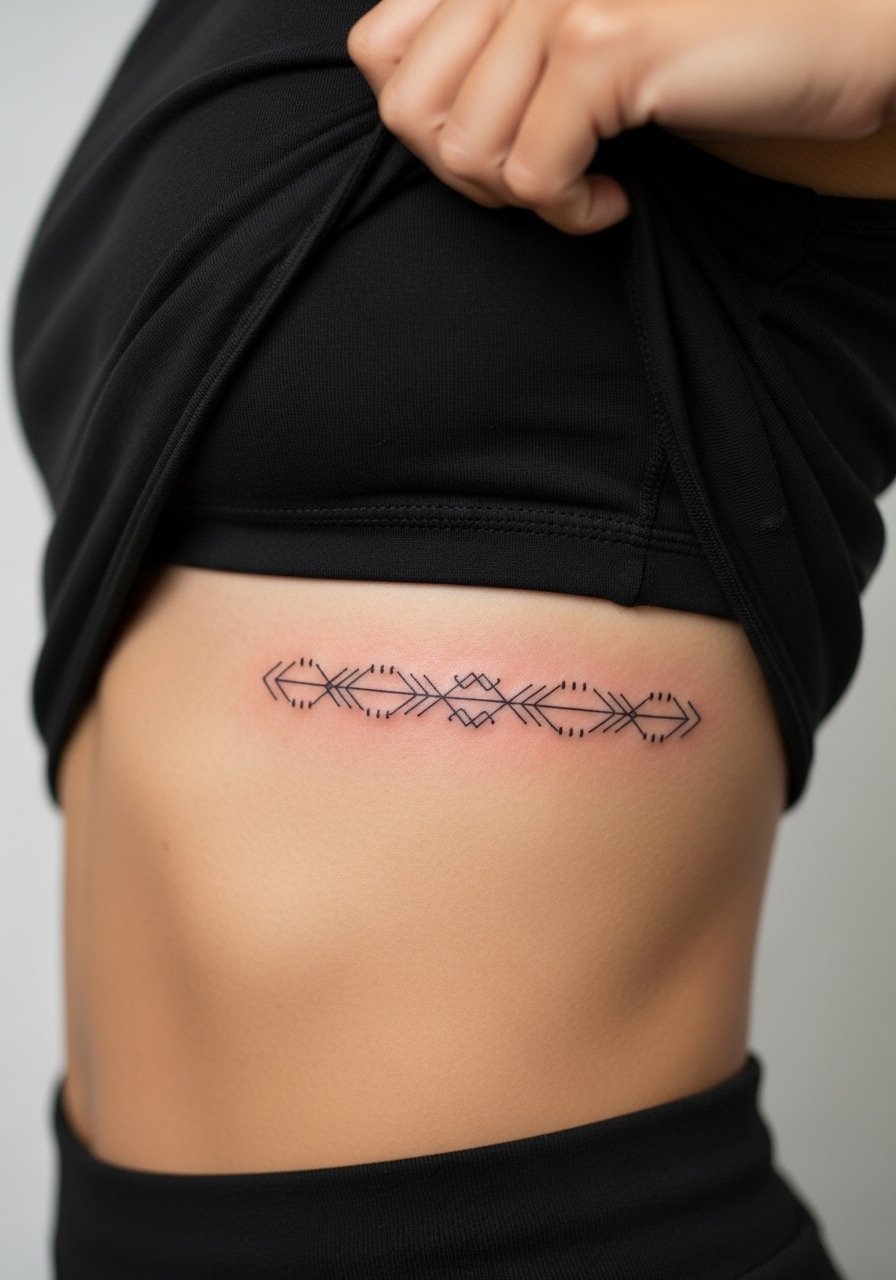
Ribcage tattoos bring the controversy up front. One camp warns that fine line and tight dot work blur quickly on ribs because the skin shifts with breathing and weight. The other camp says that with correct needle depth, spacing, and a slightly larger scale, stitch script can hold. I suggest asking your artist which approach they prefer and booking a touch-up when you schedule, because ribs are commonly revisited. Expect higher pain and a one to two hour session depending on length. Wear a zip-up hoodie you can open during the session.
11. Chain-Link Stitch Around the Wrist
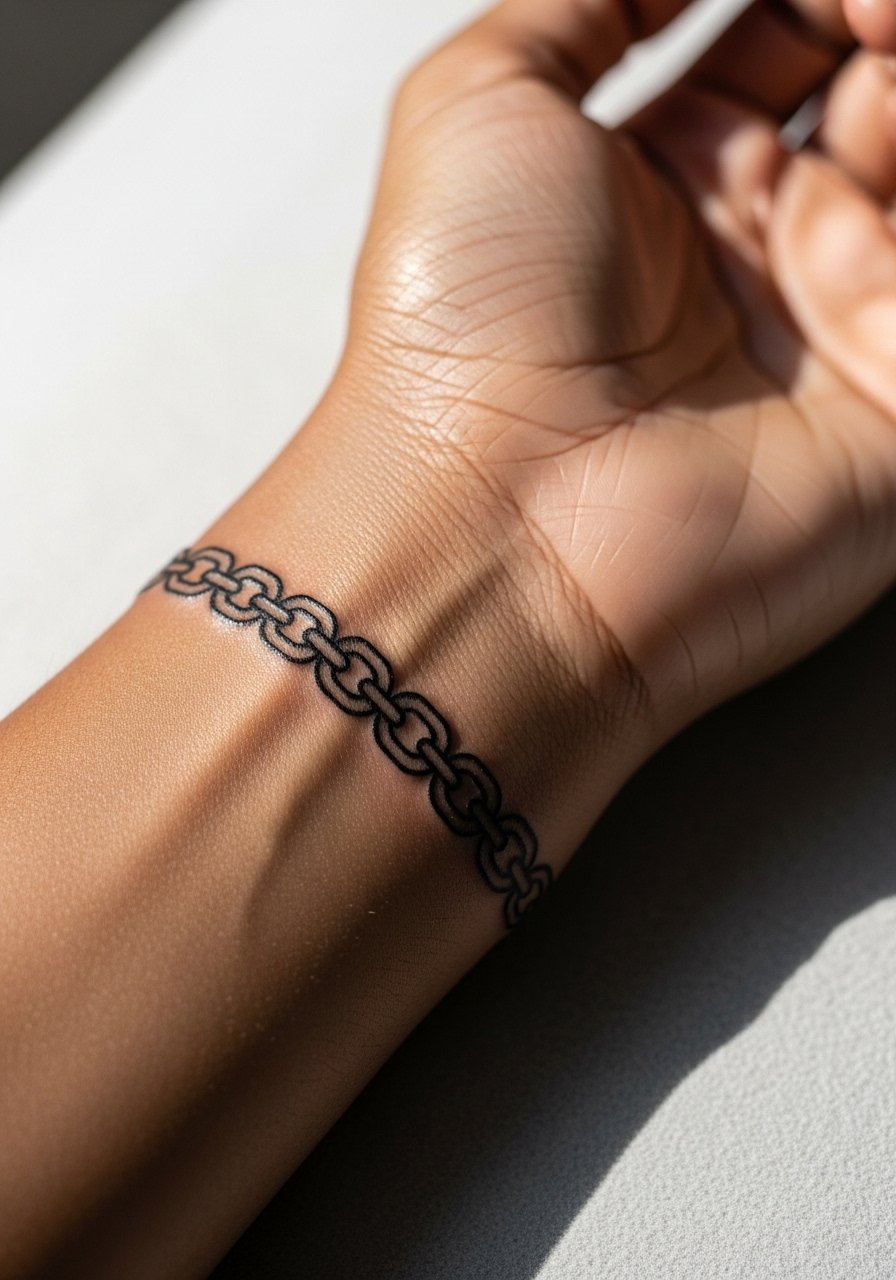
A stitched chain feels modern and fits jewelry aesthetics. Because the wrist sees constant motion, ask for a touch of extra line weight so the links keep definition beyond year one. Sessions are quick and can sting where the bone is close. A typical mistake is wanting the chain super thin to mimic actual chain metal. That scale usually requires a touch-up within months. Pair the design with a minimalist watch or slim bracelets to echo the pattern without crowding the area.
12. Stitched Compass on the Calf
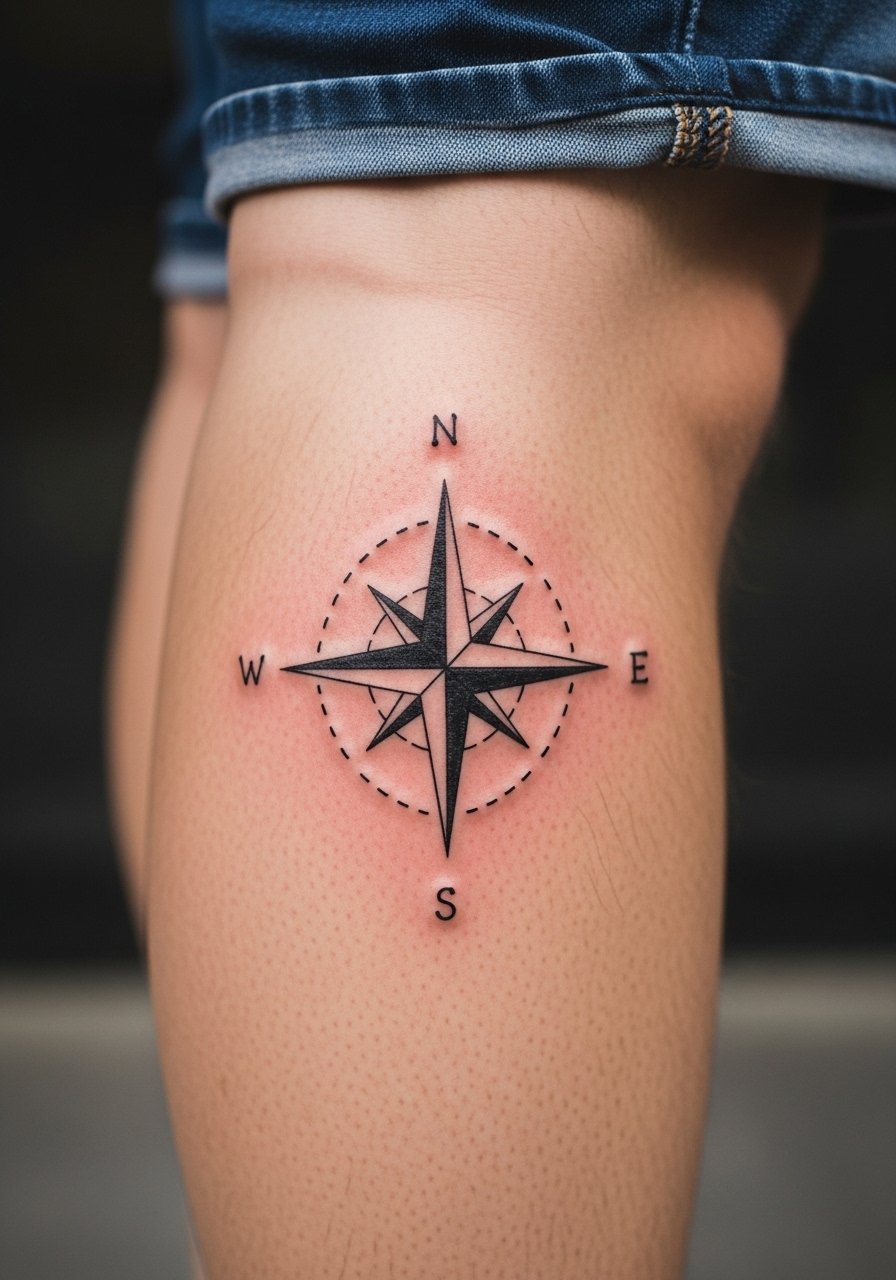
Calf pieces tolerate scale and maintain crisp geometry because the skin is robust. I recommend a slightly bolder central point for stitch compasses so radial lines keep their separation as the piece matures. Sessions are comfortable for most people and can be completed in a single appointment if kept moderate in size. A common mistake is compressing too many radial stitches toward the center. For showing it off, wear cropped trousers or a midi skirt that hits mid-calf so the compass can peek out.
13. Geometric Heart Stitch Over the Sternum

Sternum placements need considerate scale and session wear. The area moves with breathing and is a high-pain zone. Ask for a balanced scale that keeps the stitch marks spaced away from the center to avoid early merging. Because of sensitivity, many artists recommend doing the piece in two short passes. For the session wear a fitted sports bra you can easily adjust so the artist sees only the targeted area. Also note that sternum work can be more noticeable during changes in body shape.
14. Chevron Stitch Sleeve Accent on the Forearm Side
A sleeve accent like this adds direction without needing a full wrap. I advise spacing the chevrons so that each apex has negative space equal to the line thickness, which helps the pattern hold at year two and beyond. Forearm side placements are comfortable and visible. The common mistake is trying to force the chevrons to match every contour without compensating for muscle movement. During consults bring photos of your arm relaxed and flexed so the artist can adapt flow.
15. Geometric Flower Stitch on the Hip
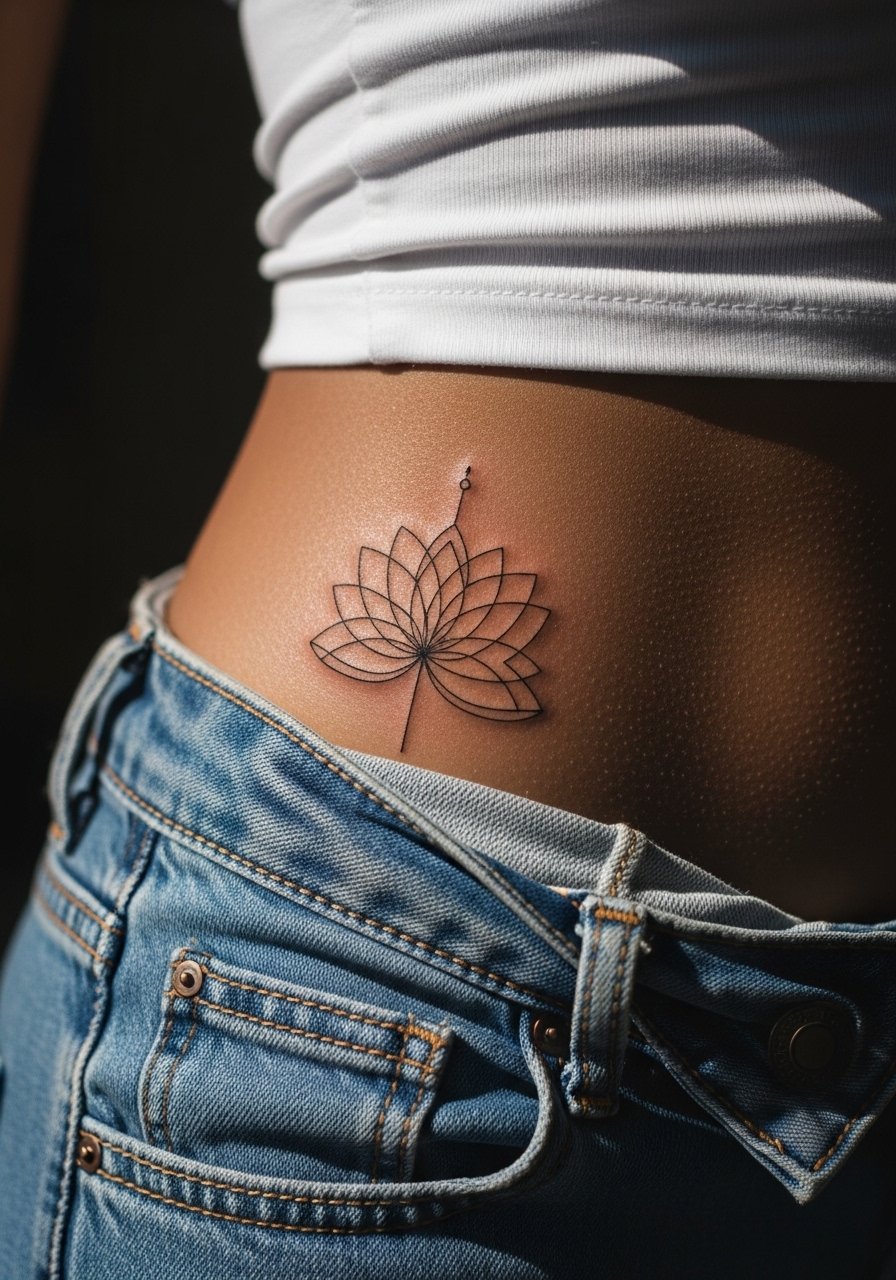
Hip tattoos let you blend stitch work with soft curves and the area hides well during early healing. Request slightly larger petals with stitch dots placed to follow your hip curve so the pattern does not warp when you move. Sessions are tolerable for most and allow for a relaxed pace. The usual mistake is compressing petals into a small circle which causes the stitch texture to merge. For wardrobe, low-rise jeans or swimwear let the piece peek without full exposure, and for the appointment choose bottoms that are easy to slide down a touch.
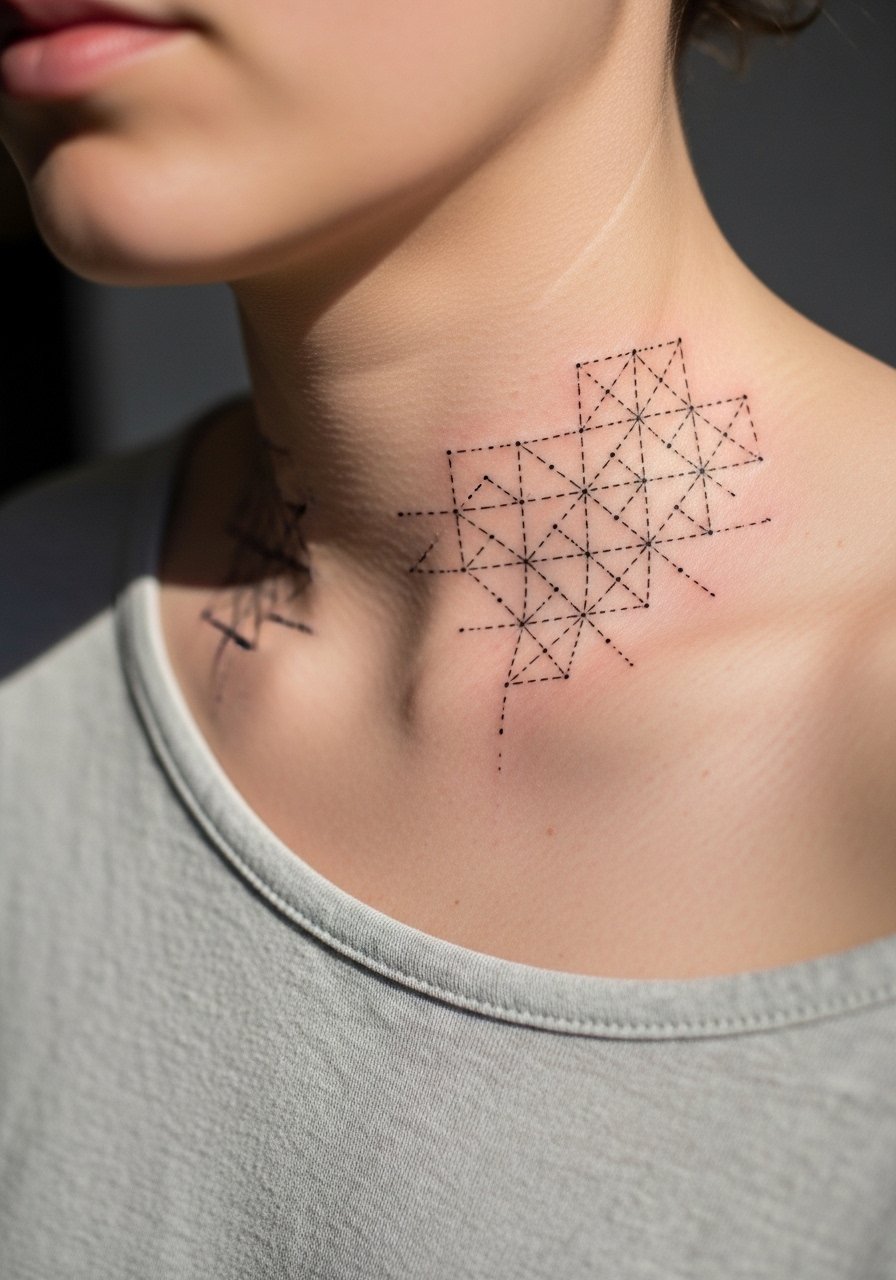
16. Interlaced Dots on the Side of the Neck
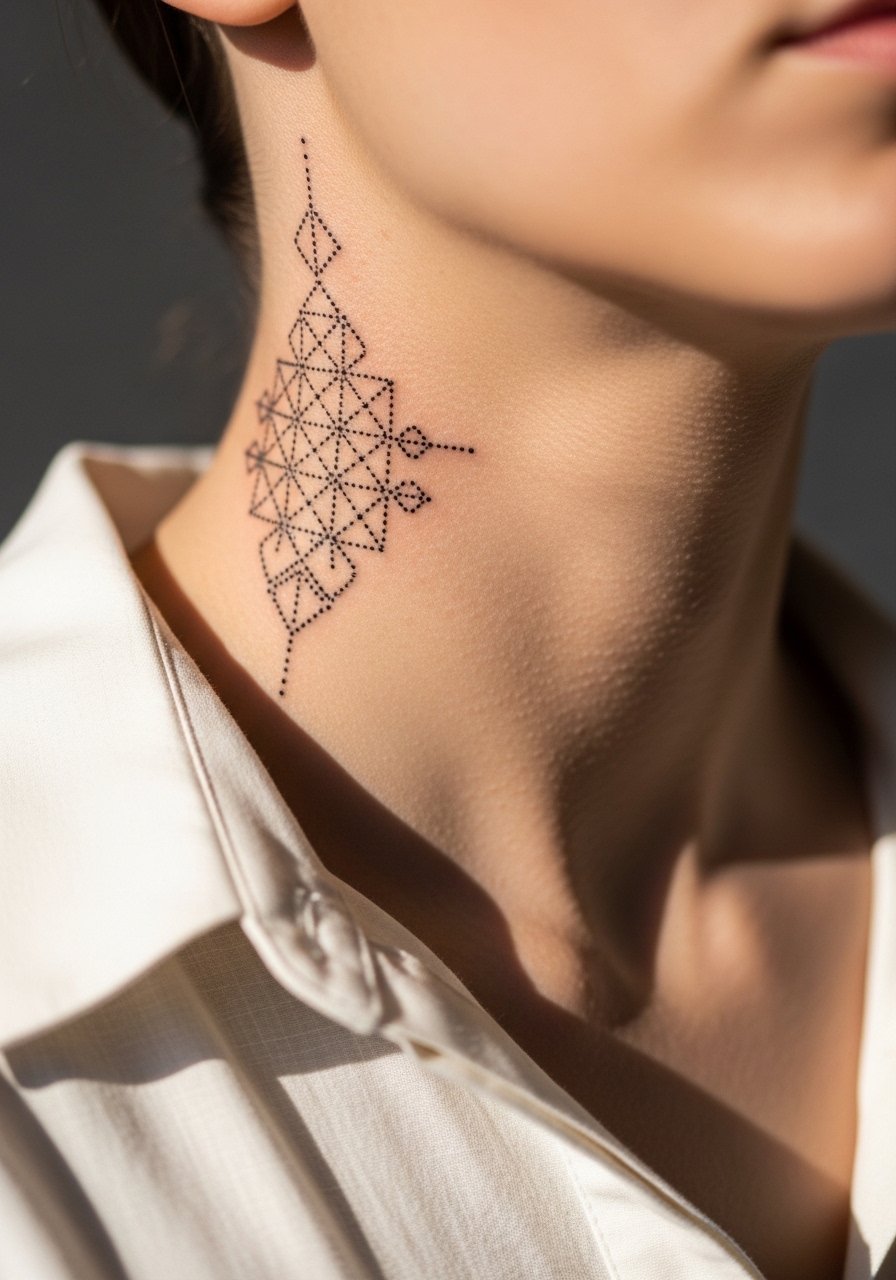
Neck pieces are visible and can affect impressions in some workplaces, so think through long-term visibility before committing. The side neck can hold fine dots if spaced generously and placed away from hairlines. Pain is moderate and the session is brief. A common mistake is choosing a high-density dot pattern too close to the hairline, which can look muddled as hair growth shifts and as the skin ages. For showing it off, pair the piece with a thin chain pendant necklace that sits above the design.
17. Geometric Stitch Sleeve Cap on the Shoulder
A shoulder cap is forgiving for stitch textures and frames the arm attractively. Ask your artist to keep the stitch marks slightly larger near the top edge so the cap reads well from across a room. Pain is low to moderate and sessions can be split across two visits to let you test placement. The common mistake is running the stitch pattern too far down the arm and losing the cap effect. For session comfort, wear a loose button-down shirt you can slide off one shoulder if needed.
Frequently Asked Questions
Q: How small can a geometric stitch design be before it risks blurring?
A: It depends on placement and the artist's technique, but as a rule of thumb stitches need negative space roughly equal to the line thickness. On high-movement areas like fingers or ribs you should go larger than you think to avoid merging over one to three years.
Q: Will a geometric mandala on my back need touch-ups more often than a bicep piece?
A: Usually not. Back skin is more stable than arm or wrist skin, so mandalas and dense stitch work on the upper back often age slower. Still plan a possible touch-up after one to three years if you want the original crispness.
Q: Are there special clothing tips for a ribcage or sternum session?
A: Yes. For a rib or sternum session wear a zip-up hoodie or a fitted sports bra you can easily pull aside so the artist has clear access. A zip-up hoodie is usually the easiest option for both comfort and modesty.
Q: Do hand and finger geometric stitches affect job prospects?
A: They still can in certain industries. One camp argues that visible hand work is increasingly accepted, while another warns that some workplaces remain conservative. Consider your career path and how visible you want the piece to be before booking.
Q: How painful is a ribcage geometric script compared with a forearm grid?
A: Ribs are commonly rated higher on pain scales because the skin sits over bone and moves with breath. Forearms are milder. If pain is a concern ask about breaking the session into shorter passes and about topical numbing if your artist allows it.
Q: How should I find an artist who understands stitch-style geometry?
A: Use discovery pathways like specialized shop portfolios, hashtag searches for stitch geometry, local shop directories, and community threads on Reddit to see healed examples. Focus on healed photos that show spacing and negative space, not only fresh work.
